How our server handles requests
Ok, let’s quickly analyze the rest of our server code, that is, the body of our callback function onRequest().
好的,让我们来快速分析一下服务器代码的剩余部分,也就是回调函数onRequest()的主体部分。
When the callback fires and our onRequest() function gets triggered, two parameters are passed into it: request and response.
当开启回调,我们的onRequest()函数被触发的时候,传入两个参数:request 和 response。
Those are objects, and you can use their methods to handle the details of the HTTP request that occured and to respond to the request (i.e., to actually send something over the wire back to the browser that requested your server).
它们是对象,你可以使用它们的方法来处理 HTTP 请求的细节,并且响应请求(比如向发出请求的浏览器发回一些东西)。
And our code does just that: Whenever a request is received, it uses the response.writeHead() function to send an HTTP status 200 and content-type in the HTTP response header, and the response.write() function to send the text ”Hello World” in the HTTP response body.
所以我们的代码就是:当收到请求时,使用 response.writeHead() 函数发送一个 HTTP 状态 200 和 HTTP 头的内容类型(content-type),使用 response.write() 函数在 HTTP 相应主体中发送文本“Hello World"。
At last, we call response.end() to actually finish our response.
最后,我们调用 response.end() 完成响应。
At this point, we don’t care for the details of the request, which is why we don’t use the request object at all.
目前来说,我们对请求的细节并不在意,所以我们还没有使用 request 对象。
Finding a place for our server module
Ok, I promised we will get back to how to organize our application. We have the code for a very basic HTTP server in the file server.js, and I mentioned that it’s common to have a main file called index.js which is used to bootstrap and start our application by making use of the other modules of the application (like the HTTP server module that lives in server.js).
好的,我之前保证过我们会回到如何组织我们的应用这个问题上。我们现在在 server.js 文件中有一个非常基础的 HTTP 服务器代码,而且我提到通常我们会有一个叫 index.js 的文件去调用应用的其他模块(比如 server.js 中的 HTTP 服务器模块)来引导和启动应用。
Let’s talk about how to make server.js a real Node.js module that can be used by our yet-to-be-written index.js main file.
我们现在就来谈谈怎么把 server.js 变成一个真正的 Node.js 模块,使它可以被我们(还没有写)的 index.js 主文件使用。
As you may have noticed, we already used modules in our code, like this:
也许你已经注意到,我们已经在代码中使用了模块。像这样:
var http = require("http");
...
http.createServer(...);
Somewhere within Node.js lives a module called ”http”, and we can make use of it in our own code by requiring it and assigning the result of the require to a local variable.
Node.js 中自带了一个叫做“http”的模块,我们在我们的代码中请求它并把返回值赋给一个本地变量。
This makes our local variable an object that carries all the public methods the http module provides.
这把我们的本地变量变成了一个拥有所有 http 模块所提供的公共方法的对象。
It’s common practice to choose the name of the module for the name of the local variable, but we are free to choose whatever we like:
给这种本地变量起一个和模块名称一样的名字是一种常见的做法,但是你也可以按照自己的喜好来:
var foo = require("http");
...
foo.createServer(...);
Fine, it’s clear how to make use of internal Node.js modules. How do we create our own modules, and how do we use them?
很好,怎么使用 Node.js 内部模块已经很清楚了。那我们该怎么创建自己的模块,又怎么使用它呢?
Let’s find out by turning our server.js script into a real module.
让我们通过将server.js变成一个真正的模块来搞懂这个问题吧。
Turns out, we don’t have to change that much. Making some code a module means we need to export those parts of its functionality that we want to provide to scripts that require our module.
实际上,我们不需要修改太多。把某段代码变成一个模块意味着我们需要导出这段代码中希望能提供某功能的部分到请求这个模块的那个脚本里。
For now, the functionality our HTTP server needs to export is simple: scripts requiring our server module simply need to start the server.
目前,我们的 HTTP 服务器需要导出的功能非常简单,因为请求服务器模块的脚本仅仅是需要启动服务器而已。
To make this possible, we will put our server code into a function named start, and we will export this function:
我们把我们的服务器脚本放到一个叫做 start 的函数里,然后我们会导出这个函数:
var http = require("http");
function start() {
  function onRequest(request, response) {
  console.log("Request received.");
  response.writeHead(200, {"Content-Type": "text/plain"});
  response.write("Hello World");
  response.end();
}
http.createServer(onRequest).listen(8888);
console.log("Server has started.");
}
exports.start = start;
This way, we can now create our main file index.js, and start our HTTP there, although the code for the server is still in our server.js file.
这样,我们现在就可以创建我们的主文件 index.js 并在其中启动我们的HTTP 了,虽然服务器的代码还在 server.js 中。
Create a file index.js with the following content:
创建 index.js 文件并写入以下内容:
var server = require("./server");
server.start();
As you can see, we can use our server module just like any internal module: by requiring its file and assigning it to a variable, its exported functions become available to us.
如你所见,我们可以像使用任何内部模块一样使用服务器模块。请求这个文件并把它指向一个变量,其中已导出的函数就可以被我们使用了。
That’s it. We can now start our app via our main script, and it still does exactly the same:
好了。我们现在就可以从我们的主要脚本启动我们的应用了,而它还是老样子:
node index.js
Great, we now can put the different parts of our application into different files and wire them together by making them modules.
很好,现在我们可以把我们应用的不同部分放进不同的文件,并且通过生成不同的模块来将它们写在一起。
We still have only the very first part of our application in place: we can receive HTTP requests. But we need to do something with them - depending on which URL the browser requested from our server, we need to react differently.
我们仍然只拥有整个应用的最初部分:我们可以接收 HTTP 请求。但是我们得做点什么——对于不同的 URL 请求,服务器应该有不同的反应。
For a very simple application, you could do this directly within the callback function onRequest(). But as I said, let’s add a bit more abstraction in order to make our example application a bit more interesting.
对于一个非常简单的应用来说,你可以直接在回调函数 onRequest() 中做这件事情。不过就像我说过的,我们应该加入一些抽象的元素,让我们的例子变得更有趣一点儿。
Making different HTTP requests point at different parts of our code is called ”routing” - well, then, let’s create a module called router.
处理不同的 HTTP 请求在我们的代码中是一个不同的部分,叫做“路由选择”——那么,接下来我们就新建一个叫做路由的模块吧。
What’s needed to ”route” requests?
We need to be able to feed the requested URL and possible additional GET and POST parameters into our router, and based on these the router then needs to be able to decide which code to execute (this ”code to execute” is the third part of our application: a collection of request handlers that do the actual work when a
request is received).
我们需要能够给路由提供请求的URL和其他所需要的GET和POST参数,然后路由根据这些参数信息来执行相应的代码(这里的代码指的是整个应用的第三个部分:一系列在接收到请求时真正工作的处理程序)
So, we need to look into the HTTP requests and extract the requested URL as well as the GET/POST parameters from them. It could be argued if that should be part of the router or part of the server (or even a module of its own), but let’s just agree on making it part of our HTTP server for now.
所以,我们需要从HTTP请求中提取到URL请求和GET/POST参数。这一功能应当属于路由还是服务器(甚至作为一个模块自身的功能)确实值得探讨,但这里暂定其是我们的 HTTP 服务器的功能。
All the information we need is available through the request object which is passed as the first parameter to our callback function onRequest(). But to interpret this information, we need some additional Node.js modules, namely url and querystring.
我们需要的所有数据都会包含在 request 对象中,该对象作为onRequest()回调函数的第一个参数传递。但是为了解析这些数据,我们需要额外的 Node.JS 模块,它们分别是 url 和 querystring 模块。
The url module provides methods which allow us to extract the different parts of a URL (like e.g. the requested path and query string), and querystring can in turn be used to parse the query string for request parameters:
URL模块提供的方法允许我们提取URL的不同部分(例如,请求的路径和查询字符串),而query string又可用于分析请求参数的查询字符串:

We can, of course, also use querystring to parse the body of a POST request for parameters, as we will see later.
当然我们也可以用 querystring 模块来解析 POST 请求体中的参数,稍后就可以看到。
Let’s now add to our onRequest() function the logic needed to find out which URL path the browser requested:
现在我们来给 onRequest()函数加上一些逻辑,用来找出浏览器请求的URL 路径:
var http = require("http");
var url = require("url");
function start() {
    function onRequest(request, response) {
        var pathname = url.parse(request.url).pathname;
        console.log("Request for " + pathname + " received.");
        response.writeHead(200, {"Content-Type": "text/plain"});
        response.write("Hello World");
        response.end();
    }
    http.createServer(onRequest).listen(8888);
    console.log("Server has started.");
}
exports.start = start;
Fine. Our application can now distinguish requests based on the URL path requested - this allows us to map requests to our request handlers based on the URL path using our (yet to be written) router.
好了,我们的应用现在可以基于请求的 URL 路径来区别不同请求了 -- 这使我们得以使用路由(还未完成)来将请求以 URL 路径为基准映射到处理程序上。
In the context of our application, it simply means that we will be able to have requests for the /start and /upload URLs handled by different parts of our code. We will see how everything fits together soon.
在我们应用的背景中,这意味着来自/start 和/upload 的请求可以使用不同的代码来处理。之后可以看到如何将它们整合到一起。
Ok, it’s time to actually write our router. Create a new file called router.js, with the following content:
现在我们可以来编写路由了,建立一个名为 router.js 的文件,添加以下内容:
function route(pathname) {
console.log("About to route a request for " + pathname);
}
exports.route = route;
Of course, this code basically does nothing, but that’s ok for now. Let’s first see how to wire together this router with our server before putting more logic into the router.
当然了,这段代码基本上啥事没做,但就现在来说是没问题的。在添加更多的逻辑以前,我们先来看看如何把路由和服务器整合起来。
Our HTTP server needs to know about and make use of our router. We could hard-wire this dependency into the server, but because we learned the hard way from our experience with other programming languages, we are going to loosely couple server and router by injecting this dependency (you may want
to read Martin Fowlers excellent post on Dependency Injection for background information).
我们的HTTP服务需要知道路由的存在并可以利用它们。我们当然可以通过硬编码的方式将这一依赖项绑定到服务器上,但是其它语言的编程经验告诉我们这会是一件非常痛苦的事,因此我们将使用依赖注入的方式较松散地添加路由模块(你可以读读 Martin Fowlers 关于依赖注入的文章来作为背景知识)
Let’s first extend our server’s start() function in order to enable us to pass the route function to be used by parameter:
首先,我们来扩展一下服务器的 start()函数,以便将路由函数作为参数传递过去:
var http = require("http");
var url = require("url");
function start(route) {
    function onRequest(request, response) {
        var pathname = url.parse(request.url).pathname;
        console.log("Request for " + pathname + " received.");
        route(pathname);
        response.writeHead(200, {"Content-Type": "text/plain"});
        response.write("Hello World");
        response.end();
    }
    http.createServer(onRequest).listen(8888);
    console.log("Server has started.");
}
exports.start = start;
And let’s extend our index.js accordingly, that is, injecting the route function of our router into the server:
同时,我们会相应扩展 index.js,使得路由函数可以被注入到服务器中:
var server = require("./server");
var router = require("./router");
server.start(router.route);
Again, we are passing a function, which by now isn’t any news for us.
同样,这里传递的函数也是啥事没做。
If we start our application now (node index.js, as always), and request an URL, you can now see from the application’s output that our HTTP server makes use of our router and passes it the requested pathname:
如果现在启动应用(node index.js,始终记得这个命令行),随后请求一个 URL,你将会看到应用输出相应的信息,这表明我们的 HTTP 服务器已经在使用路由模块了,并会将请求的路径传递给路由:
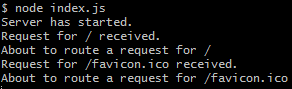
(I omitted the rather annoying output for the /favicon.ico request).
(以上输出已经去掉了比较烦人的/favicon.ico 请求相关的部分)。