MHA(Master HighAvailability)目前在MySQL高可用方面是一个相对成熟的解决方案,是一套优秀的作为MySQL高可用性环境下故障切换和主从提升的高可用软件。在MySQL故障切换过程中,MHA能做到在0~30秒之内自动完成数据库的故障切换操作,并且在进行故障切换的过程中,MHA能在最大程度上保证数据的一致性,以达到真正意义上的高可用。
目前MHA主要支持一主多从的架构。要搭建MHA,要求一个复制集群中必须最少有三台数据库服务器,一主二从,即一台充当master,一台充当备用master,另外一台充当从库。因为至少需要三台服务器,出于机器成本的考虑,淘宝也在该基础上进行了改造,目前淘宝TMHA已经支持一主一从。
MHA集群架构如图所示:

1.开启四台虚拟机,三台做mysql,一台MHA
server1 :172.25.80.1 ##做mysql的master
server2 :172.25.80.2 ##做mysql的slave
server3 :172.25.80.3 ##做mysql的slave
server4 :172.25.80.4 ##做MHA
2.三台mysql服务器修改配置文件,设置基于jtid的主从复制
具体可以查看基于jtid的主从复制
1为主,2、3为从
3.开启服务,初始化
主机:
[root@server1 mysql]# systemctl start mysqld
[root@server1 mysql]# grep password /var/log/mysqld.log
2019-05-13T10:32:27.101094Z 1 [Note] A temporary password is generated for root@localhost: pF:va6d7kT<&		##初始密码
[root@server1 mysql]# mysql -p
Enter password:
mysql> alter user root@localhost identified by 'Redhat1.';		##修改密码为:'Redhat1.‘
mysql> GRANT REPLICATION SLAVE ON *.* TO repl@'172.25.80.%' IDENTIFIED BY 'Redhat1.';
从机:
[root@server3 mysql]# systemctl start mysqld
[root@server3 mysql]# grep password /var/log/mysqld.log
2019-05-13T10:32:20.749810Z 1 [Note] A temporary password is generated for root@localhost: x!u.QM?zw6/k		##初始密码
[root@server3 mysql]# mysql -p
mysql> alter user root@localhost identified by 'Redhat1.';		##修改密码为:'Redhat1.‘
mysql> stop slave;
mysql> change master to master_host='172.25.80.1',
    -> master_user='repl',
    -> master_password='Redhat1.',
    -> master_auto_position=1;
mysql> start slave;
             Slave_IO_Running: Yes
            Slave_SQL_Running: Yes
seerver2与server3相同
4.在server4上配置MHA
1.获取包,安装
[root@server4 ~]# ls
MHA-7
[root@server4 ~]# cd MHA-7/
[root@server4 MHA-7]# ls
mha4mysql-manager-0.58-0.el7.centos.noarch.rpm
mha4mysql-manager-0.58.tar.gz
mha4mysql-node-0.58-0.el7.centos.noarch.rpm
perl-Config-Tiny-2.14-7.el7.noarch.rpm
perl-Email-Date-Format-1.002-15.el7.noarch.rpm
perl-Log-Dispatch-2.41-1.el7.1.noarch.rpm
perl-Mail-Sender-0.8.23-1.el7.noarch.rpm
perl-Mail-Sendmail-0.79-21.el7.noarch.rpm
perl-MIME-Lite-3.030-1.el7.noarch.rpm
perl-MIME-Types-1.38-2.el7.noarch.rpm
perl-Parallel-ForkManager-1.18-2.el7.noarch.rpm

[root@server4 MHA-7]# yum install -y mha4mysql-manager-0.58-0.el7.centos.noarch.rpm mha4mysql-node-0.58-0.el7.centos.noarch.rpm perl-*

2.制作钥匙
[root@server4 MHA-7]#  ssh-keygen
Generating public/private rsa key pair.
Enter file in which to save the key (/root/.ssh/id_rsa):
Created directory '/root/.ssh'.
Enter passphrase (empty for no passphrase):
Enter same passphrase again:
Your identification has been saved in /root/.ssh/id_rsa.
Your public key has been saved in /root/.ssh/id_rsa.pub.
The key fingerprint is:
c5:73:27:81:bc:80:04:c0:45:99:f2:b5:76:90:dd:6b root@server4
The key's randomart image is:
+--[ RSA 2048]----+
| ..++=.+ o ..    |
|  o o = o.+  .   |
|   o . o .+oo .  |
|    . o ..Eo o   |
|     . .S.       |
|                 |
|                 |
|                 |
|                 |
+-----------------+
[root@server4 MHA-7]# cat /etc/hosts
127.0.0.1   localhost localhost.localdomain localhost4 localhost4.localdomain4
::1         localhost localhost.localdomain localhost6 localhost6.localdomain6
172.25.80.250	foundation.ilt.example.com
172.25.80.1	server1
172.25.80.2	server2
172.25.80.3	server3
172.25.80.4	server4
172.25.80.5	server5
172.25.80.6	server6
172.25.80.7	server7
172.25.80.8	server8
172.25.80.9	server9

[root@server4 MHA-7]# ssh-copy-id server1
The authenticity of host 'server1 (172.25.80.1)' can't be established.
ECDSA key fingerprint is e9:39:fc:0d:2d:05:02:e5:14:74:b0:91:f1:9e:94:ee.
Are you sure you want to continue connecting (yes/no)? yes
/usr/bin/ssh-copy-id: INFO: attempting to log in with the new key(s), to filter out any that are already installed
/usr/bin/ssh-copy-id: INFO: 1 key(s) remain to be installed -- if you are prompted now it is to install the new keys
root@server1's password:

Number of key(s) added: 1

Now try logging into the machine, with:   "ssh 'server1'"
and check to make sure that only the key(s) you wanted were added.

[root@server4 MHA-7]# ssh-copy-id server2
The authenticity of host 'server2 (172.25.80.2)' can't be established.
ECDSA key fingerprint is b4:59:f3:ed:e3:52:bb:e2:49:05:6a:0d:c3:8b:fa:1c.
Are you sure you want to continue connecting (yes/no)? yes
/usr/bin/ssh-copy-id: INFO: attempting to log in with the new key(s), to filter out any that are already installed
/usr/bin/ssh-copy-id: INFO: 1 key(s) remain to be installed -- if you are prompted now it is to install the new keys
root@server2's password:

Number of key(s) added: 1

Now try logging into the machine, with:   "ssh 'server2'"
and check to make sure that only the key(s) you wanted were added.

[root@server4 MHA-7]# ssh-copy-id server3
The authenticity of host 'server3 (172.25.80.3)' can't be established.
ECDSA key fingerprint is 49:18:f7:a2:74:c4:a7:84:00:5a:26:05:8c:9a:ba:8f.
Are you sure you want to continue connecting (yes/no)? yes
/usr/bin/ssh-copy-id: INFO: attempting to log in with the new key(s), to filter out any that are already installed
/usr/bin/ssh-copy-id: INFO: 1 key(s) remain to be installed -- if you are prompted now it is to install the new keys
root@server3's password:

Number of key(s) added: 1

Now try logging into the machine, with:   "ssh 'server3'"
and check to make sure that only the key(s) you wanted were added.
3.测试:
[root@server4 MHA-7]# ssh server1
Last login: Mon May 13 16:16:22 2019 from foundation.ilt.example.com
[root@server1 ~]# logout
Connection to server1 closed.
[root@server4 MHA-7]# ssh server2
Last login: Mon May 13 16:16:32 2019 from foundation.ilt.example.com
[root@server2 ~]# logout
Connection to server2 closed.
[root@server4 MHA-7]# ssh server3
Last login: Mon May 13 18:01:09 2019 from foundation.ilt.example.com
[root@server3 ~]# logout
Connection to server3 closed.
4.将mha4mysql-node-0.58-0.el7.centos.noarch.rpm发送给server1、2、3并安装。
[root@server4 MHA-7]# scp mha4mysql-node-0.58-0.el7.centos.noarch.rpm server3:
mha4mysql-node-0.58-0.el7.centos.noarch.rpm   100%   35KB  35.5KB/s   00:00
[root@server4 MHA-7]# scp mha4mysql-node-0.58-0.el7.centos.noarch.rpm server5:
mha4mysql-node-0.58-0.el7.centos.noarch.rpm   100%   35KB  35.5KB/s   00:00
[root@server4 MHA-7]# scp mha4mysql-node-0.58-0.el7.centos.noarch.rpm server7:
mha4mysql-node-0.58-0.el7.centos.noarch.rpm   100%   35KB  35.5KB/s   00:00

[root@server1 ~]# yum install -y mha4mysql-node-0.58-0.el7.centos.noarch.rpm
5.在MHA(server4)上建立目录,编写配置文件
[root@server4 MHA-7]# mkdir -p /etc/masterha
[root@server4 masterha]# vim app1.cnf

[server default]
manager_log=/var/log/masterha.log
manager_workdir=/etc/masterha
master_binlog_dir=/etc/masterha
#master_ip_failover_script=/usr/local/bin/master_ip_failover
#master_ip_online_change_script=/usr/local/bin/master_ip_online_change
password=Redhat1.
ping_interval=1
remote_workdir=/tmp

repl_password=Redhat1.
repl_user=repl
#report_script=/usr/local/send_report
#secondary_check_script= /usr/local/bin/masterha_secondary_check -s server03 -s server02
#shutdown_script=""
ssh_user=root


[server1]
hostname=172.25.80.1
port=3306

[server2]
hostname=172.25.80.2
port=3306
candidate_master=1
check_repl_delay=0

[server3]
hostname=172.25.80.3
port=3306
no_master=1			##no_master表示这个节点不能作为master
6.将.ssh文件发送给server1、2、3
[root@server4 ~]# scp -r .ssh/ server1:
[root@server4 ~]# scp -r .ssh/ server2:
[root@server4 ~]# scp -r .ssh/ server3:
7.检测
检测ssh连接
masterha_check_ssh --conf=/etc/masterha/app1.cnf

检测复制
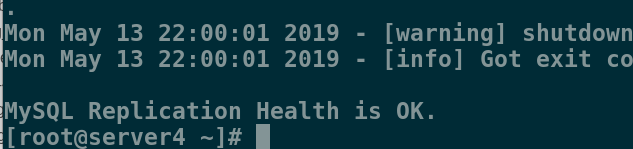
[root@server4 ~]# masterha_check_repl --conf=/etc/masterha/app1.cnf

MySQL Replication Health is NOT OK!
这里的复制是有问题的,需要在主库上添加一个root用户远程连接数据库权限
server1:
mysql> grant all on *.* to root@'%' identified by 'Redhat1.';
mysql> flush privileges;
再次检测
有错误,这是因为两个slave上的设置有问题,需要设置read_only=1,写入配置文件,都有可能提升为master,所以在server1和server2上:
mysql> set global read_only=1;
Query OK, 0 rows affected (0.00 sec)
再次检测:

完成
5.master节点手动切换
1.检测manager能否正常开启
[root@server4 ~]# nohup masterha_manager --conf=/etc/masterha/app1.cnf --remove_dead_master_conf --ignore_last_failover < /dev/null > /var/log/masterha.log 2>&1 &
[1] 4759
[root@server4 ~]# ps ax
 4759 pts/0    S      0:00 perl /usr/bin/masterha_manager --conf=/etc/masterh

[root@server4 ~]# masterha_stop --conf=/etc/masterha/app1.cnf
Stopped app1 successfully.
[1]+  Exit 1
1.cnf --remove_dead_master_conf --ignore_last_failover < /dev/null > /var/log/masterha.log 2>&1

2.关闭 server3
[root@server3 ~]# systemctl stop mysqld

3.在server4上进行手动切换,所有选项选YES
[root@server4 ~]# masterha_master_switch --master_state=dead --conf=/etc/masterha/app1.cnf --dead_master_host=172.25.80.3 --dead_master_port=3306 --new_master_host=172.25.80.5 --new_master_port=3306

4.在server3上查询
mysql> show slave status\G;
*************************** 1. row ***************************
               Slave_IO_State: Waiting for master to send event
                  Master_Host: 172.25.80.2
可以看到master变成了server2

恢复server1的slave身份
开启server的mysql
[root@server1 ~]# systemctl start mysqld
[root@server1 ~]# mysql -p
mysql> show slave status;
Empty set (0.00 sec)
mysql> change master to master_host='172.25.80.2', master_user='repl', master_password='Redhat1.', master_auto_position=1;
Query OK, 0 rows affected, 2 warnings (0.12 sec)
mysql> start slave;
Query OK, 0 rows affected (0.04 sec)
mysql> show slave status\G;
*************************** 1. row ***************************
               Slave_IO_State: Waiting for master to send event
                  Master_Host: 172.25.80.2
恢复成功!
数据库不同步的解决方法
在主库上:
[root@server1 ~]# mysqldump --all-databases --single-transaction --triggers --routines --events --host=127.0.0.1 --port=3306 --user=root --password=Redhat > redhat.sql
[root@server1 ~]# ls
redhat.sql
将数据发送给要与主库同步的从库
[root@server1 ~]# scp redhat.sql [email protected]
在从库上:
[root@server2 ~]# ls
mha4mysql-node-0.58-0.el7.centos.noarch.rpm
mysql-community-client-5.7.24-1.el7.x86_64.rpm
mysql-community-common-5.7.24-1.el7.x86_64.rpm
mysql-community-libs-5.7.24-1.el7.x86_64.rpm
mysql-community-libs-compat-5.7.24-1.el7.x86_64.rpm
mysql-community-server-5.7.24-1.el7.x86_64.rpm
redhat.sql

[root@server2 ~]# mysql -p < redhat.sql
注意:故障切换,每次切换会生成文件app1.failover.complete
[root@server4 ~]# cd /etc/masterha/
[root@server4 masterha]# ls
app1.cnf  app1.failover.complete
6.手动在线切换,刚才是master挂掉后切换
[root@server4 ~]# masterha_master_switch --conf=/etc/masterha/app1.cnf --master_state=alive --new_master_host=172.25.80.3 --new_master_port=3306 --orig_master_is_new_slave --running_updates_limit=10000
YES
yes
yes
Tue May 14 00:18:24 2019 - [info] Switching master to 172.25.80.1(172.25.80.1:3306) completed successfully.

在server3查询:
mysql> show slave status\G;
*************************** 1. row ***************************
               Slave_IO_State: Waiting for master to send event
                  Master_Host: 172.25.80.1

在线切换完成
7.配置脚本和vip漂移
用户访问入口只能有一个,所以要配置vip
1.下载mha-manager管理资源包
[root@server4 MHA-7]# ls
mha4mysql-manager-0.58.tar.gz
[root@server4 MHA-7]# tar zxf mha4mysql-manager-0.58.tar.gz
[root@server4 MHA-7]# ls
mha4mysql-manager-0.58
[root@server4 MHA-7]# cd mha4mysql-manager-0.58
[root@server4 mha4mysql-manager-0.58]# ls
AUTHORS  COPYING  lib          MANIFEST       README  samples  tests
bin      debian   Makefile.PL  MANIFEST.SKIP  rpm     t
[root@server4 mha4mysql-manager-0.58]# cd bin/
[root@server4 bin]# ls
masterha_check_repl    masterha_conf_host       masterha_master_switch
masterha_check_ssh     masterha_manager         masterha_secondary_check
masterha_check_status  masterha_master_monitor  masterha_stop
2.给master(server1)上配置vip
[root@server1 ~]# ip addr add 172.25.80.100/24 dev eth0
[root@server1 ~]# ip a
1: lo: <LOOPBACK,UP,LOWER_UP> mtu 65536 qdisc noqueue state UNKNOWN qlen 1
    link/loopback 00:00:00:00:00:00 brd 00:00:00:00:00:00
    inet 127.0.0.1/8 scope host lo
       valid_lft forever preferred_lft forever
    inet6 ::1/128 scope host
       valid_lft forever preferred_lft forever
2: eth0: <BROADCAST,MULTICAST,UP,LOWER_UP> mtu 1500 qdisc pfifo_fast state UP qlen 1000
    link/ether 52:54:00:cc:aa:a5 brd ff:ff:ff:ff:ff:ff
    inet 172.25.80.1/24 brd 172.25.80.255 scope global eth0
       valid_lft forever preferred_lft forever
    inet 172.25.80.100/24 scope global secondary eth0
       valid_lft forever preferred_lft forever
    inet6 fe80::5054:ff:fecc:aaa5/64 scope link
       valid_lft forever preferred_lft forever
3.在server4上编写脚本
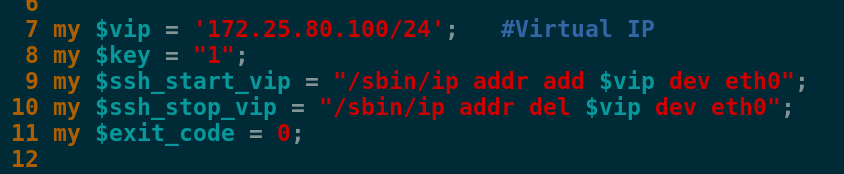
[root@server4 scripts]# vim  /usr/local/bin/master_ip_failover
  1 #!/usr/bin/env perl
  2 use strict;
  3 use warnings FATAL => 'all';
  4 use Getopt::Long;
  5
  6 my (
  7     $command,          $ssh_user,        $orig_master_host, $orig_master_    ip,
  8     $orig_master_port, $new_master_host, $new_master_ip,    $new_master_p    ort
  9 );
 10
 11 my $vip = '172.25.80.100/24';
 12 my $key = '1';
 13 my $ssh_start_vip = "/sbin/ip addr add $vip dev eth0";
 14 my $ssh_stop_vip = "/sbin/ip addr del $vip dev eth0";
 15
 16 GetOptions(
 17     'command=s'          => \$command,
 18     'ssh_user=s'         => \$ssh_user,
 19     'orig_master_host=s' => \$orig_master_host,
 20     'orig_master_ip=s'   => \$orig_master_ip,
 21     'orig_master_port=i' => \$orig_master_port,
 22     'new_master_host=s'  => \$new_master_host,
 23     'new_master_ip=s'    => \$new_master_ip,
 24     'new_master_port=i'  => \$new_master_port,
 25 );
 26
 27 exit &main();
 28
 29 sub main {
 30
 31     print "\n\nIN SCRIPT TEST====$ssh_stop_vip==$ssh_start_vip===\n\n";
 32
 33     if ( $command eq "stop" || $command eq "stopssh" ) {
 34
 35         my $exit_code = 1;
 36         eval {
 37             print "Disabling the VIP on old master: $orig_master_host \n"    ;
 38             &stop_vip();
 39             $exit_code = 0;
 40         };
 41         if ($@) {
 42             warn "Got Error: $@\n";
 43             exit $exit_code;
 44         }
 45         exit $exit_code;
 46     }
 47     elsif ( $command eq "start" ) {
 48
 49         my $exit_code = 10;
 50         eval {
 51             print "Enabling the VIP - $vip on the new master - $new_maste    r_host \n";
 52             &start_vip();
 53             $exit_code = 0;
 54         };
 55         if ($@) {
 56             warn $@;
 57             exit $exit_code;
 58         }
 59         exit $exit_code;
 60     }
 61     elsif ( $command eq "status" ) {
 62         print "Checking the Status of the script.. OK \n";
 63         exit 0;
 64     }
 65     else {
 66         &usage();
 67         exit 1;
 68     }
 69 }
 70
 71 sub start_vip() {
 72     `ssh $ssh_user\@$new_master_host \" $ssh_start_vip \"`;
 73 }
 74 sub stop_vip() {
 75      return 0  unless  ($ssh_user);
 76     `ssh $ssh_user\@$orig_master_host \" $ssh_stop_vip \"`;
 77 }
 78
 79 sub usage {
 80     print
 81     "Usage: master_ip_failover --command=start|stop|stopssh|status --orig    _master_host=host --orig_master_ip=ip --orig_master_port=port --new_m        aster_host=host --new_master_ip=ip --new_master_port=port\n";
 82 }

  1 #!/usr/bin/env perl
  2 use strict;
  3 use warnings FATAL =>'all';
  4
  5 use Getopt::Long;
  6
  7 my $vip = '172.25.80.100/24';   #Virtual IP
  8 my $key = "1";
  9 my $ssh_start_vip = "/sbin/ip addr add $vip dev eth0";
 10 my $ssh_stop_vip = "/sbin/ip addr del $vip dev eth0";
 11 my $exit_code = 0;
 12
 13 my (
 14   $command,              $orig_master_is_new_slave, $orig_master_host,
 15   $orig_master_ip,       $orig_master_port,         $orig_master_user,
 16   $orig_master_password, $orig_master_ssh_user,     $new_master_host,
 17   $new_master_ip,        $new_master_port,          $new_master_user,
 18   $new_master_password,  $new_master_ssh_user,
 19 );
 20 GetOptions(
 21   'command=s'                => \$command,
 22   'orig_master_is_new_slave' => \$orig_master_is_new_slave,
 23   'orig_master_host=s'       => \$orig_master_host,
 24   'orig_master_ip=s'         => \$orig_master_ip,
 25   'orig_master_port=i'       => \$orig_master_port,
 26   'orig_master_user=s'       => \$orig_master_user,
 27   'orig_master_password=s'   => \$orig_master_password,
 28   'orig_master_ssh_user=s'   => \$orig_master_ssh_user,
 29   'new_master_host=s'        => \$new_master_host,
 30   'new_master_ip=s'          => \$new_master_ip,
 31   'new_master_port=i'        => \$new_master_port,
 32   'new_master_user=s'        => \$new_master_user,
 33   'new_master_password=s'    => \$new_master_password,
 34   'new_master_ssh_user=s'    => \$new_master_ssh_user,
 35 );
 36
 37
 38 exit &main();
 39
 40 sub main {
 41
 42 #print "\n\nIN SCRIPT TEST====$ssh_stop_vip==$ssh_start_vip===\n\n";
 43
 44 if ( $command eq "stop" || $command eq "stopssh" ) {
 45
 46         # $orig_master_host, $orig_master_ip, $orig_master_port are passe    d.
 47         # If you manage master ip address at global catalog database,
 48         # invalidate orig_master_ip here.
 49         my $exit_code = 1;
 50         eval {
 51             print "\n\n\n************************************************    ***************\n";
 52             print "Disabling the VIP - $vip on old master: $orig_master_h    ost\n";
 53             print "******************************************************    *********\n\n\n\n";
 54 &stop_vip();
 55             $exit_code = 0;
 56         };
 57         if ($@) {
 58             warn "Got Error: $@\n";
 59             exit $exit_code;
 60         }
 61         exit $exit_code;
 62 }
 63 elsif ( $command eq "start" ) {
 64
 65         # all arguments are passed.
 66         # If you manage master ip address at global catalog database,
 67         # activate new_master_ip here.
 68         # You can also grant write access (create user, set read_only=0,     etc) here.
 69  my $exit_code = 10;
 70         eval {
 71             print "\n\n\n************************************************    ***************\n";
 72             print "Enabling the VIP - $vip on new master: $new_master_hos    t \n";
 73             print "******************************************************    *********\n\n\n\n";
 74 &start_vip();
 75             $exit_code = 0;
 76         };
 77         if ($@) {
 78             warn $@;
 79             exit $exit_code;
 80         }
 81         exit $exit_code;
 82 }
 83 elsif ( $command eq "status" ) {
 84         print "Checking the Status of the script.. OK \n";
 85         `ssh $orig_master_ssh_user\@$orig_master_host \" $ssh_start_vip \    "`;
 86         exit 0;
 87 }
 88 else {
 89 &usage();
 90         exit 1;
 91 }
 92 }
 93
 94 # A simple system call that enable the VIP on the new master
 95 sub start_vip() {
 96 `ssh $new_master_ssh_user\@$new_master_host \" $ssh_start_vip \"`;
 97 }
 98 # A simple system call that disable the VIP on the old_master
 99 sub stop_vip() {
100 `ssh $orig_master_ssh_user\@$orig_master_host \" $ssh_stop_vip \"`;
101 }
102
103 sub usage {
104 print
105 "Usage: master_ip_failover --command=start|stop|stopssh|status --orig_mas    ter_host=host --orig_master_ip=ip --orig_master_port=port --new_maste        r_host=host --new_master_ip=ip --new_master_port=port\n";
106 }
设置自动添加和删除vip,如果脚本没有执行权限要记得给执行权限。

更改/etc/masterha/app1.cnf文件:
  5 master_ip_failover_script=/usr/local/bin/master_ip_failover
  6 master_ip_online_change_script=/usr/local/bin/master_ip_online_change

4.测试vip漂移
测试前要删除/etc/masterha/的app1.failover.complete文件
server4:
[root@server4 bin]# cd /etc/masterha/
[root@server4 masterha]# ls
app1.cnf  app1.failover.complete
[root@server4 masterha]# rm -rf app1.failover.complete
[root@server4 masterha]# ls
app1.cnf
[root@server4 masterha]# masterha_master_switch --conf=/etc/masterha/app1.cnf --master_state=alive --new_master_host=172.25.80.2 --new_master_port=3306 --orig_master_is_new_slave --running_updates_limit=10000
全部YES,可以看到切换vip
***************************************************************
Disabling the VIP - 172.25.80.100/24 on old master: 172.25.80.1
***************************************************************

***************************************************************
Enabling the VIP - 172.25.80.100/24 on new master: 172.25.80.2
***************************************************************

Tue May 14 01:09:19 2019 - [info] Switching master to 172.25.80.2(172.25.80.2:3306) completed successfully.


查询vip是否漂移成功
server1:
[root@server1 ~]# ip a
1: lo: <LOOPBACK,UP,LOWER_UP> mtu 65536 qdisc noqueue state UNKNOWN qlen 1
    link/loopback 00:00:00:00:00:00 brd 00:00:00:00:00:00
    inet 127.0.0.1/8 scope host lo
       valid_lft forever preferred_lft forever
    inet6 ::1/128 scope host
       valid_lft forever preferred_lft forever
2: eth0: <BROADCAST,MULTICAST,UP,LOWER_UP> mtu 1500 qdisc pfifo_fast state UP qlen 1000
    link/ether 52:54:00:cc:aa:a5 brd ff:ff:ff:ff:ff:ff
    inet 172.25.80.1/24 brd 172.25.80.255 scope global eth0
       valid_lft forever preferred_lft forever
    inet6 fe80::5054:ff:fecc:aaa5/64 scope link
       valid_lft forever preferred_lft forever
server2:
[root@server2 ~]# ip a
1: lo: <LOOPBACK,UP,LOWER_UP> mtu 65536 qdisc noqueue state UNKNOWN qlen 1
    link/loopback 00:00:00:00:00:00 brd 00:00:00:00:00:00
    inet 127.0.0.1/8 scope host lo
       valid_lft forever preferred_lft forever
    inet6 ::1/128 scope host
       valid_lft forever preferred_lft forever
2: eth0: <BROADCAST,MULTICAST,UP,LOWER_UP> mtu 1500 qdisc pfifo_fast state UP qlen 1000
    link/ether 52:54:00:b8:4a:a9 brd ff:ff:ff:ff:ff:ff
    inet 172.25.80.2/24 brd 172.25.80.255 scope global eth0
       valid_lft forever preferred_lft forever
    inet 172.25.80.100/24 scope global secondary eth0
       valid_lft forever preferred_lft forever
    inet6 fe80::5054:ff:feb8:4aa9/64 scope link
       valid_lft forever preferred_lft forever
成功!
在server3上查询:
mysql> show slave status\G;
*************************** 1. row ***************************
               Slave_IO_State: Waiting for master to send event
                  Master_Host: 172.25.80.2
vip漂移之后,master节点也由server1变为server2。
8.测试全自动切换
设置好vip漂移就可以设置master的全自动切换了。
注意:一定要删除app1.failover.complete文件
开启manager
[root@server4 masterha]# nohup masterha_manager --conf=/etc/masterha/app1.cnf &>/dev/null &
[1] 5490
此时master为server2,所以关闭server2的mysql服务,模拟故障。
[root@server2 ~]# systemctl stop mysqld
server4会出现提醒
[root@server4 masterha]# 		##此处需要按下enter键
[1]+  Done                    nohup masterha_manager --conf=/etc/masterha/app1.cnf &>/dev/null
在server4上查看日志
[root@server4 masterha]# cat /var/log/masterha.log
Master 172.25.80.2(172.25.80.2:3306) is down!

Check MHA Manager logs at server4:/var/log/masterha.log for details.
Started automated(non-interactive) failover.
Invalidated master IP address on 172.25.80.2(172.25.80.2:3306)
Selected 172.25.80.1(172.25.80.1:3306) as a new master.
172.25.80.1(172.25.80.1:3306): OK: Applying all logs succeeded.
172.25.80.1(172.25.80.1:3306): OK: Activated master IP address.
172.25.80.3(172.25.80.3:3306): OK: Slave started, replicating from 172.25.80.1(172.25.80.1:3306)
172.25.80.1(172.25.80.1:3306): Resetting slave info succeeded.
Master failover to 172.25.80.1(172.25.80.1:3306) completed successfully.

查看vip漂移
[root@server1 ~]# ip a
1: lo: <LOOPBACK,UP,LOWER_UP> mtu 65536 qdisc noqueue state UNKNOWN qlen 1
    link/loopback 00:00:00:00:00:00 brd 00:00:00:00:00:00
    inet 127.0.0.1/8 scope host lo
       valid_lft forever preferred_lft forever
    inet6 ::1/128 scope host
       valid_lft forever preferred_lft forever
2: eth0: <BROADCAST,MULTICAST,UP,LOWER_UP> mtu 1500 qdisc pfifo_fast state UP qlen 1000
    link/ether 52:54:00:cc:aa:a5 brd ff:ff:ff:ff:ff:ff
    inet 172.25.80.1/24 brd 172.25.80.255 scope global eth0
       valid_lft forever preferred_lft forever
    inet 172.25.80.100/24 scope global secondary eth0
       valid_lft forever preferred_lft forever
    inet6 fe80::5054:ff:fecc:aaa5/64 scope link
       valid_lft forever preferred_lft forever
查询master是否切换
mysql> show slave status\G;
*************************** 1. row ***************************
               Slave_IO_State: Waiting for master to send event
                  Master_Host: 172.25.80.1
vip成功漂移,master也成功切换,全自动切换配置成功!