1 .简介
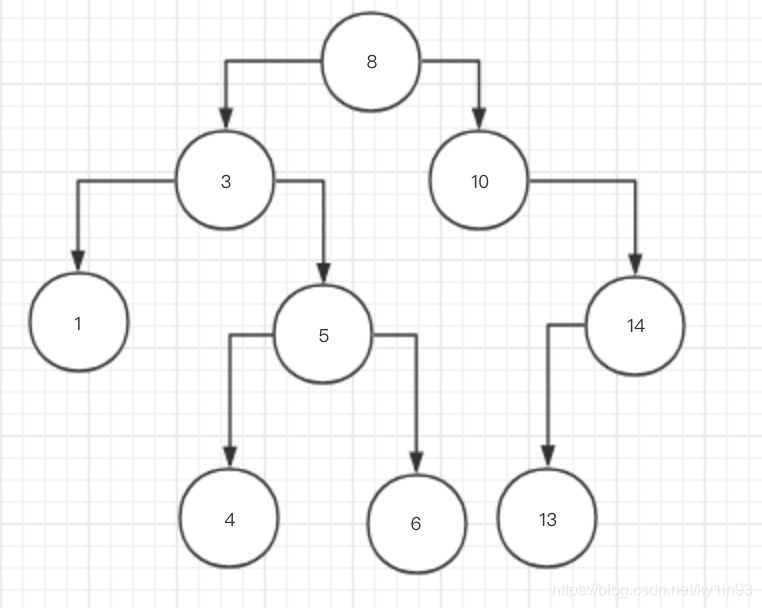
如上图所示:
“8”为root节点(根节点),“3”和“10”分别为“8” 的左子节点(左子树)和右子节点(右子树),
这颗二叉树的高度为4层,
“4”、“6”、“13”没有子节点(左右子树都没),也称为叶子节点,
“8”的左子树“3”小于“8”,右子树“10”大于“8”;“3”的左子树“1”小于“3”,右子树“5”大于“3”,形如这种的二叉树称为排序二叉树。
2 .代码实现
<!DOCTYPE html>
<html lang="en">
<head>
<meta charset="UTF-8">
<meta name="viewport" content="width=device-width, initial-scale=1.0">
<meta http-equiv="X-UA-Compatible" content="ie=edge">
<title>js二叉树</title>
</head>
<body>
<script>
// 二叉树构造函数
function BinaryTree() {
// 节点的构造函数
var Node = function(key) {
this.key = key; // 节点的值
this.left = null; // 左子树节点
this.right = null; // 右子树节点
}
// 根节点
var root = null;
// 插入root的子节点
var insertNode = function(parentNode, childNode){
// 左子树构造
if (childNode.key < parentNode.key) {
// 为空时赋值,否则继续延伸
if (parentNode.left === null) {
parentNode.left = childNode;
} else {
insertNode(parentNode.left, childNode);
}
} else { // 右子树的构造 childNode.key > parentNode.key
if (parentNode.right === null) {
parentNode.right = childNode;
} else {
insertNode(parentNode.right, childNode);
}
}
}
this.getRoot = function() {
return root;
}
// 插入节点的实例方法
this.insert = function(key) {
var thisNode = new Node(key);
// 根节点赋值
if (root === null) {
root = thisNode;
} else {
// 插入子节点
insertNode(root, thisNode);
}
}
}
var nodes = [8, 3, 10, 1, 5, 14, 4, 6, 13];
var binaryTree = new BinaryTree();
nodes.forEach( key => {
binaryTree.insert(key);
});
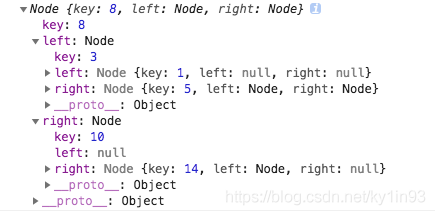
console.log(binaryTree.getRoot());
</script>
</body>
</html>
查看树的结构
3 .三种遍历方法(中序、前序、后序)
3.1 中序遍历
解析:从根节点(‘8’)作为入口,查看该节点的左子树,如果有,则进入该子树(‘3’),查看’3’有无左子树,有则进入到’3’的左子树’1’,‘1’没有左子树,则输出该节点的值,为 1。‘1’没有右子树,则返回上一层’3’,输出 3。查看’3’的右子树,有则进入’5’,‘5’有左子树,则进入到’4’,‘4’为叶子节点,所以直接输出 4。
返回上一层’5’,并输出 5 。然后进入’5’的右子树’6’,‘6’为叶子节点直接输出 6。然后返回’5’,‘5’已输出继续返回上一层’3’,‘3’也输出了,返回到’8’,然后输出 8 。'8’的右子树同理。
则顺序为1、3、4、5、6、8、10、13、14 为升序
部分代码为:
      // 中序遍历的实例方法
      this.inOrderTraverse = function(node, printLog) {
        if (node !== null) {
          // 优先去找左子树,然后中间节点,最后右子树
          this.inOrderTraverse(node.left, printLog);
          printLog(node.key);
          this.inOrderTraverse(node.right, printLog);
        }
      }
    }

    // 节点数组
    var nodes = [8, 3, 10, 1, 5, 14, 4, 6, 13];
    // 打印方法
    var printLog = key => console.log(key);
    var binaryTree = new BinaryTree();
    nodes.forEach( key => {
      binaryTree.insert(key);
    });
    var root = binaryTree.getRoot();
    console.log(root);
    binaryTree.inOrderTraverse(root, printLog);
3.2 前序遍历
解析:从根节点’8’进入并打印,然后进去左子树’3’并打印,再进入’3’的左子树’1’并打印,‘1’为叶子节点返回到上一层’3’,进入右子树’5’并打印,然后进入’5’的左子树’4’并打印,‘4’为叶子节点返回上一层’5’,进去右子树’6’并打印,然后逐一返回至根节点遍历根节点的右子树…
作用复制二叉树效率高
部分代码为:
// 前序遍历的实例方法
      this.preTraverse = function(node, printLog) {
        if (node !== null) {
          // 优先输出中间节点,然后寻找左子树,最后右子树
          printLog(node.key);
          this.preTraverse(node.left, printLog);
          this.preTraverse(node.right, printLog);
        }
      }
    }

    // 节点数组
    var nodes = [8, 3, 10, 1, 5, 14, 4, 6, 13];
    // 打印方法
    var printLog = key => console.log(key);
    var binaryTree = new BinaryTree();
    nodes.forEach( key => {
      binaryTree.insert(key);
    });
    var root = binaryTree.getRoot();
    console.log(root);
    // 中序遍历
    // binaryTree.inOrderTraverse(root, printLog);

    // 前序遍历
    binaryTree.preTraverse(root, printLog);
输出结果为:8、3、1、5、4、6、10、14、13
3.3 后序遍历
解析:首先寻找左节点最深处的并打印,然后右子树并打印,最后中间节点。
部分代码为:

	  // 后序遍历的实例方法
      this.postTraverse = function(node, printLog) {
        if (node !== null) {
          // 优先输出左子树,然后寻找右子树,最后中间节点
          this.postTraverse(node.left, printLog);
          this.postTraverse(node.right, printLog);
          printLog(node.key);
        }
      }
    }

    // 节点数组
    var nodes = [8, 3, 10, 1, 5, 14, 4, 6, 13];
    // 打印方法
    var printLog = key => console.log(key);
    var binaryTree = new BinaryTree();
    nodes.forEach( key => {
      binaryTree.insert(key);
    });
    var root = binaryTree.getRoot();
    console.log(root);
    // 中序遍历
    // binaryTree.inOrderTraverse(root, printLog);

    // 前序遍历
    // binaryTree.preTraverse(root, printLog);

    //后序遍历
    binaryTree.postTraverse(root, printLog);
输出结果为:1、4、6、5、3、13、14、10、8
4 .查询节点
4.1.查找最小值
解析:从root节点开始寻找左子树,如果没有左子树则表明该节点为最小值。
代码:
	  // 查询最小值
      this.minNode = function(node) {
        if (node !== null) {
          while(node && node.left !== null) {
            node = node.left;
          }
          return node.key;
        }
        return null;
      }
4.2.查找最大值
解析:从root节点开始寻找右子树,如果没有右子树则表明该节点为最大值。
部分代码:
	  // 查询最大值
      this.maxNode = function(node) {
        if (node !== null) {
          while(node && node.right !== null) {
            node = node.right;
          }
          return node.key;
        }
        return null;
      }
4.2.查找指定值
部分代码:
      // 查找指定值
      this.searchNode = function(node, key) {
        if (node === null) {
          return false;
        }
        // 要查找的值小于当前节点的值,用左子树继续查找
        if (key < node.key) {
          return this.searchNode(node.left, key);
        } else if (key > node.key) { // 要查找的值大于当前节点的值,用右子树继续查找
          return this.searchNode(node.right, key);
        } else {
          return true;
        }
      }