产生原因:
因为一些maven管理的jar没能正确下载。
先查看buildpath,找问题的jar包,之后再一个个解决
对这些有问题的jar,是因为当前的maven仓库无法找到,所以可以通过如下方法添加能找到相应jar的maven仓库:
1.在google中直接搜索相应jar,比如:jmxri-1.2.1.jar
2.在搜索结果中找到有这个jar的maven仓库,并加入到setting.xml中。
3.重新对项目进行 右键 - maven - update dependencies。
Eclipse 修改maven 仓储Repository位置
简述:
使用两个Nexus, 需要配置两份不同的Maven仓库
步骤:
1. 下载新的Maven运行包
2. 进入conf/ 修改setting.xml项
[java] view plain copy 在CODE上查看代码片派生到我的代码片
01.<localRepository>D:/Maven/repo-im</localRepository>
3. 进入eclipse修改
Preference -> Maven -> Installation
4. -> User Interface
选择刚才修改过的setting.xml
附注:
发现只要指定了setting.xml的位置,也就是user setting 设置一下就可以, 对于maven bin目录是无关的
所以讲setting.xml 移入了repo 文件夹下
重新在Eclipse中配置Preference -> Maven -> user setting 即可
Apply 之后点击Update Setting 即可
maven的setting.xml文件配置详解
1 首先,setting.xml一般存在与两个地方:maven的安装目录/conf/,和${user.home}/.m2/下。他们的区别是在maven安装目录下的setting.xml是所有用户都可以应用的配置,而user.home下的可想而知就是针对某一用户的配置(推荐是在user.home下)。如果两个都进行了配置,则在应用的时候会将两个配置文件进行中和,而且user.home下的setting.xml优先级大于maven安装目录下的。
2 setting.xml文件中顶层元素一览:
[html] view plain copy 在CODE上查看代码片派生到我的代码片
01.<span style="font-family:Microsoft YaHei;"><settings xmlns="http://maven.apache.org/SETTINGS/1.0.0"
02. xmlns:xsi="http://www.w3.org/2001/XMLSchema-instance"
03. xsi:schemaLocation="http://maven.apache.org/SETTINGS/1.0.0
04. http://maven.apache.org/xsd/settings-1.0.0.xsd">
05. <localRepository/>
06. <interactiveMode/>
07. <usePluginRegistry/>
08. <offline/>
09. <pluginGroups/>
10. <servers/>
11. <mirrors/>
12. <proxies/>
13. <profiles/>
14. <activeProfiles/>
15.</settings></span>
下面对各个元素进行解析:
2.1 localRepository
建构系统本地仓库的路径,不设置的话默认是在{user.home}/.m2/repository/下,如果想要系统所有用户共用一个本地仓库,则可以在maven安装目录下的setting.xml中进行设置
2.2 interactiveMode
指定Maven是否试图与用户交互来得到输入,默认是true
2.3 usePluginRegistry
如果设置为true,则在{user.home}/.m2下需要有一个plugin-registry.xml来对plugin的版本进行管理。默认是false
2.4 offline
如果不想每次编译的时候都去查找远程中心仓库,就需要设置为true,但前提是本地仓库中已有需要的jar包,默认是false
2.5 pluginGroups
该元素包含一系列的pluginGroup元素,每个pluginGroup又有一个groupId,当一个plugin被使用而在命令行中哦给没有指定groupId的时候,就会查询这个列表
2.6 Servers
maven除了一般的本地仓库和中央仓库之外,还有一种是远程仓库,一般部署在局域网中供Maven用户使用(成为私服),当maven需要下载构件的时候,它先从私服中请求,如果没有,再到外部的中央仓库中下载,同时下载的构件会在下载到私服中供以后使用,或者用户可以将将构件上传到私服中。
私服还有一个好处就是存放组织内部自己生成的私有构件,这类构件不可能从外部的中央仓库获取,但是组织内部用户又需要共享使用,这个时候就需要私服了。
一般私服建立完毕之后不需要认证就可以访问,但是处于安全方面的考虑,需要提供认证信息才能访问这些私服,这时就需要使用servers元素(需要注意的是配置私服的信息是在pom文件中,但是认证信息则是在setting.xml中,这是因为pom文件往往是被提交到代码仓库中供所有成员访问的,而setting.xml是存放在本地的,这样是安全的)。
而maven是根据pom中的repositories和distributionMnagement元素来决定,然后运行maven clean deploy,这样maven就根据pom中的配置将自己的第三方构件部署在私服上供组织内其他用户使用(注意maven clean deploy和maven clean install的区别:deploy是将该构件部署在私服中,而install是将构件存入自己的本地仓库中)。
2.7 morriors
显而易见,镜像,也供maven下载jar包
2.8 proxies
当用户 用代理登录下载时需要配置(但是我现在是在使用代理,可是还是没有作用,原因未知?)
2.9 profiles(??)
2.10 activeProfiles(??)
在settings标签里面添加
<localRepository>D:\Java\m2\repository</localRepository>
此为设置本地仓库
<profiles>
<profile>
<id>jdk-1.6</id>
<activation>
<activeByDefault>true</activeByDefault>
<jdk>1.6</jdk>
</activation>
<properties>
<maven.compiler.source>1.6</maven.compiler.source>
<maven.compiler.target>1.6</maven.compiler.target>
<maven.compiler.compilerVersion>1.6</maven.compiler.compilerVersion>
</properties>
</profile>
<profile>
<id>dev</id>
<repositories>
<repository>
<id>local-nexus</id>
<url>http://192.168.1.100:8081/nexus/content/groups/public</url>
<releases>
<enabled>true</enabled>
</releases>
<snapshots>
<enabled>true</enabled>
</snapshots>
</repository>
</repositories>
</profile>
</profiles>
此为添加本地nexus仓库和设置默认jdk为1.6
上传jar包到nexus私服
1通过网页上传
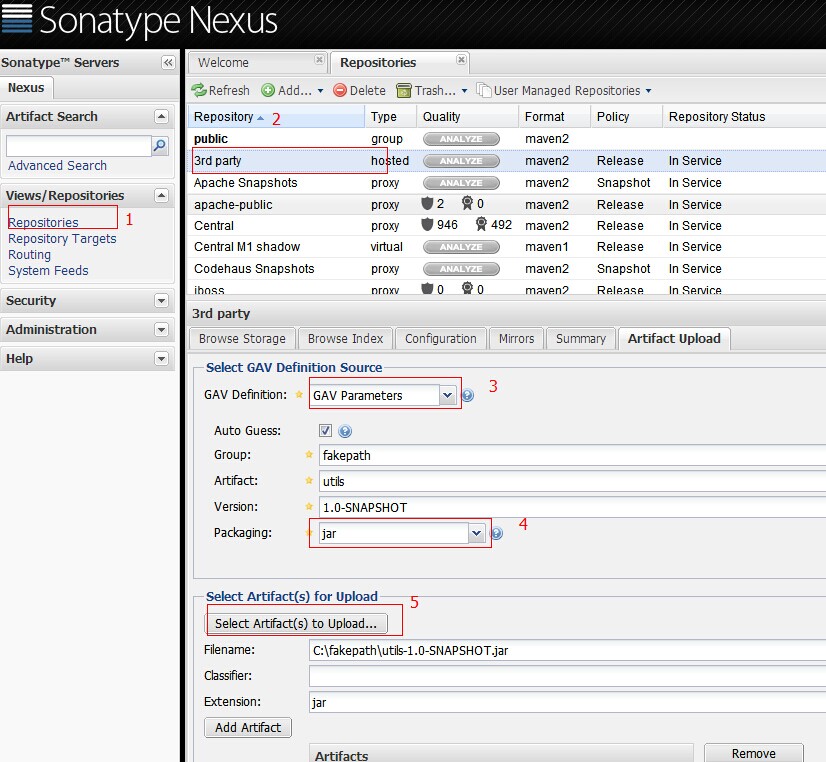
这种方法只是上传了jar包。通过maven引用当前jar,不能取得jar的依赖

from pom的方式,选择pom文件,以及jar。通过maven引入jar时,会自动加载jar的依赖
2通过maven的方式depoly
在maven的conf/setting.xml 配置nexus私服的管理账号
在servers标签下添加server
   <server>
      <id>nexus-snapshots</id>
      <username>repouser</username>
      <password>repopwd</password>
    </server>
id可自己定义一个名称 以及私服的管理管的账号密码
在mirrors和profiles下配置nexus私服
<mirrors>
    <mirror>
      <!--This sends everything else to /public -->
      <id>nexus</id>
      <mirrorOf>*</mirrorOf>
      <url>http://192.168.10.8:18080/nexus/content/repositories/releases/</url>
    </mirror>
  </mirrors>
  <profiles>
    <profile>
      <id>nexus</id>
      <!--Enable snapshots for the built in central repo to direct -->
      <!--all requests to nexus via the mirror -->
      <repositories>
        <repository>
            <id>nexus</id>
            <name>local private nexus</name>
            <url>http://192.168.10.8:18080/nexus/content/groups/public</url>
            <releases><enabled>true</enabled><updatePolicy>always</updatePolicy>
            <checksumPolicy>warn</checksumPolicy></releases>
            <snapshots><enabled>false</enabled></snapshots>
        </repository>
      </repositories>
      <pluginRepositories>
        <pluginRepository>
            <id>nexus</id>
            <name>local private nexus</name>
            <url>http://192.168.10.8:18080/nexus/content/groups/public</url>
            <releases><enabled>true</enabled><updatePolicy>always</updatePolicy>
            <checksumPolicy>warn</checksumPolicy></releases>
            <snapshots><enabled>false</enabled></snapshots>
        </pluginRepository>
       </pluginRepositories>
    </profile>
  </profiles>
  <activeProfiles>
    <!--make the profile active all the time -->
    <activeProfile>nexus</activeProfile>
  </activeProfiles>
在项目的pom.xml中配置
 <distributionManagement>
        <repository>
            <id>nexus-releases</id>
            <name>Nexus Release Repository</name>
            <url>http://192.168.10.8:18080/nexus/content/repositories/releases/</url>
        </repository>
        <snapshotRepository>
            <id>nexus-snapshots</id>
            <name>Nexus Snapshot Repository</name>
            <url>http://192.168.10.8:18080/nexus/content/repositories/snapshots/</url>
        </snapshotRepository>
    </distributionManagement>
id与settings.xml中的server的id对应
当项目package后
mvn deploy就可以将jar上传到nexus私服