Scrapy是一个专业的、高效的爬虫框架,它使用专业的Twisted包(基于事件驱动的网络引擎包)高效处理网络通信,使用lxml(专业的XML处理包)、cssselect高效地提取HTML页面的有效信息,同时它也提供了有效的线程管理
一、安装Scrapy:
pip3 install scrapy
二、创建Scrapy项目:
使用Scrapy开发爬虫时,通常需要创建一个Scrapy项目。通过如下命令即可创建Scrapy项目:
scrapy startproject 项目名
注意:
1、PyCharm中创建Scrapy项目时,需要打开Terminal执行上面的命令
2、startproject是scrapy的子命令,专门用于创建项目
3、scrapy其他的子命令有:
fetch ------>从指定URL获取响应
genspider ------>生成蜘蛛
shell -------->启动交互式控制台
version -------->查看Scrapy版本
示例:创建ZhaoPinSpider项目,抓取招聘信息
1、创建:
scrapy startproject ZhaoPinSpider

表示创建成功
PyCharm中的目录结构如下:
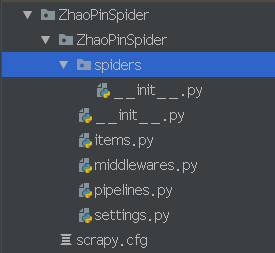
scrapy.cfg:项目的总配置文件,通常无需修改
ZhaoPinSpider:项目的python模块。程序将从此处导入Python代码。
ZhaoPinSpider/items.py:用于定义项目用到的Item类。Item类就是一个DTO(数据传输对象),通常定义N个属性,该类需要由开发者来定义
ZhaoPinSpider/middlewares.py: 是和Scrapy的请求/响应处理相关联的框架。
ZhaoPinSpider/pipelines.py:项目的管道文件,用来对items里面提取的数据做进一步处理,如保存等。需要由开发者编写
ZhaoPinSpider/settings.py:项目的配置文件。在该文件中进行项目相关配置
ZhaoPinSpider/spiders/:该目录下存放项目所需要的蜘蛛------蜘蛛负责抓取项目感兴趣的信息。
2、定义Item类:打开items.py文件
import scrapy
class ZhaopinspiderItem(scrapy.Item):
title = scrapy.Field() #名称
salary = scrapy.Field() #工资
company = scrapy.Field() #招聘公司名称
url = scrapy.Field() #工作详细链接
work_addr = scrapy.Field() #工作地点
company_size = scrapy.Field() #公司人数
recruiter = scrapy.Field() #招聘人
publish_date = scrapy.Field() #信息发布时间
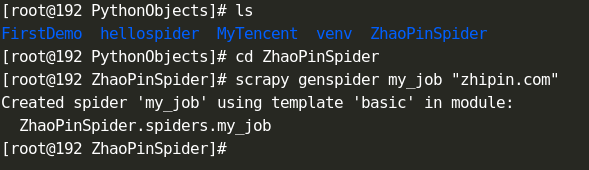
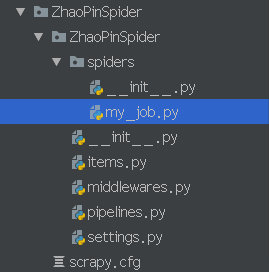
3、进入ZhaoPinSpider目录下,创建my_job文件(即定义爬虫,爬取信息)
# -*- coding: utf-8 -*-
import scrapy
import sys
sys.path.append(r"/home/PythonObjects/ZhaoPinSpider/ZhaoPinSpider")
from items import ZhaopinspiderItem
class MyJobSpider(scrapy.Spider):
name = 'my_job'
allowed_domains = ['zhipin.com']
start_urls = ['https://www.zhipin.com/c101280100/h_101280100/']
def parse(self, response):
for each in response.xpath('//div[@class="job-primary"]'):
item = ZhaopinspiderItem()
info_primary = each.xpath('./div[@class="info-primary"]')
item['title'] = info_primary.xpath('./h3/a/div[@class="job-title"]/text()').extract_first()
item['salary'] = info_primary.xpath('./h3/a/span[@class="red"]/text()').extract_first()
item['work_addr'] = info_primary.xpath('./h3/p/text()').extract_first()
item['url'] = info_primary.xpath('./h3/a/@href').extract_first()
company_text = each.xpath('./div[@class="info-company"]/div[@class="company-text"]')
item['company'] = company_text.xpath('./h3/a/text()').extract_first()
company_info = company_text.xpath('./p/text()').extract()
if company_info and len(company_info)>0:
item['industry'] = company_text.xpath('./p/text()').extract()[0]
if company_info and len(company_info) > 2:
item['company_size'] = company_text.xpath('./p/text()').extract()[2]
info_publis = each.xpath('./div[@class="info-publis"]')
item['recruiter'] = info_publis.xpath('./h3/text()').extract_first()
item['publish_date'] = info_publis.xpath('./p/text()').extract_first()
yield item
new_links = response.xpath('//div[@class="page"]/a[@class="next"]/@href').extract()
if new_links and len(new_links)>0:
new_link = new_links[0]
yield scrapy.Request("https://www.zhipin.com"+new_link,callback=self.parse)
4、Scrapy项目使用Pipeline处理被爬取信息的持久化操作,因此程序只需要修改pipelines.py文件即可
第一种方式:将信息存储到JSON文件中:
iimport json
class ZhaopinspiderPipeline(object):
def __init__(self):
self.filename = open("myjob.json", "wb")
self.filename.write('[\n'.encode("utf-8"))mport json
def process_item(self, item, spider):
text = json.dumps(dict(item), ensure_ascii=False,indent=4) + ",\n"
self.filename.write(text.encode("utf-8"))
def close_spider(self, spider):
self.filename.seek(-2,1)
self.filename.write('\n]'.encode("utf-8"))
self.filename.close()
第二种方式:将数据存储到数据库中(先安装pymysql包):
import pymysql
class ZhaopinspiderPipeline(object):
def __init__(self):
self.conn = pymysql.connect(host='127.0.0.1',user='root',passwd='admin',db='SSM',port=3306,charset='utf8')
self.cur = self.conn.cursor()
def process_item(self, item, spider):
self.cur.execute("INSERT INTO job_info VALUES (null,%s,%s,%s,%s,%s,%s,%s,%s,%s)",(item['title'],item['salary'],
item['company'],item['url'],item['work_addr'],item['industry'],item.get('company_size'),
item['recruiter'],item['publish_date']))
self.conn.commit()
def close_spider(self, spider):
print('------------关闭数据库-----------------')
self.cur.close()
self.conn.close()
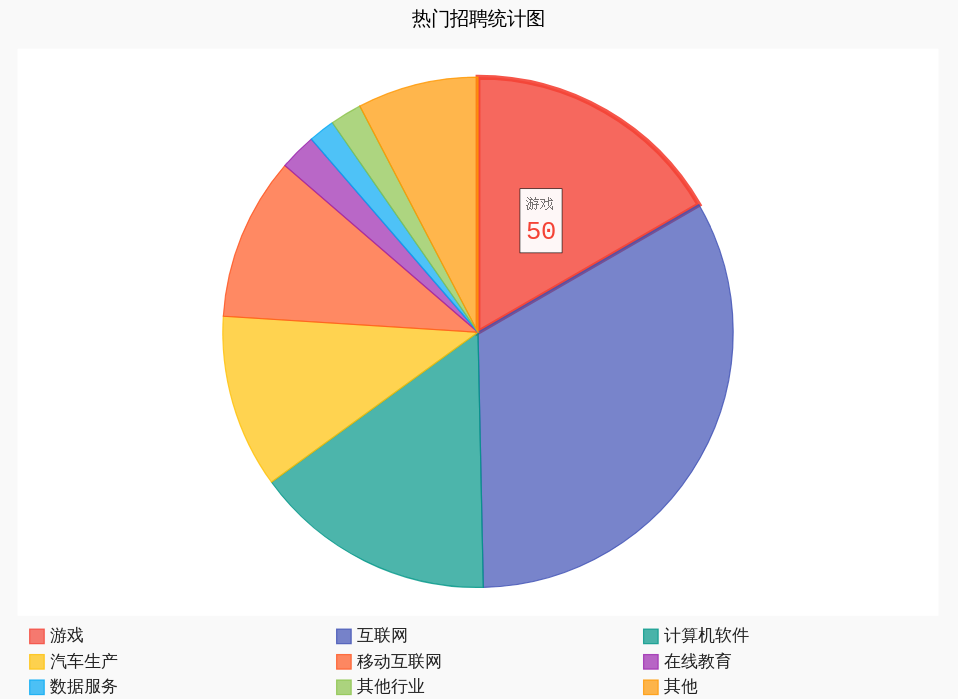
5、数据可视化:
import json
import pygal,codecs
class ZhaopinspiderPipeline(object):
def process_item(self, item, spider):
text = json.dumps(dict(item), ensure_ascii=False,indent=4) + ",\n"
self.filename.write(text.encode("utf-8"))
with codecs.open('/home/myjob.json','r','utf-8',buffering=True) as f:
job_list = json.load(f)
job_dict = {}
for job in job_list:
if job['industry'] in job_dict:
job_dict[job['industry']] += 1
else:
job_dict[job['industry']] = 1
pie = pygal.Pie()
other_num = 0
for k in job_dict.keys():
if job_dict[k] < 5:
other_num += job_dict[k]
else:
pie.add(k, job_dict[k])
pie.add('其他', other_num)
pie.title ="热门招聘统计图"
pie.legend_at_bottom = True
pie.render_to_file('job_position.svg')
运行结果为: