本篇文章主要是总结Java多线程/高并发编程的知识点,由浅入深,仅作自己的学习笔记,部分侵删。
一 . 基础知识点
1. 进程于线程的概念

2.线程创建的两种方式

注:public void run()方法提供了线程实际工作的代码;
继承Thread类的方法存在单继承的缺陷;
Runnable的代码可以被多个线程(Thread实例)共享,适合于多个线程处理统一资源的情况;
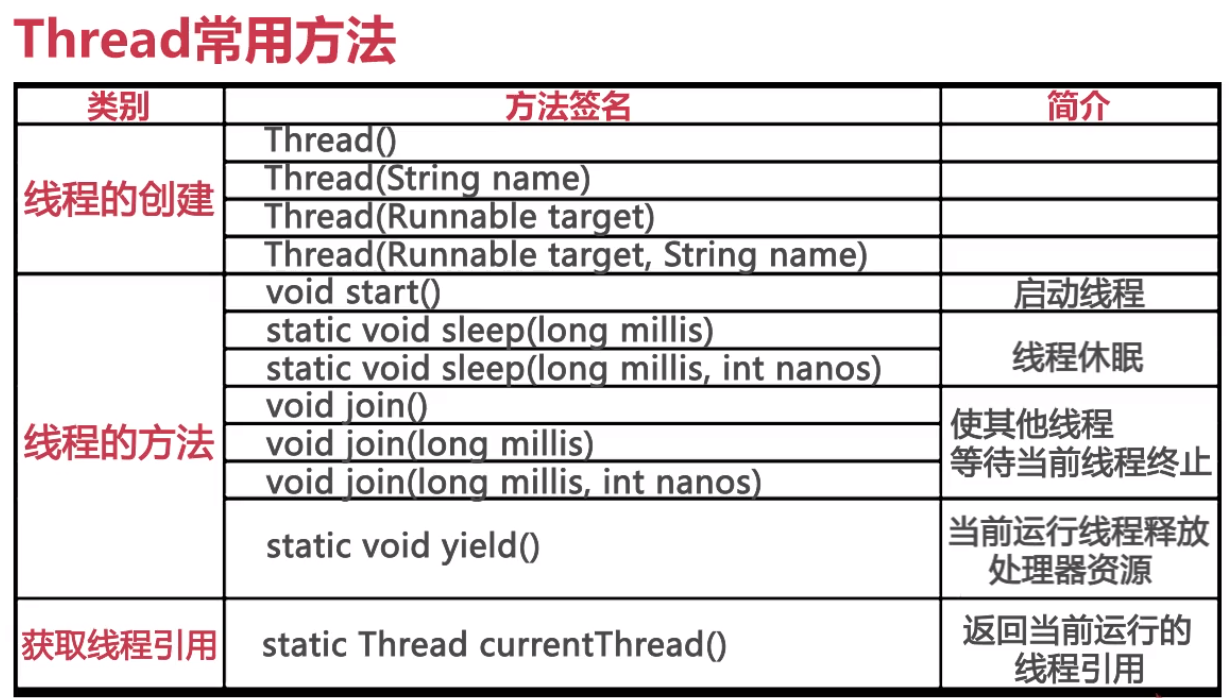
3. Thread类的常用方法

4. Java线程正确停止的方法
最常用的方法是设置退出旗标(标志),要注意,stop方法不是正确的方法,它会让线程戛然而止,interrupt()方法也不是正确停止线程的方法,它的初衷并不是用于停止线程;
5. 线程交互:互斥与同步
互斥:同一时间只能有一个线程去对临界区进行操作,通过synchronized(intrinsic lock)实现,只有获得lock的线程才能进入synchronized声明的代码块;
同步:线程之间的通信机制;当某些条件不具备时线程处于等待状态,条件满足,需要发出消息来唤醒所有线程;通过wait()/notify()/notifyAll()实现。
Wait Set:可以理解为线程休息室;
共享资源/数据又被称为临界区(Critical Section),当有一个线程想要访问共享资源的时候,首先,他需要获得锁,获得锁后进入我们的临界区进行操作,操作过程中,如果发现某些情况不被满足,将调用锁对象上的wait()方法,此时,该线程释放掉锁资源,然后进入到锁对象上的Wait Set,由于这个线程释放掉了我们的锁资源,使得其他线程可以来竞争多资源,所以其他线程获得锁并进入临界区,同时在锁对象上的wait set中有多条线程在等待条件的满足,当我们的当前运行线程执行完某些操作需要通知等待的线程时,调用notify方法将会唤醒所资源所持有的等待区域中的一条线程,是这条线程有机会去进行竞争CPU资源;或者调用notifyAll方法,这时会使wait set中的所有线程被唤醒,从而使得它们有机会在当前线程离开临界资源释放锁之后去竞争临界资源的锁对象。
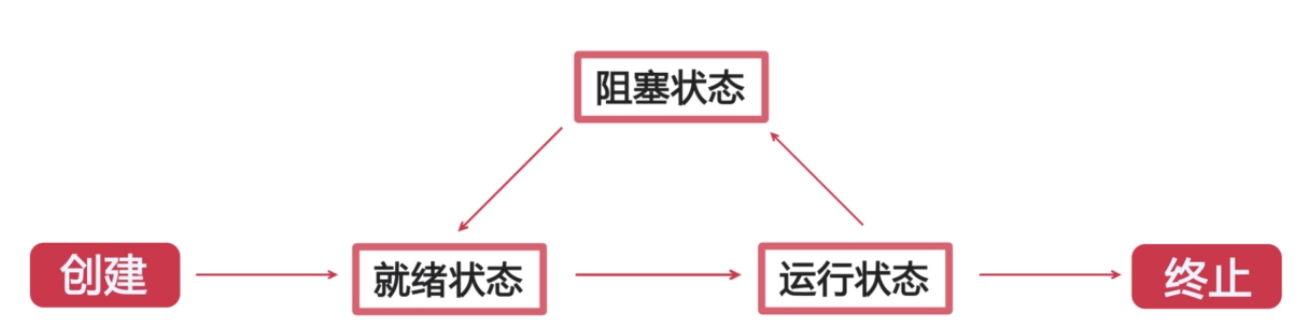
6. 线程的生命周期
7. 守护线程
Java线程有两类:
用户线程:运行在前台,执行具体的任务;程序的主线程,连接网络的子线程等都是用户线程;
守护线程:运行在后台,为其他前台线程服务;
守护线程的特点:一旦所有用户线程都结束运行,守护线程会随JVm一起结束工作;
守护线程的应用:数据库连接池中的监测线程;JVM虚拟机启动后的监测线程,最常见的是垃圾回收线程;
守护线程的设置:通过调用Thread类的setDaemon(true)方法来设置当前的线程为守护线程;
注意:setDaemon(true)必须在start()方法之前调用,否则会抛出IllegalThreadStateException异常;守护线程中产生的新线程也是守护线程;不是所有的任务都可以分配给守护线程来执行,比如读写操作或者计算逻辑;
二 . 进阶知识点
1. 对象加锁
1.1 使用synchronized关键字对某个对象加锁
 1 public class T {
 2     private int count=10;
 3     private Object o = new Object();
 4     public void m(){
 5         synchronized (o){ //任何线程要执行下面代码,必须先拿到o的锁
 6             count--;
 7             System.out.println(Thread.currentThread().getName()+"count="+count);
 8         }//执行完了释放锁
 9     }
10 }

在上面的代码中,锁是自己new的,每次new出一个没有其他功能的对象比较麻烦,所以可以用synchronized(this),代码如下:
 1 public class T {
 2     private int count = 10;
 3     public void m(){
 4         synchronized (this){
 5             count--;
 6             System.out.println(Thread.currentThread().getName()+"count="+count);
 7         }
 8         /**
 9          * 上面的代码可以简写为:
10          * public synchronized void m(){
11          *      count--;
12          *      System.out.println(Thread.currentThread().getName()+"count="+count);
13          * }
14          * 注意:synchronized 锁定的是对象而不是代码
15          */
16
17     }
18 }
1.2 synchronized用在静态方法上
类中静态方法和静态属性属性是不需要new出对象来访问的,没有new出来,就没有this引用的存在,所以当锁定一个静态方法时,相当于锁定的是当前类的class对象。
 1 public class T {
 2     private static int count = 10;
 3     public synchronized static void m(){ //这里等同于synchronized(packagename.T.class)
 4         count--;
 5         System.out.println(Thread.currentThread().getName()+"count="+count);
 6     }
 7
 8     public static void nm(){
 9         synchronized (T.class){ //是class类的对象
10             count--;
11         }
12     }
13 }
1.3 锁住线程的run方法
 1 public class T implements Runnable{
 2     private int count = 10;
 3     public synchronized void run(){
 4         count--;
 5         System.out.println(Thread.currentThread().getName()+"count="+count);
 6     }
 7     public static void main(String[] args){
 8         T t = new T();//多个线程共同访问一个Runnable对象
 9         for(int i=0; i<5; i++){
10             new Thread(t,"Thread"+i).start();
11         }
12     }
13 }
如果不加synchronized时,count--和打印语句间可能有别的线程执行count--,导致前后数据不一致,加synchronized后方法里的所有语句相当于一个原子操作,只有当run方法执行完了释放锁,下一个线程才能拿到锁执行run方法。
1.4 面试题:同步方法和非同步方法是否可以同时调用?-->可以
 1 public class T {
 2     public synchronized void m1(){
 3         System.out.println(Thread.currentThread().getName()+"m1 start...");
 4         try {
 5             Thread.sleep(10000);
 6         }catch(InterruptedException e){
 7             e.printStackTrace();
 8         }
 9         System.out.println(Thread.currentThread().getName()+"m1 end...");
10
11     }
12     public void m2(){
13         try{
14             Thread.sleep(5000);
15         }catch(InterruptedException e){
16             e.printStackTrace();
17         }
18         System.out.println(Thread.currentThread().getName()+"m2");
19     }
20
21     public static void main(String[] args){
22         T t = new T();
23         new Thread(t::m1,"t1").start();
24         new Thread(t::m2,"t2").start();
25     }
26 }
执行结果:
t1m1 start...
t2m2
t1m1 end...
1.5 对业务写方法加锁,对业务读方法不加锁,容易产生脏读
 1 public class Account {
 2     String name;
 3     double balance;
 4     public synchronized void set(String name,double balance){
 5         this.name = name;
 6         try{
 7             Thread.sleep(2000);
 8         }catch(InterruptedException e){
 9             e.printStackTrace();
10         }
11         this.balance = balance;
12     }
13
14     public double getBalance(String name){
15         return this.balance;
16     }
17
18     public static void main(String[] args){
19         Account a = new Account();
20         new Thread(()->a.set("zhangsan",100.0)).start();
21         try{
22             TimeUnit.SECONDS.sleep(2);
23         }catch(InterruptedException e){
24             e.printStackTrace();
25         }
26         System.out.println(a.getBalance("zhangsan"));//0.0
27
28         try{
29             TimeUnit.SECONDS.sleep(2);
30         }catch(InterruptedException e){
31             e.printStackTrace();
32         }
33         System.out.println(a.getBalance("zhangsan"));//100.0
34     }
35 }
1.6 一个同步方法可以调用另一个同步方法
一个线程已经拥有某个对象的锁,再次申请时仍然会得到该对象的锁
synchronized获得的锁是可重入的
 1 public class T {
 2     synchronized void m1(){
 3         System.out.println("m1 start");
 4         try{
 5             TimeUnit.SECONDS.sleep(1);
 6         }catch(InterruptedException e){
 7             e.printStackTrace();
 8         }
 9         m2();//可调用
10     }
11     synchronized void m2(){
12         try{
13             TimeUnit.SECONDS.sleep(2);
14         }catch(InterruptedException e){
15             e.printStackTrace();
16         }
17         System.out.println("m2");
18     }
19 }
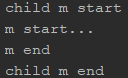
1.7 在继承中,子类重写的同步方法可以调用父类的同步方法
 1 public class T {
 2     synchronized void m(){
 3         System.out.println("m start");
 4         try{
 5             TimeUnit.SECONDS.sleep(1);
 6         }catch(InterruptedException e){
 7             e.printStackTrace();
 8         }
 9         System.out.println("m end");
10     }
11     public static void main(String[] args){
12         new TT().m();
13     }
14
15 }
16 class TT extends T{
17     synchronized void m(){
18         System.out.println("child m start");
19         super.m();//可以调用父类的同步方法
20         System.out.println("child m end");
21     }
22 }
1.8 出现异常,默认情况下锁会被释放
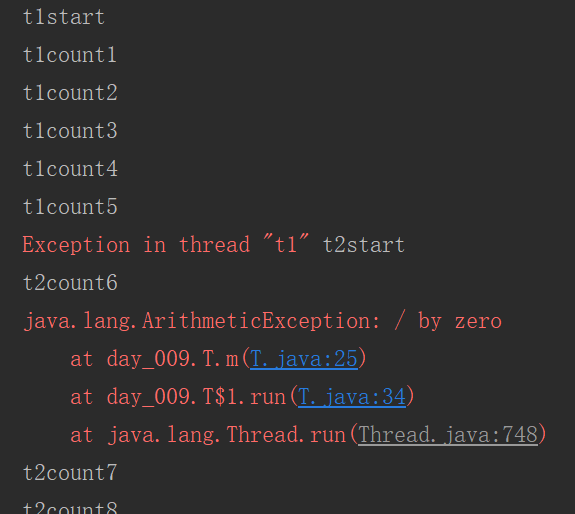
 1 /**
 2  * 程序在执行过程中如果出现异常,默认情况下锁会被释放
 3  * 所以在执行并发处理的过程中,有异常要小心,不然可能会发生不一致的情况;
 4  * 比如,在一个web app处理过程中,多个servlet线程共同访问一个资源
 5  * 这是如果异常处理不合适,在第一个线程中抛出异常,其他线程就会进入同步代码区,
 6  * 有可能会访问到异常产生时的数据(处理了一半的数据),
 7  * 因此要非常小心处理同步业务逻辑中的异常
 8  */
 9
10 import java.util.concurrent.TimeUnit;
11 public class T {
12     int count = 0;
13     synchronized void m(){
14         System.out.println(Thread.currentThread().getName()+"start");
15         while(true){
16             count++;
17             System.out.println(Thread.currentThread().getName()+"count"+count);
18             try{
19                 TimeUnit.SECONDS.sleep(1);
20             }catch(InterruptedException e){
21                 e.printStackTrace();
22             }
23             if(count==5){
24                 int i=1/0;//此处抛出异常,锁被释放,要想不被释放,可以在这里进行catch,然后让循环继续
25
26             }
27         }
28     }
29     public static void main(String[] args){
30         T t = new T();
31         Runnable r = new Runnable(){
32             public void run(){
33                 t.m();
34             }
35         };
36         new Thread(r,"t1").start();
37         try{
38             TimeUnit.SECONDS.sleep(3);
39         }catch(InterruptedException e){
40             e.printStackTrace();
41         }
42         new Thread(r,"t2").start();
43     }
44 }
2. volatile 关键字
2.1 volatile的可见性
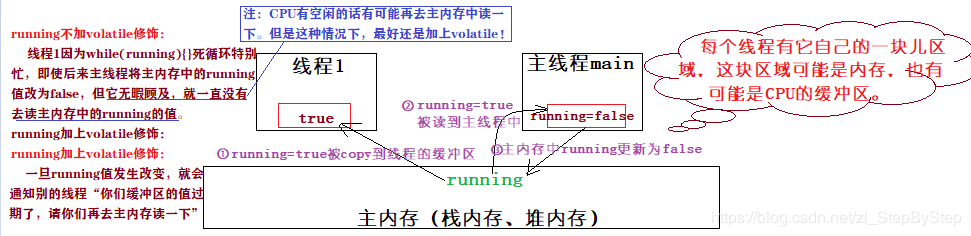
volatile 关键字,使一个变量在多个线程间可见,A B 线程都用到一个变量,java默认是A线程中保存一份copy,这样如果B线程修改了该变量,则A未必知道,使用volatile关键字,会让所有线程都会读到变量的修改值;
在下面的代码中,running 是存在于堆内存对象中,当线程t1开始运行的时候,会把running值从内存中读到t1线程工作区,在运行过程中直接使用这个copy并不会每次都去读取堆内存,这样,当主线程修改running的值之后,t1线程感知不到,所以不会停止运行
volatile并不能保证多个线程共同修改running变量时所带来的不一致问题,也就是说 volatile不能代替synchronized;
 1 public class T {
 2     volatile boolean running = true;
 3     void m(){
 4         System.out.println("m start");
 5         while(running){
 6
 7         }
 8         System.out.println("m end");
 9     }
10     public static void main(String[] args){
11         T t = new T();
12         new Thread(t::m,"t1").start();
13         try{
14             TimeUnit.SECONDS.sleep(1);
15         }catch(InterruptedException e){
16             e.printStackTrace();
17         }
18         t.running = false;
19     }
20 }
volatile 只保证了原子性,而synchronized既保证可见性有保证原子性,但是synchronized太重了;
2.2 volatile不具有原子性
 1 /*10个线程分别执行10000次count++,count是对象vna的成员变量,按理来说最终count=100000,
 2   但是最终每次执行结果都不一样,count一直小于100000,说明volatile不具备原子性*/
 3 public class VolatileNoAtomic {
 4     volatile int count = 0;
 5     void m() {
 6         for(int i=0; i<10000; i++) {
 7             count ++ ;
 8         }
 9     }
10     public static void main(String[] args) {
11         VolatileNoAtomic vna = new VolatileNoAtomic();
12         List<Thread> threads = new ArrayList<>();
13         for (int i=0; i<10; i++) {
14             threads.add(new Thread(vna::m, "thread" + i));
15         }
16         threads.forEach(o->o.start());
17         threads.forEach((o)->{
18             try {
19                 //join()方法阻塞调用此方法的线程,直到线程t完成,此线程再继续。通常用于在main()主线程内,等待其它线程完成再结束main()主线程。
20                 o.join(); //相当于在main线程中同步o线程,o执行完了,main线程才有执行的机会
21             } catch (InterruptedException e) {
22                 e.printStackTrace();
23             }
24         });
25         System.out.println(vna.count);
26     }
27 }
2.3 synchronized既保证原子性又保证可见性
 1 public class SynVisibleAndAtomic {
 2     int count = 0;
 3     synchronized void m() {  //m方法加了synchronized修饰,保证了原子性和可见性
 4         for (int i=0; i<10000; i++) {
 5             count ++ ;
 6         }
 7     }
 8     public static void main(String[] args) {
 9         SynVisibleAndAtomic sva = new SynVisibleAndAtomic();
10         List<Thread> threads = new ArrayList<>();
11         for (int i=0; i<10; i++) {
12             threads.add(new Thread( sva::m , "thread-" + i));
13         }
14         threads.forEach((o)->o.start());
15         threads.forEach((o)-> {
16             try {
17                 o.join();
18             } catch (InterruptedException e) {
19                 e.printStackTrace();
20             }
21         });
22         System.out.println(sva.count); //100000
23     }
24 }
2.4 面试题:实现一个容器,提供两个方法add,size,线程1添加10个元素到容器,线程2监控元素的个数,当个数为5时,线程2提示并结束
 1 public class MyContainerVolatile {
 2     volatile List list = new ArrayList();
 3     public void add(Object o) {  //add
 4         list.add(o);
 5     }
 6     public int size() {   //size
 7         return list.size();
 8     }
 9
10     public static void main(String[] args) {
11         MyContainerVolatile mcv = new MyContainerVolatile();
12         new Thread( () -> {  //该线程负责往list里添加
13            for (int i=0; i<10; i++) {
14                mcv.add(new Object());
15                System.out.print(" add-" + i);
16                try {
17                    Thread.sleep(500);
18                } catch (InterruptedException e) {
19                    e.printStackTrace();
20                }
21            }
22         },"t1").start();
23         new Thread( () -> { //该线程一直监测list的size,直到size=5
24             while(true) {  //一直监测着,很浪费CPU
25                 if(mcv.size() == 5) {  //此处未加同步,仍然可能会出现t1中又一次++为6了,才break
26                     break;
27                 }
28             }
29             System.out.print(" t2结束 ");
30         },"t2").start();
31     }
32 }
上面的代码能解决问题,但t2线程的死循环很浪费CPU,影响性能!更优方法是使用wait和notify,请参看下例:
 1 public class MyContainerWaitNotify {
 2     volatile List list = new ArrayList();
 3     public void add(Object o) {
 4         list.add(o);
 5     }
 6     public int size() {
 7         return list.size();
 8     }
 9
10     public static void main(String[] args) {
11         MyContainerWaitNotify mcwn = new MyContainerWaitNotify();
12         final Object lock = new Object();
13         new Thread(()->{
14             synchronized (lock) {
15                 System.out.print(" ***线程t2启动*** ");
16                 if (mcwn.size() != 5) {
17                     try {
18                         lock.wait();  //size不等于5时,就一直在那等着,直到被t1叫醒
19                     } catch (InterruptedException e) {
20                         e.printStackTrace();
21                     }
22                 }
23                 System.out.print(" ***线程t2结束*** ");
24                 lock.notify();  //通知t1继续执行
25             }
26         }, "t2").start();
27
28         new Thread(()->{
29             synchronized (lock) {
30                 for(int i=0; i<10; i++) {
31                     mcwn.add(new Object());
32                     System.out.print(" add-"  + i);
33                     if (mcwn.size() == 5) {
34                         lock.notify();  //唤醒另一个线程t2,本线程继续执行,直至synchronized包裹的代码块结束或者调用了wait
35                         try {
36                             lock.wait(); //释放锁,让t2得以执行
37                         } catch (InterruptedException e) {
38                             e.printStackTrace();
39                         }
40                     }
41                     try {
42                         Thread.sleep(1000);
43                     } catch (InterruptedException e) {
44                         e.printStackTrace();
45                     }
46                 }
47             }
48         },"t1").start();
49     }
50 }
注意:wait会释放锁,但notify不会,本代码会执行到wait或synchronized块结束才释放锁;
但是,上述的方法还是过于繁琐,Java提供了门闩;
使用CountDownLatch(门闩)的await和countdown方法替代wait和notify方法来进行通知:
 1 public class MyContainerLatch {
 2     volatile List list = new ArrayList(); //添加volatile,使t2能够得到通知
 3     public void add(Object o) {
 4         list.add(o);
 5     }
 6     public int size() {
 7         return list.size();
 8     }
 9
10     public static void main(String[] args) {
11         MyContainerLatch mcl = new MyContainerLatch();
12         CountDownLatch latch = new CountDownLatch(1);  //当1变成0时,门就开了
13         new Thread(() -> {
14             System.out.print(" *t2启动* ");
15             if (mcl.size() != 5) {
16                 try {
17                     latch.await();  //等待不需要锁定一个对象
18                     //latch.await(5000,TimeUnit.MILLISECONDS); //也可以指定等待时间
19                 } catch (InterruptedException e) {
20                     e.printStackTrace();
21                 }
22             }
23             System.out.print(" *t2结束* ");
24         },"t2").start();
25         try {
26             TimeUnit.SECONDS.sleep(1);
27         } catch (InterruptedException e) {
28             e.printStackTrace();
29         }
30
31         new Thread(()->{
32             System.out.print(" *t1启动* ");
33             for (int i=0; i<10; i++) {
34                 mcl.add(new Object());
35                 System.out.print(" add-" + i);
36                 if (mcl.size() == 5) {
37                     latch.countDown(); //打开门闩,让t2得以执行。调用一次countDown,就减1
38                 }
39                 try {
40                     TimeUnit.SECONDS.sleep(1);
41                 } catch (InterruptedException e) {
42                     e.printStackTrace();
43                 }
44             }
45             System.out.print(" *t1结束* ");
46
47         },"t1").start();
48     }
49 }
这样做的好处是通信方式简单,同时也可以指定等待时间。
声明一个CountDownLatch对象latch并设定初始值>0,调用latch.countDown()使latch值减一,当latch值变为0,门闩打开;
当不涉及同步,只涉及锁定,用synchronized+wait/notify就显得太重了。这时应该考虑CountDownLatch/cyclicbarrier/semephore.
3. 原子变量类(AtomXxx)
原子变量最主要的一个特点是所有的操作都是原子的,synchronized关键字也能做到对变量的原子操作,但是成本相对较高,需要获取锁对象,释放锁对象,如果不能获取到锁,还需要阻塞在阻塞队列上进行等待:
1 public class Counter {
2     private int count;
3
4     public synchronized void addCount(){
5         this.count++;
6     }
7 }
上述代码使用synchronized关键字保证变量原子性,简单的count++操作,线程首先需要获得Counter类实例的对象锁,然后完成自增操作,最后释放锁,十分消耗成本,如果不能获取到锁,还需要阻塞线程等;
对于这种情况,可以将count变量声明为原子变量,那么对于count的自增操作都可以以原子的方式进行,就不存在脏数据的读取了;
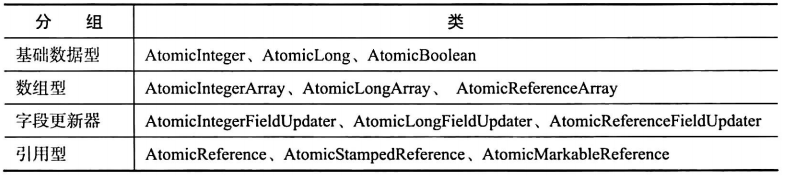
原子变量类一共有12个,可以被分为4组:
常用的基于原子操作的方法:
 1 //基于原子操作,获取当前原子变量中的值并为其设置新值
 2 public final int getAndSet(int newValue)
 3 //基于原子操作,比较当前的value是否等于expect,如果是设置为update并返回true,否则返回false
 4 public final boolean compareAndSet(int expect, int update)
 5 //基于原子操作,获取当前的value值并自增一
 6 public final int getAndIncrement()
 7 //基于原子操作,获取当前的value值并自减一
 8 public final int getAndDecrement()
 9 //基于原子操作,获取当前的value值并为value加上delta
10 public final int getAndAdd(int delta)
11 //还有一些反向的方法,比如:先自增在获取值的等等
下例展示了使用AtomicInteger来实现int类型的原子性操作:
 1 public class AtomicIntegerTest {
 2     AtomicInteger count = new AtomicInteger(0);
 3     void m() {
 4         for (int i=0; i<10000; i++) {
 5             count.incrementAndGet(); ////incrementAndGet()-先+1,再返回; getAndIncrement()-先返回,再+1
 6         }
 7     }
 8     public static void main(String[] args) {
 9         AtomicIntegerTest ait = new AtomicIntegerTest();
10         List<Thread> threads = new ArrayList<>();
11         for (int i=0; i<10; i++) {
12             threads.add(new Thread( ait::m , "thread" + i));
13         }
14         threads.forEach((o)->o.start());
15         threads.forEach((o)->{
16             try {
17                 o.join();
18             } catch (InterruptedException e) {
19                 e.printStackTrace();
20             }
21         });
22         System.out.println(ait.count); //100000
23     }
24 }
4. ReentrantLock-重入锁
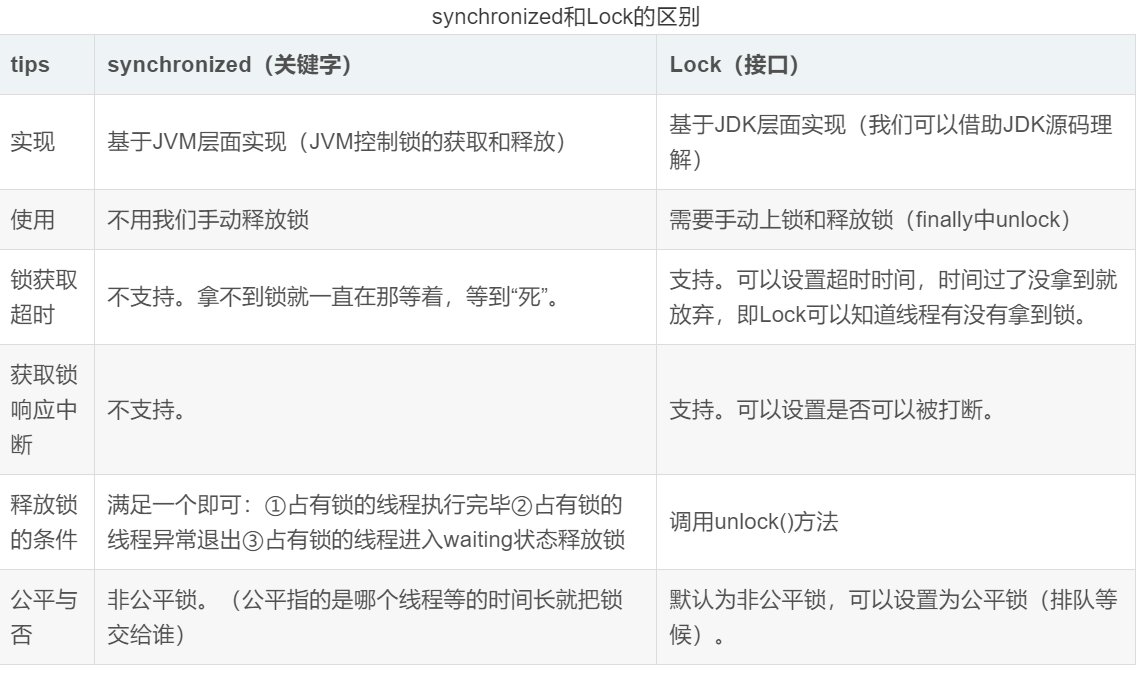
Java中实现锁通常有两种方式,一种是使用synchronized关键字,另一种是Lock:
4.1 ReentrantLock替代synchronized
 1 public class ReentrantLockTest1 {
 2     Lock lock = new ReentrantLock();
 3     void m1() {
 4         try {
 5             lock.lock();  //加锁  //相当于synchronized(this)
 6             for (int i=0; i<10; i++) {
 7                 TimeUnit.SECONDS.sleep(1);
 8                 System.out.print(" " + i);
 9             }
10         } catch (InterruptedException e) {
11             e.printStackTrace();
12         } finally {
13             lock.unlock();  //释放锁
14         }
15     }
16     void m2() {
17         lock.lock();  //加锁
18         System.out.print(" m2()... ");
19         lock.unlock();  //释放锁
20     }
21
22     public static void main(String[] args) {
23         ReentrantLockTest1 r1 = new ReentrantLockTest1();
24         new Thread(r1::m1).start();
25         try {
26             TimeUnit.SECONDS.sleep(1);
27         } catch (InterruptedException e) {
28             e.printStackTrace();
29         }
30         new Thread(r1::m2).start();
31     }
32 }
注意:使用reentrantLock必须要手动释放锁,使用syn锁定的话如果遇到异常,jvm会自动释放锁,但Lock必须手动释放锁,因此常在finally中进行锁的释放;
4.2 ReentrantLock可以进行尝试锁定tryLock()
 1 public class ReentrantLock3 {
 2     Lock lock = new ReentrantLock();
 3     void m1(){
 4         try{
 5             lock.lock();
 6             for(int i=0; i<10;i++){
 7                 TimeUnit.SECONDS.sleep(1);
 8                 System.out.println(i);
 9             }
10         }catch(InterruptedException e){
11             e.printStackTrace();
12         }finally {
13             lock.unlock();
14         }
15     }
16
17     /**
18      * 使用trylock进行尝试锁定,不管锁定与否,方法都将继续执行
19      * 可以根据tryLock返回值来判断是否锁定
20      * 也可以指定tryLock的时间,由于tryLock(time)抛出异常,所以要注意tryLock的处理
21      * 必须放到finally中
22      */
23     void m2(){
24         /*
25         //第一种方式:
26         boolean locked = lock.tryLock();
27         //不管拿没拿到锁都将执行
28         System.out.println("m2..."+locked);
29         if(locked){
30             lock.unlock();
31         }
32         */
33         //第二种方式:
34         boolean locked = false;
35         try{
36             //尝试等5秒
37             locked = lock.tryLock(5,TimeUnit.SECONDS);
38             System.out.println("m2..."+locked);
39         }catch(InterruptedException e){
40             e.printStackTrace();
41         }finally{
42             if(locked)
43                 lock.unlock();
44         }
45     }
46
47     public static void main(String[] args){
48         ReentrantLock3 r3 = new ReentrantLock3();
49         new Thread(r3::m1).start();
50         try{
51             TimeUnit.SECONDS.sleep(1);
52         }catch(InterruptedException e){
53             e.printStackTrace();
54         }
55         new Thread(r3::m2).start();
56     }
57 }
4.3 使用ReentrantLock还可以调用lockInterruptibly()方法,可以对线程interrupt方法做出响应
在一个线程等待的过程中可以被打断
 1 public class ReentrantLock4 {
 2     public static void main(String[] args){
 3         Lock lock = new ReentrantLock();
 4         Thread t1 = new Thread(()->{
 5             try{
 6                 lock.lock();
 7                 System.out.println("t1 start");
 8                 TimeUnit.SECONDS.sleep(Integer.MAX_VALUE);
 9                 System.out.println("t1 end");
10             }catch(InterruptedException e){
11                 System.out.println("Interrupted!");
12             }finally{
13                 lock.unlock();
14             }
15         });
16         t1.start();
17
18         Thread t2 = new Thread(()->{
19             boolean locked = false;
20             try {
21                 lock.lockInterruptibly();
22                 System.out.println("t2 start");
23                 TimeUnit.SECONDS.sleep(5);
24                 System.out.println("t2 end");
25             }catch(InterruptedException e){
26                 System.out.println("interrupted");
27             }finally{
28                 if(locked)
29                     lock.unlock();
30             }
31         });
32         t2.start();
33         try{
34             TimeUnit.SECONDS.sleep(1);
35         }catch(InterruptedException e){
36             e.printStackTrace();
37         }
38         t2.interrupt();
39     }
40 }
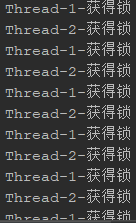
4.4. ReentrantLock指定为公平锁(谁等的时间长,谁得到锁)
 1 public class ReentrantLock5 extends  Thread{
 2     private static ReentrantLock lock = new ReentrantLock(true);//true表示公平锁
 3     public void run(){
 4         for(int i=0; i<100; i++){
 5             lock.lock();
 6             try{
 7                 System.out.println(Thread.currentThread().getName()+"获得锁");
 8
 9             }finally{
10                 lock.unlock();
11             }
12         }
13     }
14     public static void main(String[] args){
15         ReentrantLock5 r5 = new ReentrantLock5();
16         Thread th1 = new Thread(r5);
17         Thread th2 = new Thread(r5);
18         th1.start();
19         th2.start();
20     }
21 }
4.5 面试题:写一个固定容量的同步容器,有put和get方法,能够支持2个生产者线程以及10个消费者线程的阻塞调用:
方法1:使用wait和notify/notifyAll来实现:
 1 public class MyContainer1<T> {
 2     final private LinkedList<T> lists = new LinkedList<>();
 3     final private int MAX =10;
 4     private int count = 0;
 5
 6     public synchronized void put(T t){
 7         while(lists.size()==MAX){
 8             try{
 9                 this.wait();
10             }catch(InterruptedException e){
11                 e.printStackTrace();
12             }
13         }
14         lists.add(t);
15         ++count;
16         this.notifyAll();//通知消费者线程进行消费
17     }
18     public synchronized T get(){
19         T t = null;
20         //为什么用while? wait 99.9%情况下都是和while一起用的
21         //
22         while(lists.size()==0){
23             try{
24                 this.wait();
25             }catch(InterruptedException e){
26                 e.printStackTrace();
27             }
28         }
29         t = lists.removeFirst();
30         count--;
31         this.notifyAll();
32         return t;
33     }
34
35     public static void main(String[] args){
36         MyContainer1<String> c = new MyContainer1<>();
37         //启动消费者线程
38         for(int i=0; i<10; i++){
39             new Thread(()->{
40                 for(int j=0; j<5; j++){
41                     System.out.println(c.get());
42                 }
43             },"c"+i).start();
44         }
45         try{
46             TimeUnit.SECONDS.sleep(2);
47         }catch(InterruptedException e){
48             e.printStackTrace();
49         }
50
51         //启动生产者线程
52         for(int i=0;i<2;i++){
53             new Thread(()->{
54                 for(int j =0;j<25;j++){
55                     c.put(Thread.currentThread().getName()+" "+j);
56                 }
57             },"p"+i).start();
58         }
59      }
60 }
方法2:使用
使用Lock和Condition的方式可以更加精确地指定哪些线程被唤醒
 1 public class MyContainer2<T> {
 2     final private LinkedList<T> lists= new LinkedList<>();
 3     final private int MAX =20;
 4     private int count = 0;
 5
 6     private Lock lock = new ReentrantLock();
 7     private Condition producer = lock.newCondition();
 8     private Condition consumer = lock.newCondition();
 9
10     public void put(T t){
11         try{
12             lock.lock();
13             while(lists.size()==MAX){
14                 producer.await();
15             }
16             lists.add(t);
17             ++count;
18             consumer.signalAll();
19         }catch(InterruptedException e){
20             e.printStackTrace();
21         }finally{
22             lock.unlock();
23         }
24     }
25
26     public T get(){
27         T t = null;
28         try{
29             lock.lock();
30             while(lists.size()==0){
31                 consumer.await();
32             }
33             t=lists.removeFirst();
34             count--;
35             producer.signalAll();
36         }catch(InterruptedException e){
37             e.printStackTrace();
38         }finally{
39             lock.unlock();
40         }
41         return t;
42     }
43
44     public static void main(String[] args){
45         MyContainer2<String> c = new MyContainer2();
46
47         for(int i=0; i<10; i++){
48             new Thread(()->{
49                 for(int j=0; j<5; j++){
50                     System.out.println(c.get());
51                 }
52             },"c"+i).start();
53         }
54         try{
55             TimeUnit.SECONDS.sleep(2);
56         }catch (InterruptedException e){
57             e.printStackTrace();
58         }
59
60         //启动生产者线程
61         for(int i=0;i<2;i++){
62             new Thread(()->{
63                 for(int j =0;j<25;j++){
64                     c.put(Thread.currentThread().getName()+" "+j);
65                 }
66             },"p"+i).start();
67         }
68     }
69 }
5. 线程局部变量 ThreadLocal
 1 public class ThreadLocal1 {
 2     volatile static Person p = new Person();
 3     public static void main(String[] args){
 4         new Thread(()->{
 5             try{
 6                 TimeUnit.SECONDS.sleep(2);
 7             }catch(InterruptedException e){
 8                 e.printStackTrace();
 9             }
10             System.out.println(p.name);
11         }).start();
12
13         new Thread(()->{
14             try{
15                 TimeUnit.SECONDS.sleep(1);
16             }catch(InterruptedException e){
17                 e.printStackTrace();
18             }
19             p.name = "lisi";
20         }).start();
21     }
22 }
23 class Person{
24     String name  = "zhangsan";
25 }
结果为”lisi“
设定为线程局部变量:
 1 public class ThreadLocal2 {
 2     static ThreadLocal<Person> tl = new ThreadLocal<>();
 3     public static void main(String[] args){
 4         new Thread(()->{
 5             try{
 6                 TimeUnit.SECONDS.sleep(2);
 7             }catch(InterruptedException e){
 8                 e.printStackTrace();
 9             }
10             System.out.println(tl.get());
11         }).start();
12
13         new Thread(()->{
14             try {
15                 TimeUnit.SECONDS.sleep(1);
16             }catch(InterruptedException e){
17                 e.printStackTrace();
18             }
19         }).start();
20     }
21     static class Person{
22         String name = "zhangsan";
23     }
24 }
结果为null。