通过对源码的解读,会对Netty有跟深入的理解,从本篇开始,记录一些源码的理解,
本篇对入门案例的一些源码进行查看。
一、服务端流程
(一)服务端时序图

(二)步骤详解
- 创建ServerBootStrap实例。ServerBootStrap是Netty服务端启动的辅助类,提供了一些列的方法来设置服务端启动的相关参数。在构造的时候,我们并没有使用带参数的构造器,是因为参数太多,所以使用了Builder模式。
- 设置并绑定Reactor线程池。Netty中的EventLoopGroup实际上就是Reactor线程池,就是一个EventLoop数组。EventLoop用来处理注册到本线程的多路复用器Selector上的Channel,Selector的轮训操作由绑定的EventLoop线程run方法驱动,在一个循环体内循环执行。
- 设置并绑定服务端Channel。服务端需要创建NioServerSocketChannel,这里传入了一个class,使用工厂方法通过反射来完成创建。
io.netty.bootstrap.AbstractBootstrap#channel:
  public B channel(Class<? extends C> channelClass) {
    if (channelClass == null) {
      throw new NullPointerException("channelClass");
    } else {
      return this.channelFactory((io.netty.channel.ChannelFactory)(new ReflectiveChannelFactory(channelClass)));
    }
  }
- 链路建立的时候,创建了ChannelPipeline,然后通过方法回到让用户来进行设置。ChannelPipeline采用了责任链模式,负责管理和执行ChannleHandler。
- 用户添加ChannelHandler。这里我们可以添加多个自定义的Handler以及系统预置的Handler。
- 绑定并启动监听端口。
- Selector轮询。由Reactor线程NioEventLoop负责调度和执行Selector轮询操作,选择准备就绪的Channel集合。
private void select(boolean oldWakenUp) throws IOException {
    Selector selector = this.selector;

    try {
      int selectCnt = 0;
      long currentTimeNanos = System.nanoTime();
      long selectDeadLineNanos = currentTimeNanos + this.delayNanos(currentTimeNanos);

      while(true) {
        long timeoutMillis = (selectDeadLineNanos - currentTimeNanos + 500000L) / 1000000L;
        if (timeoutMillis <= 0L) {
          if (selectCnt == 0) {
            selector.selectNow();
            selectCnt = 1;
          }
          break;
        }

        if (this.hasTasks() && this.wakenUp.compareAndSet(false, true)) {
          selector.selectNow();
          selectCnt = 1;
          break;
        }

        int selectedKeys = selector.select(timeoutMillis);
        ++selectCnt;
        if (selectedKeys != 0 || oldWakenUp || this.wakenUp.get() || this.hasTasks() || this.hasScheduledTasks()) {
          break;
        }

......
- 当轮询到准备就绪的Channel之后,就由Reactor线程NioEventLoop执行ChannelPipeline的响应方法,并最终调度ChannelHandler。

- 执行ChannelHandler
  public ChannelHandlerContext fireChannelRead(Object msg) {
    invokeChannelRead(this.findContextInbound(), msg);
    return this;
  }

  static void invokeChannelRead(final AbstractChannelHandlerContext next, Object msg) {
    final Object m = next.pipeline.touch(ObjectUtil.checkNotNull(msg, "msg"), next);
    EventExecutor executor = next.executor();
    if (executor.inEventLoop()) {
      next.invokeChannelRead(m);
    } else {
      executor.execute(new Runnable() {
        public void run() {
          next.invokeChannelRead(m);
        }
      });
    }

  }
  private AbstractChannelHandlerContext findContextInbound() {
    AbstractChannelHandlerContext ctx = this;

    do {
      ctx = ctx.next;
    } while(!ctx.inbound);

    return ctx;
  }
  可以看到,这里是把所有的ChannelHandler都执行了。
二、客户端流程
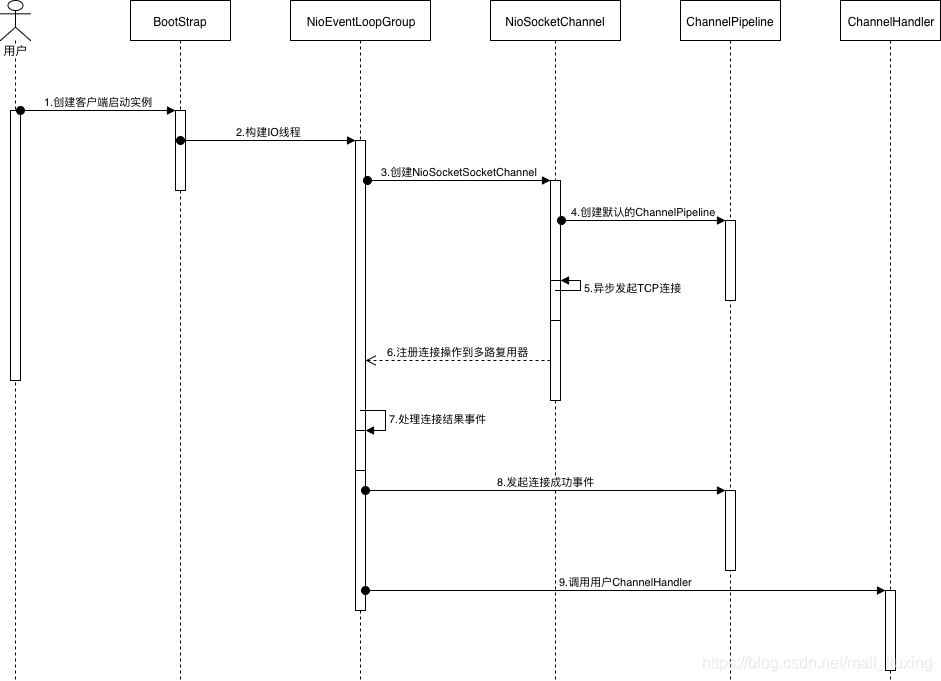
(一)时序图
(二)步骤详解
- 用户创建BootStap实例,设置客户端参数,异步发起客户端连接;
- 创建处理客户端连接、IO读写的Reactor线程组NioEventLoopGroup;
- 通过BootStrap的ChannelFactory和用户指定的Channel类型来创建用于客户端连接的NioSocketChannel,功能类似于NIO中的SocketChannel。
- 创建默认的ChannelPipeline,用于调度和执行网络事件;
- 异步发起TCP连接请求,成功就将SocketChannel注册到多路复用Selector上,监听读操作;
- 注册对应的网络监听位到多路复用器上;
- 在多路复用器上轮询各个Channel,处理连接结果;
- 如果连接成功,设置Future结果,发送连接成功事件,触发ChannelPipeline执行;
- 由ChannelPipeline调度执行系统和用户的ChannelHandler,执行业务逻辑;