版权声明:本文为博主原创文章,未经博主允许不得转载。 https://blog.csdn.net/WPR13005655989/article/details/79110845
python+opencv实现微信跳一跳辅助
微信上线的小程序游戏
“跳一跳”很趣,玩法简单,上手很快,但是想要拿到高分不容易,当然本人写这个辅助不是为了获取高分而写,排行榜什么的都是浮云,主要是想搞清楚其实现原理、实现方法。
实现思路:从游戏可以知道,小人与目标的距离越远,按压屏幕的时间就要越长,因此可以通过计算小人位置和目标中心的距离,把计算结果乘以一个系数(跳跃系数,通过多次测试可以得到一个稳定的常数)即可得到按压时间(press_time=距离*系数),然后通过命令以指定按压时间模拟按压手机屏幕,则小人即可跳跃到指定位置。由于分析小人位置需要分析小人和目标的位置,所以每次在跳跃前需要把游戏截屏-->发送到电脑-->分析,由于跳跃系数是常数,因此跳跃的精度就只和计算的距离有关,距离可根据两点间最短距离公式计算得到,所以,现在的问题就变成了求小人和目标中心的坐标。实现步骤:
- 在PC端实现手机截屏并复制到PC中用到两条命令:
adb shell screencap -p /sdcard/0.jpg
adb pull /sdcard/0.png ./op_screencap/jump.jpg
os.system(命令)#执行命令(需要引入 os)
执行完命令后,图片理论上已经保存到了项目根目录下op_screencap文件夹上,准备工作已经做好,下面开始分析图片:
- 获取小人位置,这里使用了opencv的模板匹配技术,用这种方法测试未发现识别不到问题,需要用到小人的模板(用自己手机截取屏幕并裁剪出来)
小人模板: 识别结果(蓝色方框):
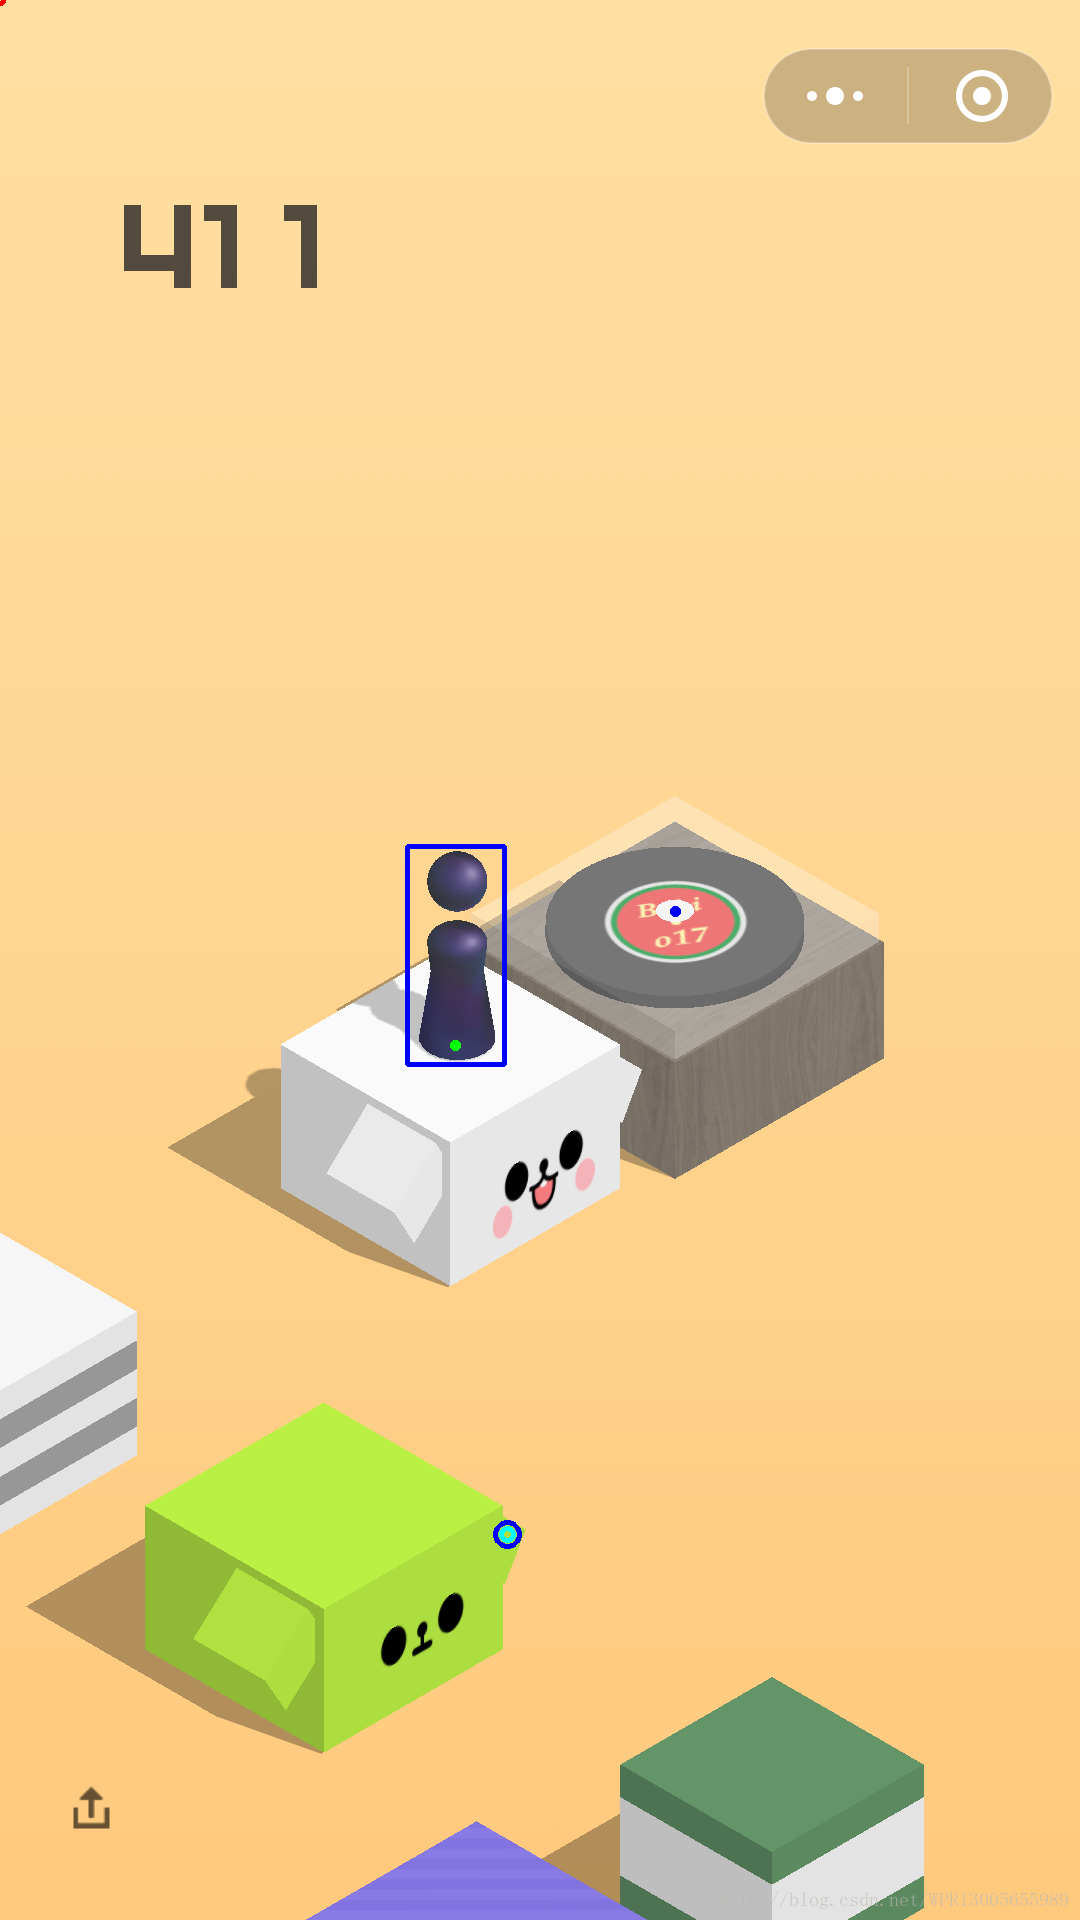
识别结果(蓝色方框):
部分代码:
- 获取底部小人坐标
    def get_people_loc(self,img):
        '''
        获取小人的位置范围
        :param img:
        :return:返回带有小人范围的图和小人坐标
        '''
        #定义小人位置
        peo_loc=[0,0]
        #与模板进行匹配识别 获取识别结果矩形范围
        min_val, max_val, min_loc, max_loc = self.matchTemplate(img,self.template)
        #绘制识别结果
        draw_peo_result = cv2.rectangle(img, max_loc, (max_loc[0] + self.w, max_loc[1] + self.h), color=(255,0,0), lineType=8,thickness=3)
        #计算小人底部坐标
        peo_bottom_x=int(max_loc[0]+(self.w)/2)
        peo_bottom_y=int((max_loc[1]+self.h-19))
        peo_loc=(peo_bottom_x,peo_bottom_y)
return (draw_peo_result,peo_loc)- 获取目标坐标(这里也是用到模板匹配,需要用到中心白点的模板,由于游戏中白点存在三种情况:1.白点和背景颜色相差大 2.白点和背景颜色很接近如白色方块 3.上一次没跳中中心,因此没出现白点,需分开处理)
模板一:色差大的中心白点模板
 模板二:色差小的中心白点模板

模板二:色差小的中心白点模板
获取目标坐标部分代码(为了防止周围干扰,这里把相似度阈值限制到80%以上):
    def get_target_loc(self,cv_img):
        '''
        获取目标位置坐标
        :param img:
        :return:识别结果的图片和目标坐标(失败返回源图像和(0,0))
        '''
        cv_img_gray=cv2.cvtColor(cv_img, cv2.COLOR_BGR2GRAY)
        min_val2, max_val2, min_loc2, max_loc2 =self.matchTemplate(cv_img_gray,self.template_center_gray)

        print('模板一匹配中心点 匹配度:%d%% 设定匹配阈值:80%%' % (max_val2 * 100), end=' ')
        # 计算中心坐标
        cen_x = int(max_loc2[0] + (self.w2 / 2))
        cen_y = int(max_loc2[1] + self.h2 / 2)
        draw_cen_result = cv2.circle(cv_img, (cen_x, cen_y), 2, color=(255, 0, 0), thickness=3)

        #预防分数干扰 把分数部分设置为全黑色
        draw_cen_result[0:500]=[0,0,0]

        if(max_val2>0.8):
            print('模板一匹配中心点成功')
            return (draw_cen_result,(cen_x,cen_y))
        else:
            cv_img_gray= cv2.cvtColor(cv_img, cv2.COLOR_BGR2GRAY)
            center_white_template_gray= cv2.cvtColor(self.center_white_template2, cv2.COLOR_BGR2GRAY)
            min_val3, max_val3, min_loc3, max_loc3=self.matchTemplate(cv_img_gray,center_white_template_gray)

            # 计算中心坐标
            cen_x3 = int(max_loc3[0] + (self.w2 / 2))
            cen_y3 = int(max_loc3[1] + self.h2 / 2)
            #print('cen_x3:%d cen_y3:%d' % (cen_x3, cen_y3), end=' ')
            draw_cen_result = cv2.circle(cv_img, (cen_x3, cen_y3), 2, color=(255, 0, 0), thickness=3)
            print('模板一匹配中心点失败\n模板二匹配中心点 匹配度:%d%% 设定匹配阈值:80%%' % (max_val3 * 100), end=' ')
            if (max_val3 > 0.8):
                print('模板二匹配中心点成功')
                return (draw_cen_result, (cen_x3, cen_y3))
            else:
                print('模板二匹配中心点失败')
return (draw_cen_result,(0,0))完整代码如下(大神请绕道、、、不喜勿喷、、变量的名字是随便命名的,大家自行理解、、、、):
- ImgHelper.py
import matplotlib.pyplot as plt
from PIL import Image
import adbOperate
import image_analysis
import time
import random
import cv2

class ImageHelprt:
    #定义小人坐标
    peo_loc=(0,0)
    #定义跳跃目标的坐标
    tar_loc=(0,0)
    #定义鼠标点击类型
    click_count=1
    reg_event=True

    def __init__(self):
        self.figure=plt.figure()
        self.tempPath=''
        self.count=0
        self.img_analysis=image_analysis.IMG_Aanlysis()
        self.CLICK_SOURCE=(500,1514)
        self.exit=False

        #设置限制跳跃次数
        self.limit_count=50

    def OnBtn_pressEvent(self, event):
        '''
        鼠标点击图片时触发的时事件
        :param event:
        :return:
        '''
        eX=event.xdata
        eY=event.ydata

        if(self.click_count==0):
            self.click_count=1
        else:
            print('点击位置 X:', eX, '   Y:', eY)

            #第二次点击计算距离
            self.tar_loc=(eX,eY)
            self.click_count=1

            distance=self.cal_distance(self.peo_loc,self.tar_loc)
            click_loc=self.cal_click_loc(self.CLICK_SOURCE)
            #操作ADB 控制手机跳跃
            adbOperate.jump(distance,click_loc=click_loc)
            self.draw_result(self.cv_img, self.peo_loc, (0,0),(int(self.tar_loc[0]),int(self.tar_loc[1])) , click_loc)
            plt.close()

    def show_img(self):
        '''
        显示照片到当前figure中
        :param img: 要显示的图片
        :return:
        '''
        #读取截图
        self.img= Image.open(self.tempPath)
        self.cv_img=cv2.imread(self.tempPath)

        if(self.jump_count>=self.limit_count):self.exit=True

        #清空GDI容器
        self.figure.clear()
        #注册鼠标点击事件
        if(self.reg_event):
            self.figure.canvas.mpl_connect('button_press_event', self.OnBtn_pressEvent)

        #分析图片
        #获取小人位置
        (cv_img,peo_loc)=self.img_analysis.get_people_loc(self.cv_img)

        # 获取目标位置
        (cv_img,target_loc)=self.img_analysis.get_target_loc(self.cv_img)
        if(target_loc[0]==target_loc[1]==0):
            self.figure=plt.figure(num='请用鼠标点击目标棋子中心')
            #说明没有识别到下一跳中心位置,弹出手动选择
            self.figure.canvas.mpl_connect('button_press_event', self.OnBtn_pressEvent)
            print('请手动选择目标!')
            self.peo_loc=peo_loc
            plt.imshow(self.cv_img,animated= True)
            plt.show()
            print('分析中...')
        else:
            #自动跳跃
            #计算距离
            distance=self.cal_distance(peo_loc=peo_loc,tar_loc=target_loc)
            #print('距离:%d' %distance)
            click_loc = self.cal_click_loc(self.CLICK_SOURCE)
            adbOperate.jump(distance,click_loc)
            self.draw_result(cv_img,peo_loc,target_loc,(0,0),click_loc)
        self.pull_screenshot()

    def cal_distance(self,peo_loc,tar_loc):
        '''
        计算小人与目标方块中心的最短距离
        :param peo_loc:小人位置坐标
        :param tar_loc:目标方块位置坐标
        :return:计算结果
        '''
        distance = (tar_loc[0] - peo_loc[0]) ** 2 + (tar_loc[1] - peo_loc[1]) ** 2
        distance = distance ** 0.5
        return distance

    def cal_click_loc(self,source_loc):
        '''
        随机产生一个点击位置
        :param source_loc:源坐标
        :return: 源坐标+随机数
        '''
        click_x=500+random.randint(1,30)
        click_y=1514+random.randint(1,30)
        return (int(click_x),int(click_y))

    def pull_screenshot(self):
        '''
        调用adb操作类执行截图 保留图片路径 继续分析下一跳
        :return:
        '''
        time.sleep(1.5+random.randint(1,50)/100)
        self.tempPath = adbOperate.pull_screenshot(self)

        #是否结束游戏
        if(self.exit):
            print('************到达限制次数:%d 自动结束跳跃************' %self.limit_count)
            return
        else:
            # 分析下一跳的图片
            self.show_img()

    def draw_result(self,src_img,peo_loc,tar_loc,click_tar_loc,click_loc):
        '''
        保存识别结果
        :param src_img:源图像
        :param peo_loc:人位置
        :param tar_loc:识别的目标
        :param click_tar_loc:点击的目标位置
        :param click_loc:模拟点击的位置
        :return:
        '''
        draw_img=src_img
        #人
        draw_img=cv2.circle(draw_img,peo_loc, 3, color=(0, 255, 0), thickness=3)
        #识别的目标
        draw_img =cv2.circle(draw_img,tar_loc,3,color=(255,0,0),thickness=3)
        #点击目标的位置
        draw_img = cv2.circle(draw_img, click_tar_loc, 3, color=(0, 0, 255), thickness=3)
        #模拟点击的位置
        draw_img = cv2.circle(draw_img,click_loc , 6, color=(255, 255, 0), thickness=3)
        draw_img = cv2.circle(draw_img, click_loc, 12, color=(255, 0, 0), thickness=3)
        cv2.imwrite(filename=self.tempPath,img=draw_img)
- image_analysis.py
import cv2

class IMG_Aanlysis:

    def __init__(self):
        #加载小人模板
        self.template = cv2.imread('.\\template\\peo_template.jpg')
        #加载中心白点模板
        self.center_white_template=cv2.imread('.\\template\\white_center_template.png')
        #加载中心白点模板2
        self.center_white_template2=cv2.imread('.\\template\\white_center_template1.png')
        #二值化模板
        self.template_gray = cv2.cvtColor(self.template, cv2.COLOR_BGR2GRAY)
        self.template_center_gray = cv2.cvtColor(self.center_white_template, cv2.COLOR_BGR2GRAY)
        #获取模板的宽高
        self.w,self. h = self.template_gray.shape[::-1]
        self.w2, self.h2 = self.template_center_gray.shape[::-1]
        print('小人模板宽高:'+str(self.w)+':'+str(self.h))
        print('中心点模板宽高:' + str(self.w2) + ':' + str(self.h2))

    def get_people_loc(self,img):
        '''
        获取小人的位置范围
        :param img:
        :return:返回小人范围图和小人坐标
        '''
        #定义小人位置
        peo_loc=[0,0]
        #与模板进行匹配识别 获取识别结果矩形范围
        min_val, max_val, min_loc, max_loc = self.matchTemplate(img,self.template)

        #绘制识别结果
        draw_peo_result = cv2.rectangle(img, max_loc, (max_loc[0] + self.w, max_loc[1] + self.h), color=(255,0,0), lineType=8,
                             thickness=3)
        #计算小人底部坐标
        peo_bottom_x=int(max_loc[0]+(self.w)/2)
        peo_bottom_y=int((max_loc[1]+self.h-19))
        peo_loc=(peo_bottom_x,peo_bottom_y)

        draw_peo_result= cv2.circle(draw_peo_result,(peo_bottom_x,peo_bottom_y),2,color=(0,255,0),thickness=3)

        return (draw_peo_result,peo_loc)

    def get_target_loc(self,cv_img):
        '''
        获取目标位置坐标
        :param img:
        :return:
        '''
        cv_img_gray=cv2.cvtColor(cv_img, cv2.COLOR_BGR2GRAY)
        min_val2, max_val2, min_loc2, max_loc2 =self.matchTemplate(cv_img_gray,self.template_center_gray)

        print('模板一匹配中心点 匹配度:%d%% 设定匹配阈值:80%%' % (max_val2 * 100), end=' ')
        # 计算中心坐标
        cen_x = int(max_loc2[0] + (self.w2 / 2))
        cen_y = int(max_loc2[1] + self.h2 / 2)
        draw_cen_result = cv2.circle(cv_img, (cen_x, cen_y), 2, color=(255, 0, 0), thickness=3)

        #预防分数干扰 把分数部分设置为全黑色
        #draw_cen_result[0:500]=[0,0,0]

        if(max_val2>0.8):
            print('模板一匹配中心点成功')
            return (draw_cen_result,(cen_x,cen_y))
        else:
            cv_img_gray= cv2.cvtColor(cv_img, cv2.COLOR_BGR2GRAY)
            center_white_template_gray= cv2.cvtColor(self.center_white_template2, cv2.COLOR_BGR2GRAY)
            min_val3, max_val3, min_loc3, max_loc3=self.matchTemplate(cv_img_gray,center_white_template_gray)

            # 计算中心坐标
            cen_x3 = int(max_loc3[0] + (self.w2 / 2))
            cen_y3 = int(max_loc3[1] + self.h2 / 2)
            #print('cen_x3:%d cen_y3:%d' % (cen_x3, cen_y3), end=' ')
            draw_cen_result = cv2.circle(cv_img, (cen_x3, cen_y3), 2, color=(255, 0, 0), thickness=3)
            print('模板一匹配中心点失败\n模板二匹配中心点 匹配度:%d%% 设定匹配阈值:80%%' % (max_val3 * 100), end=' ')
            if (max_val3 > 0.8):
                print('模板二匹配中心点成功')
                return (draw_cen_result, (cen_x3, cen_y3))
            else:
                print('模板二匹配中心点失败')
                return (draw_cen_result,(0,0))


    def matchTemplate(self,img,template):
        res = cv2.matchTemplate(img, template,
                                cv2.TM_CCOEFF_NORMED)
        return cv2.minMaxLoc(res)

    def show_result(self,img):
        cv2.namedWindow('AnaResult', cv2.WINDOW_GUI_EXPANDED)
        cv2.imshow('AnaResult', img)
cv2.waitKey(0)- adbOperate.py
import os

#定义截图名称
img_name='j.png'
img_out_path='./op_screencap/'

def pull_screenshot(self):
    '''
    截屏并存放到电脑中
    :return:
    '''
    self.count=  self.count+1
    self.jump_count=self.jump_count+1
    if(self.count>30):
        self.count=1
        print('将覆盖旧图')
    os.system('adb shell screencap -p /sdcard/'+img_name)
    os.system('adb pull /sdcard/j.png '+img_out_path+str(self.count)+'_'+img_name)
    self.temp_path=img_out_path+str(self.count)+'_'+img_name
    return  self.temp_path

def jump(distance,click_loc):#由于测试结果发现每次跳跃 系数都会在一定范围波动 因此这里分段设置跳跃系数
    cons=1.475
    if(distance<=168):
        cons=1.57
    elif(distance>168 and distance<=175):
        cons=1.5
    elif(distance>175 and distance<=313):
        cons=1.62
    elif(distance>313 and distance<400):
        cons=1.52
    elif(distance>=400 and distance<511):
        cons=1.50
    elif(distance>=511 and distance<540):
        cons = 1.49
    elif(distance>=540 and distance<659):
        cons=1.45
    elif(distance>=659 and distance<670):
        cons=1.47
    elif(distance>=670 and distance<692):
        cons=1.45
    elif(distance>=692 and distance<700):
        cons=1.38
    elif(distance>=698):
        cons=1.40
    press_time = distance * cons
    press_time = str(int(press_time))
    x1=str(click_loc[0])
    y1=str(click_loc[1])
    #cmd = 'adb shell input swipe 540 1514 540 1514 ' + str(press_time)
    cmd = 'adb shell input swipe {0} {1} {2} {3} {4}'
    cmd= cmd.format(click_loc[0],click_loc[1],click_loc[1],click_loc[0],press_time)
    #print('[distance:'+str(distance)+'][press_time:'+str(press_time)+']ms [cmd:'+cmd+']')
    print('跳跃函数:\n-----使用跳跃系数:%1.3f\n-----跳跃距离:%d\n-----按压时间:%s ms' %(cons,int(distance),press_time))
os.system(cmd)import adbOperate
import ImgHelper
class Main:
def __init__(self):
print('主程序初始化...')
imHelper = ImgHelper.ImageHelprt()
imHelper.tempPath= adbOperate.pull_screenshot(imHelper)
imHelper.show_img()
if __name__ == '__main__':
Main()
以上代码在小米5上测试完美运行,测试时请打开游戏 开始游戏然后截屏把小人模板*1、中心点模板*2(白色方块和非白色方块)裁剪好放到项目根目录下的template文件夹中,相关环境自行搭建,只要想跳就不会跳完 本人最高跳到7000多分 不过没什么用
第一次写博客,写得挺乱,将就看吧====