Starter是SpringBoot中的一个非常重要的概念,Starter相当于模块,它能将模块所需的依赖整合起来并对模块内的Bean根据条件进行自动配置。使用者只需要依赖相应功能的Starter,无需做过多的配置和依赖,SpringBoot就能自动扫描并加载相应的模块,例如我们在创建SpringBoot项目时,经常会引入如spring-boot-starter-web这种依赖,该依赖为我们做了很多默认配置,无需再依赖spring-web、spring-webmvc等相关包及做相关配置就能够立即使用它。
本文将通过一个简单的案例介绍如何定义一个Starter
一、编写Starter
1、导入依赖
这里将SpringBoot自带的编译替换成了apache的,不然会提示找不到主类的哈
    <dependencies>
        <dependency>
            <groupId>org.springframework.boot</groupId>
            <artifactId>spring-boot-starter</artifactId>
        </dependency>
        <dependency>
            <groupId>org.aspectj</groupId>
            <artifactId>aspectjweaver</artifactId>
        </dependency>
    </dependencies>

    <build>
        <plugins>
            <plugin>
                <groupId>org.apache.maven.plugins</groupId>
                <artifactId>maven-compiler-plugin</artifactId>
                <configuration>
                    <source>1.8</source>
                    <target>1.8</target>
                </configuration>
            </plugin>
        </plugins>
    </build>
2、定义一个注解
该注解会在标注的方法被执行时,进行日志输出
/**
 * @author Gjing
 **/
@Retention(RetentionPolicy.RUNTIME)
@Target(ElementType.METHOD)
public @interface Print {

}
3、编写AOP处理注解
这里通过AOP对注解进行处理,如果对AOP不熟悉的话,可以参考我的这篇文章:SpringBoot使用AOP
/**
 * @author Gjing
 **/
@Aspect
@Component
public class PrintProcess {

    @Pointcut("@annotation(com.gjing.Print)")
    public void cut() {

    }

    @Around("cut()")
    public Object printCut(ProceedingJoinPoint joinPoint) throws Throwable {
        MethodSignature signature = (MethodSignature) joinPoint.getSignature();
        Method method = signature.getMethod();
        System.out.println("方法: " + method.getName() + " 开始执行, 当前时间: " + LocalDateTime.now());
        Object proceed = joinPoint.proceed();
        System.out.println("方法: " + method.getName() + " 执行结束, 当前时间: " + LocalDateTime.now());
        return proceed;
    }
}
4、编写配置类
/**
 * @author Gjing
 **/
@Configuration
public class PrintConfiguration {

    @Bean
    public PrintProcess printProcess() {
        return new PrintProcess();
    }
}
5、配置自动装配
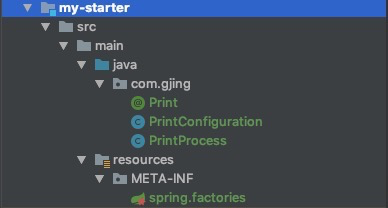
在resources文件夹下新建一个META-INF包,并创建一个spring.factories文件,如下:
spring.factories文件内容如下:
org.springframework.boot.autoconfigure.EnableAutoConfiguration=com.gjing.PrintConfiguration其中=号右边为您的配置类,需要指定包名
二、编写测试项目
1、导入依赖
<dependency>
    <groupId>org.springframework.boot</groupId>
    <artifactId>spring-boot-starter-web</artifactId>
</dependency>
<!--这个为我们定义的starter-->
<dependency>
    <groupId>com.gjing</groupId>
    <artifactId>my-starter</artifactId>
    <version>0.0.1-SNAPSHOT</version>
</dependency>
2、定义一个接口
定义接口并在方法上使用我们starter里定义的注解
/**
 * @author Gjing
 **/
@RestController
public class TestController {

    @PostMapping("/test")
    @Print
    public String test() {
        return "ok";
    }
}
3、运行测试
启动项目并进行测试,从控制台可以看到输出日志:
4、总结
从上面例子中可以看出,我们在使用这个注解的时候,没有做任何的其他配置便可以去使用它,这正是SpringBoot自动装配带来的便利性,在传统的Spring项目中,我们往往需要手动去配置一些和交给Spring的IOC容器进行管理,这就显得有点繁琐和复杂。
本文到此就结束,文章中只举了简单的例子,更多高层次的用法各位读者可以自行去摸索,本文不在阐述。如果本文有任何误点,可以在评论区留言。本文Demo地址:SpringBoot-Demo
