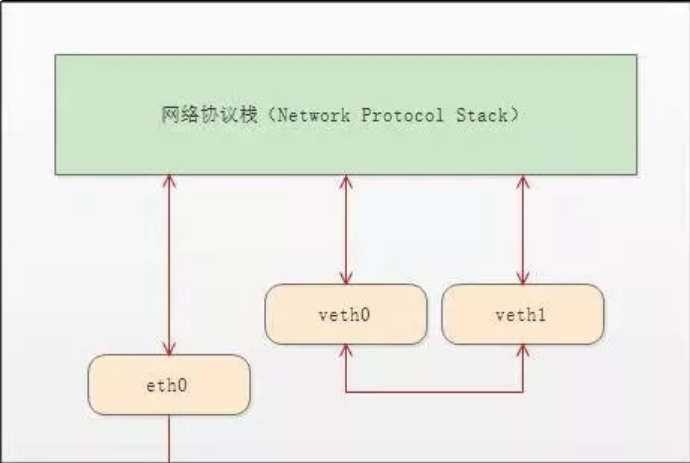
docker container的namespace使用 的是一种虚拟网络设备 veth-pair。顾名思义,veth-pair 就是一对的虚拟设备接口,和 tap/tun 设备不同的是,它都是成对出现的。一端连着协议栈,一端彼此相连着。如下图所示:
接下来做一番测试:
[root@localhost ~]# ip netns list #查看当前存在的namespace
test1
[root@localhost ~]# ip netns delete test1 #删除namespace
[root@localhost ~]# ip netns list
[root@localhost ~]# ipnetns add test1
bash: ipnetns: command not found...
[root@localhost ~]# ip netns add test1 #增加test1
[root@localhost ~]# ip netns add test2 #增加test2
[root@localhost ~]# ip netns list
test2
test1
[root@localhost ~]# ip netns exec test1 ip a #查看test1的IP地址,exec test1 表示在test1里面执行 ip a 这个命令,发现只有一个lo回环口,状态是DOWN,而且没有127.0.0.1这个IP地址
1: lo: <LOOPBACK> mtu 65536 qdisc noop state DOWN qlen 1
    link/loopback 00:00:00:00:00:00 brd 00:00:00:00:00:00
[root@localhost ~]# ip netns exec test2 ip a #查看test2的IP地址,结果和test1一样
1: lo: <LOOPBACK> mtu 65536 qdisc noop state DOWN qlen 1
    link/loopback 00:00:00:00:00:00 brd 00:00:00:00:00:00
[root@localhost ~]#
通过ip link命令可以查看namespace有多少个link,并且可以up link
[root@localhost ~]# ip link #查看本地link
1: lo: <LOOPBACK,UP,LOWER_UP> mtu 65536 qdisc noqueue state UNKNOWN mode DEFAULT qlen 1
    link/loopback 00:00:00:00:00:00 brd 00:00:00:00:00:00
2: ens33: <BROADCAST,MULTICAST,UP,LOWER_UP> mtu 1500 qdisc pfifo_fast state UP mode DEFAULT qlen 1000
    link/ether 00:0c:29:08:e1:eb brd ff:ff:ff:ff:ff:ff
3: virbr0: <NO-CARRIER,BROADCAST,MULTICAST,UP> mtu 1500 qdisc noqueue state DOWN mode DEFAULT qlen 1000
    link/ether 52:54:00:10:5a:be brd ff:ff:ff:ff:ff:ff
4: virbr0-nic: <BROADCAST,MULTICAST> mtu 1500 qdisc pfifo_fast master virbr0 state DOWN mode DEFAULT qlen 1000
    link/ether 52:54:00:10:5a:be brd ff:ff:ff:ff:ff:ff
5: docker0: <BROADCAST,MULTICAST,UP,LOWER_UP> mtu 1500 qdisc noqueue state UP mode DEFAULT
    link/ether 02:42:e8:50:c7:6c brd ff:ff:ff:ff:ff:ff
7: vethd03ae3e@if6: <BROADCAST,MULTICAST,UP,LOWER_UP> mtu 1500 qdisc noqueue master docker0 state UP mode DEFAULT
    link/ether 9e:f7:f6:f6:fe:69 brd ff:ff:ff:ff:ff:ff link-netnsid 0
9: vethbb1dfcd@if8: <BROADCAST,MULTICAST,UP,LOWER_UP> mtu 1500 qdisc noqueue master docker0 state UP mode DEFAULT
    link/ether b2:85:43:9f:e5:49 brd ff:ff:ff:ff:ff:ff link-netnsid 1
[root@localhost ~]# ip netns exec test1 ip link #查看test1 link
1: lo: <LOOPBACK> mtu 65536 qdisc noop state DOWN mode DEFAULT qlen 1
    link/loopback 00:00:00:00:00:00 brd 00:00:00:00:00:00
[root@localhost ~]# ip netns exec test1 ip link set dev lo up #up test1 的lo回环口。
[root@localhost ~]# ip netns exec test1 ip link #发现state 是 UNKNOWN ,和本地lo状态一样。 因为端口要up起来,需要满足条件,它需要两端是连起来的,就像ens33需要和MAC虚拟化的一个端口连起来,单个端口无法up,必须是一对
1: lo: <LOOPBACK,UP,LOWER_UP> mtu 65536 qdisc noqueue state UNKNOWN mode DEFAULT qlen 1
    link/loopback 00:00:00:00:00:00 brd 00:00:00:00:00:00
[root@localhost ~]#
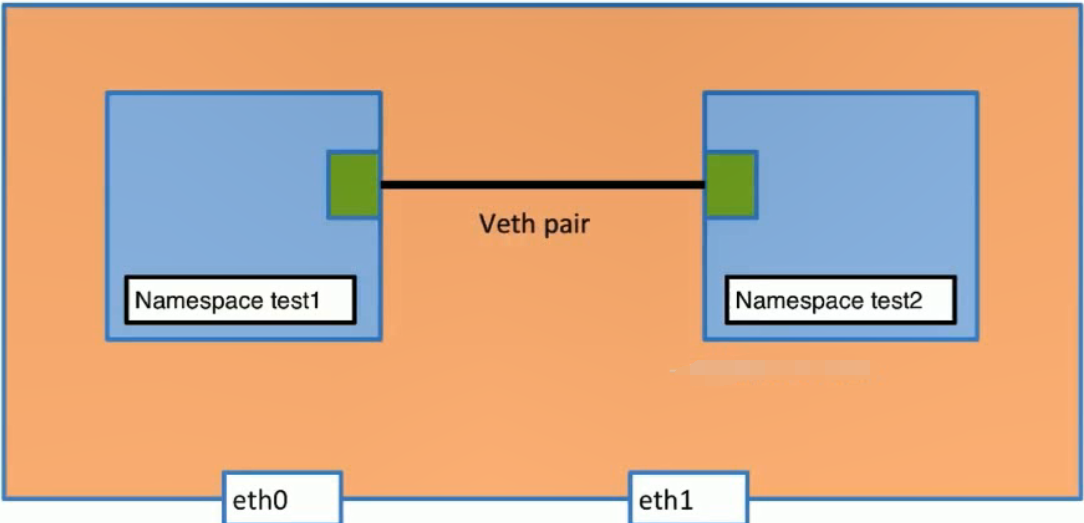
在本地添加一对veth-pair
[root@localhost ~]# ip link add veth-test1 type veth peer name veth-test2 #在本地link一对veth-pair
[root@localhost ~]# ip link
1: lo: <LOOPBACK,UP,LOWER_UP> mtu 65536 qdisc noqueue state UNKNOWN mode DEFAULT qlen 1
    link/loopback 00:00:00:00:00:00 brd 00:00:00:00:00:00
2: ens33: <BROADCAST,MULTICAST,UP,LOWER_UP> mtu 1500 qdisc pfifo_fast state UP mode DEFAULT qlen 1000
    link/ether 00:0c:29:08:e1:eb brd ff:ff:ff:ff:ff:ff
3: virbr0: <NO-CARRIER,BROADCAST,MULTICAST,UP> mtu 1500 qdisc noqueue state DOWN mode DEFAULT qlen 1000
    link/ether 52:54:00:10:5a:be brd ff:ff:ff:ff:ff:ff
4: virbr0-nic: <BROADCAST,MULTICAST> mtu 1500 qdisc pfifo_fast master virbr0 state DOWN mode DEFAULT qlen 1000
    link/ether 52:54:00:10:5a:be brd ff:ff:ff:ff:ff:ff
5: docker0: <BROADCAST,MULTICAST,UP,LOWER_UP> mtu 1500 qdisc noqueue state UP mode DEFAULT
    link/ether 02:42:e8:50:c7:6c brd ff:ff:ff:ff:ff:ff
7: vethd03ae3e@if6: <BROADCAST,MULTICAST,UP,LOWER_UP> mtu 1500 qdisc noqueue master docker0 state UP mode DEFAULT
    link/ether 9e:f7:f6:f6:fe:69 brd ff:ff:ff:ff:ff:ff link-netnsid 0
9: vethbb1dfcd@if8: <BROADCAST,MULTICAST,UP,LOWER_UP> mtu 1500 qdisc noqueue master docker0 state UP mode DEFAULT #新增的link 有mac地址,state DOWN
    link/ether b2:85:43:9f:e5:49 brd ff:ff:ff:ff:ff:ff link-netnsid 1
10: veth-test2@veth-test1: <BROADCAST,MULTICAST,M-DOWN> mtu 1500 qdisc noop state DOWN mode DEFAULT qlen 1000
    link/ether 56:73:bb:4a:fc:76 brd ff:ff:ff:ff:ff:ff
11: veth-test1@veth-test2: <BROADCAST,MULTICAST,M-DOWN> mtu 1500 qdisc noop state DOWN mode DEFAULT qlen 1000
    link/ether 4a:0c:80:98:48:42 brd ff:ff:ff:ff:ff:ff
把一对veth-pair分别添加到两个namespace中
[root@localhost ~]# ip link set v
vethbb1dfcd  vethd03ae3e  veth-test1   veth-test2   virbr0       virbr0-nic
[root@localhost ~]# ip link set v
vethbb1dfcd  vethd03ae3e  veth-test1   veth-test2   virbr0       virbr0-nic
[root@localhost ~]# ip link set veth-test1 n
name   netns
[root@localhost ~]# ip link set veth-test1 netns test1 #把本地veth-test1 link添加到namespace test1中
[root@localhost ~]# ip link set veth-test2 netns test2 #把本地veth-test2 link添加到namespace test2中
[root@localhost ~]# ip link #查看本地link发现veth-test1和veth-test2已经消失
1: lo: <LOOPBACK,UP,LOWER_UP> mtu 65536 qdisc noqueue state UNKNOWN mode DEFAULT qlen 1
    link/loopback 00:00:00:00:00:00 brd 00:00:00:00:00:00
2: ens33: <BROADCAST,MULTICAST,UP,LOWER_UP> mtu 1500 qdisc pfifo_fast state UP mode DEFAULT qlen 1000
    link/ether 00:0c:29:08:e1:eb brd ff:ff:ff:ff:ff:ff
3: virbr0: <NO-CARRIER,BROADCAST,MULTICAST,UP> mtu 1500 qdisc noqueue state DOWN mode DEFAULT qlen 1000
    link/ether 52:54:00:10:5a:be brd ff:ff:ff:ff:ff:ff
4: virbr0-nic: <BROADCAST,MULTICAST> mtu 1500 qdisc pfifo_fast master virbr0 state DOWN mode DEFAULT qlen 1000
    link/ether 52:54:00:10:5a:be brd ff:ff:ff:ff:ff:ff
5: docker0: <BROADCAST,MULTICAST,UP,LOWER_UP> mtu 1500 qdisc noqueue state UP mode DEFAULT
    link/ether 02:42:e8:50:c7:6c brd ff:ff:ff:ff:ff:ff
7: vethd03ae3e@if6: <BROADCAST,MULTICAST,UP,LOWER_UP> mtu 1500 qdisc noqueue master docker0 state UP mode DEFAULT
    link/ether 9e:f7:f6:f6:fe:69 brd ff:ff:ff:ff:ff:ff link-netnsid 0
9: vethbb1dfcd@if8: <BROADCAST,MULTICAST,UP,LOWER_UP> mtu 1500 qdisc noqueue master docker0 state UP mode DEFAULT
    link/ether b2:85:43:9f:e5:49 brd ff:ff:ff:ff:ff:ff link-netnsid 1
[root@localhost ~]# ip netns exec  test1 ip link #查看namespace test1 link,已经添加veth-test1,state down 没IP地址
1: lo: <LOOPBACK,UP,LOWER_UP> mtu 65536 qdisc noqueue state UNKNOWN mode DEFAULT qlen 1
    link/loopback 00:00:00:00:00:00 brd 00:00:00:00:00:00
11: veth-test1@if10: <BROADCAST,MULTICAST> mtu 1500 qdisc noop state DOWN mode DEFAULT qlen 1000
    link/ether 4a:0c:80:98:48:42 brd ff:ff:ff:ff:ff:ff link-netnsid 1
[root@localhost ~]# ip netns exec  test2 ip link #查看namespace test2 link,已经添加veth-test2,state down 没IP地址
1: lo: <LOOPBACK> mtu 65536 qdisc noop state DOWN mode DEFAULT qlen 1
    link/loopback 00:00:00:00:00:00 brd 00:00:00:00:00:00
10: veth-test2@if11: <BROADCAST,MULTICAST> mtu 1500 qdisc noop state DOWN mode DEFAULT qlen 1000
    link/ether 56:73:bb:4a:fc:76 brd ff:ff:ff:ff:ff:ff link-netnsid 0
[root@localhost ~]#
给两个namespace的veth-test1 2 分配IP地址
[root@localhost ~]# ip netns exec test1 ip addr add 192.168.1.1/24 dev veth-test1 #给veth-test1添加IP地址
[root@localhost ~]# ip netns exec test2 ip addr add 192.168.1.2/24 dev veth-test2 #给veth-testg2添加IP地址
[root@localhost ~]# ip netns exec test1 ip link #状态是down,需要up
1: lo: <LOOPBACK,UP,LOWER_UP> mtu 65536 qdisc noqueue state UNKNOWN mode DEFAULT qlen 1
    link/loopback 00:00:00:00:00:00 brd 00:00:00:00:00:00
11: veth-test1@if10: <BROADCAST,MULTICAST> mtu 1500 qdisc noop state DOWN mode DEFAULT qlen 1000
    link/ether 4a:0c:80:98:48:42 brd ff:ff:ff:ff:ff:ff link-netnsid 1
[root@localhost ~]# ip netns exec test2 ip link #状态是down,需要up
1: lo: <LOOPBACK> mtu 65536 qdisc noop state DOWN mode DEFAULT qlen 1
    link/loopback 00:00:00:00:00:00 brd 00:00:00:00:00:00
10: veth-test2@if11: <BROADCAST,MULTICAST> mtu 1500 qdisc noop state DOWN mode DEFAULT qlen 1000
    link/ether 56:73:bb:4a:fc:76 brd ff:ff:ff:ff:ff:ff link-netnsid 0
[root@localhost ~]#
up veth-test1 和 veth-test2
[root@localhost ~]# ip netns exec test1 ip link set dev veth-test1 up #up veth-test1
[root@localhost ~]# ip netns exec test2 ip link set dev veth-test2 up #up veth-test2
[root@localhost ~]# ip netns exec test1 ip link #查看link状态
1: lo: <LOOPBACK,UP,LOWER_UP> mtu 65536 qdisc noqueue state UNKNOWN mode DEFAULT qlen 1
    link/loopback 00:00:00:00:00:00 brd 00:00:00:00:00:00
11: veth-test1@if10: <BROADCAST,MULTICAST,UP,LOWER_UP> mtu 1500 qdisc noqueue state UP mode DEFAULT qlen 1000
    link/ether 4a:0c:80:98:48:42 brd ff:ff:ff:ff:ff:ff link-netnsid 1
[root@localhost ~]# ip netns exec test2 ip link
1: lo: <LOOPBACK> mtu 65536 qdisc noop state DOWN mode DEFAULT qlen 1
    link/loopback 00:00:00:00:00:00 brd 00:00:00:00:00:00
10: veth-test2@if11: <BROADCAST,MULTICAST,UP,LOWER_UP> mtu 1500 qdisc noqueue state UP mode DEFAULT qlen 1000
    link/ether 56:73:bb:4a:fc:76 brd ff:ff:ff:ff:ff:ff link-netnsid 0
[root@localhost ~]# ip netns exec test2 ip a #查看是否有IP
1: lo: <LOOPBACK> mtu 65536 qdisc noop state DOWN qlen 1
    link/loopback 00:00:00:00:00:00 brd 00:00:00:00:00:00
10: veth-test2@if11: <BROADCAST,MULTICAST,UP,LOWER_UP> mtu 1500 qdisc noqueue state UP qlen 1000
    link/ether 56:73:bb:4a:fc:76 brd ff:ff:ff:ff:ff:ff link-netnsid 0
    inet 192.168.1.2/24 scope global veth-test2
       valid_lft forever preferred_lft forever
    inet6 fe80::5473:bbff:fe4a:fc76/64 scope link
       valid_lft forever preferred_lft forever
[root@localhost ~]# ip netns exec test1 ip a #查看是否有IP
1: lo: <LOOPBACK,UP,LOWER_UP> mtu 65536 qdisc noqueue state UNKNOWN qlen 1
    link/loopback 00:00:00:00:00:00 brd 00:00:00:00:00:00
    inet 127.0.0.1/8 scope host lo
       valid_lft forever preferred_lft forever
    inet6 ::1/128 scope host
       valid_lft forever preferred_lft forever
11: veth-test1@if10: <BROADCAST,MULTICAST,UP,LOWER_UP> mtu 1500 qdisc noqueue state UP qlen 1000
    link/ether 4a:0c:80:98:48:42 brd ff:ff:ff:ff:ff:ff link-netnsid 1
    inet 192.168.1.1/24 scope global veth-test1
       valid_lft forever preferred_lft forever
    inet6 fe80::480c:80ff:fe98:4842/64 scope link
       valid_lft forever preferred_lft forever
[root@localhost ~]#
测试两个namespace直接是否能ping通
[root@localhost ~]# ip netns exec test1 ping 192.168.1.2
PING 192.168.1.2 (192.168.1.2) 56(84) bytes of data.
64 bytes from 192.168.1.2: icmp_seq=1 ttl=64 time=0.050 ms
64 bytes from 192.168.1.2: icmp_seq=2 ttl=64 time=0.080 ms
64 bytes from 192.168.1.2: icmp_seq=3 ttl=64 time=0.078 ms
64 bytes from 192.168.1.2: icmp_seq=4 ttl=64 time=0.080 ms
^C
--- 192.168.1.2 ping statistics ---
4 packets transmitted, 4 received, 0% packet loss, time 2999ms
rtt min/avg/max/mdev = 0.050/0.072/0.080/0.012 ms
[root@localhost ~]# ip netns exec test2 ping 192.168.1.1
PING 192.168.1.1 (192.168.1.1) 56(84) bytes of data.
64 bytes from 192.168.1.1: icmp_seq=1 ttl=64 time=0.037 ms
64 bytes from 192.168.1.1: icmp_seq=2 ttl=64 time=0.036 ms
64 bytes from 192.168.1.1: icmp_seq=3 ttl=64 time=0.034 ms
64 bytes from 192.168.1.1: icmp_seq=4 ttl=64 time=0.034 ms
^C
--- 192.168.1.1 ping statistics ---
4 packets transmitted, 4 received, 0% packet loss, time 2999ms
rtt min/avg/max/mdev = 0.034/0.035/0.037/0.004 ms
[root@localhost ~]#
docker使用image busybox 为例:
[root@localhost ~]# docker pull busybox
Using default tag: latest
latest: Pulling from library/busybox
8e674ad76dce: Pull complete
Digest: sha256:c94cf1b87ccb80f2e6414ef913c748b105060debda482058d2b8d0fce39f11b9
Status: Downloaded newer image for busybox:latest
创建两个在后台运行的container test1 和test2
docker run -d --name test1 busybox /bin/sh -c "while true;do sleep 3600;done"
docker run -d --name test2 busybox /bin/sh -c "while true;do sleep 3600;done"
[root@localhost ~]# docker image ls
REPOSITORY          TAG                 IMAGE ID            CREATED             SIZE
ubuntu              latest              4c108a37151f        4 weeks ago         64.2MB
busybox             latest              e4db68de4ff2        4 weeks ago         1.22MB
ubuntu              14.04               2c5e00d77a67        2 months ago        188MB
centos              latest              9f38484d220f        4 months ago        202MB
[root@localhost ~]# docker container ls
CONTAINER ID        IMAGE               COMMAND                  CREATED             STATUS              PORTS               NAMES
811f815caa94        busybox             "/bin/sh -c 'while t…"   3 hours ago         Up 3 hours                              test2
18bd8b5f3841        busybox             "/bin/sh -c 'while t…"   3 hours ago         Up 3 hours                              test1
[root@localhost ~]# docker exec test1 ip a
1: lo: <LOOPBACK,UP,LOWER_UP> mtu 65536 qdisc noqueue qlen 1
    link/loopback 00:00:00:00:00:00 brd 00:00:00:00:00:00
    inet 127.0.0.1/8 scope host lo
       valid_lft forever preferred_lft forever
6: eth0@if7: <BROADCAST,MULTICAST,UP,LOWER_UP,M-DOWN> mtu 1500 qdisc noqueue
    link/ether 02:42:ac:11:00:02 brd ff:ff:ff:ff:ff:ff
    inet 172.17.0.2/16 brd 172.17.255.255 scope global eth0
       valid_lft forever preferred_lft forever
[root@localhost ~]# docker exec test2 ip a
1: lo: <LOOPBACK,UP,LOWER_UP> mtu 65536 qdisc noqueue qlen 1
    link/loopback 00:00:00:00:00:00 brd 00:00:00:00:00:00
    inet 127.0.0.1/8 scope host lo
       valid_lft forever preferred_lft forever
8: eth0@if9: <BROADCAST,MULTICAST,UP,LOWER_UP,M-DOWN> mtu 1500 qdisc noqueue
    link/ether 02:42:ac:11:00:03 brd ff:ff:ff:ff:ff:ff
    inet 172.17.0.3/16 brd 172.17.255.255 scope global eth0
       valid_lft forever preferred_lft forever
[root@localhost ~]# docker exec test2 ping 172.17.0.3
PING 172.17.0.3 (172.17.0.3): 56 data bytes
64 bytes from 172.17.0.3: seq=0 ttl=64 time=0.045 ms
64 bytes from 172.17.0.3: seq=1 ttl=64 time=0.104 ms
64 bytes from 172.17.0.3: seq=2 ttl=64 time=0.112 ms
^C
[root@localhost ~]# docker exec test1 ping 172.17.0.2
PING 172.17.0.2 (172.17.0.2): 56 data bytes
64 bytes from 172.17.0.2: seq=0 ttl=64 time=0.043 ms
64 bytes from 172.17.0.2: seq=1 ttl=64 time=0.103 ms
64 bytes from 172.17.0.2: seq=2 ttl=64 time=0.105 ms
^C
[root@localhost ~]#
docker使用的namespace原因和 linux network namespace一样。