collections模块
1.namedtuple(具名元组)
(1)如何表示坐标点x为1,y为2的坐标
from collections import namedtuple
point = namedtuple('坐标',['x','y'])  # 第二个参数既可以传可迭代对象
p = point(1,2)  # 注意元素的个数必须跟namedtuple第二个参数里面的值数量一致
print(p)
print(p.x)
print(p.y)
(2)如何表示三维坐标
from collections import namedtuple
point = namedtuple('坐标','x y z a')  # 也可以传字符串,但是字符串之间以空格隔开
p = point(1,2,5,10)  # 注意元素的个数必须跟namedtuple第二个参数里面的值数量一致
print(p)
print(p.x)
print(p.y)
print(p.a)
# 可以传无限参数,但要注意上下元素个数要一致
2.queue(队列)
一边进值,一边出值,先进先出(FIFO first in first out)
import queue
q = queue.Queue()  # 生成队列对象
q.put('first')  # 往队列中添加值
q.put('second')
q.put('third')

print(q.get())  # 朝队列要值 first
print(q.get())  # second
print(q.get())  # third  先存的先取出来
print(q.get())  # 如果队列中的值取完了 程序会在原地等待 直到从队列中拿到值才停止
3.deque(双端队列)
两边都能进值,两边都能取值
from collections import deque
q = deque(['a','b','c'])
q.append(1)  # 尾部追加值
q.appendleft(2)  # 左边追加
print(q.pop())  # 尾部取值
print(q.popleft())  # 左边取值
q.insert(1,'哈哈')  # 特殊点:双端队列可以根据索引在任意位置插值
print(q[1])
队列不应该支持任意位置插值,应该只能在首尾插值(不能插队)
4.OrderedDict(有序字典)
normal_d = dict([('a',1),('b',2),('c',3)])
print(normal_d)  # 常见的字典,循环取出的key是无序的
from collections import OrderedDict
order_d = OrderedDict([('a',1),('b',2),('c',3)])
print(order_d)  # 有序字典
order_d1 = OrderedDict()
order_d1['x'] = 1
order_d1['y'] = 2
order_d1['z'] = 3
print(order_d1)  # 有序字典
for i in order_d1:
    print(i)  # 这种有序字典取出的key永远是第一个是x,第二个是y,第三个是z
5.defaultdict(默认值字典)
from collections import defaultdict
values = [11,22,33,44,55,66,77,88,99,90]
my_dict = defaultdict(list)  # 声明:后续该字典中新建的key对应的value默认就是列表
print(my_dict)
for value in  values:
    if value>66:  # 大于66的存入第一个key
        my_dict['k1'].append(value)
    else:  # 否则存入第二个key
        my_dict['k2'].append(value)
print(my_dict)  # defaultdict(<class 'list'>, {'k2': [11, 22, 33, 44, 55, 66], 'k1': [77, 88, 99, 90]})
6.Counter
Counter类的目的是用来跟踪值出现的次数
s = 'abcdeabcdabcaba' 统计字符串中每一个字符出现的次数,以字典返回
from collections import Counter
s = 'abcdeabcdabcaba'
res = Counter(s)
print(res)
时间模块(time、datetime)
1.time模块
三种表现形式
(1)时间戳
import time
print(time.time())
# 打印时间戳,打印的是当前时间距离1970-1-1 00:00:00相差的秒数(1970-1-1 00:00:00是Unix诞生元年)
(2)格式化时间(用来展示给人看的)
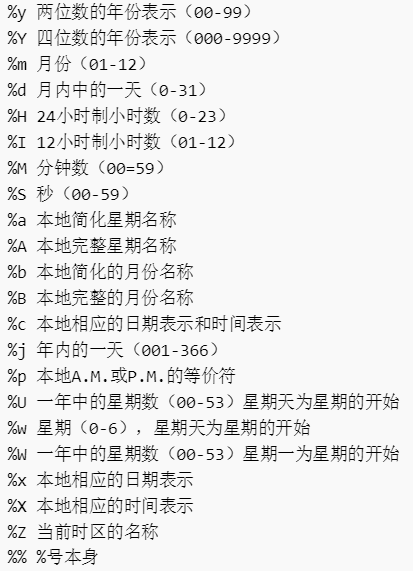
import time
print(time.strftime('%Y-%m-%d'))  # 年月日
print(time.strftime('%Y-%m-%d %H:%M:%S'))  # 年月日 时分秒
print(time.strftime('%Y-%m-%d %X'))  # %X等价于%H:%M:%S
print(time.strftime('%Y-%m'))  # 可以随意拼接
print(time.strftime('%Y/%m'))  # 拼接符也不限
格式化时间字符串
(3)结构化时间
import time
print(time.localtime())  # 相当于print(time.localtime(time.time()))
print(time.localtime(time.time()))
res = time.localtime(time.time())  # 时间戳转成结构化时间
print(time.mktime(res))  # 结构化时间转成时间戳
print(time.strftime('%Y-%m',time.localtime()))  # 结构化时间转成格式化时间
print(time.strptime(time.strftime('%Y-%m',time.localtime()),'%Y-%m'))  # 格式化时间转成结构化时间
几种格式之间的转换

结构化时间几种属性的含义

2.datetime模块
(1)获取当前时间
import datetime
print(datetime.date.today())  # date表示年月日
print(datetime.datetime.today())  # datetime表示年月日 时分秒
res = datetime.date.today()
res1 = datetime.datetime.today()  # 都可以调用下面的方法
print(res.year)  # 年
print(res.month)  # 月
print(res.day)  # 日
print(res.weekday())  # 0-6表示星期  0表示周一
print(res.isoweekday())  # 1-7表示星期 7就是周日
(2)timedelta(可以对时间进行运算操作)
import datetime
current_time = datetime.date.today()  # 日期对象
timetel_t = datetime.timedelta(days=7)  # timedelta对象
res1 = current_time+timetel_t  # 日期对象
print(current_time - timetel_t)  # 日起对象-timedelta对象
print(res1-current_time)  # 日起对象-日期对象
# 小练习 计算今天距离今年过生日还有多少天
import datetime
birth = datetime.datetime(2019,12,21,8,8,8)
current_time = datetime.datetime.today()
print(birth-current_time)
固定句式:日期对象 = 日期对象 +/- timedelta对象
timedelta对象 = 日期对象 +/- 日期对象
(3)UTC时间(格林威治时间)
import datetime
dt_today = datetime.datetime.today()  # 当前时间
dt_now = datetime.datetime.now()  # 现在时间
dt_utcnow = datetime.datetime.utcnow()
print(dt_utcnow,dt_now,dt_today)
random模块(随机模块)
randint、random、choice、shuffle
import random
print(random.randint(1,6))  # 随机取一个你提供的整数范围内的数字  包含首尾
print(random.random())  # 随机取0-1之间小数
print(random.choice([1,2,3,4,5,6]))  # 摇号  随机从列表中取一个元素
res = [1,2,3,4,5,6]
random.shuffle(res)  # 洗牌  随机打乱顺序
print(res)
如何生成验证码
# 生成5位数的随机验证码,包含大写字母、小写字母、数字,封装成一个函数,用户想生成几位就生成几位
import random
def get_code(n):
    code = ''
    for i in range(n):
        # 先生成随机的大写字母 小写字母 数字
        upper_str = chr(random.randint(65,90))  # ascii码表中字母对应的标号
        lower_str = chr(random.randint(97,122))
        random_int = str(random.randint(0,9))
        code += random.choice([upper_str,lower_str,random_int])  # 从上面三个中随机选择一个作为随机验证码的某一位
    return code
res = get_code(5)
print(res)
os模块(跟操作系统打交道的模块)
1.dirname、join、listdir
import os
BASE_DIR = os.path.dirname(__file__)  # 当前文件所在文件夹的绝对路径
MOVIE_DIR = os.path.join(BASE_DIR,'老师们的作品')  # 拼接绝对路径
movie_list = os.listdir(MOVIE_DIR)  # 会将当前文件夹里面的所有文件展示出来
while True:
    for i,j in enumerate(movie_list,1):
        print(i,j)
    choice = input('你想看谁的(今日热搜:tank老师)>>>:').strip()
    if choice.isdigit():  # 判断用户输入的是否是纯数字
        choice = int(choice)  # 传成int类型
        if choice in range(1,len(movie_list)+1):  # 判断是否在列表元素个数范围内
            target_file = movie_list[choice-1]  # 获取用户想要看的文件名
            target_path = os.path.join(MOVIE_DIR,target_file)  # 拼接文件绝对路径
            with open(target_path,'r',encoding='utf-8') as f:
                print(f.read())  # 读取文件
2.exists、isfile、rmdir
import os
os.mkdir('tank老师精选')  # 自动创建文件夹
print(os.path.exists(r'D:\Python项目\day16\rion老师精选'))  # 判断文件是否存在,也可以判断文件夹
print(os.path.exists(r'D:\Python项目\day16\老师们的作品\tank老师.txt'))  # 判断文件是否存在,也可以判断文件夹
print(os.path.isfile(r'D:\Python项目\day16\tank老师精选'))  # 只能判断文件,不能判断文件夹
print(os.path.isfile(r'D:\Python项目\day16\老师们的作品\tank老师.txt'))  # 只能判断文件,不能判断文件夹
os.rmdir(r'D:\Python项目\day16\老师们的作品')  # 删除文件夹,只能删空文件夹
3.getcwd、chdir
print(os.getcwd())  # 获取当前工作目录,即当前python脚本工作的目录路径
print(os.chdir(r'D:\Python项目\day16\老师们的作品'))  # 切换当前所在的目录
print(os.getcwd())  # 获取当前工作目录,即当前python脚本工作的目录路径
4.getsize(获取文件大小)
print(os.path.getsize(r'D:\Python项目\day16\老师们的作品\tank老师.txt'))  # 获取的是字节大小
with open(r'D:\Python项目\day16\老师们的作品\tank老师.txt',encoding='utf-8') as f:
    print(len(f.read()))
sys模块(跟python解释器打交道模块)
1.path.append、platform、version
import sys
sys.path.append(F:\python\day16\代码\day16\06 sys模块.py)  # 将某个路径添加到系统的环境变量中
print(sys.platform)  # 查看系统位数
print(sys.version)  # python解释器的版本
2.args(命令行参数List,第一个元素是程序本身路径)
import sys
print(sys.argv)  # 命令行启动文件 可以做身份的验证
if len(sys.argv) <= 1:
    print('请输入用户名和密码')
else:
    username = sys.argv[1]
    password = sys.argv[2]
    if username == 'jason' and password == '123':
        print('欢迎使用')
        # 当前这个py文件逻辑代码
    else:
        print('用户不存在 无法执行当前文件')
序列化模块
序列化:其他数据类型转换成字符串的过程
反序列化:字符串转成其他数据类型
写入文件的数据必须是字符串,基于网络传输的数据必须是二进制
1.json模块
所有的语言都支持json格式
支持的数据类型很少:字符串、列表、字典、整型、元组(会转成列表)、布尔值
(1)dumps:序列化,将其他数据类型转成json格式的字符串
loads:反序列化 将json格式的字符串转换成其他数据类型
import json
d = {"name":"jason"}
print(d)
res = json.dumps(d)  # json格式的字符串 必须是双引号 >>>: '{"name": "jason"}'  序列化:把字典类型转换成字符串类型
print(res,type(res))
res1 = json.loads(res)  # 反序列化:再把字符串类型转换成字典类型
print(res1,type(res1))
(2)dump、json
import json
d = {"name":"jason"}
with open('userinfo','w',encoding='utf-8') as f:
    json.dump(d,f)  # 转字符串并自动写入文件
with open('userinfo','r',encoding='utf-8') as f:
    res = json.load(f)  # 转字典并自动读出
    print(res,type(res))
(3)如何写入多行并转字符串
import json
d = {"name":"jason"}
with open('userinfo','w',encoding='utf-8') as f:
    json_str = json.dumps(d)
    json_str1 = json.dumps(d)
    f.write('%s\n'%json_str)  # 写多行需要换行
    f.write('%s\n'%json_str1)  # 写多行需要换行

with open('userinfo','r',encoding='utf-8') as f:
    for line in f:
        res = json.loads(line)  #取一行转换
        print(res,type(res))
# 必须要换行,一行一行的写入
(4)json会把元组类型转换成列表类型
import json
t = (1,2,3,4)
print(json.dumps(t))
# 因为元组这种数据类型只在python中有
(5)json会把中文转码
import json
d1 = {'name':'中文'}
print(json.dumps(d1))  # json会把中文转码
print(json.dumps(d1,ensure_ascii=False))  # 可以指定参数ensure_ascii=False让json不要转码
2.pickle模块
跟json没有太大区别
import pickle
d = {'name':'jason'}
res = pickle.dumps(d)  # 将对象直接转成二进制
print(pickle.dumps(d))
res1 = pickle.loads(res)  # 转回来
print(res1,type(res1))
但是用pickle操作文件的时候,文件的打开模式必须是b模式,因为转成的是二进制
import pickle
d = {'name':'jason'}
with open('userinfo_1','wb') as f:
    pickle.dump(d,f)  # 转成二进制并写入文件

with open('userinfo_1','rb') as f:
    res = pickle.load(f)  # 转回来并读出
    print(res,type(res))
subprocess模块(子进程模块)
sub:子
process:进程
1.如何实现:让用户远程操作你这台电脑
(1)用户通过网络连接上了你的这台电脑
(2)用户输入相应的命令,基于网络发送给了你这台电脑上某个程序
(3)获取用户命令,里面subprocess执行该用户命令
(4)将执行结果再基于网络发送给用户
while True:
    cmd = input('cmd>>>:').strip()
    import subprocess
    obj = subprocess.Popen(cmd,shell=True,stdout=subprocess.PIPE,stderr=subprocess.PIPE)
    # print(obj)
    print('正确命令返回的结果stdout',obj.stdout.read().decode('gbk'))
    print('错误命令返回的提示信息stderr',obj.stderr.read().decode('gbk'))