消息
1. 大多应用中,可通过消息服务中间件来提升系统异步通信、扩展解耦能力
2. 消息服务中两个重要概念:
消息代理(message broker)和目的地(destination)
当消息发送者发送消息以后,将由消息代理接管,消息代理保证消息传递到指定目 的地。
3. 消息队列主要有两种形式的目的地
1. 队列(queue):点对点消息通信(point-to-point)
2. 主题(topic):发布(publish)/订阅(subscribe)消息通信
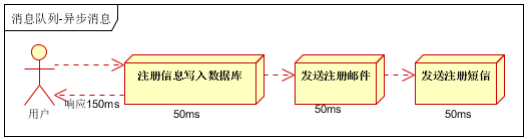
异步处理
1、同步处理方式
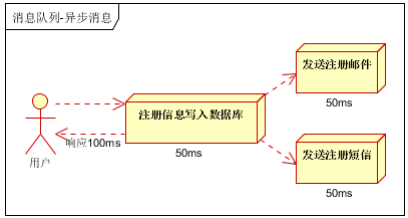
2、多线程处理方式
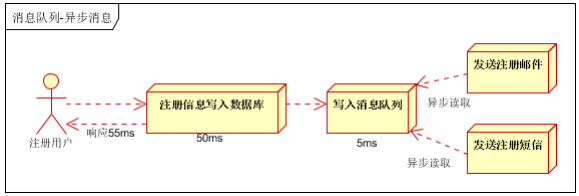
3、消息队列
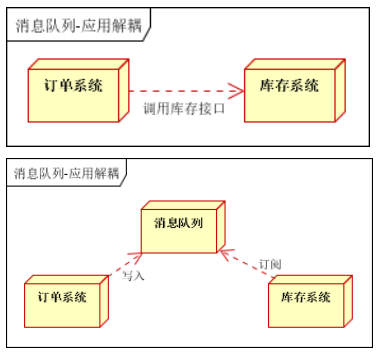
应用解耦
流量削峰

消息队列方式
1. 点对点式:
– 消息发送者发送消息,消息代理将其放入一个队列中,消息接收者从队列中获取消息内容, 消息读取后被移出队列 – 消息只有唯一的发送者和接受者,但并不是说只能有一个接收者
2. 发布订阅式:
– 发送者(发布者)发送消息到主题,多个接收者(订阅者)监听(订阅)这个主题,那么 就会在消息到达时同时收到消息
3. JMS(Java Message Service)JAVA消息服务:
– 基于JVM消息代理的规范。ActiveMQ、HornetMQ是JMS实现
4. AMQP(Advanced Message Queuing Protocol)
– 高级消息队列协议,也是一个消息代理的规范,兼容JMS – RabbitMQ是AMQP的实现
JMS vs AMQP

spring的支持
– spring-jms提供了对JMS的支持
– spring-rabbit提供了对AMQP的支持
– 需要ConnectionFactory的实现来连接消息代理
– 提供JmsTemplate、RabbitTemplate来发送消息
– @JmsListener(JMS)、@RabbitListener(AMQP)注解在方法上监听消息代理发 布的消息
– @EnableJms、@EnableRabbit开启支持
springboot的支持-----提供自动配置类
– JmsAutoConfiguration
– RabbitAutoConfiguration
RabbitMQ简介
RabbitMQ简介:
RabbitMQ是一个由erlang开发的AMQP(Advanved Message Queue Protocol)的开源实现。
核心概念
Message
消息,消息是不具名的,它由消息头和消息体组成。消息体是不透明的,而消息头则由一系列的可选属性组 成,这些属性包括routing-key(路由键)、priority(相对于其他消息的优先权)、delivery-mode(指出 该消息可能需要持久性存储)等。
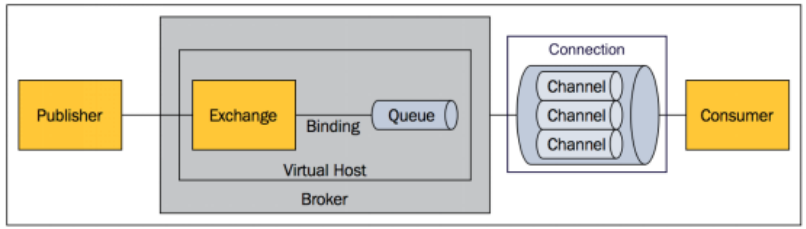
Publisher
消息的生产者,也是一个向交换器发布消息的客户端应用程序。
Exchange
交换器,用来接收生产者发送的消息并将这些消息路由给服务器中的队列。 Exchange有4种类型:direct(默认),fanout, topic, 和headers,不同类型的Exchange转发消息的策略有 所区别
Queue
消息队列,用来保存消息直到发送给消费者。它是消息的容器,也是消息的终点。一个消息 可投入一个或多个队列。消息一直在队列里面,等待消费者连接到这个队列将其取走。
Binding
绑定,用于消息队列和交换器之间的关联。一个绑定就是基于路由键将交换器和消息队列连 接起来的路由规则,所以可以将交换器理解成一个由绑定构成的路由表。 Exchange 和Queue的绑定可以是多对多的关系。
Connection
网络连接,比如一个TCP连接。
Channel
信道,多路复用连接中的一条独立的双向数据流通道。信道是建立在真实的TCP连接内的虚 拟连接,AMQP 命令都是通过信道发出去的,不管是发布消息、订阅队列还是接收消息,这 些动作都是通过信道完成。因为对于操作系统来说建立和销毁 TCP 都是非常昂贵的开销,所 以引入了信道的概念,以复用一条 TCP 连接。
Consumer
消息的消费者,表示一个从消息队列中取得消息的客户端应用程序。
Virtual Host
虚拟主机,表示一批交换器、消息队列和相关对象。虚拟主机是共享相同的身份认证和加 密环境的独立服务器域。每个 vhost 本质上就是一个 mini 版的 RabbitMQ 服务器,拥有 自己的队列、交换器、绑定和权限机制。vhost 是 AMQP 概念的基础,必须在连接时指定, RabbitMQ 默认的 vhost 是 / 。
Broker
表示消息队列服务器实体
运行机制
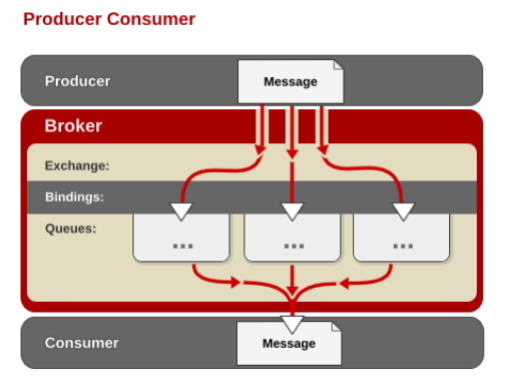
AMQP 中的消息路由
• AMQP 中消息的路由过程和 Java 开发者熟悉的 JMS 存在一些差别,AMQP 中增加了 Exchange 和 Binding 的角色。生产者把消息发布到 Exchange 上,消息最终到达队列并被 消费者接收,而 Binding 决定交换器的消息应该发送到那个队列。
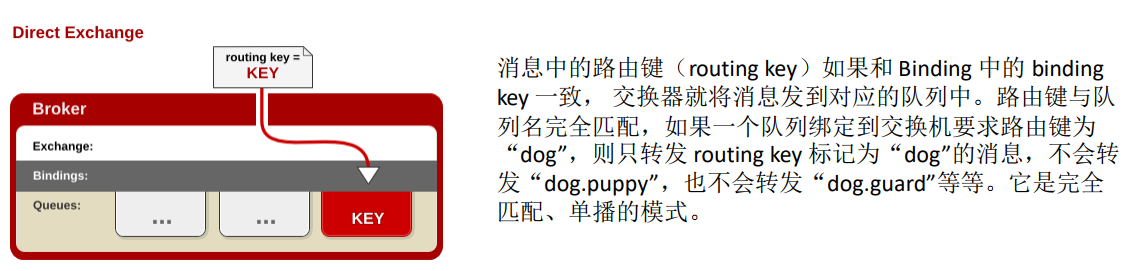
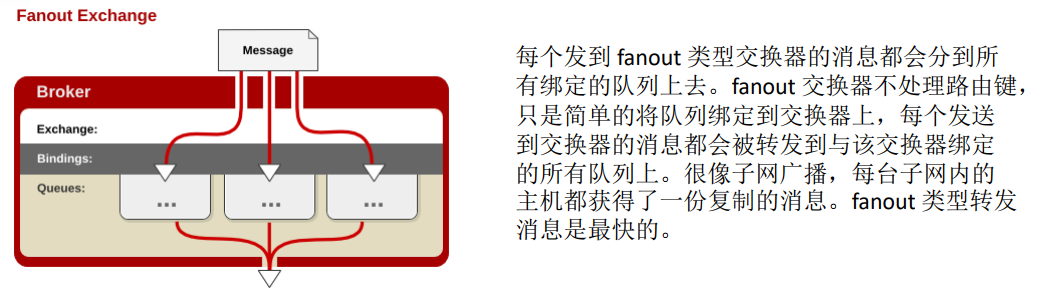
Exchange 类型
• Exchange分发消息时根据类型的不同分发策略有区别,目前共四种类型: direct、fanout、topic、headers 。headers 匹配 AMQP 消息的 header 而不是路由键, headers 交换器和 direct 交换器完全一致,但性能差很多, 目前几乎用不到了,所以直接看另外三种类型:

RabbitMQ整合-----springboot对rabbitmq提供了支持
1、搭建rabbitmq服务
这个找官网下载就好,然后在服务端配置好对应的exchange以及queue即可
a、创建exchange

b、创建queue
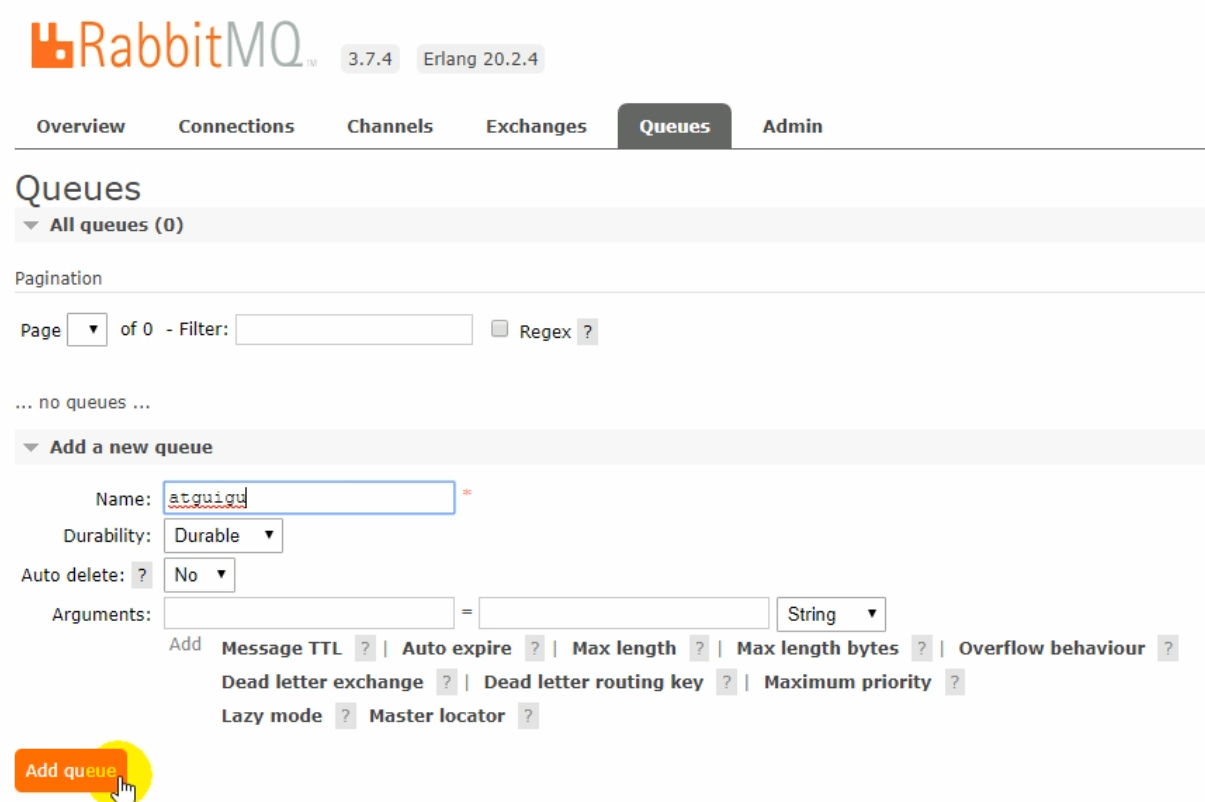
c、exchange绑定队列

2、pom.xml
<dependency>
    <groupId>org.springframework.boot</groupId>
    <artifactId>spring-boot-starter-amqp</artifactId>
</dependency>
3、运行主类
/**
 * 自动配置
 *  1、RabbitAutoConfiguration
 *  2、有自动配置了连接工厂ConnectionFactory;
 *  3、RabbitProperties 封装了 RabbitMQ的配置
 *  4、 RabbitTemplate :给RabbitMQ发送和接受消息;
 *  5、 AmqpAdmin : RabbitMQ系统管理功能组件;
 *      AmqpAdmin:创建和删除 Queue,Exchange,Binding
 *  6、@EnableRabbit +  @RabbitListener 监听消息队列的内容
 *
 */
@EnableRabbit  //开启基于注解的RabbitMQ模式
@SpringBootApplication
public class Springboot02AmqpApplication {

    public static void main(String[] args) {
        SpringApplication.run(Springboot02AmqpApplication.class, args);
    }
}
4、application.properties
spring.rabbitmq.host=118.24.44.169
spring.rabbitmq.username=guest
spring.rabbitmq.password=guest
#spring.rabbitmq.virtual-host=
5、amqpConfig
package com.atguigu.amqp.config;

import org.springframework.amqp.support.converter.Jackson2JsonMessageConverter;
import org.springframework.amqp.support.converter.MessageConverter;
import org.springframework.context.annotation.Bean;
import org.springframework.context.annotation.Configuration;

@Configuration
public class MyAMQPConfig {

   //自定义消息转换器,将对象转换成json数据。默认使用的是jdk的序列化类,序列化之后的消息看着不是很友好
    @Bean
    public MessageConverter messageConverter(){
        return new Jackson2JsonMessageConverter();
    }
}
6、Book
package com.atguigu.amqp.bean;

public class Book {
    private String bookName;
    private String author;

    public Book() {
    }

    public Book(String bookName, String author) {
        this.bookName = bookName;
        this.author = author;
    }

    public String getBookName() {
        return bookName;
    }

    public void setBookName(String bookName) {
        this.bookName = bookName;
    }

    public String getAuthor() {
        return author;
    }

    public void setAuthor(String author) {
        this.author = author;
    }

    @Override
    public String toString() {
        return "Book{" +
                "bookName='" + bookName + '\'' +
                ", author='" + author + '\'' +
                '}';
    }
}
7、BookService
package com.atguigu.amqp.service;

import com.atguigu.amqp.bean.Book;
import org.springframework.amqp.core.Message;
import org.springframework.amqp.rabbit.annotation.RabbitListener;
import org.springframework.stereotype.Service;

@Service
public class BookService {

    @RabbitListener(queues = "atguigu.news")
    public void receive(Book book){
        System.out.println("收到消息:"+book);
    }

    @RabbitListener(queues = "atguigu")
    public void receive02(Message message){
        System.out.println(message.getBody());
        System.out.println(message.getMessageProperties());
    }
}
8、测试类
package com.atguigu.amqp;

import com.atguigu.amqp.bean.Book;
import org.junit.Test;
import org.junit.runner.RunWith;
import org.springframework.amqp.core.AmqpAdmin;
import org.springframework.amqp.core.Binding;
import org.springframework.amqp.core.DirectExchange;
import org.springframework.amqp.core.Queue;
import org.springframework.amqp.rabbit.core.RabbitTemplate;
import org.springframework.beans.factory.annotation.Autowired;
import org.springframework.boot.test.context.SpringBootTest;
import org.springframework.test.context.junit4.SpringRunner;

import java.util.Arrays;
import java.util.HashMap;
import java.util.Map;

@RunWith(SpringRunner.class)
@SpringBootTest
public class Springboot02AmqpApplicationTests {

    @Autowired
    RabbitTemplate rabbitTemplate;

    @Test
    public void createExchange(){

//        amqpAdmin.declareExchange(new DirectExchange("amqpadmin.exchange"));
//        System.out.println("创建完成");

//        amqpAdmin.declareQueue(new Queue("amqpadmin.queue",true));
        //创建绑定规则

//        amqpAdmin.declareBinding(new Binding("amqpadmin.queue", Binding.DestinationType.QUEUE,"amqpadmin.exchange","amqp.haha",null));

        //amqpAdmin.de
    }

    /**
     * 1、单播(点对点)
     */
    @Test
    public void contextLoads() {
        //Message需要自己构造一个;定义消息体内容和消息头
        //rabbitTemplate.send(exchage,routeKey,message);

        //object默认当成消息体,只需要传入要发送的对象,自动序列化发送给rabbitmq;
        //rabbitTemplate.convertAndSend(exchage,routeKey,object);
        Map<String,Object> map = new HashMap<>();
        map.put("msg","这是第一个消息");
        map.put("data", Arrays.asList("helloworld",123,true));
        //对象被默认序列化以后发送出去
        rabbitTemplate.convertAndSend("exchange.direct","atguigu.news",new Book("西游记","吴承恩"));

    }

    //接受数据,如何将数据自动的转为json发送出去
    @Test
    public void receive(){
        Object o = rabbitTemplate.receiveAndConvert("atguigu.news");
        System.out.println(o.getClass());
        System.out.println(o);
    }

    /**
     * 广播
     */
    @Test
    public void sendMsg(){
        rabbitTemplate.convertAndSend("exchange.fanout","",new Book("红楼梦","曹雪芹"));
    }
}
如果事先没有创建exchange、queue等,可以通过amqpadmin管理
import org.springframework.amqp.core.AmqpAdmin;
import org.springframework.amqp.core.Binding;
import org.springframework.amqp.core.DirectExchange;
import org.springframework.amqp.core.Queue;
@RunWith(SpringRunner.class)
@SpringBootTest
public class Springboot02AmqpApplicationTests {
    @Autowired
    AmqpAdmin amqpAdmin;

    @Test
    public void createExchange(){

        amqpAdmin.declareExchange(new DirectExchange("amqpadmin.exchange"));
        System.out.println("创建完成");

        amqpAdmin.declareQueue(new Queue("amqpadmin.queue",true));
        //创建绑定规则

        amqpAdmin.declareBinding(new Binding("amqpadmin.queue", Binding.DestinationType.QUEUE,"amqpadmin.exchange","amqp.haha",null));


    }
}