稀稀拉拉学了有快1年的Android了,但是依然跟刚入门的小白一样,用到啥学啥,上网查别人的代码,然后复制粘贴过去,最后什么都没学到,现在是深有体会,我希望记录一些知识点,踏踏实实的走好每一步,希望刚入门的小白能用到。
首先Android Studio中有许多系统自带的空间,比较常见是TextView,EditView,ImageView,Button,ImageButton,
等等许多的空间,现在我来介绍一种常用的空间——————ListView———————
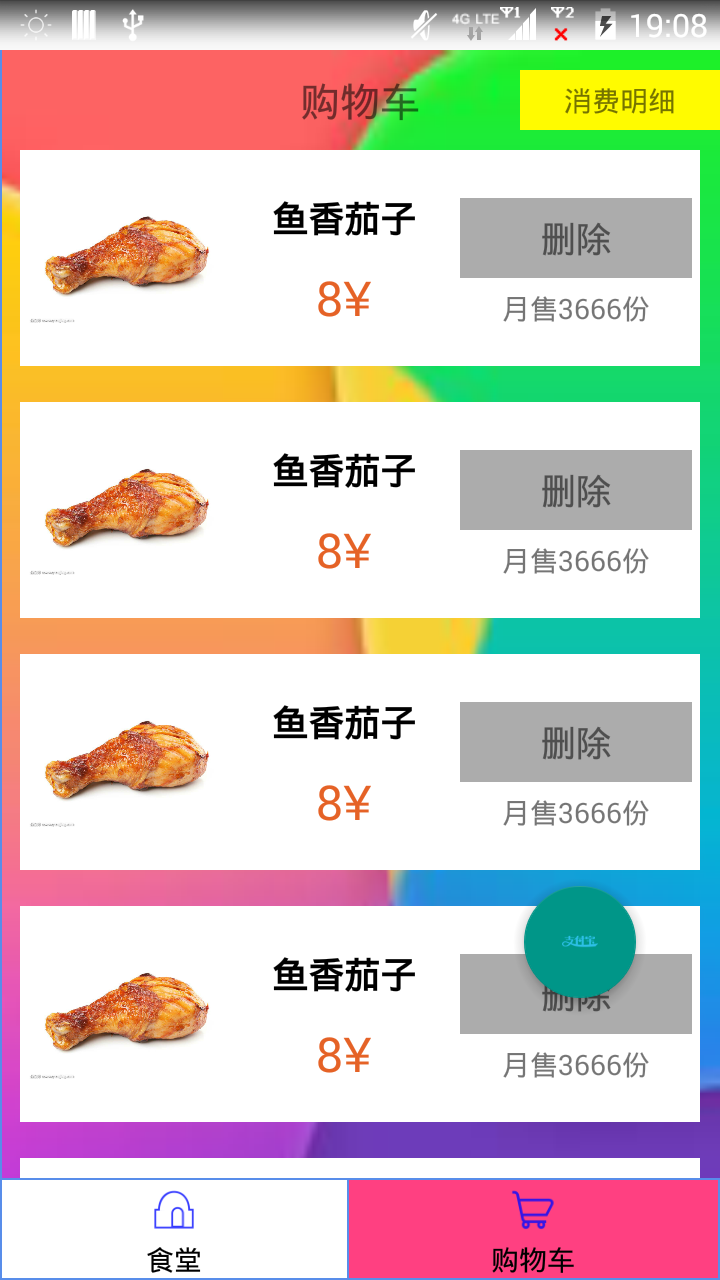
ListView 就是把展示的东西一条条展示出来 例如这样:虽然比较丑 但是起码实现了ListView
接下来我来一步步介绍一下,并且附上源码,如何写一个比较好的ListView:
1.内布局(我自己这样叫)shopfacelist.xml文件
就是白色区域内的布局,白色区域中的布局自己去写,写成什么样的布局,就会展示什么样的布局
<?xml version="1.0" encoding="utf-8"?>
<RelativeLayout
    xmlns:android="http://schemas.android.com/apk/res/android"
    android:layout_width="match_parent"
    android:layout_height="match_parent"
    android:background="@color/cardview_light_background"
    android:orientation="vertical">
    <LinearLayout
        android:id="@+id/rela_1"
        android:layout_width="match_parent"
        android:layout_height="wrap_content"
        android:padding="4dp"
        android:layout_alignTop="@+id/view_1"
        android:layout_alignParentLeft="true"
        android:layout_alignParentStart="true">
        <ImageView
            android:id="@+id/food_Image"
            android:layout_width="100dp"
            android:layout_height="100dp" />
        <LinearLayout
            android:layout_width="match_parent"
            android:layout_height="wrap_content"
            android:orientation="vertical"
            android:layout_weight="1">

            <TextView
                android:id="@+id/food_Name"
                android:layout_width="match_parent"
                android:layout_height="40dp"
               android:layout_marginTop="10dp"
                android:gravity="center"
                android:text="凉皮"
                android:textColor="@color/black"
                android:textSize="18sp"
                android:textStyle="bold|normal" />

            <TextView
                android:layout_width="100dp"
                android:layout_height="40dp"
                android:id="@+id/food_Price"
                android:text="5元"
                android:textSize="24sp"
                android:gravity="center"
                android:textColor="@color/¥color"
                android:layout_marginLeft="8dp"
                android:layout_marginStart="8dp" />
        </LinearLayout>

      <LinearLayout
          android:layout_width="match_parent"
          android:layout_height="wrap_content"
          android:orientation="vertical"
          android:layout_weight="1">
          <TextView
              android:id="@+id/delete_food"
              android:layout_width="match_parent"
              android:layout_height="40dp"
              android:layout_marginTop="20dp"
              android:background="@color/blackline"
              android:gravity="center"
              android:text="删除"
              android:textSize="18sp" />

          <TextView
              android:id="@+id/show_Sole_Count"
              android:layout_width="match_parent"
              android:layout_height="30dp"
              android:text="月售"
              android:gravity="center" />

      </LinearLayout>
    </LinearLayout>

</RelativeLayout>
2.ListView fragment_perfood.xml文件
在b.xml文件中,我们会安放ListView控件并且设置ID
<?xml version="1.0" encoding="utf-8"?>
<RelativeLayout
    xmlns:android="http://schemas.android.com/apk/res/android"
    xmlns:app="http://schemas.android.com/apk/res-auto"
    android:id="@+id/fragment_perFood"
    android:layout_width="match_parent"
    android:layout_height="match_parent"
    android:background="@mipmap/image_10">
    <TextView
        android:id="@+id/show_shopping_cart"
        android:layout_width="match_parent"
        android:layout_height="50dp"
        android:gravity="center"
        android:textSize="20sp"
        android:text="购物车"
        android:layout_alignParentTop="true"
        android:layout_alignParentStart="true" />
    <TextView
        android:id="@+id/in_out_count"
        android:layout_width="100dp"
        android:layout_height="30dp"
        android:gravity="center"
        android:text="消费明细"
        android:layout_alignParentTop="true"
        android:layout_marginTop="10dp"
        android:layout_below="@id/show_shopping_cart"
        android:layout_alignParentRight="true"
        android:background="@color/moneyColor"/>
    <ListView
        android:id="@+id/listView_perSomething"
        android:layout_width="match_parent"
        android:layout_height="wrap_content"
        android:layout_marginStart="10dp"
        android:layout_marginEnd="10dp"
        android:divider="#00000000"
        android:dividerHeight="18dp"
        android:layout_below="@+id/show_shopping_cart"></ListView>
    <com.indes.interfacedesign.FloatActionbutton.DrawFloatActionButton
        android:id="@+id/fab_payfor"
        android:layout_width="wrap_content"
        android:layout_height="wrap_content"
        android:backgroundTint="#ff87ffeb"
        android:src="@drawable/icon_zhifubao"
        android:layout_alignParentRight="true"
        android:layout_marginEnd="30dp"
        android:layout_marginTop="400dp"
        app:rippleColor="@android:color/holo_green_dark"
        />
</RelativeLayout>
3.数据源类 CartResource.java
如果自定义的话,那么你就必须要有数据源,每个ListView的Item(子项),就是图片中的白框,内容基本都是不一样的,图片中的Item的内容是因为在初始化的时候每个Item的数据利用循环就变的一模一样了。
public class CartResource {
    private String onlyFlag;       //给每个商品加入唯一标识码
    private int imageId;        //图片ID
    private String foodName;    //食物名称
    private String foodPrice;   //食物价格
    private String monthSoleCount;  //月售的数量
    private String  buttonId;       //删除

    public CartResource(String onlyFlag,int imageId, String foodName, String foodPrice, String monthSoleCount, String  buttonId) {
        this.onlyFlag = onlyFlag;
        this.imageId = imageId;
        this.foodName = foodName;
        this.foodPrice = foodPrice;
        this.monthSoleCount = monthSoleCount;
        this.buttonId = buttonId;
    }

    public String getOnlyFlag() {
        return onlyFlag;
    }

    public void setOnlyFlag(String onlyFlag) {
        this.onlyFlag = onlyFlag;
    }

    public int getImageId() {return imageId;}

    public void setImageId(int imageId) {
        this.imageId = imageId;
    }

    public String getFoodName() {
        return foodName;
    }

    public void setFoodName(String foodName) {
        this.foodName = foodName;
    }

    public String getFoodPrice() {
        return foodPrice;
    }

    public void setFoodPrice(String foodPrice) {
        this.foodPrice = foodPrice;
    }

    public String getMonthSoleCount() {
        return monthSoleCount;
    }

    public void setMonthSoleCount(String monthSoleCount) {
        this.monthSoleCount = monthSoleCount;
    }

    public String getButtonId() {
        return buttonId;
    }

    public void setButtonId(String  buttonId) {
        this.buttonId = buttonId;
    }
}
4.适配器 CartAdapter.java
自定义适配器来适配数据源
public class CartAdapter extends ArrayAdapter<CartResource>{
    private int resourceId;

    public CartAdapter(@NonNull Context context, @LayoutRes int resource, @NonNull List<CartResource> objects) {
        super(context, resource, objects);
        resourceId = resource;
    }

    @NonNull
    @Override
    public View getView(final int position, @Nullable View convertView, @NonNull final ViewGroup parent) {
        CartResource s = getItem(position);
        View view;
        if(convertView == null){
            view = LayoutInflater.from(getContext()).inflate(resourceId,parent,false);
        }else {
            view = convertView;
        }

        /**
         * 删除菜品
         */
        ImageView imageId  = (ImageView) view.findViewById(R.id.food_Image);
        TextView foodName  = (TextView)view.findViewById(R.id.food_Name);
        TextView foodPricce = (TextView)view.findViewById(R.id.food_Price);
        TextView delete = (TextView) view.findViewById(R.id.delete_food);
        TextView monthSoleOut = (TextView)view.findViewById(R.id.show_Sole_Count);

        imageId.setImageResource(s.getImageId());
        foodName.setText(s.getFoodName());
        foodPricce.setText(s.getFoodPrice());
        /**
         * 删除菜品是点击事件
         */
        delete.setText(s.getButtonId());
        delete.setOnClickListener(new View.OnClickListener() {
            @Override
            public void onClick(View view) {
                String onlyflag = getItem(position).getOnlyFlag();   //商品编号
                remove(getItem(position));
                Toast.makeText(parent.getContext(),"删除了编号为"+onlyflag+"的菜品", Toast.LENGTH_SHORT).show();
        }
        });
        delete.setText(s.getButtonId());
        monthSoleOut.setText(s.getMonthSoleCount());
        return view;
    }

}
5.活动 Fragment_perFood.java
在活动中初始化数据源,绑定适配器。
public class Fragment_perFood extends Fragment {
    private List mList;
    public CartResource reInit;
    private CartAdapter ReAdapter;
    private ListView listView;

    @Nullable
    @Override
    public View onCreateView(LayoutInflater inflater, @Nullable ViewGroup container, @Nullable Bundle savedInstanceState) {
        View view = inflater.inflate(R.layout.fragment_perfood,null);

        /**
         * 绑定数据源
         */
        mList = new ArrayList<CartResource>();
        //初始化适配器
        Init();
        //必须刷新才能是添加的东西展示出来
        ReAdapter = new CartAdapter(getActivity(),R.layout.shopfacelist_1,mList);
        listView = (ListView)view.findViewById(R.id.listView_perSomething);
        listView.setAdapter(ReAdapter);
        return view;
    }
    /*
    * 当前的数据
    */
    public void Init(){
        for(int i = 0 ;i<50 ; i++){
            reInit = new CartResource(12306+i+"",R.mipmap.image_7,"鱼香茄子","8¥","月售3666份","删除");
            mList.add(reInit);
        }
    }
}
记录一下,方便自己以后用到,也方便刚入门的小白上手。
在这里我用到了Fragment(碎片),一般在Andriod平板中很常见,但是因为项目需要所以就用到了。
这里5种代码都齐全了,所以复制的时候大家可以把Fragment换成Activity来用,新建Activity,将红色代码复制进去就行了。
说一下可能会遇到的问题:
1.代码中用到的图片肯定要换,不然报错。
2.Activity那块一定要注意
3.我把控件的响应事件放在Adapter
4.导包
5.代码中有悬浮按钮的空间,是我自定义的,可以删除。还有下边两个Fragment。