CentOS7.5 上使用 bundle 文件安装 MySQL8.0 MySQL5.0
CentOS7.5 环境
[root@instance-fjii60o3 ~]# rpm -qi centos-release
Name        : centos-release
Version     : 7
Release     : 5.1804.el7.centos
Architecture: x86_64
Install Date: Wed 30 May 2018 07:38:02 PM CST
Group       : System Environment/Base
Size        : 40173
License     : GPLv2
Signature   : RSA/SHA256, Tue 01 May 2018 12:17:56 AM CST, Key ID 24c6a8a7f4a80eb5
Source RPM  : centos-release-7-5.1804.el7.centos.src.rpm
Build Date  : Sun 29 Apr 2018 12:35:55 AM CST
Build Host  : x86-01.bsys.centos.org
Relocations : (not relocatable)
Packager    : CentOS BuildSystem <http://bugs.centos.org>
Vendor      : CentOS
Summary     : CentOS Linux release file
Description :
CentOS Linux release files
[root@instance-fjii60o3 ~]# cat /etc/redhat-release
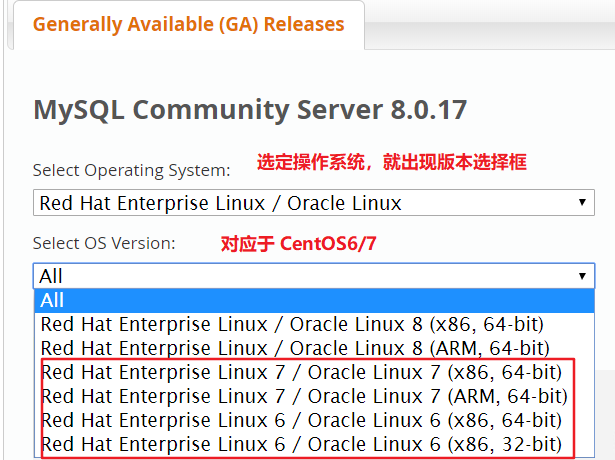
CentOS Linux release 7.5.1804 (Core)下载 MySQL
https://dev.mysql.com/downloads/mysql/
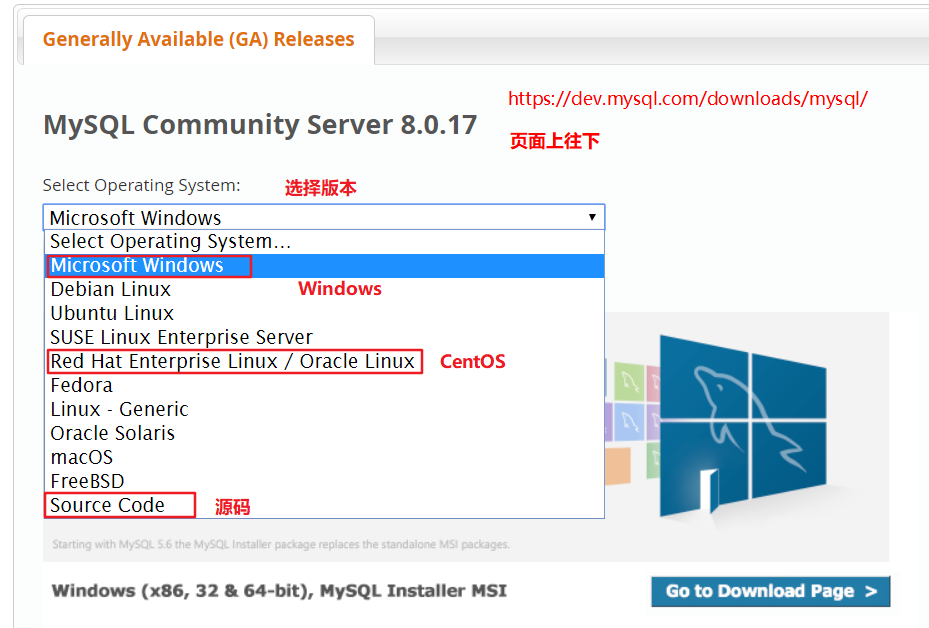
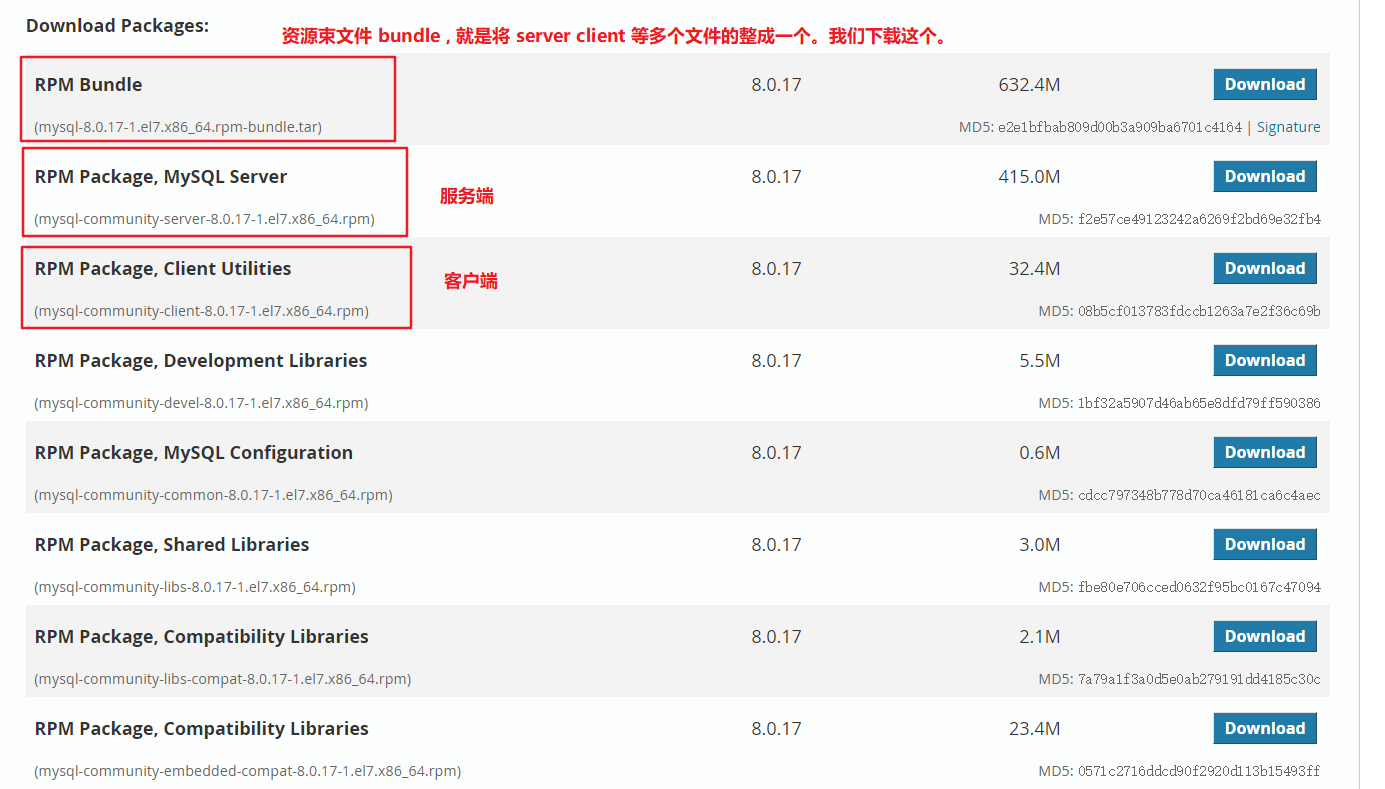
rpm-bundle 资源束
MySQL8.0
# MySQL8.0 资源束
[root@instance-fjii60o3 develop]# tar -xvf mysqlpackage/mysql-8.0.13-1.el7.x86_64.rpm-bundle.tar
mysql-community-client-8.0.13-1.el7.x86_64.rpm
mysql-community-embedded-compat-8.0.13-1.el7.x86_64.rpm
mysql-community-libs-8.0.13-1.el7.x86_64.rpm
mysql-community-server-8.0.13-1.el7.x86_64.rpm
mysql-community-common-8.0.13-1.el7.x86_64.rpm
mysql-community-devel-8.0.13-1.el7.x86_64.rpm
mysql-community-test-8.0.13-1.el7.x86_64.rpm
mysql-community-libs-compat-8.0.13-1.el7.x86_64.rpm
MySQL5.5
# 查看文件大小 -h human 以人可读的方式显示
[root@instance-fjii60o3 ~]# du -sh MySQL-5.5.62-1.el7.x86_64.rpm-bundle.tar
166M    MySQL-5.5.62-1.el7.x86_64.rpm-bundle.tar
# MySQL5.5 资源束
[root@instance-fjii60o3 ~]# tar -xvf MySQL-5.5.62-1.el7.x86_64.rpm-bundle.tar -C develop/mysql5.5/
MySQL-devel-5.5.62-1.el7.x86_64.rpm
MySQL-embedded-5.5.62-1.el7.x86_64.rpm
MySQL-shared-5.5.62-1.el7.x86_64.rpm
MySQL-test-5.5.62-1.el7.x86_64.rpm
MySQL-server-5.5.62-1.el7.x86_64.rpm
MySQL-shared-compat-5.5.62-1.el7.x86_64.rpm
MySQL-client-5.5.62-1.el7.x86_64.rpm
使用 rpm 本地安装 MySQL8.0
rpm 安装缺少依赖会报错,所以安装要按照指定的顺序。
rpm -ivh mysql-community-libs-8.0.13-1.el7.x86_64.rpm
rpm -ivh mysql-community-common-8.0.13-1.el7.x86_64.rpm
rpm -ivh mysql-community-client-8.0.13-1.el7.x86_64.rpm
rpm -ivh mysql-community-server-8.0.13-1.el7.x86_64.rpm
使用 rpm 本地安装 MySQL5.5
尝试安装,报错 perl 。
[root@instance-fjii60o3 mysql5.5]# rpm -ivh *.rpm
warning: MySQL-client-5.5.62-1.el7.x86_64.rpm: Header V3 DSA/SHA1 Signature, key ID 5072e1f5: NOKEY
error: Failed dependencies:
    perl(Data::Dumper) is needed by MySQL-server-5.5.62-1.el7.x86_64
    perl(Data::Dumper) is needed by MySQL-test-5.5.62-1.el7.x86_64
方案:
    安装 perl 和 自动配置 autoconf
# 安装 perl
[root@instance-fjii60o3 mysql5.5]# yum install perl

# 安装 autoconf 解决 perl(Data::Dumper) 问题
[root@instance-fjii60o3 mysql5.5]# yum -y install autoconf
Installed:
  autoconf.noarch 0:2.69-11.el7
Dependency Installed:
  perl-Data-Dumper.x86_64 0:2.145-3.el7
按照指定顺序进行安装
# 安装 autoconf
yum -y install autoconf
rpm -ivh MySQL-client-5.5.62-1.el7.x86_64.rpm
rpm -ivh MySQL-devel-5.5.62-1.el7.x86_64.rpm
rpm -ivh MySQL-server-5.5.62-1.el7.x86_64.rpm
启动 bug
[root@instance-fjii60o3 mysql5.5]# systemctl start mysqld
Failed to start mysqld.service: Unit not found.
原因:
    MySQL5.5 的服务名是 mysql 而不是 mysqld
[root@instance-fjii60o3 mysql5.5]# systemctl start mysql
Job for mysql.service failed because the control process exited with error code. See "systemctl status mysql.service" and "journalctl -xe" for details.
原因:
MySQL8.0 卸载后没有删除相应数据目录,有残留。造成 MySQL5.5 安装后出问题。完全卸载干净后,重新安装成功。[root@instance-fjii60o3 mysql5.5]# mysqld
190804 10:38:36 [Note] mysqld (mysqld 5.5.62) starting as process 24055 ...
190804 10:38:36 [ERROR] Fatal error: Please read "Security" section of the manual to find out how to run mysqld as root![root@instance-fjii60o3 mysql5.5]# mysqld --verbose --help > a.txt
190804 10:47:41 [Note] mysqld (mysqld 5.5.62) starting as process 24203 ...
190804 10:47:41 [Note] Plugin 'FEDERATED' is disabled.
mysqld: Table 'mysql.plugin' doesn't exist
190804 10:47:41 [ERROR] Can't open the mysql.plugin table. Please run mysql_upgrade to create it.验证安装是否成功
# mysqld 和 mysql 查看版本号
[root@instance-fjii60o3 develop]# mysql --version
mysql  Ver 8.0.13 for Linux on x86_64 (MySQL Community Server - GPL)
[root@instance-fjii60o3 develop]# mysqld --version
/usr/sbin/mysqld  Ver 8.0.13 for Linux on x86_64 (MySQL Community Server - GPL)
启动 关闭 重启 查看 MySQL 服务
MySQL8.0 服务名为 mysqld , MySQL5.5 的服务名为 mysql 。
# 启动 MySQL8.0 服务。MySQL8.0 服务名为 mysqld , MySQL5.5 的服务名为 mysql 。
[root@instance-fjii60o3 develop]# systemctl start mysqld
# 关闭 MySQL8.0 服务
[root@instance-fjii60o3 develop]# systemctl stop mysqld
# 重启 MySQL8.0 服务
[root@instance-fjii60o3 develop]# systemctl restart mysqld
# 查看 MySQL8.0 服务
[root@instance-fjii60o3 develop]# systemctl status mysqld

# ps 查找 mysql 进程
[root@instance-fjii60o3 develop]# ps -aux | grep mysql
mysql    12991  3.4 18.1 1369508 371432 ?      Ssl  17:38   0:00 /usr/sbin/mysqld
root     13039  0.0  0.0 112708   980 pts/0    R+   17:38   0:00 grep --color=auto mysql

# netstat 查看 3306 端口
[root@instance-fjii60o3 develop]# netstat -ntlp
Active Internet connections (only servers)
Proto Recv-Q Send-Q Local Address           Foreign Address         State       PID/Program name       tcp6       0      0 :::3306                 :::*                    LISTEN      12991/mysqld
完全卸载 MySQL
[root@instance-fjii60o3 mysql5.5]# rpm -qa|grep -i mysql
MySQL-devel-5.5.62-1.el7.x86_64
MySQL-client-5.5.62-1.el7.x86_64
MySQL-server-5.5.62-1.el7.x86_64

[root@instance-fjii60o3 mysql5.5]# rpm -e MySQL-devel-5.5.62-1.el7.x86_64
[root@instance-fjii60o3 mysql5.5]# rpm -e MySQL-client-5.5.62-1.el7.x86_64
[root@instance-fjii60o3 mysql5.5]# rpm -e MySQL-server-5.5.62-1.el7.x86_64

[root@instance-fjii60o3 mysql5.5]# find / -name mysql
/usr/lib64/mysql
/etc/selinux/targeted/tmp/modules/100/mysql
/etc/selinux/targeted/active/modules/100/mysql
/var/lib/mysql
/var/lib/mysql/mysql
/run/lock/subsys/mysql

[root@instance-fjii60o3 mysql5.5]# rm -rf /usr/lib64/mysql /var/lib/mysql /run/lock/subsys/mysql /etc/selinux/targeted/tmp/modules/100/mysql /etc/selinux/targeted/active/modules/100/mysql
MySQL8.0 获取临时密码,客户端本地登录,并修改密码
MySQL8.0 临时密码文件 /var/log/mysqld.log
# 获取临时密码
[root@instance-fjii60o3 develop]# grep 'temporary password' /var/log/mysqld.log
2019-08-03T09:38:05.811773Z 5 [Note] [MY-010454] [Server] A temporary password is generated for root@localhost: vwhK+YKXJ0=v

# 使用临时密码登录 MySQL 客户端
[root@instance-fjii60o3 develop]# mysql -uroot -pvwhK+YKXJ0=v
mysql: [Warning] Using a password on the command line interface can be insecure.
Welcome to the MySQL monitor.  Commands end with ; or \g.
Your MySQL connection id is 8

# 修改密码。注意:因为对密码格式有限制,所以不符合规则的密码会报错。
mysql> ALTER USER 'root'@'localhost' IDENTIFIED BY 'Root1234=';
Query OK, 0 rows affected (0.03 sec)
MySQL5.5 设置登录密码,客户端本地登录
PLEASE REMEMBER TO SET A PASSWORD FOR THE MySQL root USER !
To do so, start the server, then issue the following commands:

/usr/bin/mysqladmin -u root password 'new-password'
/usr/bin/mysqladmin -u root -h instance-fjii60o3 password 'new-password
mysqladmin 修改登录密码,客户端本地登录
[root@instance-fjii60o3 mysql5.5]# /usr/bin/mysqladmin -u root password 'root'
[root@instance-fjii60o3 mysql5.5]# mysql -uroot -proot
Welcome to the MySQL monitor.  Commands end with ; or \g.
Your MySQL connection id is 4
Server version: 5.5.62 MySQL Community Server (GPL)
查看 MySQL8.0 初始配置
datadir=/var/lib/mysql/ 数据库数据文件的存放位置编写 MySQL 配置文件
利用 mysqld 打印的帮助信息中,查看 MySQL 使用的配置文件。
[root@instance-fjii60o3 ~]# mysqld --verbose --help | grep -A 1 'Default options'
190804 14:32:05 [Note] mysqld (mysqld 5.5.62) starting as process 4698 ...
190804 14:32:05 [Note] Plugin 'FEDERATED' is disabled.
Default options are read from the following files in the given order:
/etc/my.cnf /etc/mysql/my.cnf /usr/etc/my.cnf ~/.my.cnf
创建 /etc/my.cnf 配置文件
# 创建文件 /etc/my.cnf 并修改 MySQL 服务端口号
[mysqld]
port=3307
更详细的参考 MySQL8.0 版手册
# MySQL 8.0 版本参考手册
4.2.4 Specifying Program Options # 选项配置方式。
5.1.1 Configuring the Server
5.1.7 Server Command Options # 选项。
4.2.4 Specifying Program Options
There are several ways to specify options for MySQL programs:
• List the options on the command line following the program name.
• List the options in an option file that the program reads when it starts.
• List the options in environment variables (see Section 4.2.11, “Setting Environment Variables”).5.1.7 Server Command Options
When you start the mysqld server, you can specify program options using any of the methods described in Section 4.2.4。
mysqld reads options from the [mysqld] and [server] groups.
mysqld_safe reads options from the [mysqld], [server], [mysqld_safe], and [safe_mysqld] groups.
mysql.server reads options from the [mysqld] and [mysql.server] groups.
mysqld accepts many command options. For a brief summary, execute this command:
mysqld --help
To see the full list, use this command:
mysqld --verbose --help外网连接 MySQL 服务
开放 3306 端口
# 持久化开放 3306 端口,需要防火墙重新加载
[root@instance-fjii60o3 develop]# firewall-cmd --add-port=3306/tcp --permanent
success
# 防火墙重新加载
[root@instance-fjii60o3 develop]# firewall-cmd --reload
success
# 查看开放的端口
[root@instance-fjii60o3 develop]# firewall-cmd --list-ports
80/tcp 8080/tcp 3306/tcp
创建 MySQL 网络用户并进行授权
# 创建 MySQL 网络用户。 % 表示任意网络地址都可以访问。
mysql> CREATE USER 'root'@'%' IDENTIFIED BY 'Root1234=';
Query OK, 0 rows affected (0.07 sec)

# 查询 mysql.user 表,获取用户信息。
mysql> select host, user from mysql.user;
+-----------+------------------+
| host      | user             |
+-----------+------------------+
| %         | root             |

# 授予全部权限。
mysql> grant all on *.* to 'root'@'%';
Query OK, 0 rows affected (0.04 sec)
外部主机连接 MySQL 服务
C:\Users\jie>mysql -h 106.12.196.253 -uroot -pRoot1234=
mysql: [Warning] Using a password on the command line interface can be insecure.
Welcome to the MySQL monitor.  Commands end with ; or \g.
Your MySQL connection id is 14
Server version: 8.0.13 MySQL Community Server - GPL
MySQL8.0 认证插件
# 查看默认密码认证插件
mysql> show variables like '%auth%';
+-------------------------------+-----------------------+
| Variable_name                 | Value                 |
+-------------------------------+-----------------------+
| default_authentication_plugin | caching_sha2_password |
+-------------------------------+-----------------------+
1 row in set, 1 warning (0.00 sec)

# 查看可用的密码认证插件
mysql> show plugins;
+----------------------------+----------+--------------------+---------+---------+
| Name                       | Status   | Type               | Library | License |
+----------------------------+----------+--------------------+---------+---------+
| mysql_native_password      | ACTIVE   | AUTHENTICATION     | NULL    | GPL     |
| sha256_password            | ACTIVE   | AUTHENTICATION     | NULL    | GPL     |
| caching_sha2_password      | ACTIVE   | AUTHENTICATION     | NULL    | GPL     |

# 修改指定用户的密码认证插件
mysql> alter user 'root'@'localhost' identified with caching_sha2_password by 'root';
Query OK, 0 rows affected (0.16 sec)
修改密码规则
mysql之validate_password_policy https://blog.csdn.net/wltsysterm/article/details/79649484
validate_password插件是mysql5.6以后可以引入的一个新密码校验插件(网友说的,同时还说要用这个插件至少要求mysql5.6.6之后的版本,没啥重要的,就没去验证了),在mysql5.7之后会自动安装的(这个是真的,我装的5.7.21是这样的)
validate_password_policy是随着validate_password插件诞生而诞生的,换句话说如果没有安装validate_password插件,就不用看下面的内容了。
md5 工具校验下载的文件
# 利用 md5sum 工具生成文件的校验码和 MySQL 官网下载页提供的校验码应该保持一致。
[root@instance-fjii60o3 ~]# md5sum develop/mysql80-community-release-el7-3.noarch.rpm
893b55d5d885df5c4d4cf7c4f2f6c153  develop/mysql80-community-release-el7-3.noarch.rpm

官网下载页提供的 MD5: 893b55d5d885df5c4d4cf7c4f2f6c153

# 使用 md5sum 工具可以为任意文件生成校验码
[root@instance-fjii60o3 ~]# md5sum a.txt
d41d8cd98f00b204e9800998ecf8427e  a.txt