一、概述
1.在大多应用中,我们系统之间需要进行异步通信,即异步消息。
2.异步消息中两个重要概念:消息代理(message broker)和目的地(destination)
当消息发送者发送消息以后,将由消息代理接管,消息代理保证消息传递到指定目的地。
3.异步消息主要有两种形式的目的地
- 队列(queue):点对点消息通信(point-to-point)
- 主题(topic):发布(publish)/订阅(subscribe)消息通信
4.点对点式:
- –消息发送者发送消息,消息代理将其放入一个队列中,消息接收者从队列中获取消息内容,消息读取后被移出队列
- –消息只有唯一的发送者和接受者,但并不是说只能有一个接收者
5.发布订阅式:
- –发送者(发布者)发送消息到主题,多个接收者(订阅者)监听(订阅)这个主题,那么就会在消息到达时同时收到消息
二、AMQP(Advanced Message Queuing Protocol)
- –高级消息队列协议,也是一个消息代理的规范,兼容JMS
- –RabbitMQ是AMQP的实现
核心概念:
Producer&Consumer
- –producer指的是消息生产者,consumer消息的消费者。
Broker
- –它提供一种传输服务,它的角色就是维护一条从生产者到消费者的路线,保证数据能按照指定的方式进行传输
Queue
- –消息队列,提供了FIFO的处理机制,具有缓存消息的能力。rabbitmq中,队列消息可以设置为持久化,临时或者自动删除。
- –设置为持久化的队列,queue中的消息会在server本地硬盘存储一份,防止系统crash,数据丢失
- –设置为临时队列,queue中的数据在系统重启之后就会丢失
- –设置为自动删除的队列,当不存在用户连接到server,队列中的数据会被自动删除
Exchange
- –消息交换机,它指定消息按什么规则,路由到哪个队列。
- –Exchange有4种类型:direct(默认,点对点式),fanout(广播模式,所有绑定的队列都能收到消息), topic(发布订阅式,符合指定规则的队列能收到消息),不同类型的Exchange转发消息的策略有所区别。
Binding
- –将一个特定的Exchange 和一个特定的Queue 绑定起来。
- –Exchange 和Queue的绑定可以是多对多的关系。
virtual host(vhosts )
- –在rabbitmq server上可以创建多个虚拟的message broker,又叫做virtual hosts (vhosts)
- –每一个vhost本质上是一个mini-rabbitmq server,分别管理各自的exchange,和bindings
- –vhost相当于物理的server,可以为不同app提供边界隔离
- –producer和consumer连接rabbit server需要指定一个vhost
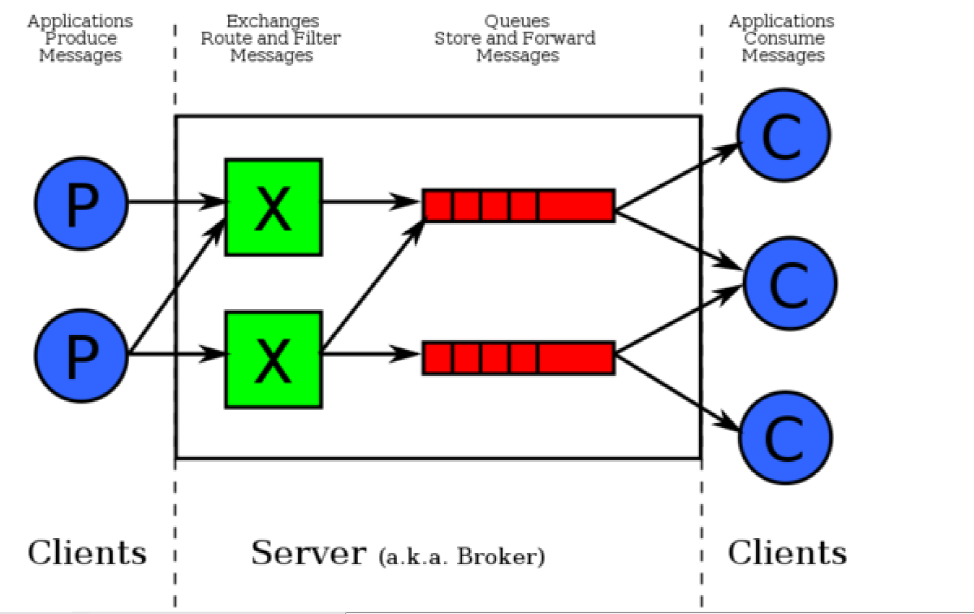
三、RabbitMQ的运行机制
四、springboot与RabbitMQ的整合
- 1.引入spring-boot-starter-amqp
- 2.application.yml配置
- 3.测试RabbitMQ
RabbitMQ配置由spring.rabbitmq。*中的外部配置属性控制。 例如,您可以在application.properties中声明以下部分:
spring.rabbitmq.host=localhost
spring.rabbitmq.port=5672
spring.rabbitmq.username=admin
spring.rabbitmq.password=secret
.....
发送消息
Spring的AmqpTemplate和AmqpAdmin是自动配置的,您可以将它们直接自动装入自己的bean中:
package com.ustc.rabbitmq;

import org.junit.Test;
import org.junit.runner.RunWith;
import org.springframework.amqp.rabbit.core.RabbitTemplate;
import org.springframework.beans.factory.annotation.Autowired;
import org.springframework.boot.test.context.SpringBootTest;
import org.springframework.test.context.junit4.SpringRunner;

import java.util.Arrays;
import java.util.HashMap;

@RunWith(SpringRunner.class)
@SpringBootTest
public class RabbitmqApplicationTests {

    @Autowired
    RabbitTemplate rabbitTemplate;
    @Test
    public void contextLoads() {
        HashMap map = new HashMap();
        map.put("msg","this is idea send");
        map.put("data", Arrays.asList("hahaha",185,true));
        rabbitTemplate.convertAndSend("exchange.direct","ustc.emp",map);
    }

    @Test
    public void receive(){
        Object o = rabbitTemplate.receiveAndConvert("ustc.news");
        System.out.println(o.getClass());
        System.out.println(o);
    }

}
tips:默认的传输对象的测试是采用java自带的序列化机制,如果想更改默认的序列化机制,可以配置一个messagerConverter.
package com.ustc.rabbitmq.config;

import org.springframework.amqp.support.converter.Jackson2JsonMessageConverter;
import org.springframework.amqp.support.converter.MessageConverter;
import org.springframework.context.annotation.Bean;
import org.springframework.context.annotation.Configuration;

@Configuration
public class RabbitMQConfiguration {

    @Bean
    public MessageConverter messageConverter(){
        return new Jackson2JsonMessageConverter();
    }
}
接收消息
import org.springframework.amqp.rabbit.annotation.RabbitListener;
import org.springframework.stereotype.Service;

@Service
public class MessageService {

    @RabbitListener(queues = "ustc.emp")     //指明要监听的队列  是一个数组
    public void recive(Object o){
        System.out.println(o);
    }
}
tips:使用该注解时,需要先开启注解功能。
import org.springframework.amqp.rabbit.annotation.EnableRabbit;
import org.springframework.boot.SpringApplication;
import org.springframework.boot.autoconfigure.SpringBootApplication;

@EnableRabbit   //开启基于注解的rabbitmq
@SpringBootApplication
public class RabbitmqApplication {

    public static void main(String[] args) {
        SpringApplication.run(RabbitmqApplication.class, args);
    }

}