这片文章是对自己学习的总结,学习材料是Java EE互联网轻量级框架整合开发 SSM框架(Spring MVC + Spring + Mybatis)和Redis实现。作者是杨开振,周吉文,梁华辉和谭茂华。
本文可单独查看,也可以接着这篇文章看。
bean是一个类,不是像String,Arraylist这样被定义好的具体的类。Bean里存放着一个类的实例描述信息(不是实例),用户可以通过这个Bean所属容器中的getBean方法得到类的实例。
说到这里,bean实际上就是一个类,是放在Spring IoC这个容器中的类。我们要用简单的描述信息从Spring IoC中得到对象,这个动作就是装配bean(这部分的细节以及什么是Spring Ioc容器可以看这篇文章https://blog.csdn.net/sinat_38393872/article/details/95076976)
下面开始讲解注解装配Bean会使用到的各种注解
@Component,@ComponentScan和@Value
通过@Component装配Bean。使用方法如下。
package com.ssm.annotation;
//这两个包必须导入
import org.springframework.beans.factory.annotation.Value;
import org.springframework.stereotype.Component;

@Component(value = "role")       //或者写成@Component("role")
public class Role{
    @Value("1")
    private long id;
    @Value("role_name_1")
    private String roleName;
    //setter and getter//
}
注解@Componet代表Spring IoC会把这个类扫描生成Bean实例,其中的value就相当于XML中的id。如果不写value值,则Spring默认类名,以小写形式写入id。
注解@Value代表值的注入。
有了以上的注解后,还没能完成装配,因为Spring IoC不知道去哪里扫描对象,这时候除了导入上述代码的两个包,还需要同包下再导入一个PojoConfig类。PojoConfig类如下所示
package com.ssm.annotation;
import org.springframework.context.annotation.ComponentScan;
@ComponentScan
public class PojoConfig{
}
这个类很简单,但是有一点是要注意的。
注意第一行代码,这个类的包名必须和需要装配的类的包名是一样的。因为@ComponentScan扫描默认是扫描当前包的路径,所以包名必须和需要装配的类相同。
从这里就可以理解为什么需要装配的类分散在不同的包时,使用注解不容易管理,需要使用XML的原因。
@ComponentScan和@Component一样,@Component有参数value可以设置,@ComponentScan也有参数可以设置。有两个参数可供设置——basePackages和basePackateClasses
- basePackages的值是包的全限定性名,它表示Spring IoC会扫描这个包以及其所有子包的所有类来装配Bean。比如
package com.ssm.annotation;
import org.springframework.context.annotation.ComponentScan;
@ComponentScan(basePackages = {"com.ssm.eles", "com.ssm.other")}
public class PojoConfig{
}
这代表着Spring IoC会扫描包com.ssm.eles和com.ssm.other下所有的类(包括它们子包的所有类)。
- basePackagesClasses的值是类的Class类,它表示Spring IoC会扫描当前包下的这些类来装配Bean。比如
package com.ssm.annotation;
import org.springframework.context.annotation.ComponentScan;
//Role和RoleImpl是定义好的类或接口
@ComponentScan(basePackageClasses = {Role.class, RoleImpl.class})
public class PojoConfig{
}
这代表Spring IoC会扫描com.ssm.annotation这个包下的Role和RoleImpl这两个类来装配Bean。
最后说一下basePackages和basePackagesClasses重复扫描的问题。
如果采用多个@ComponentScan去扫描对应的包,当两个ComponentScan扫描到同一个类时,会为这个类配置生成多个对象。
同一个@ComponentScan多次扫描一个类,也只是为这个类配置生成一个对象。
@Autowired
@Autowired是自动装配,它是为了解决注解装配Bean中,如何为引用赋值的问题。比如
@Component("role")
public class Role {
    @Value("1")
    private int id;
    @Value("roleName1")
    private String roleName;
    @Autowired
    public Sword sword;
}
我想为装配Role类,并且sword是有值的。但是Sword不能用@Value来赋值,所以我们使用@Autowired注解。
使用@Autowired注解后,容器会扫描容器内所有的Bean,只要扫描到一个类型与@Autowired标注的相同的Bean,就将这个Bean赋值给@Autowired标注的变量。比如我们已经装配了一个Sword类进入容器,使用上面的代码后装配的Role对象中,sword就是有值的,而不是空的。
@Autowired的属性required
@Autowired有一个属性requireed。该属性默认为true,表示一定要找到对应属性的bean,找不到就报错;如果该属性为false,那找不到对应类型的Bean也没关系,不会报错。比如下面代码
@Autowired
public Sword sword;
这就表示找不到就报错
@Autowired(required = false)
public Sword sword;
这表示找不到也不会报错,这是这一变量为空。
@Autowired注解方法
@Autowired也可以修饰方法,只要方法中的参数是引用类型就行。比如下面代码
@Autowired
public void setSword(Sword sword){
    this.sword = sword;
}
@Autowired的效果相当于是在容器中找到和参数类型相同的Bean并且赋值给参数,然后执行这个方法。
写到这也可以发现如果容器内同一个类型的Bean有多个,会导致容器不知道选哪一个赋值给@Autowired标注的对象,这是Autowired的歧义性。有关如何解决歧义性可以看这篇文章。
@Bean
以上是使用@Component装配Bean,但是@Component只能对类进行注解,不能对单个方法进行注解。@Bean可以在方法上进行注解,并且将方法返回的对象作为Spring容器中的Bean,比如下面的代码
public class Data{
    @Bean(name="dataSource")
    public Properties getDataSource(){
        Properties props = new Properties();
        props.setProperty("driver", "com.msql.jdbc.Driver");
        props.setProperty("uri", "jdbc:mysql://localhost:3306/chapter12");
        props.setProperty("username", "root");
        props.setProperty("password", "123456");
        return props;
    }
}
通过@Bean注解,getDataSource方法的返回值被装配到容器中,并且id为dataSource。
使用该注解要注意两点,就是扫描和@Bean会被@Conponent覆盖数据这两点
比如有两个类如下
public class Data {
    @Bean(name = "sword1")
    public Sword getSword(){
        Sword sword = new Sword();
        sword.setDamage(10);
        sword.setLength(10);
        return sword;
    }
}

@Component("sword")
public class Sword {
    @Value("1")
    private int length;
    @Value("2")
    private int damage;
    public int getLength() {
        return length;
    }
    public void setLength(int length) {
        this.length = length;
    }
    public int getDamage() {
        return damage;
    }
    public void setDamage(int damage) {
        this.damage = damage;
    }
}
获取容器的代码在这里
public class AnnotationMain {
    public static void main(String[] args) {
        ApplicationContext ac = new AnnotationConfigApplicationContext(PojoConfig.class);
        Sword sword1 = (Sword) ac.getBean("sword1");
        Sword sword = (Sword) ac.getBean("sword");
        System.out.println(sword == sword1);
        System.out.println(sword.getDamage());
        System.out.println(sword1.getDamage());
    }
}
配置类代码如下
@ComponentScan
public class PojoConfig {
}
先声明一点,以上的几个类都在同一个包下,所以不用担心扫描没扫到的问题。
但是如果直接运行AnnotationMain的main方法,会在第二行报NoSuchBeanDefinitionException,也就是说,@Bean装配的sword1找不到。这是因为Data类前面什么注解也没有,容器扫描到这个类时,认为这个类不需要装配,所以都没看里面的方法就直接跳过了,导致sword1没有装配进容器。
v解决方法有两个,给Data类加上@Configuration表明这个类需要装配。
@Configuration
public class Data {···}
或者在使用AnnotationConfigApplicationContext获取容器时,将Data.class也放进参数中
ApplicationContext ac = new AnnotationConfigApplicationContext(PojoConfig.class, Data.class);
@ImportResource和@Import
这两个注解是为了解决xml和注解混合装配的问题
1、使用注解装配Xml
在一些config类中可能还是需要使用Xml来装配Bean,这时候就要用到@ImportResource注解配置类,将xml配置添加进去。
我这里的用idea和maven默认项目结构,如下图
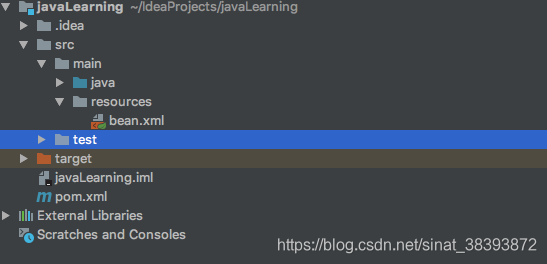
java是项目根目录。现在回到@ImportResource。这个注解需要加到配置类,代码如下。
@ComponentScan
@ImportResource({"classpath:bean.xml"})
public class PojoConfig {
}
@ImportResource里的参数表示路径名,classpath表示编译后的项目根目录(不是编译前的)。在idea的maven项目中,编译后的.class和resources里的文件放在target.classes中,如下图所示。可以看到,resources目录下的bean.xml也放在target.classes之下。

而classpath:就表示目录target.classes,所以@ImportResource中的classpath:bean.xml就表示target.classes.bean.xml。
那么我们定义PojoConfig容器时,bean.xml中装配的bean我们也可以使用。
@ImportResource中可以添加多个xml。比如
@ImportResource({"classpath:bean1.xml", "classpath:bean2.xml"})这就是同时装配两个xml。
2、注解添加其他注解
一个项目中可能有多个配置类,我们可能需要将这些配置类整合起来,这时候就要用到@Import注解,具体用法如下。
@ComponentScan
@Import({ApplicationConfig2.class, ApplicationConfig3.class})
public class PojoConfig {
}
@PropertySource
这两个注解是用来加载properties文件的,比较常见的使用场景是加载数据库。连接数据库的必要信息存储在properties文件中,比如用户名,密码等。这样项目中连接数据库就可以动态得到这些属性。
若有文件jdbcConfig.properties放在resources文件下,代码如下
jdbc.driver=com.mysql.jdbc.Driver
jdbc.url=jdbc:mysql://localhost:3306/eesy
jdbc.username=root
jdbc.password=1234
配置类加上@PropertySource注解,就表示将这些键值对加载到容器中。@PropertySource里的属性意义和本文的@ImportSource一样。
@ComponentScan
@PropertySource({"classpath:jdbcConfig.properties"})
public class PojoConfig {
}
现在容器中就有jdbc连接需要的信息,此时我们有一个jdbc类,我们可以用@Value("${}")为这个类赋值装配,代码如下。
@Component
public class JdbcConfig {
    @Value("${jdbc.driver}")
    private String driver;
    @Value("${jdbc.url}")
    private String url;
    @Value("${jdbc.username}")
    private String username;
    @Value("${jdbc.password}")
    private String password;
」
@Value中使用${}来获取properties中的值,大括号内填key值就能得到对应的value。
获取PojoConfig容器后,可以得到jdbcConfig对象。
public class AnnotationMain {
    public static void main(String[] args) {
        ApplicationContext ac = new AnnotationConfigApplicationContext(PojoConfig.class);
        JdbcConfig jdbcConfig = (JdbcConfig) ac.getBean("jdbcConfig");
        System.out.println(jdbcConfig.getPassword());
    }
}
@PropertySource也可以同时加载多个properties文件,写法如下
@ComponentScan
@PropertySource({"classpath:jdbcConfig.properties", "classpath:jdbcConfig1.properties"})
public class PojoConfig {
}
但是要注意同一个key覆盖的问题,比如上面的jdbcConfig.properties和jdbcConfig1.properties文件中有相同的key都是password,而对应的value不相同,如下所示
//jdbcConfig
password = 1234

//jdbcConfig1
password = 123456
那从容器中读取password时,读取到的值是写在后面的properties。比如上面的
@PropertySource({"classpath:jdbcConfig.properties", "classpath:jdbcConfig1.properties"})
读取到的是jdbcConfig1里的password的值。