优化之前的分配角色功能
实现下拉列表的选项默认选中
-
-
我们得先获取到这个用户的rid
// 分配角色提交
grantrolesubmit () {
    if (this.grantForm.rid) {
        grantUserRole(this.grantForm.id, this.grantForm.rid)
            .then(res => {
            if (res.data.meta.status === 200) {
                this.$message({
                    type: 'success',
                    message: res.data.meta.msg
                })
                this.grantDialogFormVisible = false
            }
        })
    } else {
        this.$message({
            type: 'warning',
            message: '请先选择一个角色'
        })
    }
}
<el-input
          placeholder="请输入内容"
          v-model="userKey"
          class="input-with-select"
          style="width:300px;margin-right:15px"
          @keyup.enter.native="init"
          >
    <el-button slot="append" icon="el-icon-search" @click='init'></el-button>
</el-input>
<template>
    <div class="right">right</div>
</template>
<script>
export default {

}
</script>
<style lang="less" scoped>

</style>
添加路由配置
{
    name: 'Right',
    path: 'right',
    component: Right
}
修改左侧菜单项的指定子项的index
<el-menu-item index="/home/right">
    <template slot="title">
        <i class="el-icon-location"></i>
        <span>权限列表</span>
    </template>
</el-menu-item>
获取所有权限列表数据
-
-
添加api方法
// 获取所有权限列表
export const getAllRightList = (type) => {
  return axios({
    url: `rights/${type}`
  })
}
制作权限列表组件
-
-
添加表格
-
data:代码表格的数据源
-
列中的prop是指定这一列要展示数据属性名称
 <!-- 表格结构 -->
<el-table :data="rightList" border style="width: 100%">
    <el-table-column type="index" width="50"></el-table-column>
    <el-table-column prop="authName" label="权限" width="180"></el-table-column>
    <el-table-column prop="path" label="路径" width="180"></el-table-column>
    <el-table-column prop="level" label="层级"></el-table-column>
</el-table>
getAllRightList('list')
      .then(res => {
        console.log(res)
        this.rightList = res.data.data
      })
数据处理:添加过滤器
-
-
在当前组件中通过filters创建
filters:{
    名称:(参数) =>{
        return ''
    }
}
filters: {
    levelFormat: level => {
      if (level === '0') {
        return '一级'
      } else if (level === '1') {
        return '二级'
      } else if (level === '2') {
        return '三级'
      }
      return ''
    }
  }
-
现在现实情况,我们需要在表格中列中使用过滤器
-
列中有一个prop属性,但是不能在这个属性中直接使用过滤器
-
我们可以考虑添加template来实现这个效果
<el-table-column label="层级">
    <template slot-scope="scope">
        <span>{{scope.row.level | levelFormat}}</span>
    </template>
</el-table-column>
-
数据展示:添加展开行功能
-
添加角色
-
可以为角色授权--树形组件
-
展开行功能:可以实现权限的删除
-
树形组件中可以实现授权权限和删除权限
一个建议:一定要仔细的去分析数据结构
添加单文件组件
<template>
    <div class="role">role</div>
</template>
<script>
export default {

}
</script>
<style lang="less" scoped>

</style>
配置路由
{
    name: 'Role',
    path: 'roles',
    component: Role
}
修改左侧菜单项的index设置
<el-menu-item index="/home/roles">
    <template slot="title">
        <i class="el-icon-location"></i>
        <span>角色列表</span>
    </template>
</el-menu-item>
-
面包屑
-
按钮
-
展开行
-
通过设置 type="expand" 和
Scoped slot可以开启展开行功能,el-table-column的模板会被渲染成为展开行的内容,展开行可访问的属性与使用自定义列模板时的Scoped slot相同
-
表格数据是显示角色数据 :表格》》角色
-
展开行数据是展示这个角色的权限数据 :展开行》》权限
-
获取所有角色数据
-
设置表格的相关属性
<el-table :data="roleList" style="width: 100%">
      <!-- type="expand":说明这列可以实现展开 -->
      <el-table-column type="expand">
        <!-- 展开的时候,template模板中的结构就是展开行的内容 -->
        <template slot-scope="props">我要自己的内容,以后这块内容应该根据数据动态生成</template>
      </el-table-column>
      <el-table-column type="index" width="50"></el-table-column>
      <el-table-column label="角色名称" prop="roleName"></el-table-column>
      <el-table-column label="描述" prop="roleDesc"></el-table-column>
      <el-table-column label="操作">
        <!-- 插槽:匿名插槽,具名插槽,数据插槽 -->
        <template v-slot="scope">
          <el-tooltip class="item" effect="dark" content="编辑" placement="top">
            <el-button type="info" icon="el-icon-edit"></el-button>
          </el-tooltip>
          <el-tooltip class="item" effect="dark" content="角色授权" placement="top">
            <el-button type="success" icon="el-icon-share"></el-button>
          </el-tooltip>
          <el-tooltip class="item" effect="dark" content="删除" placement="top">
            <el-button type="warning" icon="el-icon-delete"></el-button>
          </el-tooltip>
        </template>
      </el-table-column>
    </el-table>
-
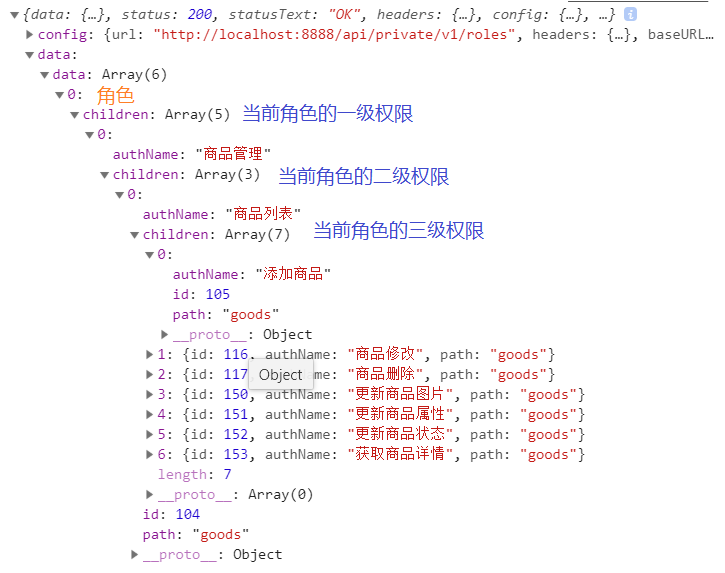
权限数据在当前角色的children中
-
我们需要根据权限数据动态生成展开行结构
-
-
二级权限是属于指定一级权限的二级权限,所以我应该在展示完某个一级权限,采用嵌套的结构去展示它的二级权限
-
三级权限是指定的二级权限的三级权限
<template slot-scope="scope">
    <!-- 遍历数据行对象的children -->
    <el-row v-for="first in scope.row.children" :key="first.id" style='margin-bottom:10px;border-bottom:1px dashed #ccc'>
        <el-col :span="4">
            <el-tag closable type="success">{{first.authName}}</el-tag>
        </el-col>
        <el-col :span="20">
            <el-row v-for='second in first.children' :key='second.id' style='margin-bottom:10px;'>
                <el-col span='4'><el-tag closable type="info">{{second.authName}}</el-tag></el-col>
                <el-col span='20'>
                    <el-tag closable type="danger" v-for='third in second.children' :key='third.id' style='margin:0 4px 4px 0'>{{third.authName}}</el-tag>
                </el-col>
            </el-row>
        </el-col>
    </el-row>
</template>
效果展示:
角色列表

权限列表

如果您喜欢这篇文章,可以打赏点钱给我 :)
支付宝 微信