目录
概述
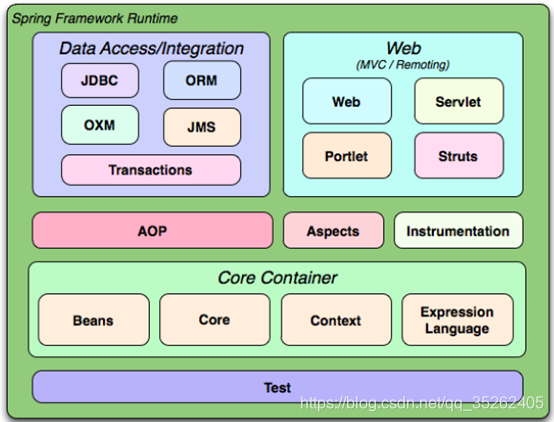
Spring是一个开源框架,Spring是于2003 年兴起的一个轻量级的Java 开发框架,由Rod Johnson 在其著作Expert One-On-One J2EE Development and Design中阐述的部分理念和原型衍生而来。它是为了解决企业应用开发的复杂性而创建的。
框架的主要优势之一就是其分层架构,分层架构允许使用者选择使用哪一个组件,同时为 J2EE 应用程序开发提供集成的框架。
Spring使用基本的JavaBean来完成以前只可能由EJB完成的事情。然而,Spring的用途不仅限于服务器端的开发。从简单性、可测试性和松耦合的角度而言,任何Java应用都可以从Spring中受益。
Spring的核心是控制反转(IoC)和面向切面(AOP)。简单来说,Spring是一个分层的JavaSE/EEfull-stack(一站式) 轻量级开源框架。
控制反转(IOC/DI)
控制反转(Inversion of Control),就是应用本身不负责对象的创建和维护,对象和依赖对象创建完全交给Spring的容器去管理和维护,这个权利反转给容器。
项目中分层开发,学Spring之前bean都是我们自己创建

面向切面(AOP)
AOP(Aspect Oriented Programming),通过预编译的方式在运行期使用动态代理的方式来实现的一种技术。
-
在项目中使用aop来管理事务,事务的开启,提交,回滚。
-
在项目中管理事务的传播特性。
spring的其他功能
spring环境搭建
- 创建java工程
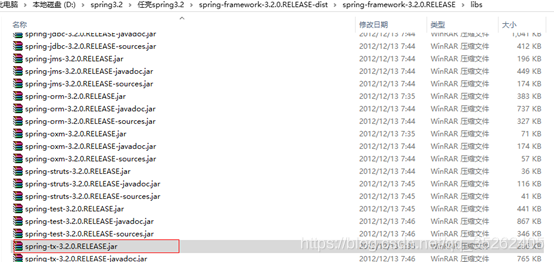
- 引入包

- 创建spring的配置文件
默认名称叫ApplicationContext.xml
<?xml version="1.0" encoding="UTF-8"?>
<beans xmlns="http://www.springframework.org/schema/beans"
       xmlns:xsi="http://www.w3.org/2001/XMLSchema-instance"
       xsi:schemaLocation="http://www.springframework.org/schema/beans
           http://www.springframework.org/schema/beans/spring-beans-3.2.xsd">
</beans>
配置dtd

- 创建bean
package com.rl.spring.dao.impl;

import com.rl.spring.dao.UserDao;

public class UserDaoImpl implements UserDao {

	@Override
	public void save() {
		System.out.println("user被保存了");
	}
}
Spring配置,现在多数用注解注入
<bean id="userDao" class="com.rl.spring.dao.impl.UserDaoImpl"></bean>
我们必须指定id,唯一标识,class就是bean的类的全路径
- 创建Spring的容器
@Test
public void test() {
	//初始化spring容器
	ApplicationContext ctx = new ClassPathXmlApplicationContext("ApplicationContext.xml");
	//获得bean
	UserDao userDao = (UserDao) ctx.getBean("userDao");
	userDao.save();
}
Bean的创建方式
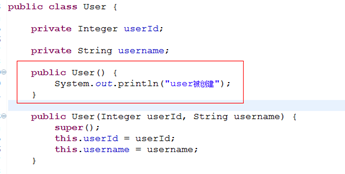
使用构造器创建
使用构造器方式创建bean,要求bean必须要有默认的构造器,这是工作中最常用的方式。
<bean id="user" class="com.rl.spring.model.User"></bean>
静态工厂方式创建
提供静态工厂
public class FactoryBean {

	/**
	 * 必须是静态方法
	 * @return

	 */
	public static User createUser(){
		return new User();
	}
}
配置:
<!-- id:唯一标识
		class:静态工厂的类
		factory-method:静态工厂的方法
	 -->
<bean id="user" class="com.rl.spring.factory.FactoryBean"
factory-method="createUser"></bean>
实例工厂方式创建
实例工厂:
public class FactoryBean1 {
	public User createUser(){
		return new User();
	}
}
配置:
<!-- 通过Spring来定义实例工厂 -->
	<bean id="factoryBean" class="com.rl.spring.factory.FactoryBean1"></bean>
	<!-- 指定要创建的bean
		factory-bean:指定实例工厂类,
		factory-method:工厂的创建bean的方法
	 -->
	<bean id="user" factory-bean="factoryBean" factory-method="createUser"></bean>
延迟加载
所有的bean默认情况下,非延迟加载的,是spring的容器创建的时候就把bean给创建出来了,我们getBean的时候直接从容器中去拿这个Bean就可以了。
是否延迟加载由lazy-init来控制,默认是false,如果变成true就在getBean的时候去创建user。
bean的作用域
默认情况下,bean都是单例的,是容器初始化的时候被创建的,就这么一份。
Scope:singleton单例,prototype多例,默认使用singleton
如果是singleton我们可以设置非延迟加载(容器初始化时创建bean)和延迟加载(getBean的时候才创建)方式创建bean。
如果是prototype我们没得选择只能是延迟加载方式创建(getBean的时候才创建)。
bean的生命周期
通过两个方法来验证,Init方法和destroy。
Init是bean被创建的时候被调用,主要做一些准备工作。
Destroy是bean被销毁的时候被调用,做清理工作。
Bean的生命周期和容器一致,容器被创建bean就被创建,容器销毁bean就被销毁。
在user中定义两个方法
public void init(){
		System.out.println("我出来了");
	}
	public void destroy(){
		System.out.println("20年后又是一条好汉");
	}
配置:
<!--
		init-method:bean被创建时调用
		destroy-method:bean被销毁时调用
	 -->
	<bean id="user" class="com.rl.spring.model.User"
	 init-method="init" destroy-method="destroy"></bean>
依赖注入(重点)
常量注入
<!--
		bean的常量注入
	 -->
	<bean id="user" class="com.rl.spring.model.User">
		<!--
			property:class里面的属性
			name:属性名
		 -->
		<property name="userId" value="1"></property>
		<property name="username" value="renliang"></property>
		<property name="password" value="123"></property>
	</bean>
构造器注入
构造器注入常量:
<!-- 构造器方式注入 -->

	<bean id="user" class="com.rl.spring.model.User">
		<!--
			index:构造方法的参数的索引顺序
			type:构造方法的参数的类型(不是必须 的)
			value:值
		 -->
		<!-- <constructor-arg index="0" type="java.lang.Integer" value="2"/>
		<constructor-arg index="1" type="java.lang.String" value="renliang"/>
		<constructor-arg index="2" type="java.lang.String" value="666"/> -->
		<constructor-arg index="0"  value="2"/>
		<constructor-arg index="1"  value="renliang"/>
		<constructor-arg index="2"  value="666"/>
	</bean>
注入bean:
第一步给当前的bean(Service实现类)提供要注入的bean有参数的构造器,切记不要忘了把默认构造器显示的提供出来
public class UserServiceImpl implements UserService {
	private UserDao userDao;

	public UserServiceImpl() {
	}

	public UserServiceImpl(UserDao userDao) {
		super();
		this.userDao = userDao;
	}

	@Override
	public void save() {
		userDao.save();
	}
}
第二步做配置
<!--
		定义UserDao的bean
	 -->
	<bean id="userDao" class="com.rl.spring.dao.impl.UserDaoImpl"></bean>
	<!-- 定义UserService的Bean -->
	<bean id="userService" class="com.rl.spring.service.impl.UserServiceImpl">
		<!-- 通过构造器的方式指定注入的bean
			type:指定UserDao接口,不要指定实现类
			ref:就是要注入的bean
		 -->
		<constructor-arg index="0" type="com.rl.spring.dao.UserDao" ref="userDao"/>
	</bean>
外部bean注入(90%使用)
创建UserService,中有一个UserDao的属性,必须提供set方法
public class UserServiceImpl implements UserService {


	private UserDao userDao;

	/**
	 * 外部bean的方式注入,必须提供要注入的bean的set方法
	 * @param userDao
	 */
	public void setUserDao(UserDao userDao) {
		this.userDao = userDao;
	}

	@Override
	public void save() {
		userDao.save();
	}
}
配置
<!--
		定义UserDao的bean
	 -->
	<bean id="userDao" class="com.rl.spring.dao.impl.UserDaoImpl"></bean>
	<!-- 定义Service的bean -->
	<bean id="userService" class="com.rl.spring.service.impl.UserServiceImpl">
		<!-- 通过属性方式注入
			name:bean的属性名
			ref:要注入的bean
		 -->
		<property name="userDao" ref="userDao"></property>
	</bean>
内部bean注入
第一步:创建UserService,中有一个UserDao的属性,必须提供set方法
public class UserServiceImpl implements UserService {


	private UserDao userDao;

	/**
	 * 外部bean的方式注入,必须提供要注入的bean的set方法
	 * @param userDao
	 */
	public void setUserDao(UserDao userDao) {
		this.userDao = userDao;
	}

	@Override
	public void save() {
		userDao.save();
	}

}
UserDaoImpl它定义在UserService的内部,不能其他bean注入,比较少用
<bean id="userService" class="com.rl.spring.service.impl.UserServiceImpl">
		<property name="userDao">
			<bean class="com.rl.spring.dao.impl.UserDaoImpl"></bean>
		</property>
	</bean>
集合注入
都能注入set,list,map,property,必须提供set方法
public class CollectionInjection {

	private Set<String> set;

	private List<String> list;

	private Map<String, String> map;

	private Properties prop;

	public Properties getProp() {
		return prop;
	}

	public void setProp(Properties prop) {
		this.prop = prop;
	}

	public Map<String, String> getMap() {
		return map;
	}

	public void setMap(Map<String, String> map) {
		this.map = map;
	}

	public List<String> getList() {
		return list;
	}

	public void setList(List<String> list) {
		this.list = list;
	}

	public Set<String> getSet() {
		return set;
	}

	public void setSet(Set<String> set) {
		this.set = set;
	}

}
配置
<bean id="ci" class="com.rl.spring.model.CollectionInjection">
		<property name="set">
			<set>
				<value>football</value>
				<value>basketball</value>
			</set>
		</property>
		<property name="list">
			<list>
				<value>male</value>
				<value>female</value>
			</list>
		</property>
		<property name="map">
			<map>
				<entry key="key1" value="value1"></entry>
				<entry key="key2" value="value2"></entry>
			</map>
		</property>
		<property name="prop">
			<props>
				<prop key="name">任亮</prop>
				<prop key="job">讲师</prop>
			</props>
		</property>
	</bean>
注解方式注入(常用)
配置
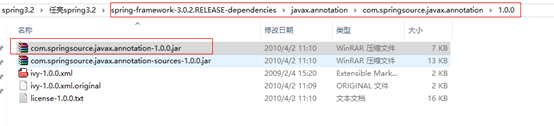
第一步:引入依赖包
第二步:引入约束文件
<?xml version="1.0" encoding="UTF-8"?>
<beans xmlns="http://www.springframework.org/schema/beans"
       xmlns:xsi="http://www.w3.org/2001/XMLSchema-instance"
       xmlns:context="http://www.springframework.org/schema/context"
       xsi:schemaLocation="http://www.springframework.org/schema/beans
           http://www.springframework.org/schema/beans/spring-beans-3.2.xsd
           http://www.springframework.org/schema/context
           http://www.springframework.org/schema/context/spring-context-3.2.xsd">
</beans>
第三步:开启注解的驱动
<?xml version="1.0" encoding="UTF-8"?>
<beans xmlns="http://www.springframework.org/schema/beans"
       xmlns:xsi="http://www.w3.org/2001/XMLSchema-instance"
       xmlns:context="http://www.springframework.org/schema/context"
       xsi:schemaLocation="http://www.springframework.org/schema/beans
           http://www.springframework.org/schema/beans/spring-beans-3.2.xsd
           http://www.springframework.org/schema/context
           http://www.springframework.org/schema/context/spring-context-3.2.xsd">

	<!-- 开启注解的驱动 -->
	<context:annotation-config/>

	<bean id="userDao" class="com.rl.spring.dao.impl.UserDaoImpl"></bean>

	<bean id="userService" class="com.rl.spring.service.impl.UserServiceImpl"></bean>
</beans>
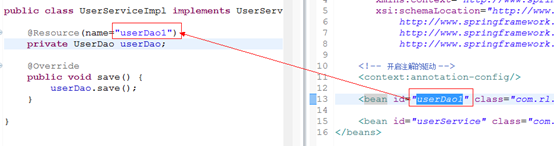
@Resource注解
@Resource注解并不是spring的注解是javax下的
加在属性上
在bean中定义要注入bean的属性,不需要提供set方法
public class UserServiceImpl implements UserService {

	@Resource
	private UserDao userDao;

	@Override
	public void save() {
		userDao.save();
	}
}
Spring容器初始化的时候,@Resource注解首先按着@Resource属性的name(默认没有指定name的时候用变量名(userDao))名称匹配跟spring容器中bean的id来匹配。
默认不指定@Resource的name时,如果name匹配不上,就按着接口和实现类的关系来匹配,如果存在一个接口有多个实现类的关系的时候,我们必须指定@Resource的name属性来指定到底注入哪一个bean。
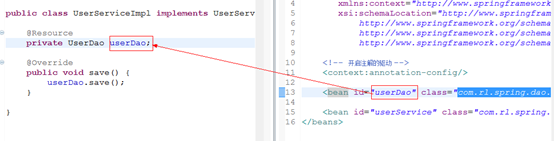
如果指定了name,能找到就注入进来,如果找不到就会报错,不会按着类型进行匹配。
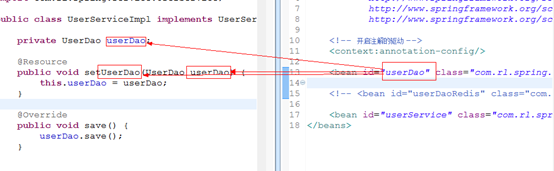
加在set方法上
在set方法上加@Resource注解
默认不指定@Resource的name的时候,bean的id和如果下左边的三个框内的任意一个名称能匹配上就能注入。如果三个名字都匹配不上就会按着接口和实现类的关系来匹配,如果遇到两个实现类就会报错,这时要求@Resource的name。
如果一旦指定了@Resource的name如果name匹配不上就直接报错,不会再去按着类型去匹配
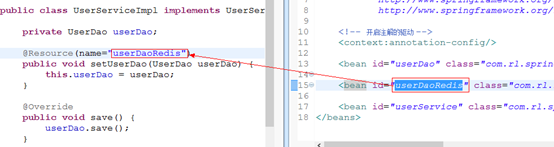
@Resource(name="userDaoRedis")
	public void setUserDao(UserDao userDao) {
		this.userDao = userDao;
	}
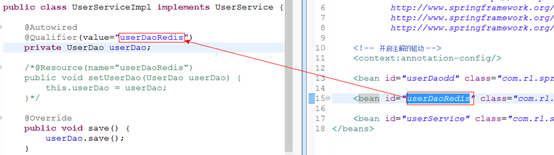
@Autowired注解(常用)
@Resource注解是spring的注解
加在属性上
@Autowired按着接口和实现类的关系来匹配的,如果存在多个接口的实现类的时候,我们必须要指定name来匹配,要结合@Qulifier的注解来指定value和bean的id匹配来注入。
加在set方法上

spring的扫描器管理Bean(常用)
实际项目如果很大就会出现大量配置,我们使用扫描器可以解决这个问题
扫描器扫描带有@Controller,@Service, @Repository,@Component的类
- @Controller:控制层的类
- @Service:服务层的类
- @Repository:数据层的类
- @Component:无法分层的类上
以上注 标注的类的bean的id默认类名的首字符小写
spring和junit的整合
第一步:引入spring的测试包

实现:
/**
 * @RunWith:指定spring对junit提供的一个运行器
 * @ContextConfiguration:指定spring配置文件位置
 * @author renliang
 *
 */
@RunWith(value=SpringJUnit4ClassRunner.class)
@ContextConfiguration(locations={"classpath:ApplicationContext.xml"})
public class TestSpring1 {

	/**
	 * 在junit的bean中注入UserService
	 */
	@Autowired
	UserService userService;

	@Test
	public void test2() {
		userService.save();
	}
}
AOP
AOP(Aspect Oriented Programming),面向切面编程,通过预编译的方式在运行期通过动态代理实现一种技术。
AOP是OOP延续,利用AOP可以实现业务和切面的逻辑分离,降低耦合度。程序的重用性提高。

jdk动态代理
JDK动态代理代理目标是接口实现类的形式
代理的目标对象
public class UserServiceImpl implements UserService {
	private User user;


	public User getUser() {
		return user;
	}

	public void setUser(User user) {
		this.user = user;
	}

	public void save() {
		System.out.println("保存用户");
	}

	@Override
	public void update() {
		System.out.println("修改用户");
	}
}
代理:
public class JDKProxy implements InvocationHandler {

	/**
	 * 指定代理目标对象
	 */
	private Object targetObj;

	/**
	 * 第一个参数:获得目标对象的类的加载器
	 * 第二个参数:获得目标对象的接口
	 * 第三个参数:设置回调对象,当前代理对象的方法被调用时,会委派该参数去调用invoke
	 * @param targetObj
	 * @return
	 */
	public Object createProxyInstance(Object targetObj){
		this.targetObj = targetObj;
		return Proxy.newProxyInstance(this.targetObj.getClass().getClassLoader(),
				this.targetObj.getClass().getInterfaces(), this);
	}

	/**
	 * proxy:代理类
	 * Method:要调用的业务方法
	 * Object[]:调用的业务方法的参数
	 *
	 */
	@Override
	public Object invoke(Object proxy, Method method, Object[] args)
			throws Throwable {
		//获得目标对象的get方法
		Method getMeth = this.targetObj.getClass().getMethod("getUser", null);
		//通过反射来调用getUser
		Object user = getMeth.invoke(targetObj, null);
		Object obj = null;
		if(user != null){
			//obj是业务方法返回的值
			obj = method.invoke(this.targetObj, args);
		}else{
			System.out.println("您还没有登录");
		}
		return obj;
	}
}
CGLIB动态代理
CGLIB可以对普通类做动态代理,目标类不能是final,目标类里面的方法也不能是final
public class UserServiceImpl {
//implements UserService {

	private User user;


	public User getUser() {
		return user;
	}

	public void setUser(User user) {
		this.user = user;
	}

	public void save() {
		System.out.println("保存用户");
	}

	public void update() {
		System.out.println("修改用户");
	}

}
代理:
public class CGLIBProxy implements MethodInterceptor {

	/**
	 * 指定代理目标对象
	 */
	private Object targetObj;

	public Object createProxyInstance(Object targetObj){
		this.targetObj = targetObj;
		Enhancer en = new Enhancer();
		//设置代理类的父类
		en.setSuperclass(this.targetObj.getClass());
		//设置回调对象
		en.setCallback(this);
		//创建代理类
		return en.create();
	}

	@Override
	public Object intercept(Object arg0, Method method, Object[] arg2,
			MethodProxy arg3) throws Throwable {
		Method getMeth = this.targetObj.getClass().getMethod("getUser", null);
		//通过反射来调用getUser
		Object user = getMeth.invoke(targetObj, null);
		Object obj = null;
		if(user != null){
			obj = method.invoke(this.targetObj, arg2);
		}else{
			System.out.println("您还没有登录");
		}
		return obj;
	}
}
Spring的注解形式AOP
- Aspect(切面):对横切性关注点的一中抽象。
- Jionpoint(连接点):要拦截的方法。
- Pointcut(切点):是连接点的集合
- Advice(通知):在连接点前后或异常情况来做的事情,前置通知,后置通知,返回通知,异常通知,环绕通知。
- Target(目标对象):代理的目标对象
- Weave(织入):切面应用到目标对象并且导致proxy对象创建的过程叫织入
第一步:引入Spring的aop的包


第二步:引入头信息
<?xml version="1.0" encoding="UTF-8"?>
<beans xmlns="http://www.springframework.org/schema/beans"
       xmlns:xsi="http://www.w3.org/2001/XMLSchema-instance"
       xmlns:context="http://www.springframework.org/schema/context"
       xmlns:aop="http://www.springframework.org/schema/aop"
       xsi:schemaLocation="http://www.springframework.org/schema/beans
           http://www.springframework.org/schema/beans/spring-beans-3.2.xsd
           http://www.springframework.org/schema/context
           http://www.springframework.org/schema/context/spring-context-3.2.xsd
           http://www.springframework.org/schema/aop
           http://www.springframework.org/schema/aop/spring-aop-3.2.xsd">
</beans>
第三步:基于注解方式的切面声明
<?xml version="1.0" encoding="UTF-8"?>
<beans xmlns="http://www.springframework.org/schema/beans"
       xmlns:xsi="http://www.w3.org/2001/XMLSchema-instance"
       xmlns:context="http://www.springframework.org/schema/context"
       xmlns:aop="http://www.springframework.org/schema/aop"
       xsi:schemaLocation="http://www.springframework.org/schema/beans
           http://www.springframework.org/schema/beans/spring-beans-3.2.xsd
           http://www.springframework.org/schema/context
           http://www.springframework.org/schema/context/spring-context-3.2.xsd
           http://www.springframework.org/schema/aop
           http://www.springframework.org/schema/aop/spring-aop-3.2.xsd">

	<!-- 开启以注解形式切面的驱动 -->
	<aop:aspectj-autoproxy/>
</beans>
第四步:切面定义
创建一个类,在上加入@Aspect注解
@Aspect
public class PermAspect {

	/**
	 * 第一个*:拦截方法的返回值
	 * 第一个..:子包
	 * 第二个*:所有的类
	 * 第三个*:所有的方法
	 * 第二个..:所有的参数
	 */
	@Pointcut("execution(* com.rl.spring.service..*.*(..))")
	public void anyMethod(){
	}
}
前置通知
/*@Aspect
public class PermAspect {

	/**
	 * 第一个*:拦截方法的返回值
	 * 第一个..:子包
	 * 第二个*:所有的类
	 * 第三个*:所有的方法
	 * 第二个..:所有的参数
	 */
	/*@Pointcut(value="execution(* com.rl.spring.service..*.*(..))")
	public void anyMethod(){

	}*/
	/*@Pointcut(value="execution(* com.rl.spring.service..*.*(..))&&args(param)", argNames="param")
	public void anyMethod(User user){

	}*/

	/*@Pointcut(value="execution(!java.lang.String com.rl.spring.service..*.*(..))&&args(param)", argNames="param")
	public void anyMethod(User user){

	}*/
	@Pointcut(value="execution(!java.lang.String com.rl.spring.service..*.*(com.rl.spring.model.User,..))")
	public void anyMethod(){

	}
	/**
	 * @Before前置通知
	 * anyMethod():指定前置通知的切点
	 * 拦截带有user参数的业务方法
	 * args中参数名必须和方法的参数名称一致
	 */
	/*@Before(value="anyMethod()&&args(user)")
	public void preAdive(User user){
		System.out.println(user);
		user.setUsername("任亮");
		System.out.println("执行前置通知");
		System.out.println("------------------------------------------");
	}*/
	/*@Before(value="anyMethod()&&args(param)", argNames="param")
	public void preAdive(User user1){
		System.out.println(user1);
		user1.setUsername("任亮");
		System.out.println("执行前置通知");
		System.out.println("------------------------------------------");
	}*/

	/*@Before(value="anyMethod(param)", argNames="param")
	public void preAdive(User user1){
		System.out.println(user1);
		user1.setUsername("任亮");
		System.out.println("执行前置通知");
		System.out.println("------------------------------------------");
	}*/
	@Before(value="anyMethod()")
	public void preAdive(){
		System.out.println("执行前置通知");
		System.out.println("------------------------------------------");
	}
	/*@Before(value="anyMethod()")
	public void preAdive(){
		System.out.println("执行前置通知");
		System.out.println("------------------------------------------");
	}*/
}
后置通知
定义一个void方法,在方法上加@After注解,在业务方法执行之后来执行,其余使用方法和前置拦截一样。
返回通知
/**
	 * @AfterReturning:返回通知的注解,在返回通知里面可以对业务方法的返回值做最后的统一加工。
	 * pointcut:指定返回通知的切点
	 * returning:指定返回值和返回通知的方法的参数名称要一致
	 *
	 * @param user
	 */
	@AfterReturning(pointcut="anyMethod()", returning="user")
	public void returnAdvice(User user){
		user.setUsername("任亮");
		System.out.println("执行返回通知");
	}
例外通知
我们主要使用例外通知做运行期监控,获得项目的异常信息
/**
	 * @AfterThrowing:异常通知的注解
	 * pointcut:切点
	 * throwing:抛出的异常
	 * @param ex
	 */
	@AfterThrowing(pointcut="anyMethod()", throwing="ex")
	public void exceptionAdvice(Exception ex){
		System.out.println("执行例外通知");
		ex.printStackTrace();
	}
环绕通知
@Aspect
public class PermAspect2 {

	/**
	 * 第一个*:拦截方法的返回值
	 * 第一个..:子包
	 * 第二个*:所有的类
	 * 第三个*:所有的方法
	 * 第二个..:所有的参数
	 */
	@Pointcut(value="execution(* com.rl.spring.service..*.*(..))")
	public void anyMethod(){}


	/**
	 * 环绕通知:可以实现前置通知,后置通知,返回通知,例外通知的所有功能
	 * @Around:环绕通知的注解,指定切点
	 * @param jp:指定的连接点(拦截的业务方法)
	 * @return
	 */
	@Around("anyMethod()")
	public Object doAroundAdvice(ProceedingJoinPoint jp) {
		//获得拦截的业务方法的参数
		Object[] args = jp.getArgs();
		System.out.println("环绕通知----前"+"-------传递的参数:"+args[0]);
		Object obj = null;
		User user = null;
		try {
			//执行业务方法,也可以使用无参数,返回值就是业务方法的返回值
			obj = jp.proceed(args);
			user = (User) obj;
		} catch (Throwable e) {
			e.printStackTrace();
		}
		user.setUsername("任亮");
		System.out.println("环绕通知----后"+"-------返回值:"+obj);
		return obj;
	}
}
使用配置文件做AOP(重点)
配置:
<aop:config>
		<!--
			切点配置:
			expression:切点的表达式
			id:唯一标识
		 -->
		<aop:pointcut expression="execution(* com.rl.spring.service..*.*(..))" id="mycut"/>
		<!-- 切面配置
			ref:要关联的切面类
		 -->
		<aop:aspect ref="permApect">
			<!-- 前置通知
				method:切面类中方法
				pointcut-ref:切点
			 -->
			<aop:before method="preAdvice" pointcut-ref="mycut"/>
			<!-- 后置通知 -->
			<aop:after method="afterAdvice" pointcut-ref="mycut"/>
			<!-- 返回通知
				returning:业务方法返回的值
			 -->
			<aop:after-returning method="returnAdvice" pointcut-ref="mycut" returning="returnval"/>
			<!--
				例外外通
				throwing:抛出的异常的变量名知
			 -->
			 <aop:after-throwing method="exceptionAdvice" pointcut-ref="mycut" throwing="ex"/>
			<!--
				环绕通知
			 -->
			 <aop:around method="aroundAdvice" pointcut-ref="mycut"/>
		</aop:aspect>
	</aop:config>
切面:
public class PermAspect {

	public void preAdvice(JoinPoint jp){
		Object[] args = jp.getArgs();
		if(args.length > 0)
		System.out.println("执行前置通知-----------业务参数:"+args[0]);
	}

	public void afterAdvice(JoinPoint jp){
		Object[] args = jp.getArgs();
		if(args.length > 0)
		System.out.println("执行后置通知-----------业务参数:"+args[0]);
	}

	public void returnAdvice(JoinPoint jp, Object returnval){
		if(returnval instanceof User){
			User user = (User) returnval;
			user.setUsername("任亮");
		}
		System.out.println("返回通知----------返回的值"+returnval);
	}

	public void exceptionAdvice(JoinPoint jp, Exception ex){
		System.out.println("例外通知------------");
		ex.printStackTrace();
	}

	public Object aroundAdvice(ProceedingJoinPoint jp){
		Object[] objs = jp.getArgs();
		if(objs.length>0)
		System.out.println("执行环绕通知前-----------业务参数:"+objs[0]);
		Object obj = null;
		try {
			 obj = jp.proceed();
			 System.out.println("执行环绕通知后-----------业务参数:"+objs[0]);
		} catch (Throwable e) {
			e.printStackTrace();
		}
		return obj;
	}

}
jdbcTemplate
第一步:引入jdbc的包


第二步:配置数据源
<!-- 数据源配置 -->
	<bean id="dataSource" class="org.apache.commons.dbcp.BasicDataSource" destroy-method="close">
		<property name="driverClassName" value="com.mysql.jdbc.Driver"></property>
		<property name="url" value="jdbc:mysql://localhost:3306/spring3.2_10"></property>
		<property name="username" value="root"></property>
		<property name="password" value="root"></property>
		<!-- 初始化的连接数 -->
		<property name="initialSize" value="1"></property>
		<!-- 连接池的最大连接数-->
		<property name="maxActive" value="5"></property>
		<!-- 最大的空闲的连接数 -->
		<property name="maxIdle" value="2"></property>
		<!-- 最小的空闲连接数 -->
		<property name="minIdle" value="1"></property>
	</bean>
第三步:建立t_user表

第四步:DAO
public class UserDaoImpl implements UserDao {

	private DataSource dataSource;

	private JdbcTemplate jt;

	public void setDataSource(DataSource dataSource) {
		this.dataSource = dataSource;
		this.jt = new JdbcTemplate(dataSource);
	}

	@Override
	public void saveUser(User user) {
		String sql = "insert into t_user values(null, ?, ?)";
		jt.update(sql, new Object[]{user.getUsername(), user.getPassword()});
	}

	@Override
	public void updateUser(User user) {
		String sql = "update t_user set username = ?, password=? where user_id = ?";
		jt.update(sql, new Object[]{user.getUsername(), user.getPassword(), user.getUserId()});
	}

	@Override
	public User queryUserById(int userId) {
		String sql = "select * from t_user t where t.user_id = ?";
		User user = jt.queryForObject(sql, new Object[]{userId}, new UserRowMapper());
		return user;
	}

	@Override
	public List<User> queryUserAll() {
		String sql = "select * from t_user";
		List<User> userList = jt.query(sql, new UserRowMapper());
		return userList;
	}

}
事务控制
概述
一荣俱荣,一损俱损,很多复杂的操作我们可以把它看成是一个整体,要么同时成功,要么同时失败。
事务的四个特征ACID:
- 原子性(Atomic):表示组成一个事务的多个数据库的操作的不可分割的单元,只有所有的操作成功才算成功,整个事务提交,其中任何一个操作失败了都是导致整个所有操作失败,事务会回滚。
- 一致性(Consistentcy):事务操作成功后,数据库所处的状态和业务规则一致。如果A账户给B账户汇100,A账户减去100,B加上100,两个账户的总额是不变的。
- 隔离性(islation):在多个数据库的操作相同的数据并发时,不同的事务有自己的数据空间,事务与事务之间不受干扰(不是绝对的)。干扰程度受数据库或者操作事务的隔离级别来决定,隔离级别越高,干扰就越低,数据的一致性越好,并发性就越差。
- 持久性(Druability):一旦事务提交成功,数据就被持久化到数据库,不可以回滚。
spring使用注解对事务的控制(重点)
处理事务传播特性
第一步:配置事务管理器
<beans xmlns="http://www.springframework.org/schema/beans"
       xmlns:xsi="http://www.w3.org/2001/XMLSchema-instance"
       xmlns:context="http://www.springframework.org/schema/context"
       xmlns:aop="http://www.springframework.org/schema/aop"
       xmlns:tx="http://www.springframework.org/schema/tx"
       xsi:schemaLocation="http://www.springframework.org/schema/beans
           http://www.springframework.org/schema/beans/spring-beans-3.2.xsd
           http://www.springframework.org/schema/context
           http://www.springframework.org/schema/context/spring-context-3.2.xsd
           http://www.springframework.org/schema/aop
           http://www.springframework.org/schema/aop/spring-aop-3.2.xsd
           http://www.springframework.org/schema/tx
           http://www.springframework.org/schema/tx/spring-tx-3.2.xsd">
	<!-- Spring读取属性文件配置 -->
	<context:property-placeholder location="classpath:jdbc.properties"/>
	<!-- 数据源配置 -->
	<bean id="dataSource" class="org.apache.commons.dbcp.BasicDataSource" destroy-method="close">
		<property name="driverClassName" value="${driverClassName}"></property>
		<property name="url" value="${url}"></property>
		<property name="username" value="${uname}"></property>
		<property name="password" value="${pword}"></property>
		<!-- 初始化的连接数 -->
		<property name="initialSize" value="${initialSize}"></property>
		<!-- 连接池的最大连接数-->
		<property name="maxActive" value="${maxActive}"></property>
		<!-- 最大的空闲的连接数 -->
		<property name="maxIdle" value="${maxIdle}"></property>
		<!-- 最小的空闲连接数 -->
		<property name="minIdle" value="${minIdle}"></property>
	</bean>

	<bean id="userDao" class="com.rl.spring.dao.impl.OrderDaoImpl">
		<property name="dataSource" ref="dataSource"></property>
	</bean>

	<bean id="detailDao" class="com.rl.spring.dao.impl.DetailDaoImpl">
		<property name="dataSource" ref="dataSource"></property>
	</bean>

	<bean id="userService" class="com.rl.spring.service.impl.OrderServiceImpl">
		<property name="userDao" ref="userDao"></property>
	</bean>

	<!-- 定义事务的管理器 -->
	<bean id="txManager" class="org.springframework.jdbc.datasource.DataSourceTransactionManager">
		<property name="dataSource" ref="dataSource"></property>
	</bean>
	<!-- 事务管理器的主键驱动 -->
	<tx:annotation-driven transaction-manager="txManager"/>
</beans>
第二步:通过@Transactional来标注要使用事务的类或接口或方法,在项目中我们通常都会把事务开启在Service层,建议把注解标注在接口的实现类或者是方法上。
注意:在Service层开启事务的时候,默认情况下,发生运行时异常会回滚,非运行时异常不会回滚。
可以设置对指定的异常回滚
rollbackFor或rollbackForClassName设置对哪些回滚
noRollbackFor或noRollbackForClassName设置对哪些不回滚
@Transactional的默认传播特性是reqired,实际项目中80%都是采用reqired

事务的传播特性:
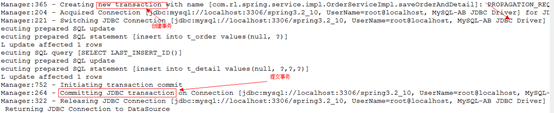
REQUIRED:默认的传播特性,业务方法需要在一个事务中运行,如果一个方法已经处在一个事务中那么就加入到这个事务中,否则就会创建一个事务。

被嵌套的事务
在事务中运行:

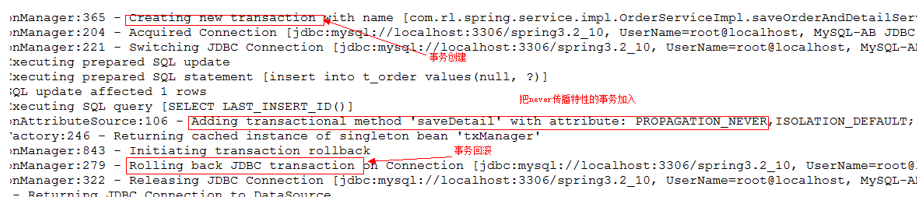
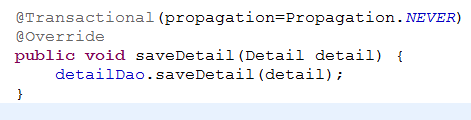
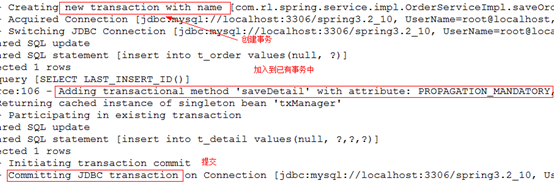
MANDATORY:该属性指定业务方法只能在一个已经存在的事务中执行,业务方法不能自己发起自己的事务,如果业务方法不存在事务,容器就抛异常。
MANDATORY完全和NEVER相反,如果没有在事务中运行

在有事务的环境中
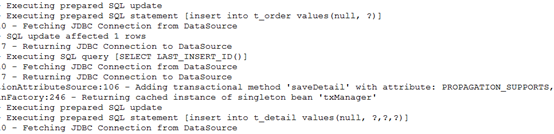
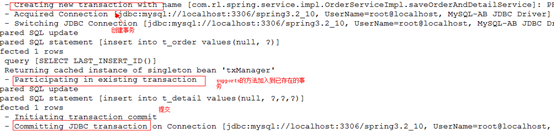
SUPPORTS:如果业务方法中已经在某个事务中被调用,则方法就称为事务的一部分,如果外部业务方法没有开启事务,supports该方法也会在没有事务的环境中执行。
在没有事务的环境下运行
在有事务的环境下运行
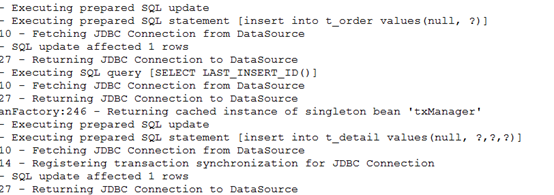
NOT_SUPPORTED:如果该业务方法在一个事务中被调用,那么当前的事务会被挂起,执行该业务方法,方法执行完毕唤醒被挂起的事务,如果业务方法不在一个事务中执行,该方法也不会开事务。不管是否在有无事务的环境中执行都不开启事务。
不在事务中运行

REQUIRES_NEW:不管是否存在事务,业务方法总会自己开启一个事务,如果在已有事务的环境中调用,已有事务会被挂起,新的事务会被创建,直到业务方法调用结束,已有事务才被唤醒。
不在事务中调用
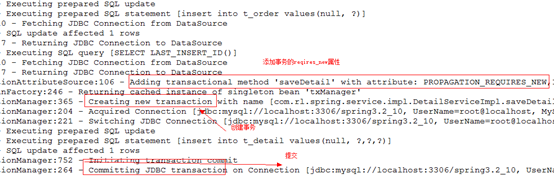
在事务中调用
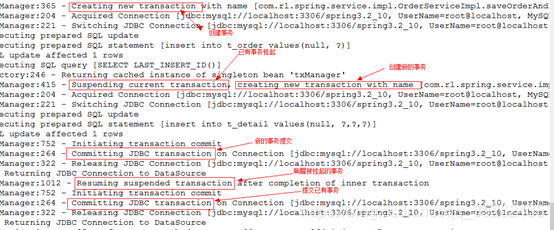
注意:内外事务不受影响
NESTED:如果业务方法在一个事务中执行,就在这个事务中嵌套,如果没有事务按着required执行,开启单独的事务,这种事务有多个事务的保存点,内部事务的回滚对外部事务没有影响。

在没有事务中执行
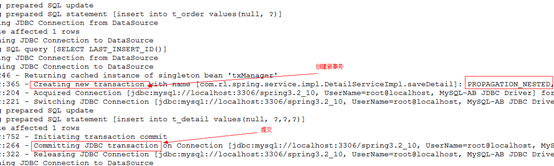
在已有事务中执行
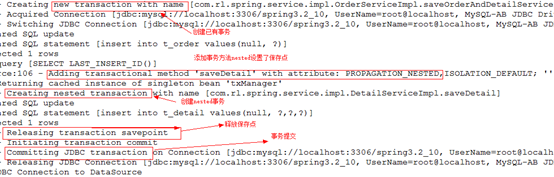
在已有事务中Nested事务发生异常
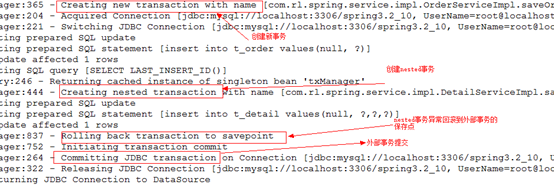
Nested事务正常,已有事务异常
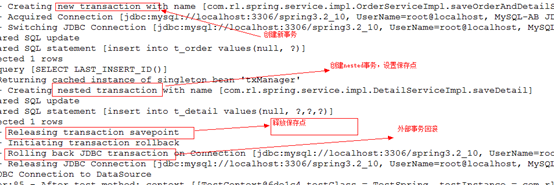
注意:外部事务回滚,nested事务也跟着回滚
事务的并发

并发问题:
脏读(dirty read)
A事务读到B事务没有提交的数据,并且A来修改这个数据,如果恰巧B做事务回滚,那么A事务读到的数据就是错误的

不可重复读(unrepeatable read)
指的是A事务读取了B事务已经提交了的更改数据,假设A取款的过程中B向账户汇入100,A事务两次读取数据不一致。

幻读(phantom read)
A事务读取B事务新增的数据,假设银行做在一个A事务中统计,在统计过程中B新增了用户,A的事务中两次统计不同

第一类更新丢失
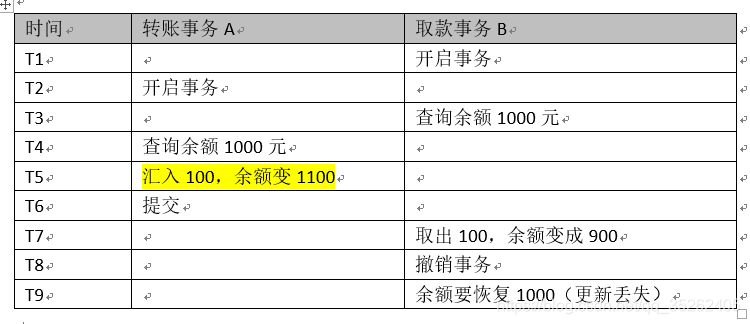
第二类更新丢失

事务的隔离级别
Sql92标准提供4个隔离级别,会给我们自动根据不同事务的隔离级别加不同的锁
| 隔离级别 | 脏读 | 不可重复读 | 幻读 | 第一丢失更新 | 第二丢失更新 |
|---|---|---|---|---|---|
| READ UNCOMMITED | Y | Y | Y | N | Y |
| READ COMMITED | N | Y | Y | N | Y |
| REPEATABLE READ | N | N | Y | N | N |
| SERIALIZEABLE | N | N | N | N | N |
数据库的隔离级别越高,并发性就越差,性能就越低
最常用的就是READ COMMITED和REPEATABLE READ
使用配置文件对事务控制(常用)
	<!--
		通知配置
	 -->
	<tx:advice id="txAdvice" transaction-manager="txManager">
		<tx:attributes>
			<!-- 具体的方法的配置 -->
			<tx:method name="save*" propagation="REQUIRED"/>
			<tx:method name="update*" propagation="REQUIRED"/>
			<tx:method name="query*" read-only="true"/>
		</tx:attributes>
	</tx:advice>

	<!--
		切面配置
	 -->
	<aop:config>
		<!-- 切点配置:一般情况我们把切点配置在Service层 -->
		<aop:pointcut expression="execution(* com.rl.spring.service..*.*(..))" id="mycut"/>
		<!--
			advice-ref:管理通知
			pointcut-ref:关联切点
		 -->
		<aop:advisor advice-ref="txAdvice" pointcut-ref="mycut"/>
	</aop:config>