Window表示一个悬浮窗口,在开发直接接触的并不多,但是当我们需要使用在桌面上显示一个悬浮窗的东西的时候Window就派上用场了。Window是一个抽象类,它的具体实现时PopupWindow类,创建Window很简单,只需要通过WindowManager即可完成。WindowManager是外界访问Window的入口。
Window和WindowManager之间的联系
为了分析Window的工作机制,使用WindowManager来添加一个Window
floatingButton=new Button(this);
floatingButton.setText("123");
mLayoutParams=new WindowManager.LayoutParams(LayoutParams.WRAP_CONTENT,LayoutParams.WRAP_CONTENT,0,0,PixelFormat.TRANSPARENT);
mLayoutParams.flags=LayoutParams.FLAG_NOT_TOUCH_MODAL|LayoutParams.FLAG_NOT_FOCUSABLE|LayoutParams.FLAG_SHOW_WHEN_LOCKED;
mLayoutParams.gravity=Gravity.LEFT|Gravity.TOP;
mLayoutParams.x=100;
mLayoutParams.y=300;
mWindowManager.addView(floatingButton,mLayoutParams);
在构建WindowManager.LayoutParams时,其中的type和flags是非常重要的.
flags参数有很多选项,用来控制Window的显示特性
- FLAG_NOT_FOCUSABLE——表示此Window不需要获取焦点,不接受各种输入事件,此标记会同时启用FLAG_NOT_TOUCH_MODAL,最终事件会直接传递给下层具有焦点的Window
- FLAG_NOT_TOUCH_MODAL——自己Window区域内的事件自己处理,自己Window区域外的事件传递给底层Window处理。一般这个选项会默认开启,否则其他Window无法收到事件
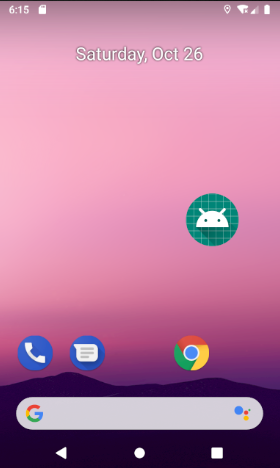
- FLAG_SHOW_WHEN_LOCKED——可以让Window显示在锁屏上
type参数时int类型,表示Window的类型。Window有三种类型
- 应用Window——对应着一个Activity,层级范围1~99;
- 子Window——不能独立存在,需要附属在特定的父Window种,比如Dialog就是一个子Window。层级范围1000~1999;
- 系统WIndow——需要声明权限才能创建,如Toast和系统状态栏都是系统Window,层级范围2000~2999;
Window是分层的,层级大的Window会覆盖在层级小的Window上面。
WindowManager提供的功能很简单,常用的只有三个方法,即添加View,更新View和删除View。这三个方法定义在ViewManager种,而WindowManager继承自ViewManager。
public interface ViewManager{
	public void addView(View view,ViewGroup.LayoutParams params);
	public void updateViewLayout(View view,ViewGroup.LayoutParams params);
	public void removeView(View view);
}
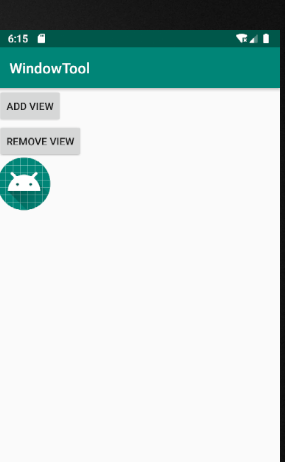
应用悬浮窗实例:
public class MainActivity extends AppCompatActivity implements View.OnClickListener, View.OnTouchListener {

    private static final String TAG="TestActivity";

    private Button addBtn,rmvBtn;

    private ImageView imageView;
    private WindowManager windowManager;
    private WindowManager.LayoutParams layoutParams;

    @Override
    protected void onCreate(Bundle savedInstanceState) {
        super.onCreate(savedInstanceState);
        setContentView(R.layout.activity_main);
        //当API大于23时需要在代码中动态申请权限
        if(Build.VERSION.SDK_INT>=Build.VERSION_CODES.M){
            Intent intent=new Intent(Settings.ACTION_MANAGE_OVERLAY_PERMISSION);
            startActivityForResult(intent,100);
        }else {
            initView();

        }

    }

    private void initView() {
        addBtn=findViewById(R.id.add_btn);
        rmvBtn=findViewById(R.id.remocve_btn);
        addBtn.setOnClickListener(this);
        rmvBtn.setOnClickListener(this);

        windowManager=(WindowManager) getApplicationContext().getSystemService(Context.WINDOW_SERVICE);
    }

    @Override
    protected void onActivityResult(int requestCode, int resultCode, @Nullable Intent data) {
        super.onActivityResult(requestCode, resultCode, data);
        if(requestCode==100){
            initView();
        }
    }

    @Override
    public void onClick(View v) {
        switch (v.getId()){
            case R.id.add_btn:
                addView();
                break;
            case R.id.remocve_btn:
                removeView();
                break;
        }
    }

    private void removeView() {
        windowManager.removeViewImmediate(imageView);
    }

    private void addView() {
        imageView = new ImageView(this);
        imageView.setBackgroundResource(R.mipmap.ic_launcher);
        layoutParams = new WindowManager.LayoutParams(WindowManager.LayoutParams.WRAP_CONTENT
                , WindowManager.LayoutParams.WRAP_CONTENT, 2099,
                WindowManager.LayoutParams.FLAG_NOT_TOUCH_MODAL
                        | WindowManager.LayoutParams.FLAG_NOT_FOCUSABLE
                        | WindowManager.LayoutParams.FLAG_SHOW_WHEN_LOCKED
                , PixelFormat.TRANSPARENT);
        layoutParams.type = WindowManager.LayoutParams.TYPE_APPLICATION_OVERLAY;
        layoutParams.gravity = Gravity.TOP | Gravity.LEFT;
        layoutParams.x = 0;
        layoutParams.y = 300;
        imageView.setOnTouchListener(this);
        windowManager.addView(imageView, layoutParams);
    }

    @Override
    public boolean onTouch(View v, MotionEvent event) {

        int rawX=(int) event.getRawX();
        int rawY=(int) event.getRawY();

        switch (event.getAction()){
            case MotionEvent.ACTION_MOVE: {
                layoutParams.x = rawX;
                layoutParams.y = rawY;
                windowManager.updateViewLayout(imageView, layoutParams);
                break;
            }
            default:
                break;
        }
        return true;
    }
}
在XML中直接添加了两个Button
实现效果:
Window的内部机制
window是一个抽象概念,每一个Window都对应着一个View和ViewRootImpl,Window和View通过ViewRootImpl来建立联系。因此Window并不是实际存在的,而是以View的形式存在。 在实际使用中无法直接访问Window,对Window的访问必须同通过WindowManager。在WindowManager住要提供了三个接口方法,addView,updateViewLayout,removeView,所以我们就从Window的添加,更新,删除来看它的内部机制。
Window添加的过程
在WindowManager中真正实现三大操作的是WindowManagerImpl类,在WindowManagerImpl中Window的三大操作如下:
 @Override
    public void addView(@NonNull View view, @NonNull ViewGroup.LayoutParams params) {
        applyDefaultToken(params);
        mGlobal.addView(view, params, mContext.getDisplay(), mParentWindow);
    }

    @Override
    public void updateViewLayout(@NonNull View view, @NonNull ViewGroup.LayoutParams params) {
        applyDefaultToken(params);
        mGlobal.updateViewLayout(view, params);
    }

	 @Override
	 public void removeView(View view) {
        mGlobal.removeView(view, false);
    }
在代码中看到了一个mGlobal,发现这一些列操作都是由他来实现的,来看看mGlobal是何方神圣。
private final WindowManagerGlobal mGlobal = WindowManagerGlobal.getInstance();
这个mGlobal是一个WindowManagerGlobal类的实例,那么继续查看在这个类中是如何实现我们的三大操作的呢?
WindowManagerGlobal中的addView如下:
 public void addView(View view, ViewGroup.LayoutParams params,
            Display display, Window parentWindow) {
            //检查参数是否合法,如果是子Window那么还需要调整一些布局参数
        if (view == null) {
            throw new IllegalArgumentException("view must not be null");
        }
        if (display == null) {
            throw new IllegalArgumentException("display must not be null");
        }
        if (!(params instanceof WindowManager.LayoutParams)) {
            throw new IllegalArgumentException("Params must be WindowManager.LayoutParams");
        }

        final WindowManager.LayoutParams wparams = (WindowManager.LayoutParams) params;
        if (parentWindow != null) {
        //当是子Window的时候需要调整参数通过adjustLayoutParamsForSubWindow这个方法
            parentWindow.adjustLayoutParamsForSubWindow(wparams);
        } else {
            //如果没有父视图,则此视图的硬件加速将从应用程序的硬件加速设置中设置。
            final Context context = view.getContext();
            if (context != null
                    && (context.getApplicationInfo().flags
                            & ApplicationInfo.FLAG_HARDWARE_ACCELERATED) != 0) {
                wparams.flags |= WindowManager.LayoutParams.FLAG_HARDWARE_ACCELERATED;
            }
        }

        ViewRootImpl root;
        View panelParentView = null;

        synchronized (mLock) {
            // Start watching for system property changes.
            if (mSystemPropertyUpdater == null) {
                mSystemPropertyUpdater = new Runnable() {
                    @Override public void run() {
                        synchronized (mLock) {
                            for (int i = mRoots.size() - 1; i >= 0; --i) {
                                mRoots.get(i).loadSystemProperties();
                            }
                        }
                    }
                };
                SystemProperties.addChangeCallback(mSystemPropertyUpdater);
            }

            int index = findViewLocked(view, false);
            if (index >= 0) {
                if (mDyingViews.contains(view)) {
                    // Don't wait for MSG_DIE to make it's way through root's queue.
                    mRoots.get(index).doDie();
                } else {
                    throw new IllegalStateException("View " + view
                            + " has already been added to the window manager.");
                }
                // The previous removeView() had not completed executing. Now it has.
            }

            // If this is a panel window, then find the window it is being
            // attached to for future reference.
            if (wparams.type >= WindowManager.LayoutParams.FIRST_SUB_WINDOW &&
                    wparams.type <= WindowManager.LayoutParams.LAST_SUB_WINDOW) {
                final int count = mViews.size();
                for (int i = 0; i < count; i++) {
                    if (mRoots.get(i).mWindow.asBinder() == wparams.token) {
                        panelParentView = mViews.get(i);
                    }
                }
            }
            //下列操作将Window的一系列对象添加到列表中
            root = new ViewRootImpl(view.getContext(), display);

            view.setLayoutParams(wparams);
            //mView存储的是所有Window对应的View
            mViews.add(view);
            //mRoots存储的是所有Window所对应的ViewRootImpl
            mRoots.add(root);
            //mParams存储的是所有Window所对应的布局参数
            mParams.add(wparams);

            // do this last because it fires off messages to start doing things
            try {
            //通过ViewRootImpl的实例root.setView来更新界面并完成Window的添加过程
                root.setView(view, wparams, panelParentView);
            } catch (RuntimeException e) {
                // BadTokenException or InvalidDisplayException, clean up.
                if (index >= 0) {
                    removeViewLocked(index, true);
                }
                throw e;
            }
        }
    }
通过ViewRootImpl将View添加到列表,并通过ViewRootImpl来更新界面并完成Window的添加,在ViewRootImpl的实例的setView方法中来完成,在setView的内部会通过requestLayout来完成异步刷新请求。
@Override
    public void requestLayout() {
        if (!mHandlingLayoutInLayoutRequest) {
            checkThread();
            mLayoutRequested = true;
            //View的绘制入口
            scheduleTraversals();
        }
    }
查看scheduleTraversals的实现:
				try {
                    mOrigWindowType = mWindowAttributes.type;
                    mAttachInfo.mRecomputeGlobalAttributes = true;
                    collectViewAttributes();
                    res = mWindowSession.addToDisplay(mWindow, mSeq, mWindowAttributes,
                            getHostVisibility(), mDisplay.getDisplayId(), mTmpFrame,
                            mAttachInfo.mContentInsets, mAttachInfo.mStableInsets,
                            mAttachInfo.mOutsets, mAttachInfo.mDisplayCutout, mInputChannel,
                            mTempInsets);
                    setFrame(mTmpFrame);
                } catch (RemoteException e) {
                    mAdded = false;
                    mView = null;
                    mAttachInfo.mRootView = null;
                    mInputChannel = null;
                    mFallbackEventHandler.setView(null);
                    unscheduleTraversals();
                    setAccessibilityFocus(null, null);
                    throw new RuntimeException("Adding window failed", e);
                } finally {
                    if (restore) {
                        attrs.restore();
                    }
                }
通过WindowSession最终来实现Window的添加过程,WindowSession是一个IWindowSession,是一个Binder对象,真正的实现类是Session,所以Window的添加过程就是一次IPC调用
session内部的会通过WindowManagerService来实现Window的添加
public int addToDisplay(IWindow window, int seq, WindowManager.LayoutParams, attrs, int viewVisibility,
                  int displayId, Rect outContentInsets, InputChannel outInputChannel){
   return mService.addWindow(this, window, seq, attrs, viewVisibility
   , displayId, outContentInsets, outInputChannel);
}
最终,Window的添加请求移交给了WindowManagerService手上,在WindowManagerService内部会为每一个应用保留一个单独的Session。Window的添加就到此为止了。
图解:
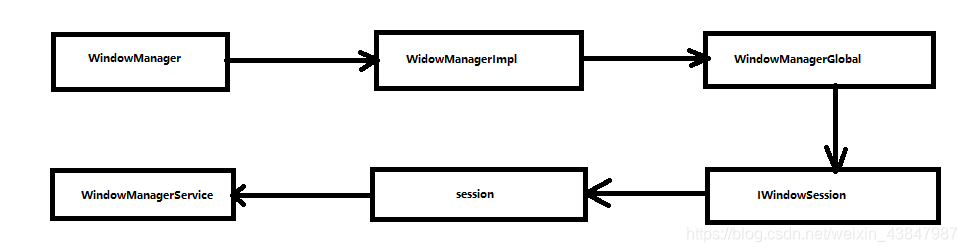
对于Window的删除操作和更新操作其实都是类似的。