本章主要介绍对LevelDB基础操作Open,Put,Get等操作,熟悉具体的数据读写处理流程。
先放一个基本的LevelDB的基础操作demo。demo实现的就是首先打开一个数据库,然后向其插入一个KV数据,随后读取出来。
int main(int argc,char* argv[]){
    leveldb::DB* ptr = nullptr;
    const std::string name = "./myleveldata.ldb";
    leveldb::Options option;
    option.create_if_missing = true;
    //open
    leveldb::Status status = leveldb::DB::Open(option,name,&ptr);
    if(!status.ok()){
        std::cerr<<"open db error "<<status.ToString()<<std::endl;
        return 1;
    }
    assert(ptr != nullptr);
    const std::string key = "myfirstkey";
    const std::string value = "myfirstvalue";
    //put
    {
        leveldb::WriteOptions writeoptions;
        writeoptions.sync = true;    //leveldb默认写是异步的,这里打开syncx同步
        status = ptr->Put(writeoptions,key,value);
        if(!status.ok()){
            std::cerr<<"write error";
            return 1;
        }
    }
    //get
    {
        leveldb::ReadOptions getOptions;
        std::string rdVal;
        status = ptr->Get(getOptions, key, &rdVal);
        if (!status.ok()) {
            std::cerr << "get data error" << std::endl;
            return 0;
        }
        assert(value == rdVal);
        std::cout<<"happy ending ";
    }
    delete ptr;
    return 0;
}
可以看出,整体数据操作都是围绕DB*,首先在打开数据库的时候会返回一个DB*,然后围绕其做增删改查操作。DB类是一个抽象类,但是其对于纯虚函数都有提供默认实现,继承其的子类也还是要重写这些虚函数。
class LEVELDB_EXPORT DB {
 public:
  // 以下函数具体实现在db_impl.cc
  // 打开数据库,返回dbptr
  static Status Open(const Options& options, const std::string& name,
                     DB** dbptr);
  DB() = default;
  DB(const DB&) = delete;
  DB& operator=(const DB&) = delete;
  virtual ~DB();
  // 注意这里纯虚函数,也可以提供默认实现
  // 向数据库中插入key-value对
  virtual Status Put(const WriteOptions& options, const Slice& key,
                     const Slice& value) = 0;
  // 数据库中删除key
  virtual Status Delete(const WriteOptions& options, const Slice& key) = 0;
  // 数据库更新
  virtual Status Write(const WriteOptions& options, WriteBatch* updates) = 0;
  // 数据库中读取key,如果有则返回value,如果没有则保持value不变,status=Status::IsNotFount()
  virtual Status Get(const ReadOptions& options, const Slice& key,
                     std::string* value) = 0;
  ...
};
数据库Open流程
Open流程较为容易,简单而言就是根据输入的dbname,找到对应的磁盘文件,将其数据恢复到内存中,同时设置log和manifest等,将这些数据都放到DBimpl*对象中,并返回其为进一步的读写操作。
Status DB::Open(const Options& options, const std::string& dbname, DB** dbptr) {
  *dbptr = nullptr;
  //构造一个impl,并调用Recover
  DBImpl* impl = new DBImpl(options, dbname);
  //接下来的操作是从日志中恢复数据库的内容(将数据加载到内存中),因为里面要对impl进行赋值,所以要先加锁
  impl->mutex_.Lock();
  VersionEdit edit;
  // Recover handles create_if_missing, error_if_exists
  bool save_manifest = false;
  Status s = impl->Recover(&edit, &save_manifest);
  if (s.ok() && impl->mem_ == nullptr) {
    // Create new log and a corresponding memtable.
    // 创建新log和memtable(并且要自己增加reference)
    uint64_t new_log_number = impl->versions_->NewFileNumber();
    WritableFile* lfile;
    // 将数据从磁盘文件中加载出来赋给impl
    s = options.env->NewWritableFile(LogFileName(dbname, new_log_number),
                                     &lfile);
    if (s.ok()) {
      edit.SetLogNumber(new_log_number);
      impl->logfile_ = lfile;
      impl->logfile_number_ = new_log_number;
      impl->log_ = new log::Writer(lfile);
      impl->mem_ = new MemTable(impl->internal_comparator_);
      impl->mem_->Ref();
    }
  }
  if (s.ok() && save_manifest) {
    edit.SetPrevLogNumber(0);  // No older logs needed after recovery.
    edit.SetLogNumber(impl->logfile_number_);
    // 设置Manifest为当前版本
    s = impl->versions_->LogAndApply(&edit, &impl->mutex_);
  }
  if (s.ok()) {
    impl->DeleteObsoleteFiles();
    impl->MaybeScheduleCompaction();
  }
  impl->mutex_.Unlock();
  if (s.ok()) {
    assert(impl->mem_ != nullptr);
    *dbptr = impl;
  } else {
    delete impl;
  }
  return s;
}
数据库Put、Delete操作
put操作是将key-value插入到数据库中。首先会调用DBImpl::Put函数,而DBImpl::Put直接调用父类的DB::Put ,DB::Put中新建一个WriteBatch对象,调用WriteBatch::Put函数,最后在调用DBImpl::Write函数。下图所示的是一个Batch对象的结构。
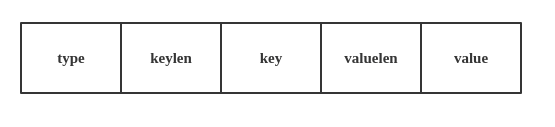
对于WriteBatch对象的构建都是在WriteBatch::Put函数中进行的,函数的作用就是将key和value值都放在batch对象中。这里有一点需要说明的是,数据库的写入操作和删除操作其实是相似的操作,delete操作其实就是一个value为空的put操作,写入操作的type是kTypeValue,删除操作的type是kTypeDeletion。
Status DB::Put(const WriteOptions& opt, const Slice& key, const Slice& value) {
  WriteBatch batch;
  batch.Put(key, value);
  return Write(opt, &batch);
}

Status DB::Delete(const WriteOptions& opt, const Slice& key) {
  WriteBatch batch;
  batch.Delete(key);
  return Write(opt, &batch);
}
接下来的DBImlp::Write函数操作至关重要,这个函数的作用是具体写入,其能体现出LevelDB写性能卓越的原因。具体过程如下:
- 首先初始化一个Writer对象,Writer对象其实是batch对象的一个封装数据结构。
- 然后用一个deque队列同步线程,目的是合并多个batch一起写入磁盘,将多个操作合并成一个批插入操作,这样能有效减少写磁盘的次数,提高系统的写性能。这里还有一个小技巧,利用条件变量和互斥量来实现这个功能。不同的线程将Writer对象插入deque队列,如果发现队列中已经存在Writer对象(也就是说对象非队列头部)则wait等待。直到等到信号才会被一起BuildBatchGroup写入log和MemTable。这里给一个例子。这里有五个线程,A,B,C,D,E,每个线程都拥有一个Writer想要写入。一开始deque队列为空,A线程获取mutex,然后deque中push进去,因为其为队列首部,则继续执行下去,由于其一直占着mutex,其他线程无法插入到deque中,所以线程A执行的BuildBatchGroup,SetSequence等操作都是只包含自己,然而在写日志之前,线程A释放掉mutex,这时候其他线程就可以争抢mutex并加入deque中,但是由于并不是队列头部而条件变量等待,这时候又会释放掉mutex,其他线程继续争抢,最后B,C,D,E都会加入deque,但是顺序很可能不一样。接着线程A会继续写入log和MemTable,然后会调用signal唤醒队列中下一个线程(假设为C),线程C唤醒后,也是同样的操作,只是此时队列中还剩下B,D,E线程,这时候BuildBatchGroup就可以将deque中的所有Writer合并为一个batch,一次性的写入log和MemTable,最后循环pop队列头部元素,并比较是否为last_writer,比较完成(E == last_writer)后即退出。
Status DBImpl::Write(const WriteOptions& options, WriteBatch* updates) {
  //初始化Writer
  Writer w(&mutex_);
  w.batch = updates;
  w.sync = options.sync;
  w.done = false;

  //加锁为了线程同步(条件变量),合并多个batch一起写入磁盘,合并为一个批插入操作,这也是写操作高性能的关键所在
  MutexLock l(&mutex_);
  writers_.push_back(&w);
  while (!w.done && &w != writers_.front()) {
    w.cv.Wait();
  }
  if (w.done) {
    return w.status;
  }

  // May temporarily unlock and wait.
  Status status = MakeRoomForWrite(updates == nullptr);
  uint64_t last_sequence = versions_->LastSequence();
  Writer* last_writer = &w;
  if (status.ok() && updates != nullptr) {  // nullptr batch is for compactions
    //将writers_队列中的所有batch合并,一起写入。
    WriteBatch* updates = BuildBatchGroup(&last_writer);
    WriteBatchInternal::SetSequence(updates, last_sequence + 1);
    last_sequence += WriteBatchInternal::Count(updates);

    // Add to log and apply to memtable.  We can release the lock
    // during this phase since &w is currently responsible for logging
    // and protects against concurrent loggers and concurrent writes
    // into mem_.
    {
      mutex_.Unlock();
      //数据顺序写入log日志
      status = log_->AddRecord(WriteBatchInternal::Contents(updates));
      bool sync_error = false;
      if (status.ok() && options.sync) {
        status = logfile_->Sync();
        if (!status.ok()) {
          sync_error = true;
        }
      }
      if (status.ok()) {
        //数据插入到memTable
        status = WriteBatchInternal::InsertInto(updates, mem_);
      }
      mutex_.Lock();
      if (sync_error) {
        // The state of the log file is indeterminate: the log record we
        // just added may or may not show up when the DB is re-opened.
        // So we force the DB into a mode where all future writes fail.
        RecordBackgroundError(status);
      }
    }
    if (updates == tmp_batch_) tmp_batch_->Clear();

    versions_->SetLastSequence(last_sequence);
  }

  while (true) {
    Writer* ready = writers_.front();
    writers_.pop_front();
    if (ready != &w) {
      ready->status = status;
      ready->done = true;
      ready->cv.Signal();
    }
    if (ready == last_writer) break;
  }

  // Notify new head of write queue
  if (!writers_.empty()) {
    writers_.front()->cv.Signal();
  }

  return status;
}
数据库Get操作
Get操作也是很重要的一块,虽然主体流程很清晰,但是里面有很多需要注意的点,花费了工程师很多时间优化。比如这里的LookupKey的作用,还有在MemTable中查找的过程等。下一章我会分析MemTable和Version的结构、读写过程。
Status DBImpl::Get(const ReadOptions& options, const Slice& key,
                   std::string* value) {
  Status s;
  MutexLock l(&mutex_);
  SequenceNumber snapshot;
  if (options.snapshot != nullptr) {
    snapshot =
        static_cast<const SnapshotImpl*>(options.snapshot)->sequence_number();
  } else {
    snapshot = versions_->LastSequence();
  }
  //MemTable
  MemTable* mem = mem_;
  //Immutable MemTable
  MemTable* imm = imm_;
  //current version
  Version* current = versions_->current();
  //要自己增加引用计数
  mem->Ref();
  if (imm != nullptr) imm->Ref();
  current->Ref();

  bool have_stat_update = false;
  Version::GetStats stats;

  // Unlock while reading from files and memtables
  {
    mutex_.Unlock();
    // First look in the memtable, then in the immutable memtable (if any).
    // 读取顺序,Memtable -> Immutable Memtable -> Current Version
    LookupKey lkey(key, snapshot);
    if (mem->Get(lkey, value, &s)) {
      // Done
    } else if (imm != nullptr && imm->Get(lkey, value, &s)) {
      // Done
    } else {
      s = current->Get(options, lkey, value, &stats);
      have_stat_update = true;
    }
    mutex_.Lock();
  }

  //如果是从磁盘中获取的数据,则有可能出发Comapction合并操作
  if (have_stat_update && current->UpdateStats(stats)) {
    MaybeScheduleCompaction();
  }
  // 读取完成后引用计数减一
  mem->Unref();
  if (imm != nullptr) imm->Unref();
  current->Unref();
  return s;
}
参考博客:
- https://leveldb-handbook.readthedocs.io/zh/latest/rwopt.html
- https://www.cnblogs.com/ym65536/p/7720105.html