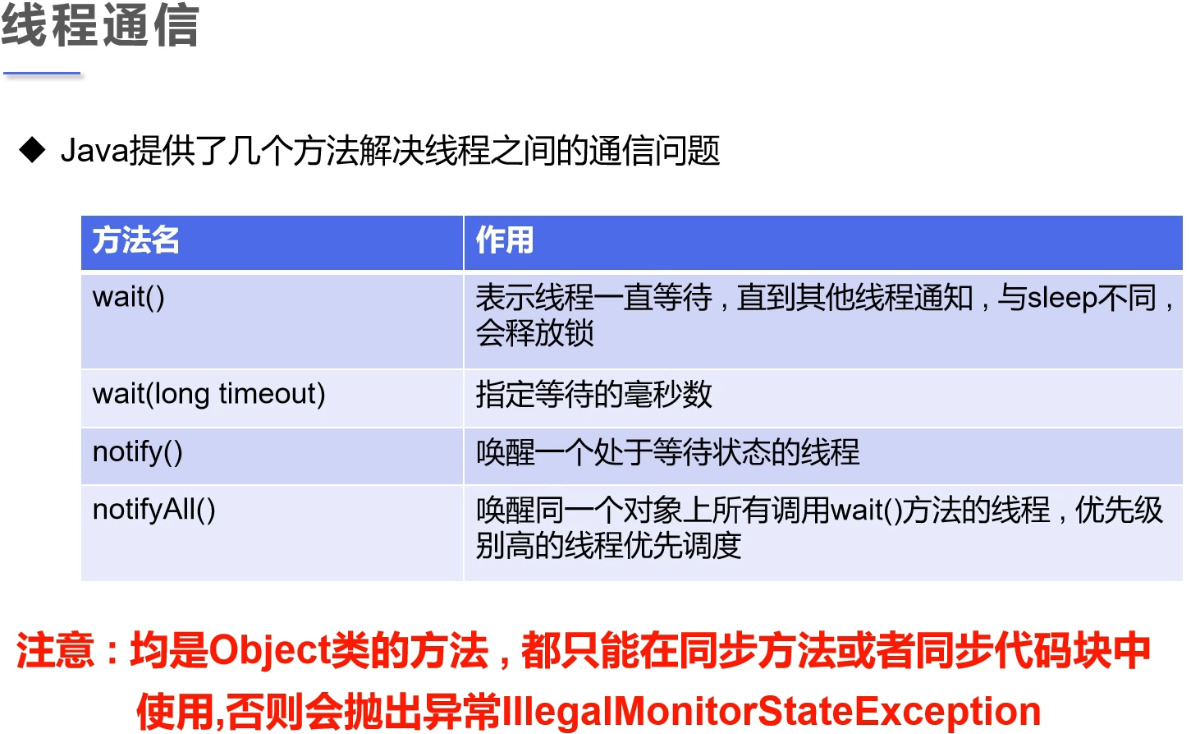
利用“生产者/消费者模式”去解决线程间的通信问题,这里整理“管程法”与“信号灯法”两种实现方式。
“管程法” 代码示例:
  1 package com.huolongluo.coindemo;
  2
  3 /**
  4  * Created by 火龙裸 on 2019/11/10.
  5  * desc   : 线程间的通信
  6  * 生产者与消费者模式 -->利用缓冲区解决:管程法
  7  * version: 1.0
  8  */
  9
 10 //生产者,消费者,产品,缓冲区
 11 public class TestPC {
 12     public static void main(String[] args) {
 13         SynContainer container = new SynContainer();
 14         new Productor(container).start();
 15         new Consumer(container).start();
 16     }
 17 }
 18
 19 //生产者
 20 class Productor extends Thread {
 21     SynContainer container;
 22
 23     public Productor(SynContainer container) {
 24         this.container = container;
 25     }
 26
 27     //生产
 28     @Override
 29     public void run() {
 30         for (int i = 0; i < 100; i++) {
 31             container.push(new Chicken(i));
 32             System.out.println("生产了 " + i + " 只鸡");
 33         }
 34     }
 35 }
 36
 37 //消费者
 38 class Consumer extends Thread {
 39     SynContainer container;
 40
 41     public Consumer(SynContainer container) {
 42         this.container = container;
 43     }
 44
 45     //消费
 46     @Override
 47     public void run() {
 48         for (int i = 0; i < 100; i++) {
 49             System.out.println("消费了第--> " + container.pop().id + " 只鸡");
 50         }
 51     }
 52 }
 53
 54 //产品
 55 class Chicken {
 56     int id;//产品编号
 57
 58     public Chicken(int id) {
 59         this.id = id;
 60     }
 61 }
 62
 63 //缓冲区
 64 class SynContainer {
 65
 66     //需要一个容器大小
 67     Chicken[] chickens = new Chicken[10];
 68     //容器计数器
 69     int count = 0;
 70
 71     //生产者放入产品
 72     public synchronized void push(Chicken chicken) {
 73         //如果容器满了,就需要等待消费者消费
 74         if (count == chickens.length) {
 75             //通知消费者消费,生产者等待
 76             try {
 77                 this.wait();
 78             } catch (InterruptedException e) {
 79                 e.printStackTrace();
 80             }
 81         }
 82         //如果没有满,我们就需要丢入产品
 83         chickens[count] = chicken;
 84         count++;
 85
 86         //可以通知消费者消费了
 87         this.notifyAll();
 88     }
 89
 90     //消费者消费产品
 91     public synchronized Chicken pop() {
 92         //判断能否消费
 93         if (count == 0) {
 94             //等待生产者生产,消费者等待
 95             try {
 96                 this.wait();
 97             } catch (InterruptedException e) {
 98                 e.printStackTrace();
 99             }
100         }
101
102         //如果可以消费
103         count--;
104         Chicken chicken = chickens[count];
105
106         //吃完了,通知生产者生产
107         this.notifyAll();
108         return chicken;
109     }
110 }
“信号灯法” 代码示例:
 1 package com.huolongluo.coindemo.morethread;
 2
 3 /**
 4  * Created by 火龙裸 on 2019/11/10.
 5  * desc   : 测试生产者消费者问题2:信号灯法,标志位解决
 6  * version: 1.0
 7  */
 8 public class TestPc2 {
 9     public static void main(String[] args) {
10         TV tv = new TV();
11         new Player(tv).start();
12         new Watcher(tv).start();
13     }
14 }
15
16 //生产者-->演员
17 class Player extends Thread {
18     TV tv;
19
20     public Player(TV tv) {
21         this.tv = tv;
22     }
23
24     @Override
25     public void run() {
26         for (int i = 0; i < 20; i++) {
27             if (i % 2 == 0) {
28                 this.tv.paly("快乐大本营");
29             } else {
30                 this.tv.paly("抖音:记录美好生活");
31             }
32         }
33     }
34 }
35
36 //消费者-->观众
37 class Watcher extends Thread {
38     TV tv;
39
40     public Watcher(TV tv) {
41         this.tv = tv;
42     }
43
44     @Override
45     public void run() {
46         for (int i = 0; i < 20; i++) {
47             tv.watch();
48         }
49     }
50 }
51
52 //产品-->节目
53 class TV {
54     //演员表演,观众等待 (flag为T,演员表演)
55     //观众观看,演员等待 (flag为F,演员等待)
56     String voice;//表演的节目
57     boolean flag = true;
58
59     //表演
60     public synchronized void paly(String voice) {
61         if (!flag) {
62             try {
63                 this.wait();
64             } catch (InterruptedException e) {
65                 e.printStackTrace();
66             }
67         }
68         System.out.println("演员表演了: " + voice);
69         //通知观众观看
70         this.notifyAll();//通知唤醒
71         this.voice = voice;
72         this.flag = !this.flag;
73     }
74
75     //观看
76     public synchronized void watch() {
77         if (flag) {
78             try {
79                 this.wait();
80             } catch (InterruptedException e) {
81                 e.printStackTrace();
82             }
83         }
84         System.out.println("观众观看了: " + voice);
85         //通知演员表演
86         this.notifyAll();
87         this.flag = !this.flag;
88     }
89 }
线程池

- JDK5.0起提供了线程池相关API:ExecutorService和Executors
- ExecutorService:真正的线程池接口。常见子类ThreadPoolExecutor
1. void execute(Runnable command):执行任务/命令,没有返回值,一般用来执行Runnable
2. <T>Future<T> submit(Callable<T> task):执行任务,有返回值,一般用来执行Callable
扫描二维码关注公众号,回复:
7807674 查看本文章

3. void shutdown():关闭连接池
- Executors:工具类、线程池的工厂类,用于创建并返回不同类型的线程池
线程池 代码示例:
 1 package com.huolongluo.coindemo;
 2
 3 import java.util.concurrent.ExecutorService;
 4 import java.util.concurrent.Executors;
 5
 6 /**
 7  * Created by 火龙裸 on 2019/11/10.
 8  * desc   : 线程池
 9  * version: 1.0
10  */
11 public class TestPool {
12     public static void main(String[] args) {
13         //1.创建服务,创建线程池
14         //newFixedThreadPool 参数为:线程池大小
15         ExecutorService service = Executors.newFixedThreadPool(10);
16
17         //执行
18         service.execute(new MyThread());
19         service.execute(new MyThread());
20         service.execute(new MyThread());
21         service.execute(new MyThread());
22         service.execute(new MyThread());
23
24         //2.关闭链接
25         service.shutdown();
26     }
27 }
28
29 class MyThread implements Runnable {
30
31     @Override
32     public void run() {
33         System.out.println("当前线程:" + Thread.currentThread().getName());
34     }
35 }
运行结果:

总结:
线程的实现方式,代码示例如下:
 1 package com.huolongluo.coindemo;
 2
 3 import java.util.concurrent.Callable;
 4 import java.util.concurrent.ExecutionException;
 5 import java.util.concurrent.FutureTask;
 6
 7 /**
 8  * Created by 火龙裸 on 2019/11/10.
 9  * desc   :回顾线程的创建
10  * version: 1.0
11  */
12 public class ThreadNew {
13     public static void main(String[] args) {
14         //启动线程 MyThread1
15         new MyThread1().start();
16
17         //启动线程 MyThread2
18         new Thread(new MyThread2()).start();
19
20         //启动线程 MyThread3 (通过Callable接口启动线程的方式有很多,这里只简单介绍一种)
21         //FutureTask的构造参数可以是一个Callable接口,也可以是一个Runnable接口
22         FutureTask<Integer> futureTask = new FutureTask<Integer>(new MyThread3());
23         new Thread(futureTask).start();//FutureTask本身RunnableFuture接口,而RunnableFuture接口又是继承的Runnable接口,所以可以这样启动
24         try {
25             Integer integer = futureTask.get();//通过get()方法获得返回值
26             System.out.println("获得的返回值:" + integer);
27         } catch (ExecutionException e) {
28             e.printStackTrace();
29         } catch (InterruptedException e) {
30             e.printStackTrace();
31         }
32     }
33 }
34
35 //1.继承Thread类
36 class MyThread1 extends Thread {
37     @Override
38     public void run() {
39         System.out.println("Thread1");
40     }
41 }
42
43 //2.实现Runnable接口
44 class MyThread2 implements Runnable {
45
46     @Override
47     public void run() {
48         System.out.println("MyThread2");
49     }
50 }
51
52 //3.实现Callable接口
53 class MyThread3 implements Callable<Integer> {
54     @Override
55     public Integer call() throws Exception {
56         System.out.println("MyThread3");
57         return 100;
58     }
59 }
运行结果:
