一、部署示意图/架构图/框图
1) 2D
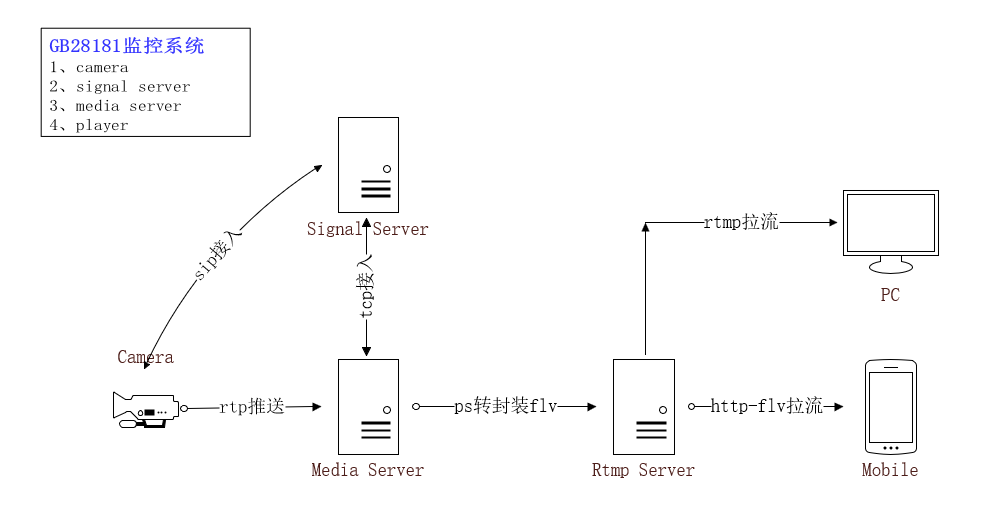
3D)

二、gb28181设备接入gb28181服务器总览
1、下载Hikvision Tools(含SADP、录像容量计算等工具)
https://www.hikvision.com/cn/download_more_393.html?_blank
扫描摄像头,更改ip,与电脑在同一网段。
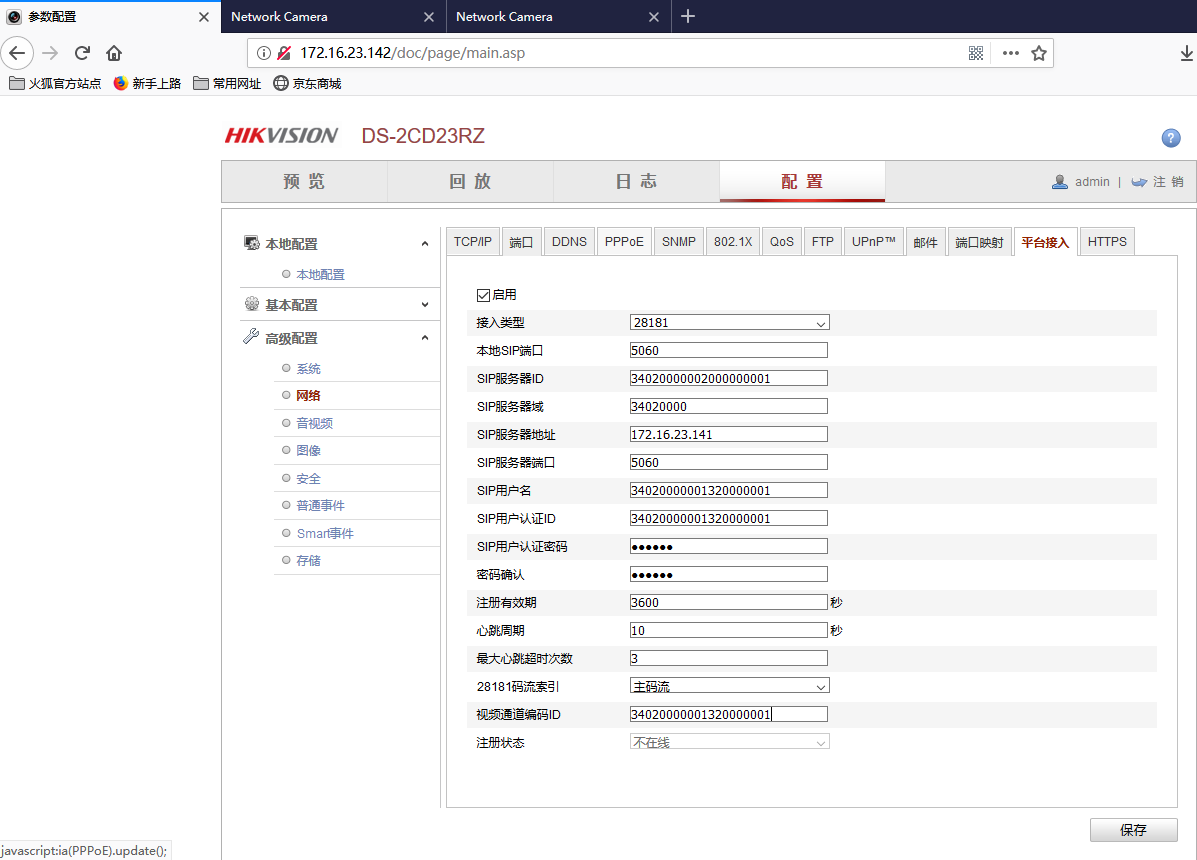
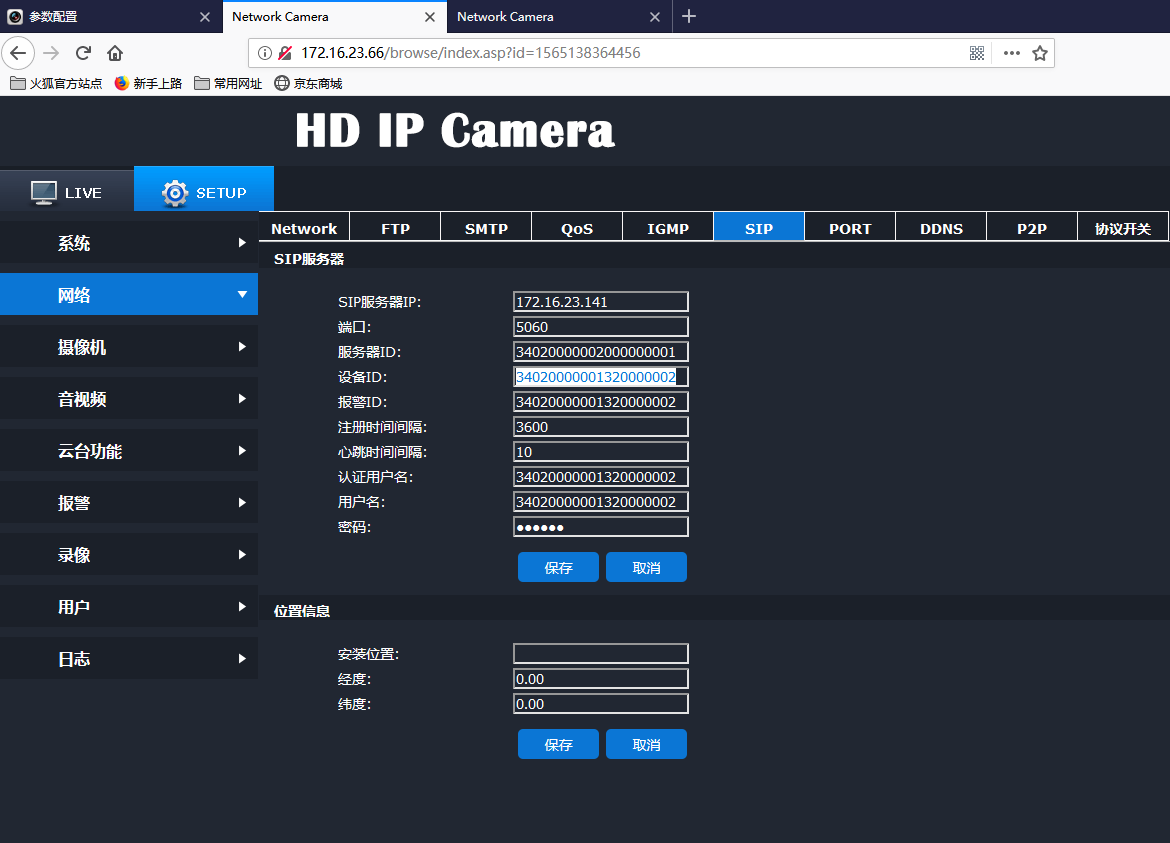
2、摄像头gb28181协议配置
1#摄像头
2#摄像头
3#摄像头

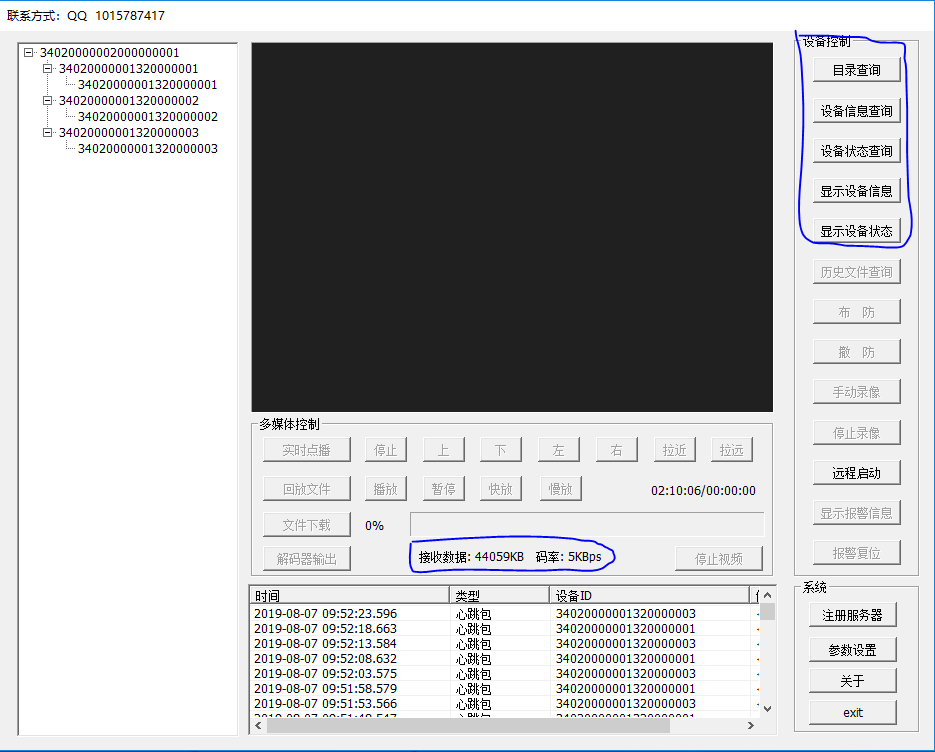
3、gb28181下级平台服务器接入摄像头
gb28181服务器调试工具下载,50个积分,这tm在打劫呀,也可以用公安部的spvmn,就是太难用了,IE控件也播不了rtp的ps流。
https://download.csdn.net/download/qq_24798461/9820447

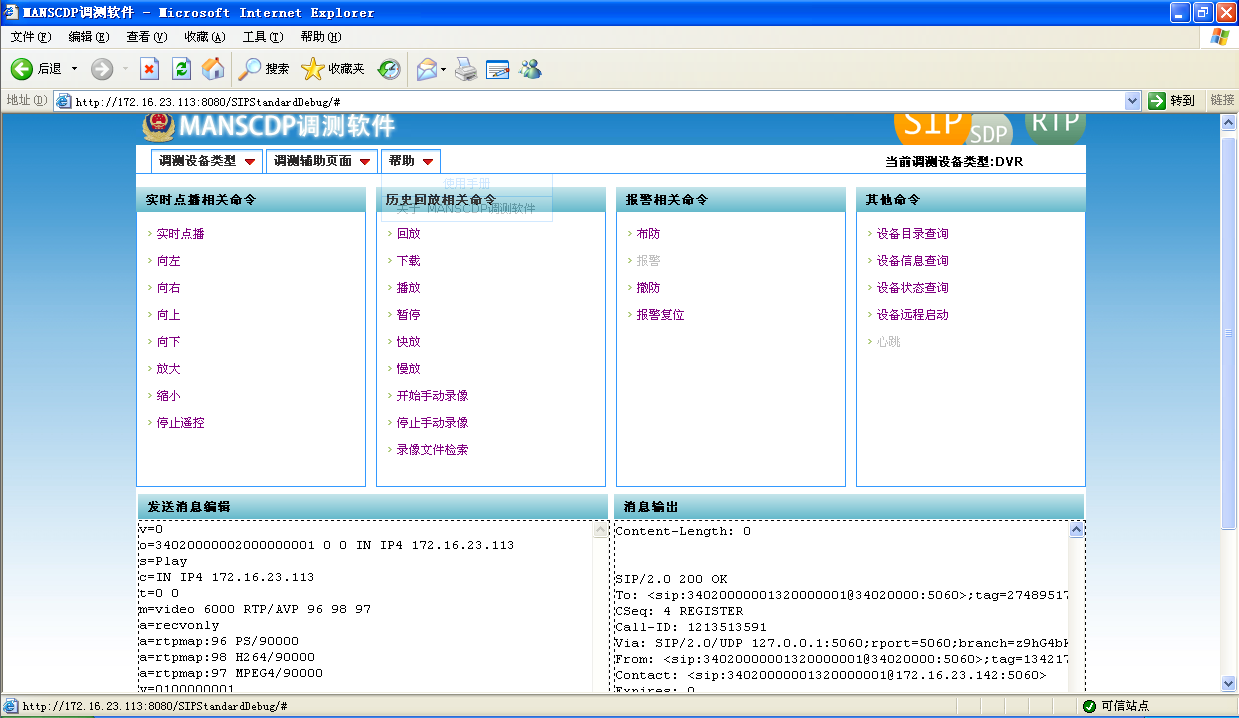
4、也可以用公安部的SPVMN(1.0.0.1版软件包里有应用手册,其他版本好像没有)
SPVMN 视频监控联网调测软件完整版
https://download.csdn.net/download/chming_love/9389401
需要配置好配置文件
C:\mss-1.4.0.FINAL-apache-tomcat-6.0.29\webapps\SIPStandardDebug\WEB-INF\classes\SSDConfig.properties
#############SIP服务器配置#############
#SIP服务器域名
sipserver_domainname=34020000
#SIP服务器ID
sipserver_id=34020000002000000001
#SIP服务器本地IP地址
sipserver_ip=172.16.23.113
#SIP服务器本地SIP端口
sipserver_port=5060
#SIP服务器对外注册密码
sipserver_password=123456
#############DVR/NVR设备配置#############
#DVR/NVR设备ID
sipdevice_DVR_id=34010000001180000001
#DVR/NVR设备注册密码
sipdevice_DVR_password=12345678
#DVR/NVR所带通道ID
sipdevice_DVR_camera_id=34010000001320000001
#DVR/NVR所带报警输入ID
sipdevice_DVR_alarm_id=34010000001340000001
#############IPC设备配置#############
#IPC设备ID
sipdevice_IPC_id=34020000001320000001
#IPC设备注册密码
sipdevice_IPC_password=123456
#IPC所带报警输入ID
sipdevice_IPC_alarm_id=34020000001320000001
sipdevice_IPC_camera_id=34020000001320000001
#############解码器设备配置#############
#解码器设备ID
sipdevice_decoder_id=34010000001140000001
#解码器设备注册密码
sipdevice_decoder_password=12345678
#解码器所带监视器ID
sipdevice_decoder_monitor_id=34010000001330000001
#############外部系统配置#############
#外部系统ID
sipdevice_othersystem_id=34020000002000000001
#外部系统密码
sipdevice_othersystem_password=12345678
#外部系统IP地址
sipdevice_othersystem_ip=192.168.0.197
#外部系统SIP端口
sipdevice_othersystem_port=5060
#############视频参数配置#############
#媒体接收端ID
media_dest_id=34020000002000000001
#媒体接收端IP
media_dest_ip=172.16.23.113
#媒体接收端Port
media_dest_port=6000
#历史回放开始时间,格式为yyyyMMddhhmmss
history_starttime=20110827010456
#历史回放结束时间,格式为yyyyMMddhhmmss
history_endtime=20110827011456
以上用调试工具调通了gb28181的设备端接入平台服务器,那么剩下的就是自行实现gb28181的设备端 和 上下级服务器了
三、gb28181系统sip信令通道
1. Resources used
sip server + sip user agent
sip server: freeswitch / freepbx
sip user agent: libexosip2-5.1.0/tools/sip_reg.c
2. Install freeswitch
https://freeswitch.org/confluence/display/FREESWITCH/CentOS+7+and+RHEL+7
https://freeswitch.org/confluence/display/FREESWITCH/CentOS+7
2) step by step:
Install FreeSWITCH 1.6.0 on CentOS 7 (fresh installation):

Note: Everything below is run inside CentOS 7 terminal as "root" user (via "su -" command)

1) Make sure yum update is run and CentOS is up-to-date
2) {optional} inside Terminal window select Edit Profile Preferences and select "Use custom default terminal size" and make it 160 x 60.  Close terminal and re-open for the change to take affect.
3) yum -y install git
4) yum -y install epel-release
5) rpm -Uvh http://files.freeswitch.org/freeswitch-release-1-6.noarch.rpm
6) yum -y install git gcc-c++ autoconf automake libtool wget python ncurses-devel zlib-devel libjpeg-devel openssl-devel e2fsprogs-devel sqlite-devel libcurl-devel pcre-devel speex-devel ldns-devel libedit-devel libxml2-devel
7) yum -y install libyuv-devel opus-devel libvpx-devel libvpx2* libdb4* libidn-devel unbound-devel libuuid-devel lua-devel libsndfile-devel
8) cd /usr/local/src
9) git clone -b v1.6 https://freeswitch.org/stash/scm/fs/freeswitch.git
10) cd /usr/local/src/freeswitch
11) ./bootstrap.sh
12) ./configure
13) make
14) make install
15) make cd-sounds-install
16) make cd-moh-install
17) cd /usr/local/freeswitch/conf
18) vi vars.xml
    Change:  <X-PRE-PROCESS cmd="set" data="default_password=1234"/> {!!set it to something different!!}
    Save and close (<Esc> :wq!)
19) cd /usr/local/freeswitch/conf/sip_profiles
20) mv internal-ipv6.xml internal-ipv6.xml.removed   {disables ipv6 support}
21) mv external-ipv6.xml external-ipv6.xml.removed  {disables ipv6 support}
22) cd /usr/local/freeswitch/bin
23) ./freeswitch -nonat -nonatmap
24) ... to exit from FreeSWITCH console
3) Quickly install
yum install -y http://files.freeswitch.org/freeswitch-release-1-6.noarch.rpm epel-release
yum install -y freeswitch-config-vanilla freeswitch-lang-* freeswitch-sounds-* systemctl enable freeswitch freeswitch
4) source install
freeswitch_v1.6_install_centos7.6.sh
#
yum install -y http://files.freeswitch.org/freeswitch-release-1-6.noarch.rpm epel-release yum install -y git alsa-lib-devel autoconf automake bison broadvoice-devel bzip2 curl-devel db-devel e2fsprogs-devel flite-devel g722_1-devel gcc-c++ gdbm-devel gnutls-devel ilbc2-devel ldns-devel libcodec2-devel libcurl-devel libedit-devel libidn-devel libjpeg-devel libmemcached-devel libogg-devel libsilk-devel libsndfile-devel libtheora-devel libtiff-devel libtool libuuid-devel libvorbis-devel libxml2-devel lua-devel lzo-devel mongo-c-driver-devel ncurses-devel net-snmp-devel openssl-devel opus-devel pcre-devel perl perl-ExtUtils-Embed pkgconfig portaudio-devel postgresql-devel python26-devel python-devel soundtouch-devel speex-devel sqlite-devel unbound-devel unixODBC-devel wget which yasm zlib-devel # cd /usr/local/src git clone -b v1.6 https://github.com/signalwire/freeswitch.git freeswitch cd /usr/local/src/freeswitch ./bootstrap.sh -j ./configure make -j make -j install # make -j cd-sounds-install make -j cd-moh-install # ln -sf /usr/local/freeswitch/bin/freeswitch /usr/bin/ ln -sf /usr/local/freeswitch/bin/fs_cli /usr/bin/ # #freeswitch -nc freeswitch # #netstat -anp|grep 5060 # #fs_cli
3. Build libexosip2-5.1.0.tar.gz + libosip2-5.1.0.tar.gz
#compiler setup
if [[ $1 = 'arm' ]]; then compiler=`CC=arm-linux-gnueabihf-gcc CXX=arm-linux-gnueabihf-g++` elif [[ $1 = 'himix100' ]]; then compiler=`CC=arm-himix100-linux-gcc CXX=arm-himix100-linux-g++` elif [[ $1 = 'himix200' ]]; then compiler=`CC=arm-himix200-linux-gcc CXX=arm-himix200-linux-g++` else : fi #Preinstalled directory install=${HOME}/_install #Delete installed directory rm -rf ${install} #library path pkg_config=${install}/lib/pkgconfig lib_config=`CPPFLAGS=-I${install}/include CFLAGS=-I${install}/include LDFLAGS=-L${install}/lib` #Delete compiled directory for i in `ls .` do if [ -d $i ];then rm -rf $i fi done #http://www.mirrorservice.org/pub/gnu/osip/ tar xvf libosip2-* cd libosip2-* ./configure ${compiler} --prefix=${install} ${lib_config} --enable-static --enable-shared make && make install cd .. #http://mirror.ossplanet.net/nongnu/exosip/ tar xvf libexosip2-* cd libexosip2-* ./configure ${compiler} --prefix=${install} PKG_CONFIG_PATH=${pkg_config} ${lib_config} --enable-static --enable-shared make && make install cd ..
dong@ubuntu:~/libexosip2-5.1.0$ su
Password:
root@ubuntu:/home/dong/libexosip2-5.1.0# ./_install.sh
root@ubuntu:~# tar cvf _install.tar.gz _install/
root@ubuntu:~# mv _install.tar.gz /home/dong/
dong@ubuntu:~$ sudo chmod 777 _install.tar.gz
4. example:
libexosip2-5.1.0/tools/sip_reg.c
export LD_LIBRARY_PATH=$(pwd)/_install/lib:$LD_LIBRARY_PATH
gcc -O2 -I./_install/include -L./_install/lib sip_reg.c \
-o sip_reg \
-leXosip2 -losip2 -losipparser2 -lpthread
test.sh
./sip_reg \
-r sip:182.61.147.213:5060 \ -u sip:1002@182.61.147.213 \ -c sip:1002@182.61.147.213:5060 \ -U 1002 \ -P 1234 \ -p 5060 \ -e 1800 \ -d
running
dong@ubuntu:~/libexosip2_demo$ ./test.sh
SipReg v1.0 up and running
proxy: sip:182.61.147.213:5060 fromuser: sip:1002@182.61.147.213 contact: sip:1002@182.61.147.213:5060 expiry: 1800 local port: 5060 transport: UDP username: 1002 password: [removed] registrered successfully registrered successfully registrered successfully INVITE rejected with 405 call closed call release
四、gb28181系统媒体数据通道
1、ps流封包
有人整理了而且经验证是靠谱的,我就不干重复劳动了。
https://github.com/shenshuyu/es2ps
测试demo,填EsFrame , 回调函数出ps
void PsMuxerCb(char* psData, unsigned long dataLen, unsigned int lastPackMark){

}

int main(int argc, char **argv) { EsFrame *frame = (EsFrame *)malloc(sizeof(EsFrame)); MuxerHandle m = create_ps_muxer(PsMuxerCb, NULL); input_es_frame(m, frame); release_ps_muxer(m); free(frame); return 0; }
2、ps流解包
可以用ffmpeg解析ps流,源码包里有两个示例都可以将ps解析成h264
ffmpeg-4.1/doc/examples/remuxing.c
ffmpeg-4.1/doc/examples/transcoding.c
以上例子是解析文件,改成缓存可以参考
https://www.cnblogs.com/dong1/p/9575291.html
3、media-server太给力了,啥都做好了,rtp/flv/ps/ts/es/h264全都处理好了!
https://github.com/ireader/media-server
我需要的一部分整理出来
https://files.cnblogs.com/files/dong1/gb28181_test.zip
https://files.cnblogs.com/files/dong1/rtp_ts_send_recv.zip
从PS流获取H264
https://www.xilixili.net/2018/05/11/parse-hikvision-camera-ps-stream/
4、基于jrtplib的rtp收发
虽然ffmpeg也可以做rtp收发,但是jrtplib包里有现成的,有现成的,有现成的。
下面的例子注释掉h264过滤,可以收发任意格式的rtp包
https://files.cnblogs.com/files/dong1/jrtplib_send_recv_h264.zip
jrtplib在ubuntu下的编译安装
https://blog.csdn.net/wang3141128/article/details/80482849
5、ps解析g711
在mpeg-ps-dec-test.cpp示例(支持ps解析h264视频和aac音频)的基础上加了个g711音频的解析
#include "mpeg-ps.h"
#include "mpeg-ts-proto.h" #include <stdio.h> #include <assert.h> #include <stdlib.h> #include <string.h> static FILE* vfp; static FILE* afp; static FILE* gfp; inline const char* ftimestamp(int64_t t, char* buf) { if (PTS_NO_VALUE == t) { sprintf(buf, "(null)"); } else { t /= 90; sprintf(buf, "%d:%02d:%02d.%03d", (int)(t / 3600000), (int)((t / 60000) % 60), (int)((t / 1000) % 60), (int)(t % 1000)); } return buf; } static void onpacket(void* /*param*/, int /*stream*/, int avtype, int flags, int64_t pts, int64_t dts, const void* data, size_t bytes) { static char s_pts[64], s_dts[64]; if(PSI_STREAM_AAC == avtype) { static int64_t a_pts = 0, a_dts = 0; if (PTS_NO_VALUE == dts) dts = pts; //assert(0 == a_dts || dts >= a_dts); printf("[A] pts: %s(%ld), dts: %s(%ld), diff: %03d/%03d\n", ftimestamp(pts, s_pts), pts, ftimestamp(dts, s_dts), dts, (int)(pts - a_pts) / 90, (int)(dts - a_dts) / 90); a_pts = pts; a_dts = dts; fwrite(data, 1, bytes, afp); } else if(PSI_STREAM_AUDIO_G711 == avtype) { static int64_t a_pts = 0, a_dts = 0; if (PTS_NO_VALUE == dts) dts = pts; //assert(0 == a_dts || dts >= a_dts); printf("[A] pts: %s(%ld), dts: %s(%ld), diff: %03d/%03d\n", ftimestamp(pts, s_pts), pts, ftimestamp(dts, s_dts), dts, (int)(pts - a_pts) / 90, (int)(dts - a_dts) / 90); a_pts = pts; a_dts = dts; fwrite(data, 1, bytes, gfp); } else if (PSI_STREAM_H264 == avtype) { static int64_t v_pts = 0, v_dts = 0; assert(0 == v_dts || dts >= v_dts); printf("[V] pts: %s(%ld), dts: %s(%ld), diff: %03d/%03d\n", ftimestamp(pts, s_pts), pts, ftimestamp(dts, s_dts), dts, (int)(pts - v_pts) / 90, (int)(dts - v_dts) / 90); v_pts = pts; v_dts = dts; fwrite(data, 1, bytes, vfp); } else { //assert(0);  } } static uint8_t s_packet[2 * 1024 * 1024]; int main(int argc, char **argv) { FILE* fp = fopen("full.ps", "rb"); vfp = fopen("v.h264", "wb"); afp = fopen("a.aac", "wb"); gfp = fopen("a.g711", "wb"); size_t n, i= 0; ps_demuxer_t* ps = ps_demuxer_create(onpacket, NULL); while ((n = fread(s_packet + i, 1, sizeof(s_packet) - i, fp)) > 0) { size_t r = ps_demuxer_input(ps, s_packet, n + i); memmove(s_packet, s_packet + r, n + i - r); i = n + i - r; } ps_demuxer_destroy(ps); fclose(fp); fclose(vfp); fclose(afp); fclose(gfp); }
6、 rtmp推送
1)用的开源srs_librtmp,文档介绍
https://github.com/ossrs/srs/wiki/v2_CN_SrsLibrtmp#publish-h264-raw-data
2) 关于srs_rtmp_lib推流细节做了个笔记
https://www.cnblogs.com/dong1/p/5100792.html
3)这里边涉及到音视频组帧
SPS帧起始码 00 00 00 01 67
PPS帧起始码 00 00 00 01 68
I帧起始码 00 00 00 01 65
P帧分片码 00 00 00 01 41
if(FindStartCode(p))
{
    printf("h264 payload +++ %x %x %x %x %x\n",p[0],p[1],p[2],p[3],p[4]); ringput(buf, pos + bytes); pos = 0; memcpy(&(buf[pos]),p,bytes); pos = pos + bytes; } else { memcpy(&(buf[pos]),p,bytes); pos = pos + bytes; }
详细说明https://blog.csdn.net/lizhijian21/article/details/80773031
7、h264bitstream (read and write H.264 video bitstreams)
https://www.cnblogs.com/dong1/p/11457760.html
8、总结
至此 yuv/pcm ---> h264/aac/g711 ---> ps ---> rtp
rtp ---> ps ---> h264/aac/g711 ---> yuv/pcm
另外 h264/aac/g711 ---> flv ---> rtmp
rtmp ---> flv ---> h264/aac/g711
都通了 ,后面只需要整合起来就行了。有了上面这些基础模块,无论是开发gb28181设备端还是服务端,都已经不是件困难的事了。
以上基础功能模块基本都是开源的,虽然没几行代码,但是信息量比较大,所以整合起来还不是件轻松的事,我目前做的产品也就是这样堆积木拼凑出来的。
10、参考资料
雷萧华用h264bitstream做了个的h264数据分析工具
https://files.cnblogs.com/files/dong1/H264BSAnalyzer.zip
MPEG-2 文件结构解析
https://blog.csdn.net/dancing_night/article/details/46832371
ps文件分析工具
https://download.csdn.net/download/dancing_night/8888147
https://download.csdn.net/download/lxmnet123/6290181