场景:
glusterfs作用: 可以让多台主机通过glusterfs 共享数据。(即分布式文件存储)
k8s 中部署了多台node 节点:
场景1:pod每次更新启动都可能会切换到不同的node节点。但是每次启动后还需要读取上次运行时调用的文件,这个时候glusterfs就排场用场了。
场景2:pod产生的日志需要保留并集中存放,这种情况使glusterfs作为集中存储就非常完美(如)。
以上2种情况说明了pod 与 glusterfs 的通讯交互,下面直接贴码:
K8S主机情况,操作系统统一CentOS Linux release 7.6.1810.
| IP | 角色 | k8s版本 | 配置 |
| 192.168.133.128 | master | v1.14.2 | 2c 2G |
| 192.168.133.129 | node2 | v1.14.2 | 2c 2G |
| 192.168.133.130 | node3 | v1.14.2 | 2c 2G |
Glusterfs主机情况
| IP | 角色 | Glusterfs | 配置 |
| 192.168.133.131 | 单节点运行 | glusterfs 6.6 | 2c 2G |
搭建K8S集群:https://www.kubernetes.org.cn/5462.html
安装Glusterfs:
这里只从K8S 创建Glusterfs point开始。
[root@master glusterfs]# cat glusterfs-endpoints.json
apiVersion: v1 ####版本号不解释
kind: Endpoints ####声明创建的类型,直接抄就行
metadata:
name: glusterfs-volume ####要创建的Endpoints名字,随便起。
subsets:
- addresses:
- ip: 192.168.133.131 #### Glusterfs IP
ports:
- port: 20 #### 这个端口不懂什么意思,随便写。
#########################################################
[root@master glusterfs]# cat pv-demo.yaml
apiVersion: v1 ######版本不解释
kind: PersistentVolume ######声明创建的类型
metadata:
name: tong-gluster ######创建的PV名字,随便起
spec:
capacity: ######容量属性
storage: 7G ######容量大小
accessModes: ######挂载模式
- ReadWriteMany ###### 分三种: ReadWriteMany : 多节点读写 ReadOnlyMany:多节点只读 ReadWriteOnce:单个节点读写
persistentVolumeReclaimPolicy: Recycle ########持久性属性分三种: Recycle:需要擦出后才能再使用。 delete: 没用过。Retain:手动回收
glusterfs:
endpoints: "glusterfs-volume" #####pv使用的endpoint,我们在上面创建的endpoint名字
path: "project" #####glusterfs 创建的卷名:这个非常重要,写错了pod会挂载不上。(很多帖子没有解释这一点^_^)
readOnly: false #####只读模式设置为false
################################################################
[root@master glusterfs]# cat pvc-demo.yaml
kind: PersistentVolumeClaim #####声明类型
apiVersion: v1
metadata:
name: xian-glusterfs ####PVC 的名字随便起。
spec:
accessModes:
- ReadWriteMany #####连接模式 读写模式
resources:
requests:
storage: 2G #####申请的大小,一般与创建的PV一致(或者小于PV)。PVC会自动去匹配已创建的PV,如果没有完全一致的就匹配最接近的。
###################################################################
前面的基础工作做完了,下面就可以创建POD去挂载PVC了,看例子:
[root@master glusterfs]# cat nginx-deployment.yaml
apiVersion: apps/v1 ###########版本号,不解释
kind: Deployment ######类型
metadata:
name: web02-deployment ######deployment的名字,随便起
labels:
web02: nginx ######标签,随便起
spec:
replicas: 2 ######启动POD的数量,随便写。
selector:
matchLabels:
web02: nginx ######标签格式。。必须写,最好所有的labels都一样,好区分。
template:
metadata:
labels:
web02: nginx #######POD的标签
spec:
containers:
- name: nginx02 ######POD名字
image: nginx ######镜像名
ports:
- containerPort: 80 ######对外暴露的端口号
volumeMounts: ######挂载
- name: www #####与下面的volumes name要一样,因为这里是调用的Volumes名字
mountPath: /usr/share/nginx/html #####挂载到POD的什么路径下
volumes: ######声明挂载
- name: www ######声明挂载的名字,给上面的volumeMounts调用
persistentVolumeClaim: ######持久请求
claimName: xian-glusterfs ############选择上面创建的PVC的名字。
#################################################################
上面的都文件配置好然后我们来使用kubectl 创建下,按顺序来:
1、kubectl create -f glusterfs-endpoints.json
2、kubectl create -f pv-demo.yaml
3、kubectl create -f pvc-demo.yaml
4、kubectl create -f nginx-deployment.yaml
创建完成后我们来查看下运行的情况:
[root@master glusterfs]# kubectl get ep -o wide
NAME ENDPOINTS AGE
glusterfs-volume 192.168.133.131:20 93m 我们创建的Endpoint
httpd 10.244.1.43:8080,10.244.2.33:8080,10.244.2.36:8080 27h
kubernetes 192.168.133.128:6443 4d13h
nginx 10.244.1.41:80,10.244.2.32:80,10.244.2.37:80 2d3h
web02 10.244.1.48:80,10.244.2.41:80 82m 我们创建的 Pod
[root@master glusterfs]# kubectl get pods -l web02=nginx
NAME READY STATUS RESTARTS AGE
web02-deployment-6f4f996589-4gw4z 1/1 Running 0 88m
web02-deployment-6f4f996589-m28nh 1/1 Running 0 88m
[root@master glusterfs]# kubectl get pv
NAME CAPACITY ACCESS MODES RECLAIM POLICY STATUS CLAIM STORAGECLASS REASON AGE
tong-gluster 7G RWX Recycle Bound default/xian-glusterfs 91m
[root@master glusterfs]# kubectl get pvc
NAME STATUS VOLUME CAPACITY ACCESS MODES STORAGECLASS AGE
xian-glusterfs Bound tong-gluster 7G RWX 93m
都创建完成了,接下来我们创建一个service 使用供外部主机访问下
[root@master glusterfs]# cat nginx_service.yaml
apiVersion: v1
kind: Service ######声明服务类型
metadata:
labels:
web02: nginx #######标签
name: web02 #######服务名字
namespace: default
spec:
ports:
- port: 80 #######servcie 内部服务使用的端号,供k8s各node访问使用,外部网络访问不到。
targetPort: 80 #######pod暴露的端口号,实在后端提供服务的端口号
nodePort: 30099 #######映射到node本地的端口号上,对外部网络提供服务
type: NodePort #######声明了nodeport类型才上面的nodeport 才有效。
selector:
web02: nginx ###########选择Pod标签为 web02: nginx 的Pod进行关联,我们在创建POD时给POD打过标签了,可以看看上面的POD创建。
##################################################################
我们来创建一个服务关联上面创建的2个Pod.
kubectl create -f nginx_service.yaml
使用下面命令看看sevice的关联情况:
[root@master glusterfs]# kubectl get svc
NAME TYPE CLUSTER-IP EXTERNAL-IP PORT(S) AGE
httpd NodePort 10.1.26.50 <none> 80:30089/TCP 28h
kubernetes ClusterIP 10.1.0.1 <none> 443/TCP 4d14h
nginx NodePort 10.1.241.95 <none> 88:30088/TCP 2d4h
web02 NodePort 10.1.168.227 <none> 80:30099/TCP 94m
[root@master glusterfs]# kubectl describe svc web02
Name: web02
Namespace: default
Labels: web02=nginx
Annotations: <none>
Selector: web02=nginx
Type: NodePort
IP: 10.1.168.227
Port: <unset> 80/TCP
TargetPort: 80/TCP
NodePort: <unset> 30099/TCP
Endpoints: 10.244.1.48:80,10.244.2.41:80
Session Affinity: None
External Traffic Policy: Cluster
Events: <none>
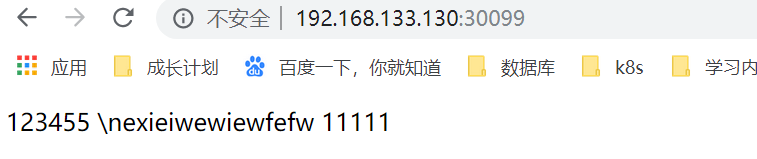
都部署完成了,我们测试访问下服务。页面是我自己在glusterfs端改的,不然直接挂载进去了是没有文件的。