Spring简介
Spring不是服务于开发web项目的功能,或业务。而是服务于项目的开发,方便各层间的解耦调用,方便对类的批量管理,是提高软件开发效率,降低后期维护成本的框架。
Spring的核心思想是IOC(控制反转),AOP(切面编程)两点。
IOC:即不再需要程序员去显式地`new`一个对象,而是把Spring框架把框架创建出的对象拿来用。因为是spring框架创建的对象,对象都在spring框架对象中保存,亦称为spring容器,这样spring就知道当前项目中都创建了哪些对象,这个对象归属于那一层,该如何管理。想使用spring的其他功能第一点就是要用spring的对象,也称为将控制权交给spring管理。
AOP:对某种路径下的所有类,或有共同特性的类或方法统一管理,在原任务执行的前后,加入新功能。做出监控,初始化,整理,销毁等一系列统一的伴随动作。
如果你从事Java编程有一段时间了, 那么你或许会发现(可能你也实际使用过) 很多框架通过强迫应用继承它们的类或实现它们的接口从而导致应用与框架绑死。这种侵入式的编程方式在早期版本的Struts以及无数其他的Java规范和框架中都能看到。Spring竭力避免因自身的API而弄乱你的应用代码。Spring不会强迫你实现Spring规范的接口或继承Spring规范的类,相反,在基于Spring构建的应用中,它的类通常没有任何痕迹表明你使用了Spring。 最坏的场景是, 一个类或许会使用Spring注解, 但它依旧是POJO。
任何一个有实际意义的应用(肯定比Hello World示例更复杂) 都会由两个或者更多的类组成, 这些类相互之间进行协作来完成特定的业务逻辑。 按照传统的做法, 每个对象负责管理与自己相互协作的对象(即它所依赖的对象) 的引用, 这将会导致高度耦合和难以测试的代码。
IOC声明Bean
首先创建的Maven Poject,详细包结构如下
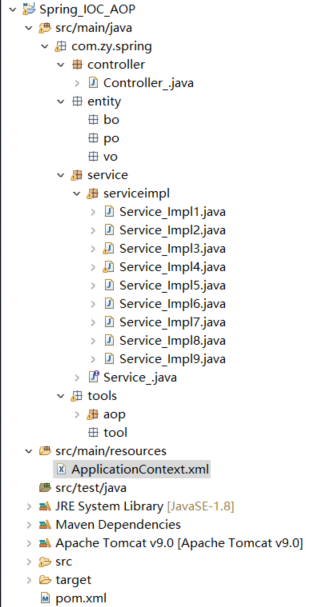
其中AOP会在下一篇进行讲解;
Controller_.java
/**
     * @see HttpServlet#doGet(HttpServletRequest request, HttpServletResponse response)
     */
    protected void doGet(HttpServletRequest request, HttpServletResponse response) throws ServletException, IOException {
        // TODO Auto-generated method stub
        response.getWriter().append("Served at: ").append(request.getContextPath());
        ClassPathXmlApplicationContext ctx=new ClassPathXmlApplicationContext("/ApplicationContext.xml");
        Service_ s = (Service_) ctx.getBean("service_Impl1_new");
        System.out.println(s);
        s.show();
    }
由于Spring无法单独演示,所以Controller_.java是创建的是一个Servlet,直接调用doPost或者doGet方法,进行Service的实现,输出Service_对象s,执行show方法。
Service_.java
public interface Service_ {
    public void show();
}
创建一个Service接口,用来实现Spring。
1.无参构造方法声明bean
Service_Impl1.java
public class Service_Impl1 implements Service_{


    public Service_Impl1() {
        // TODO Auto-generated constructor stub
        System.out.println("service1-无参构造方法");
    }
    @Override
    public void show() {
        // TODO Auto-generated method stub
        System.out.println("Service_Impl1");
    }

}
重写Service_的show方法输出实现了Service_Impl1,编写无参构造方法。
ApplicationContext.xml

<!-- 默认构造方法 -->
    <bean id="service_Impl1" class="com.zy.spring.service.serviceimpl.Service_Impl1"></bean>
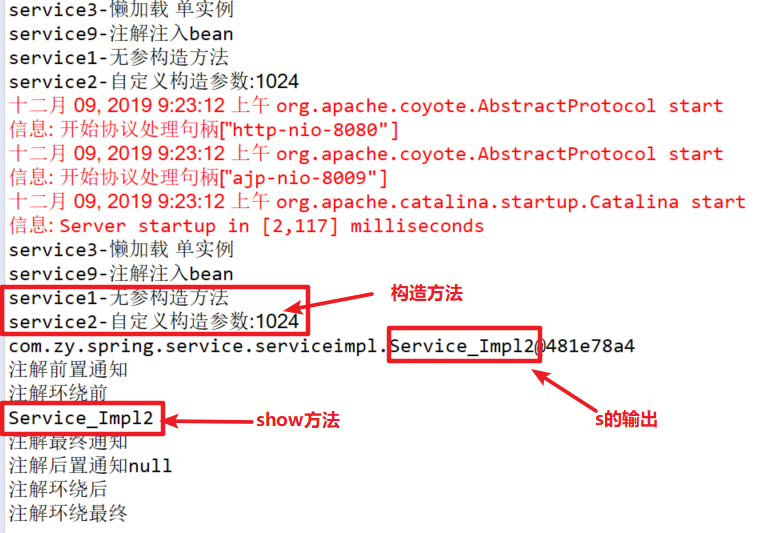
只需要设置id与class,class对应Service_Impl1,id则是Controller_.java调用的getBean中的参数。运行结果见自定义构造方法注入bean
2.自定义构造方法声明bean
Service_Impl2.java
public class Service_Impl2 implements Service_{

    public Service_Impl2(int a) {
        // TODO Auto-generated constructor stub
        System.out.println("service2-自定义构造参数:"+a);
    }
    @Override
    public void show() {
        // TODO Auto-generated method stub
        System.out.println("Service_Impl2");
    }

}
ApplicationContext.xml
 <!-- 自定义构造方法 -->
     <bean id="service_Impl2" class="com.zy.spring.service.serviceimpl.Service_Impl2">
         <constructor-arg index="0" value="1024"></constructor-arg>
     </bean>
<constructor-arg index="0" value="1024"></constructor-arg>这是构造方法中参数的设置,index顾名思义就是索引的意思,其中a参数是第0个,value是参数的值。
3.单实例 懒加载声明bean
Service_Impl3.java
public class Service_Impl3 implements Service_{
    public Service_Impl3() {
        // TODO Auto-generated constructor stub
        System.out.println("service3-懒加载 单实例");
    }
    @Override
    public void show() {
        // TODO Auto-generated method stub
        System.out.println("Service_Impl3");
    }

}
ApplicationContext.xml
 <!--  单实例 懒加载 -->
    <bean id="service_Impl3" class="com.zy.spring.service.serviceimpl.Service_Impl3" lazy-init="true" scope="singleton"></bean>
lazy-init="true" 设置懒加载,也就是调用的时候才会加载bean,不会自动加载;scope="singleton" 作用域标签,单实例也就是只创建一个实例。

4.参数引用声明bean
Service_Impl4.java
public class Service_Impl4 implements Service_{

    Service_ s3;


    public Service_ getS3() {
        return s3;
    }
    public void setS3(Service_ s3) {
        this.s3 = s3;
    }
    public Service_Impl4() {
        // TODO Auto-generated constructor stub
        System.out.println("service4-参数引用bean");
    }
    @Override
    public void show() {
        // TODO Auto-generated method stub
        System.out.println("Service_Impl4");
    }

}
ApplicationContext.xml
<!-- 参数引用bean -->
    <bean id="service_Impl4" class="com.zy.spring.service.serviceimpl.Service_Impl4">
       <property name="s3" ref="service_Impl3"></property>
    </bean>
<property name="s3" ref="service_Impl3"></property> 参数标签,name是Service_Impl4中的参数s3,ref链接要引用的bean。
5.初始化属性声明bean
Service_Impl5.java
public class Service_Impl5 implements Service_{
    String name;
    ArrayList<String> list;
    HashMap<String, String> map;
    HashSet<Integer> set;


    @Override
    public int hashCode() {
        final int prime = 31;
        int result = 1;
        result = prime * result + ((list == null) ? 0 : list.hashCode());
        result = prime * result + ((map == null) ? 0 : map.hashCode());
        result = prime * result + ((name == null) ? 0 : name.hashCode());
        result = prime * result + ((set == null) ? 0 : set.hashCode());
        return result;
    }
    @Override
    public boolean equals(Object obj) {
        if (this == obj)
            return true;
        if (obj == null)
            return false;
        if (getClass() != obj.getClass())
            return false;
        Service_Impl5 other = (Service_Impl5) obj;
        if (list == null) {
            if (other.list != null)
                return false;
        } else if (!list.equals(other.list))
            return false;
        if (map == null) {
            if (other.map != null)
                return false;
        } else if (!map.equals(other.map))
            return false;
        if (name == null) {
            if (other.name != null)
                return false;
        } else if (!name.equals(other.name))
            return false;
        if (set == null) {
            if (other.set != null)
                return false;
        } else if (!set.equals(other.set))
            return false;
        return true;
    }
    @Override
    public String toString() {
        return "Service_Impl5 [name=" + name + ", list=" + list + ", map=" + map + ", set=" + set + "]";
    }
    public String getName() {
        return name;
    }
    public void setName(String name) {
        this.name = name;
    }
    public ArrayList<String> getList() {
        return list;
    }
    public void setList(ArrayList<String> list) {
        this.list = list;
    }
    public HashMap<String, String> getMap() {
        return map;
    }
    public void setMap(HashMap<String, String> map) {
        this.map = map;
    }
    public HashSet<Integer> getSet() {
        return set;
    }
    public void setSet(HashSet<Integer> set) {
        this.set = set;
    }


    public Service_Impl5() {
        // TODO Auto-generated constructor stub
        System.out.println("service5-初始化属性");
    }
    @Override
    public void show() {
        // TODO Auto-generated method stub
        System.out.println("Service_Impl5");
    }

}
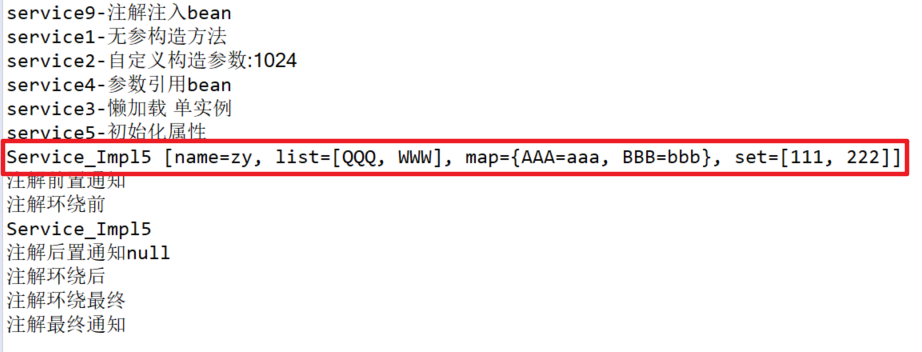
其中初始化参数有list,map,set以及普通参数,重写了hashCode和equals方法,详见HashMap内存泄漏;重写toString方法用来输出初始化属性。
ApplicationContext.xml
<!--     初始化属性  -->
     <bean id="service_Impl5" class="com.zy.spring.service.serviceimpl.Service_Impl5">
         <property name="name" value="zy"></property>
         <property name="map">
             <map>
                 <entry key="AAA" value="aaa"></entry>
                 <entry key="BBB" value="bbb"></entry>
             </map>
         </property>

         <property name="list">
             <list>
                 <value type="java.lang.String">QQQ</value>
                 <value type="java.lang.String">WWW</value>
             </list>
         </property>

         <property name="set">
             <set>
                 <value type="java.lang.Integer">111</value>
                 <value type="java.lang.Integer">222</value>
             </set>
         </property>
     </bean>
其中map标签内使用<entry key="AAA" value="aaa"></entry>进行赋值。其他的正常使用property和value进行赋值。
6.初始化属性引用方法返回值声明bean
Service_Impl6.java
public class Service_Impl6 implements Service_{
    String s5_toString;


    public String getS5_toString() {
        return s5_toString;
    }
    public void setS5_toString(String s5_toString) {
        this.s5_toString = s5_toString;
    }

    public Service_Impl6() {
        // TODO Auto-generated constructor stub
        System.out.println("service6-调用方法返回值");
    }
    @Override
    public void show() {
        // TODO Auto-generated method stub
        System.out.println("Service_Impl6 返回值"+s5_toString);
    }

}
其中调用了Service_Impl5的toString方法并且进行了输出。
ApplicationContext.xml
<!--     调用方法返回值 -->
      <bean id="service_Impl6" class="com.zy.spring.service.serviceimpl.Service_Impl6">
            <property name="s5_toString">
                <bean class="org.springframework.beans.factory.config.MethodInvokingFactoryBean">
                    <property name="targetObject" ref="service_Impl5"></property>
                    <property name="targetMethod" value="toString"></property>
                </bean>
            </property>
      </bean>
<bean class="org.springframework.beans.factory.config.MethodInvokingFactoryBean">固定用来声明调用方法返回值。
targetObject——目标的bean
targetMethod——目标的方法

7.静态工厂——声明工厂bean
Service_Impl7.java
public class Service_Impl7 implements Service_{

    public static Service_ StaticFactory(int num) {
        switch (num) {
        case 1:
            return new Service_Impl1();
        case 2:
            return new Service_Impl2(100);
        case 3:
            return new Service_Impl3();
        case 4:
            return new Service_Impl4();
        case 5:
            return new Service_Impl5();
        default:
            return new Service_Impl6();
        }
    }

    public Service_Impl7() {
        // TODO Auto-generated constructor stub
        System.out.println("service7-静态工厂");
    }
    @Override
    public void show() {
        // TODO Auto-generated method stub
        System.out.println("Service_Impl7");
    }

}
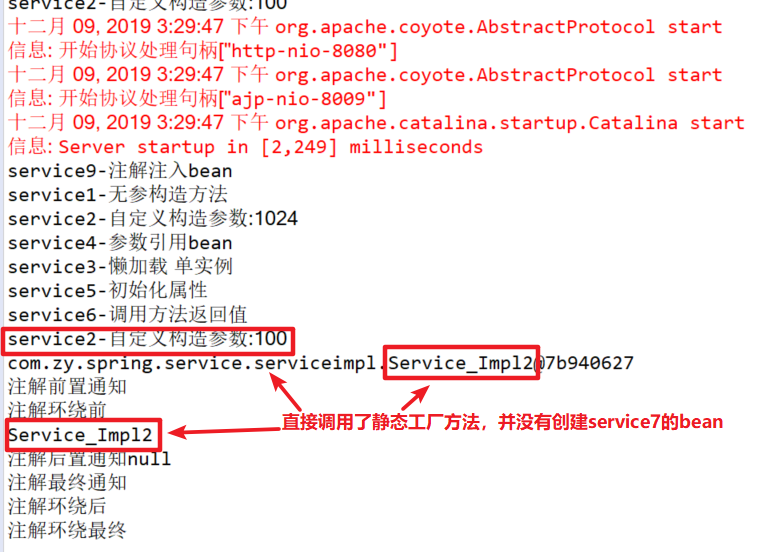
工厂在实现类中使用了switch语句进行模拟,静态工厂在方法前加上static关键字,分别调用上面的其他实现类方法。
ApplicationContext.xml
<!--   静态工厂 -->
       <bean id="service_Impl7" class="com.zy.spring.service.serviceimpl.Service_Impl7" factory-method="StaticFactory" >
               <constructor-arg name="num" value="2"></constructor-arg>
       </bean>
使用构造方法注入的方法来赋值<constructor-arg name="num" value="2"></constructor-arg> ;factory-method="StaticFactory" ( factory-method工厂的方法名)
8.实例工厂——声明工厂bean
Service_Impl8.java
public class Service_Impl8 implements Service_{

    public  Service_ factory1(int num) {
        switch (num) {
        case 1:
            return new Service_Impl1();
        case 2:
            return new Service_Impl2(100);
        case 3:
            return new Service_Impl3();
        case 4:
            return new Service_Impl4();
        case 5:
            return new Service_Impl5();
        default:
            return new Service_Impl6();
        }
    }

    public Service_Impl8() {
        // TODO Auto-generated constructor stub
        System.out.println("service8-实例工厂");
    }
    @Override
    public void show() {
        // TODO Auto-generated method stub
        System.out.println("Service_Impl8");
    }

}
ApplicationContext.xml
  <!-- 实例工厂 -->
      <bean id="service_Impl8" class="com.zy.spring.service.serviceimpl.Service_Impl8"  >
       </bean>
    <bean id="service_Impl8_new"  factory-bean="service_Impl8" factory-method="factory1">
        <constructor-arg name="num" value="2"></constructor-arg>
    </bean>
创建实例工厂bean,首先创建一个实例工厂的bean,然后再创建一个工厂方法的bean去调用工厂的bean。
调用的时候要调用工厂方法的bean,这里就要调用service_Impl8_new
9.注解声明bean
@Service:用于标注业务层组件
@Controller:用于标注控制层组件(如struts中的action)
@Repository:用于标注数据访问组件,即DAO组件
@Component(value="*"):泛指组件,当组件不好归类的时候,我们可以使用这个注解进行标注
Service_Impl9.java
@Service
public class Service_Impl9 implements Service_{


    public Service_Impl9() {
        // TODO Auto-generated constructor stub
        System.out.println("service9-注解注入bean");
    }
    @Override
    public void show() {
        // TODO Auto-generated method stub
        System.out.println("Service_Impl9");
    }

}
@Service进行bean的声明(注解只能声明无参构造方法),使用注解默认声明的bean是类名的首字母小写,这里声明的bean的id应该是service_Impl9。
ApplicationContext.xml
 <!-- 注解扫描IOC根目录 -->
        <context:component-scan base-package="com.zy.spring">
     <context:exclude-filter type="annotation" expression="org.springframework.stereotype.Controller"/><!-- 扫描不包括controller -->
    </context:component-scan>
使用注解需要加上注解扫描,其中base-package是扫描的目录,一般使用的是项目的根目录,以后使用SpringMVC的话,就不用扫描Controller。

注解写入bean
@Resource(name="*" type="*")bean写入
@Autowired/@Qualifier
@inject/@named