1、展示修改用户的对话框
给修改按钮添加点击事件:
<!--修改-->
<el-button type="primary" size="mini" icon="el-icon-edit"
              @click="showEditDialog()"></el-button>
添加修改对话框代码:
<!--修改用户信息的对话框-->
<el-dialog title="修改用户" :visible.sync="editDialogVisible" width="50%" >
      <span>这是一段信息</span>
      <span slot="footer" class="dialog-footer">
        <el-button @click="editDialogVisible = false">取 消</el-button>
        <el-button type="primary" @click="editDialogVisible = false">确 定</el-button>
      </span>
</el-dialog>

<script>
export default {
  data() {
     return {
        editDialogVisible: false // 控制修改用户信息对话框是否显示
     }
  },
  methods: {
     // 监听 修改用户状态
    showEditDialog() {
      this.editDialogVisible = true
    }
  }
}
</script>
此时,点击修改按钮已经可以弹出对话框了。
2、显示对应的用户信息
通过作用域插槽获取row信息
<!--修改按钮-->
<el-button type="primary" size="mini" icon="el-icon-edit"
              @click="showEditDialog(scope.row)"></el-button>
新建editForm:
<script>
export default {
  data() {
     return {
        // 修改用户信息的表单数据
        editForm: {
          username: '',
          email: '',
          mobile: ''
        }
     }
  },
  methods: {
     // 监听 修改用户状态
    showEditDialog(userinfo) {
      this.editDialogVisible = true
      console.log(userinfo)
      this.editForm = userinfo
    }
  }
}
</script>
也可以通过ID查询对应的用户信息:
<!--修改按钮-->
<el-button type="primary" size="mini" icon="el-icon-edit"
              @click="showEditDialog(scope.row.id)"></el-button>

// 监听 修改用户状态
async showEditDialog(id) {
     this.editDialogVisible = true
     // console.log(id)
     const { data: res } = await this.$http.get('users/' + id)
     if (res.meta.status !== 200) {
        return this.$message.error('查询用户信息失败')
     }
     this.editForm = res.data
}
3、渲染修改用户信息的表单
用户名为禁止修改状态
<!--内容主体区域-->
<el-form :model="editForm" :rules="editFormRules" ref="editFormRef" label-width="70px">
       <el-form-item label="用户名">
          <el-input v-model="editForm.username" :disabled="true"></el-input>
       </el-form-item>
       <el-form-item label="邮箱" prop="email">
          <el-input v-model="editForm.email"></el-input>
       </el-form-item>
       <el-form-item label="手机" prop="mobile">
          <el-input v-model="editForm.mobile"></el-input>
       </el-form-item>
</el-form>
修改用户信息表单的验证规则:
// 修改用户信息表单的验证规则对象
editFormRules: {
      email: [
          { required: true, message: '请输入用户邮箱', trigger: 'blur' },
          { validator: checkEmail, trigger: 'blur' }
      ],
      mobile: [
          { required: true, message: '请输入用户手机', trigger: 'blur' },
          { validator: checkMobile, trigger: 'blur' }
      ]
}
editForm:是数据绑定对象,editFormRef:是引用名称,editFormRules:是验证规则,label-width:是表单域标签的宽度
验证规则的required:表示是否必填,message:表示提示信息,trigger:表示触发时机(blur失去焦点)
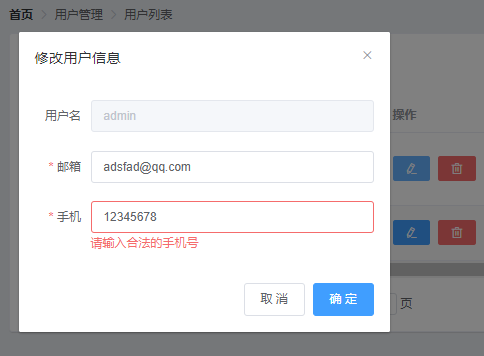
点击修改按钮,实现效果如图:
4、实现修改用户信息表单的重置功能
添加close事件:
<!--修改用户信息的对话框-->
<el-dialog title="修改用户信息" :visible.sync="editDialogVisible" width="50%" @close="editDialogClosed">
添加editDialogClosed事件:
// 监听 修改用户信息对话框的关闭事件
editDialogClosed() {
    // 表单内容重置为空
    this.$refs.editFormRef.resetFields() // 通过ref引用调用resetFields方法
}
5、完成提交修改前的表单预校验
给确定按钮绑定点击事件:
<el-button type="primary" @click="editUserInfo">确 定</el-button>

// 点击按钮 修改用户信息
editUserInfo() {
     this.$refs.editFormRef.validate(valid => {
        // console.log(valid)
        if (!valid) return
        // 可以发起修改用户信息的网络请求
        this.editDialogVisible = false
     })
 }
6、提交表单完成用户信息的修改
继续添加代码:
// 点击按钮 修改用户信息
editUserInfo() {
      this.$refs.editFormRef.validate(async valid => {
        // console.log(valid)
        if (!valid) return
        // 可以发起修改用户信息的网络请求
        const { data: res } = await this.$http.put(
          'users/' + this.editForm.id,
          { email: this.editForm.email, mobile: this.editForm.mobile }
        )
        if (res.meta.status !== 200) {
          return this.$message.error('修改用户信息失败!')
        }
        this.$message.success('修改用户信息成功!')
        // 关闭对话框
        this.editDialogVisible = false
        // 重新发起请求用户列表
        this.getUserList()
      })
}
OK,完成