Docker私有仓库部署和管理
本章结构:
Harbor介绍
部署Harbor所依赖的Docker Compose服务
部署Harbor服务
Harbor日常操作管理
Harbor管理生命周期
Harbor介绍
Harbor是VMware公司开源的企业级Docker Registry项目
Harbor的优势
基于角色控制
基于镜像的复制策略
支持LDAP目录服务/AD域服务
图像删除和垃圾收集
图形UI(可以访问Web界面)
审计
RESTful API
Harbor架构组成
Proxy:
通过一个前置的反向代理统一接收浏览器、Docker客户端的请求, 并将请求转发给后端不同的服务
Registry:仓库
负责储存Docker镜像, 并处理docker push(上传)/pull(下载)命令
Core services:
Harbor的核心功能,包括UI、webhook、 token(令牌) 服务
Database:mysql
为core services提供数据库服务
Log collector:
负责收集其他组件的log,供日后进行分析
Docker私有仓库架构拓扑:
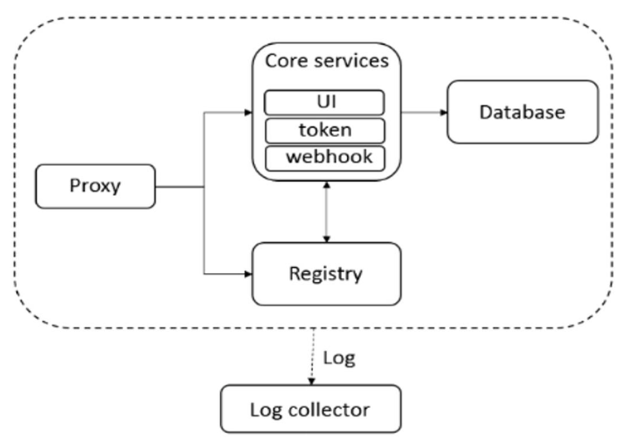
过程介绍:
访问仓库之前先用账户访问Core service,UI支持web界面,首次成功登录后token发身份验证令牌,后期用户直接使用分发的令牌访问database仓库,查看镜像,如果没有就直接返回无镜像名称(hub公共仓库下载),如果存在,使用webhook回调,仓库发送信息返回客户端,最终所有的操作信息都会记录到log collector中
名词解释
webhook:
微服务当中的回调机制
token(令牌)生成方式:
1.服务器给予序列号,后面直接通过序列号找服务器验证,方可通过
2.基于客户端的MAC地址,生成字符串,每次传参数时需要带上MAC地址,此时服务器会去验证MAC地址,若之前已验证过则可直接通过
database:
存储用户信息,包括权限,镜像的属性信息
部署Harbor服务
下载Harbor安装程序:
wget http://harbor.orientsoft.cn/harbor-1.2.2/harbor-offline-installer-v1.2.2.tgz
tar xvf harbor-offline-installer-v1.2.2.tgz -C /usr/local
配置Harbor参数文件:
参数位于文件/usr/local/harbor/harbor.cfg
Harbor所需要参数:
hostname 、ui_url_protocol、max_job_workers
db_password、customize_crt、ssl_cert、ssl_cert_key
secretkey_path
Harbor可选参数:
电子邮件设置、harbour_admin_password、auth_mode
self_registration、token_expiration
project_creation_restriction、verify_remote_cert
启动并安装Harbor:
[root@localhost harbor]# sh /usr/local/harbor/install.sh
查看Harbor启动镜像并访问管理页面
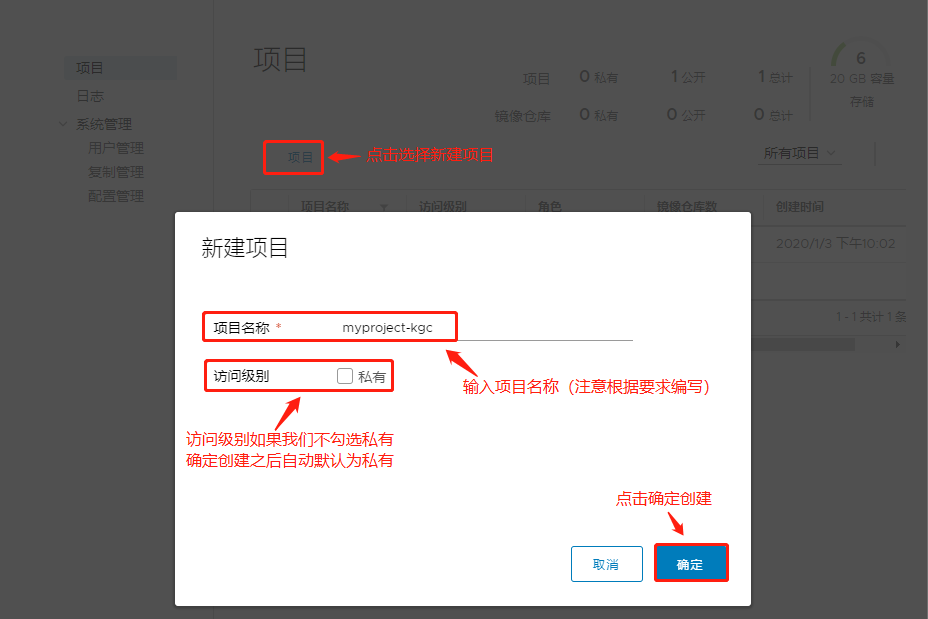
创建一个新项目:
首先登录Harbor
镜像打tag
上传镜像到Harbor
以上操作都是在Harbor本地,如果其他客户端操作Harbor,就会报错,需要在Harbor以外的其他Docker客户端修改配置,然后重启Docker
Demo:Harbor私有仓库部署
doncker私库:CentOS 7-3:192.168.18.128
[root@localhost ~]# systemctl stop firewalld.service
[root@localhost ~]# setenforce 0
[root@localhost ~]# yum install yum-utils device-mapper-persistent-data lvm2 -y
[root@localhost ~]# yum-config-manager --add-repo https://mirrors.aliyun.com/docker-ce/linux/centos/docker-ce.repo
[root@localhost ~]# yum install -y docker-ce
[root@localhost ~]# systemctl start docker.service
[root@localhost ~]# systemctl enable docker.service
[root@localhost ~]# tee /etc/docker/daemon.json <<-'EOF'
{
  "registry-mirrors": ["https://w1ogxqvl.mirror.aliyuncs.com"]
}
EOF

[root@localhost ~]# vim /etc/sysctl.conf
`在末行下一行插入以下内容`
net.ipv4.ip_forward=1
#按Esc退出插入模式,输入:wq保存退出
[root@localhost ~]# service network restart
Restarting network (via systemctl):                        [  确定  ]
[root@localhost ~]# systemctl restart docker
[root@localhost ~]# sysctl -p
net.ipv4.ip_forward = 1

[root@localhost ~]# systemctl daemon-reload
[root@localhost ~]# systemctl restart docker
[root@localhost ~]# mkdir /aaa
[root@localhost ~]# mount.cifs //192.168.0.105/rpm /aaa
Password for root@//192.168.0.105/rpm:
[root@localhost ~]# cd /aaa/docker/
[root@localhost docker]# cp docker-compose /usr/local/bin/
[root@localhost docker]# docker-compose -v
docker-compose version 1.21.1, build 5a3f1a3
部署Harbor服务
[root@localhost docker]# tar zxvf harbor-offline-installer-v1.2.2.tgz -C /usr/local/
[root@localhost docker]# cd /usr/local/
[root@localhost local]# ls
bin etc games harbor include lib lib64 libexec sbin share src
#此时有harbor目录
[root@localhost local]# cd harbor/
[root@localhost harbor]# ls
common docker-compose.yml harbor.v1.2.2.tar.gz NOTICE
docker-compose.clair.yml harbor_1_1_0_template install.sh prepare
docker-compose.notary.yml harbor.cfg LICENSE upgrade
[root@localhost harbor]# vim harbor.cfg
hostname = 192.168.18.128 #第5行hostname后面改为自己客户端的IP地址
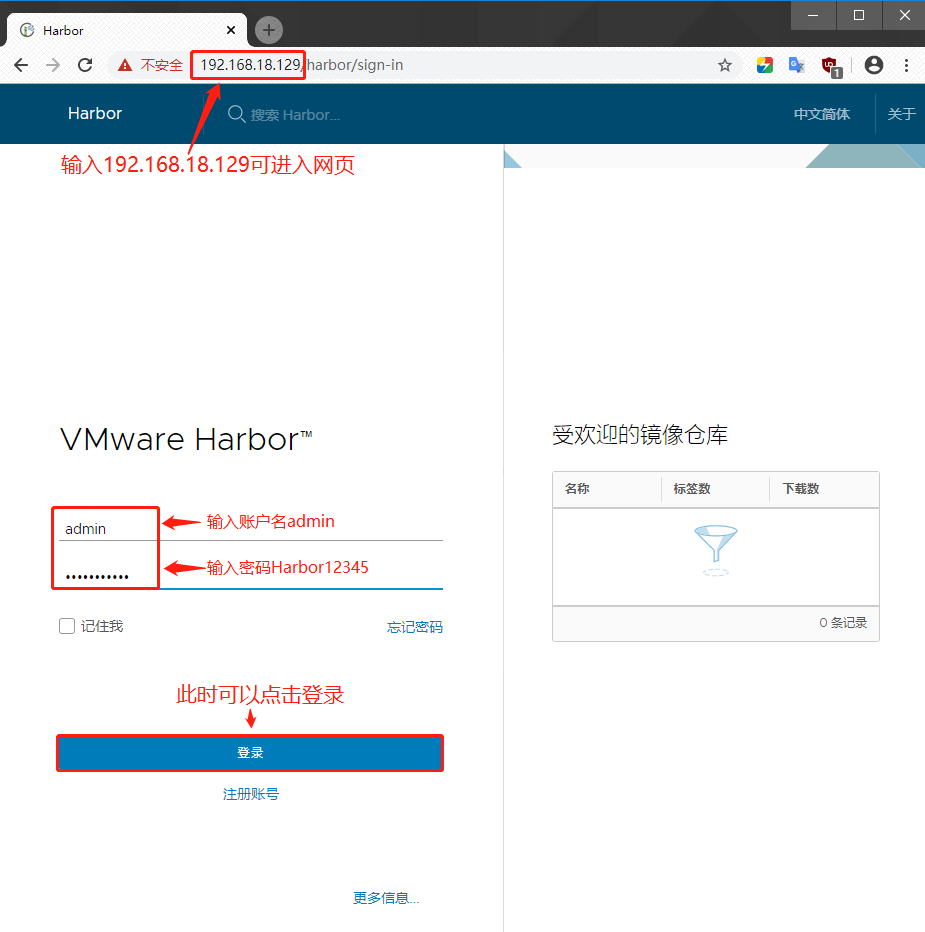
harbor_admin_password = Harbor12345 #第59行默认用户名为admin,密码为Harbor12345
[root@localhost harbor]# sh /usr/local/harbor/install.sh
[root@localhost harbor]# docker images
REPOSITORY TAG IMAGE ID CREATED SIZE
vmware/harbor-log v1.2.2 36ef78ae27df 2 years ago 200MB
vmware/harbor-jobservice v1.2.2 e2af366cba44 2 years ago 164MB
vmware/harbor-ui v1.2.2 39efb472c253 2 years ago 178MB
vmware/harbor-adminserver v1.2.2 c75963ec543f 2 years ago 142MB
vmware/harbor-db v1.2.2 ee7b9fa37c5d 2 years ago 329MB
vmware/nginx-photon 1.11.13 6cc5c831fc7f 2 years ago 144MB
vmware/registry 2.6.2-photon 5d9100e4350e 2 years ago 173MB
vmware/postgresql 9.6.4-photon c562762cbd12 2 years ago 225MB
vmware/clair v2.0.1-photon f04966b4af6c 2 years ago 297MB
vmware/harbor-notary-db mariadb-10.1.10 64ed814665c6 2 years ago 324MB
vmware/notary-photon signer-0.5.0 b1eda7d10640 2 years ago 156MB
vmware/notary-photon server-0.5.0 6e2646682e3c 2 years ago 157MB
photon 1.0 e6e4e4a2ba1b 3 years ago 128MB
#此时我们可以看到所有下载的镜像
[root@localhost harbor]# docker ps -a
CONTAINER ID IMAGE COMMAND CREATED STATUS PORTS NAMES
bd6e948955f2 vmware/harbor-jobservice:v1.2.2 "/harbor/harbor_jobs…" 3 minutes ago Up 3 minutes harbor-jobservice
45d02b396e2f vmware/nginx-photon:1.11.13 "nginx -g 'daemon of…" 3 minutes ago Up 3 minutes 0.0.0.0:80->80/tcp, 0.0.0.0:443->443/tcp, 0.0.0.0:4443->4443/tcp nginx
0538aa954b1f vmware/harbor-ui:v1.2.2 "/harbor/harbor_ui" 3 minutes ago Up 3 minutes harbor-ui
ed741e609d5a vmware/harbor-adminserver:v1.2.2 "/harbor/harbor_admi…" 3 minutes ago Up 3 minutes harbor-adminserver
f0c689bedc71 vmware/registry:2.6.2-photon "/entrypoint.sh serv…" 3 minutes ago Up 3 minutes 5000/tcp #私库的5000端口 registry
516f88c68b93 vmware/harbor-db:v1.2.2 "docker-entrypoint.s…" 3 minutes ago Up 3 minutes 3306/tcp #数据库的3306端口 harbor-db
47a2fa42392c vmware/harbor-log:v1.2.2 "/bin/sh -c 'crond &…" 3 minutes ago Up 3 minutes 127.0.0.1:1514->514/tcp harbor-log
#此时所有的容器都属于Up状态
`通过编排一步完成镜像的下载和容器的启动`
[root@localhost harbor]# pwd
/usr/local/harbor #在工作目录下
[root@localhost harbor]# docker-compose ps
Name Command State Ports
-----------------------------------------------------------------------------------------
harbor-adminserver /harbor/harbor_adminserver Up
harbor-db docker-entrypoint.sh mysqld Up 3306/tcp
harbor-jobservice /harbor/harbor_jobservice Up
harbor-log /bin/sh -c crond && rm -f ... Up 127.0.0.1:1514->514/tcp
harbor-ui /harbor/harbor_ui Up
nginx nginx -g daemon off; Up 0.0.0.0:443->443/tcp,
0.0.0.0:80->80/tcp
registry /entrypoint.sh serve /etc/ ... Up 5000/tcp验证:回到宿主机使用浏览器访问192.168.18.128网页可进入Harbor页面
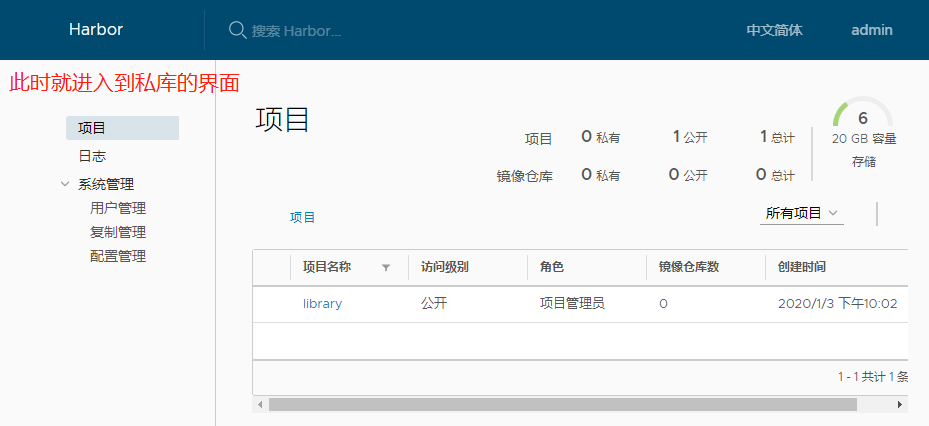
此时私库中还没有镜像,此时我们需要选择新建项目
使用CentOS 7-5客户端登录:
[root@localhost harbor]# docker login -u admin -p Harbor12345 http://127.0.0.1
WARNING! Using --password via the CLI is insecure. Use --password-stdin.
WARNING! Your password will be stored unencrypted in /root/.docker/config.json.
Configure a credential helper to remove this warning. See
https://docs.docker.com/engine/reference/commandline/login/#credentials-store
Login Succeeded #此时显示登陆成功
[root@localhost harbor]# docker pull cirros #下载镜像
[root@localhost harbor]# docker tag cirros 127.0.0.1/myproject-kgc/cirros:v1 #打标签
[root@localhost harbor]# docker images
REPOSITORY TAG IMAGE ID CREATED SIZE
127.0.0.1/myproject-kgc/cirros v1 bc94bceaae77 12 months ago 10.3MB
[root@localhost harbor]# docker push 127.0.0.1/myproject-kgc/cirros:v1 #上传镜像
The push refers to repository [127.0.0.1/myproject-kgc/cirros]
abbd6d6ac643: Pushed
75b99987219d: Pushed
0cc237193a30: Pushed
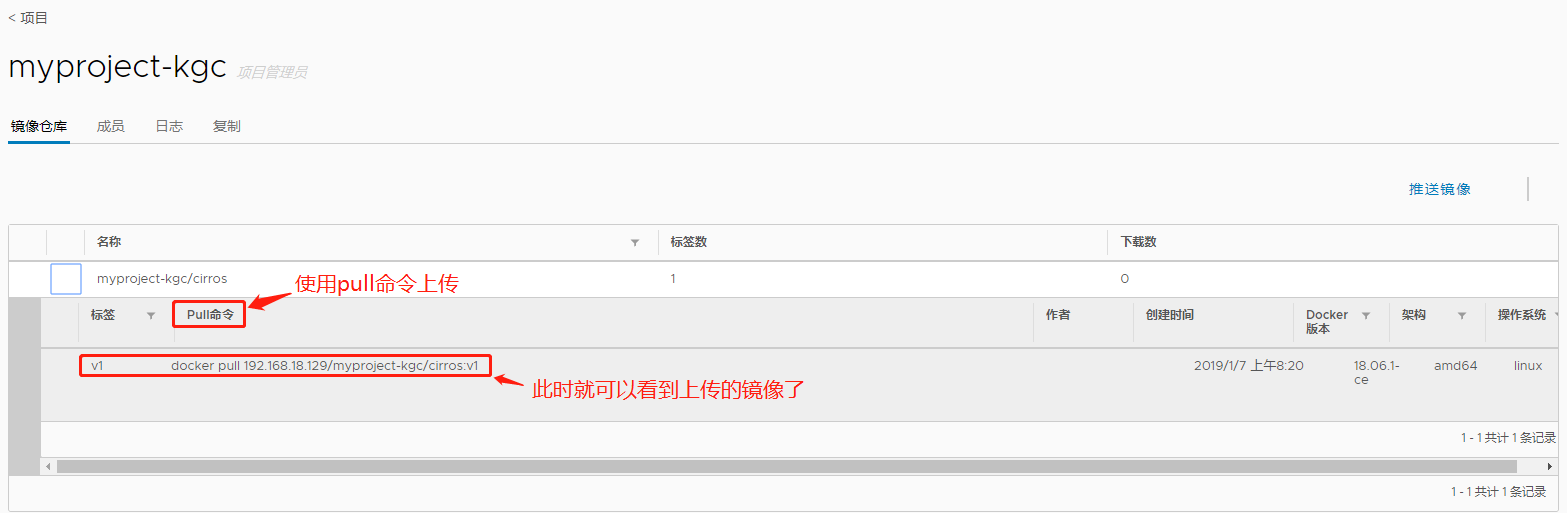
v1: digest: sha256:96137d51e0e46006243fa2403723eb47f67818802d1175b5cde7eaa7f19446bd size: 943此时回到私库页面就可以看到上传的镜像文件:
client客户端:CentOS 7-5:192.168.18.145
[root@localhost ~]# systemctl stop firewalld.service
[root@localhost ~]# setenforce 0
[root@localhost ~]# yum install yum-utils device-mapper-persistent-data lvm2 -y
[root@localhost ~]# yum-config-manager --add-repo https://mirrors.aliyun.com/docker-ce/linux/centos/docker-ce.repo
[root@localhost ~]# yum install -y docker-ce
[root@localhost ~]# systemctl start docker.service
[root@localhost ~]# systemctl enable docker.service
[root@localhost ~]# tee /etc/docker/daemon.json <<-'EOF'
{
  "registry-mirrors": ["https://w1ogxqvl.mirror.aliyuncs.com"]
}
EOF
[root@localhost ~]# vim /etc/sysctl.conf
`在末行下一行插入以下内容`
net.ipv4.ip_forward=1
#按Esc退出插入模式,输入:wq保存退出
[root@localhost ~]# service network restart
Restarting network (via systemctl):                        [  确定  ]
[root@localhost ~]# systemctl restart docker
[root@localhost ~]# sysctl -p
net.ipv4.ip_forward = 1

[root@localhost ~]# systemctl daemon-reload
[root@localhost ~]# systemctl restart docker
此时我们使用CentOS 7-5客户端访问:
[root@localhost ~]# docker login -u admin -p Harbor12345 http://192.168.18.128
WARNING! Using --password via the CLI is insecure. Use --password-stdin.
Error response from daemon: Get https://192.168.18.129/v2/: dial tcp 192.168.18.129:443: connect: connection refused
`此时如果我们使用登陆命令直接登陆的话会报错,解决方法如下`

#需要先指定私有仓库的实例地址,之后就可以利用其中的sock文件连接了
[root@localhost ~]# vim /usr/lib/systemd/system/docker.service
ExecStart=/usr/bin/dockerd -H fd:// --insecure-registry 192.168.18.128 --containerd=/run/con    tainerd/containerd.sock
#第14行中间添加私有库实例地址
[root@localhost ~]# systemctl daemon-reload
[root@localhost ~]# systemctl restart docker
[root@localhost ~]# docker login -u admin -p Harbor12345 http://192.168.18.128
Login Succeeded     #此时就会显示登陆成功
下载镜像使用:
[root@localhost ~]# docker pull cirros
[root@localhost ~]# docker pull 192.168.18.128/myproject-kgc/cirros:v1
v1: Pulling from myproject-kgc/cirros
Digest: sha256:96137d51e0e46006243fa2403723eb47f67818802d1175b5cde7eaa7f19446bd
Status: Downloaded newer image for 192.168.18.128/myproject-kgc/cirros:v1
192.168.18.128/myproject-kgc/cirros:v1
[root@localhost ~]# docker images
REPOSITORY TAG IMAGE ID CREATED SIZE
192.168.18.128/myproject-kgc/cirros v1 bc94bceaae77 12 months ago 10.3MB
cirros latest bc94bceaae77 12 months ago 10.3MB
`打标签,注意打标签的时候项目名称一定要与之前上传的镜像一致,此处为192.168.18.128/myproject-kgc/`
[root@localhost ~]# docker tag cirros:latest 192.168.18.128/myproject-kgc/cirros:v2 #打标签
[root@localhost ~]# docker push 192.168.18.128/myproject-kgc/cirros:v2 #上传
The push refers to repository [192.168.18.128/myproject-kgc/cirros]
abbd6d6ac643: Layer already exists
75b99987219d: Layer already exists
0cc237193a30: Layer already exists
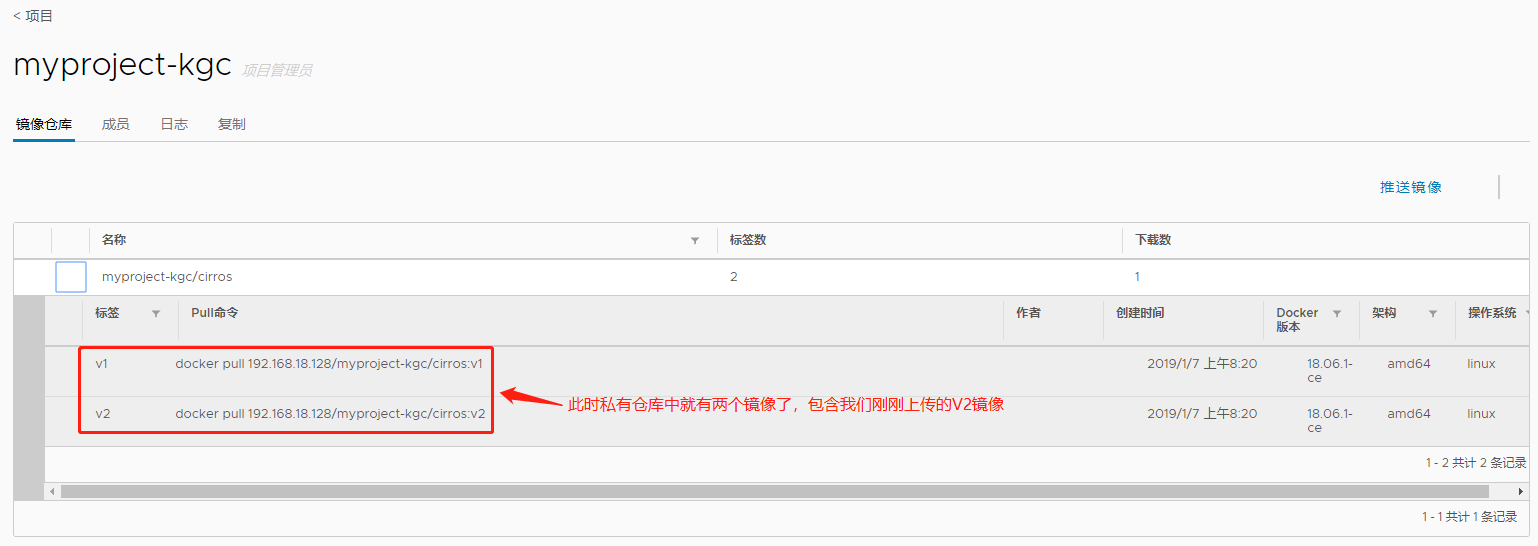
v2: digest: sha256:96137d51e0e46006243fa2403723eb47f67818802d1175b5cde7eaa7f19446bd size: 943此时我们到私有仓库页面刷新就可以可看到两个镜像文件了,其中包含了我们刚刚上传的v2镜像
[root@localhost ~]# docker pull nginx
[root@localhost ~]# docker images
REPOSITORY                            TAG                 IMAGE ID            CREATED             SIZE
nginx                                 latest              f7bb5701a33c        6 days ago          126MB
[root@localhost ~]# docker tag nginx:latest 192.168.18.128/myproject-kgc/nginx:new
[root@localhost ~]# docker push 192.168.18.128/myproject-kgc/nginx:new
The push refers to repository [192.168.18.128/myproject-kgc/nginx]
75248c0d5438: Pushed
49434cc20e95: Pushed
556c5fb0d91b: Pushed
new: digest: sha256:36b77d8bb27ffca25c7f6f53cadd059aca2747d46fb6ef34064e31727325784e size: 948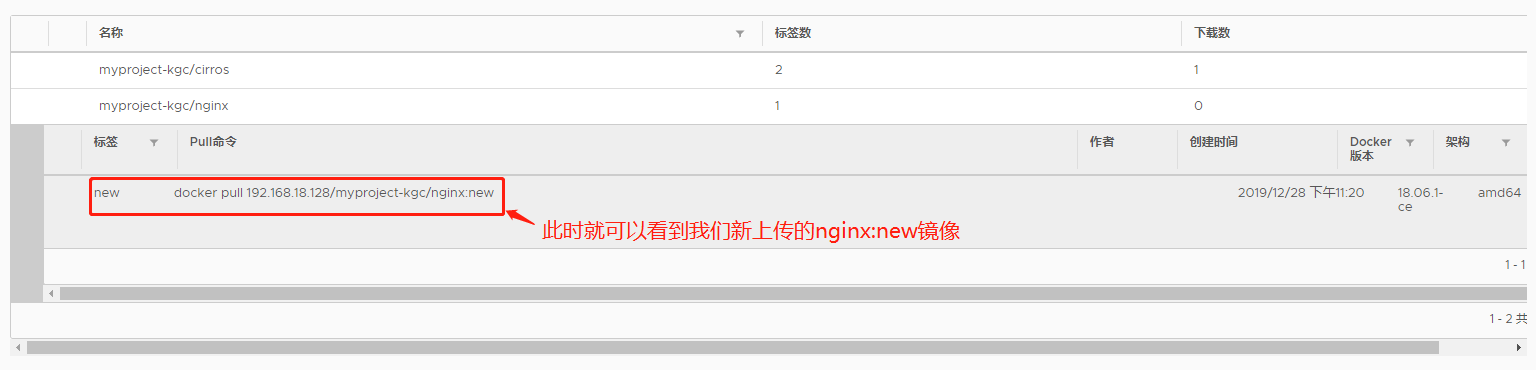
维护管理
(1).在CentOS 7-3中的操作
[root@localhost harbor]# docker-compose down -v #关闭容器
Stopping nginx ... done
Stopping harbor-jobservice ... done
Stopping harbor-ui ... done
Stopping harbor-db ... done
Stopping harbor-adminserver ... done
Stopping registry ... done
Stopping harbor-log ... done
Removing nginx ... done
Removing harbor-jobservice ... done
Removing harbor-ui ... done
Removing harbor-db ... done
Removing harbor-adminserver ... done
Removing registry ... done
Removing harbor-log ... done
Removing network harbor_harbor
`修改配置文件`
vim harbor.cfg
[root@localhost harbor]# ./prepare #加载配置文件
[root@localhost harbor]# docker-compose up -d #启动
Creating network "harbor_harbor" with the default driver
Creating harbor-log ... done
Creating registry ... done
Creating harbor-db ... done
Creating harbor-adminserver ... done
Creating harbor-ui ... done
Creating nginx ... done
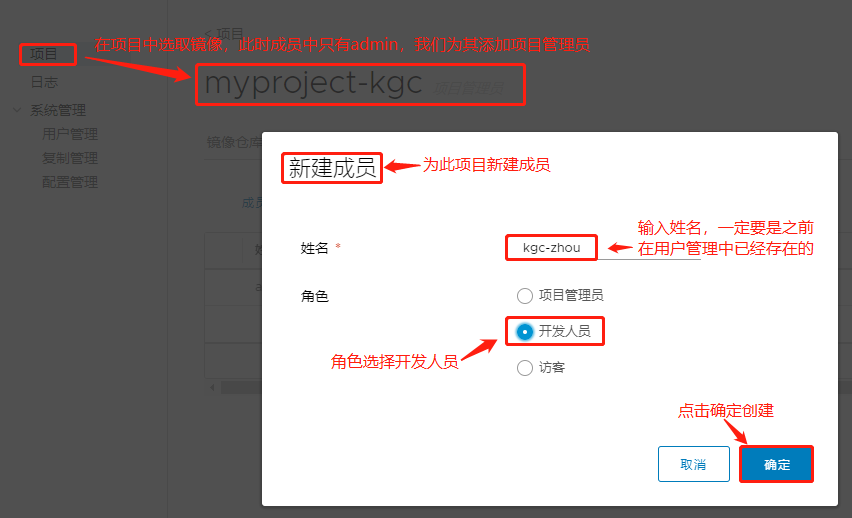
Creating harbor-jobservice ... done(2).创建新用户:

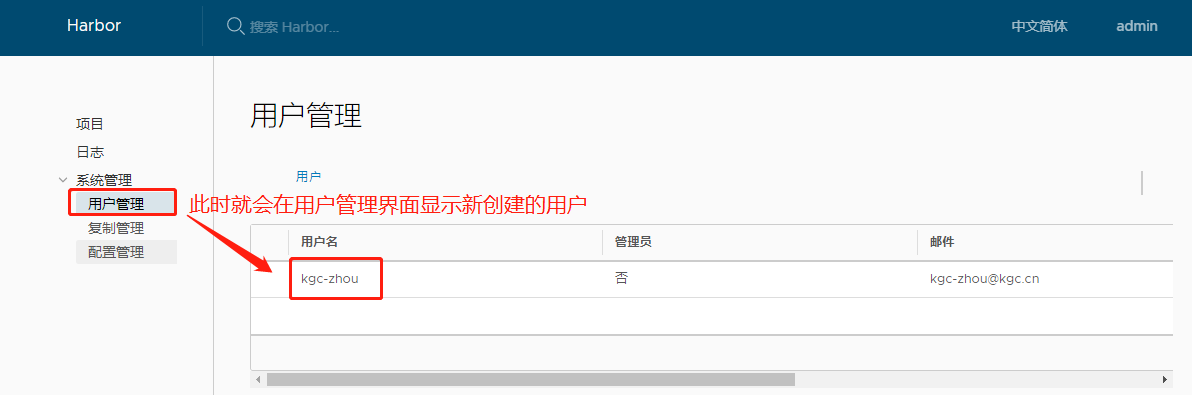
接下来我们尝试用客户端登录:
`需要先注销登出,再重新登录`
[root@localhost ~]# docker logout http://192.168.18.128 #登出
Removing login credentials for 192.168.18.128
[root@localhost ~]# docker login http://192.168.18.128 #登录
Username: kgc-zhou #输入用户名kgc-zhou
Password: #输入密码Harbor12345
WARNING! Your password will be stored unencrypted in /root/.docker/config.json.
Configure a credential helper to remove this warning. See
https://docs.docker.com/engine/reference/commandline/login/#credentials-store
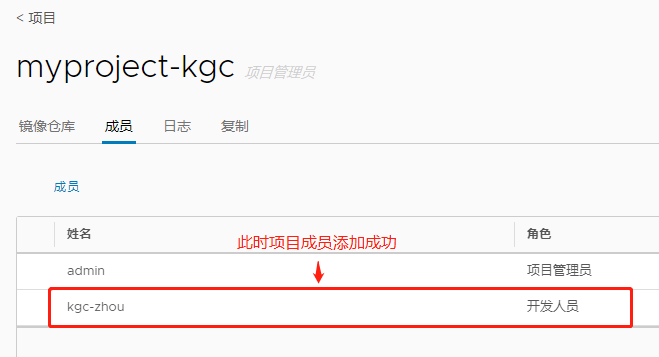
Login Succeeded #显示登陆成功(3).创建项目开发人员: