部署环境与安装包准备
CentOS Linux release 7.7.1908 (Core)
5.5.64-MariaDB MariaDB Server
Confluence下载:(俺下载的v7.2 x64)
https://www.atlassian.com/software/confluence/download
破解工具下载:
https://files.cnblogs.com/files/xjcn/confluence_act_tools.zip
Mysql JDBC下载:(无需oracle账号,俺使用的v5.1.42)
http://central.maven.org/maven2/mysql/mysql-connector-java/
上传atlassian-confluence-7.2.0-x64.bin,添加执行权限,开始安装(俺基本都选择的默认选项)
[root@localhost opt]# chmod +x atlassian-confluence-7.2.0-x64.bin
[root@localhost opt]# ./atlassian-confluence-7.2.0-x64.bin
Installing fontconfig...
Loaded plugins: fastestmirror
Loading mirror speeds from cached hostfile
 * base: mirrors.aliyun.com
 * extras: mirrors.aliyun.com
 * updates: mirrors.aliyun.com
base                                                                                         | 3.6 kB  00:00:00
epel                                                                                         | 5.3 kB  00:00:00
extras                                                                                       | 2.9 kB  00:00:00
updates                                                                                      | 2.9 kB  00:00:00
Resolving Dependencies
--> Running transaction check
---> Package fontconfig.x86_64 0:2.13.0-4.3.el7 will be installed
--> Processing Dependency: fontpackages-filesystem for package: fontconfig-2.13.0-4.3.el7.x86_64
--> Processing Dependency: dejavu-sans-fonts for package: fontconfig-2.13.0-4.3.el7.x86_64
--> Running transaction check
---> Package dejavu-sans-fonts.noarch 0:2.33-6.el7 will be installed
--> Processing Dependency: dejavu-fonts-common = 2.33-6.el7 for package: dejavu-sans-fonts-2.33-6.el7.noarch
---> Package fontpackages-filesystem.noarch 0:1.44-8.el7 will be installed
--> Running transaction check
---> Package dejavu-fonts-common.noarch 0:2.33-6.el7 will be installed
--> Finished Dependency Resolution
Dependencies Resolved

====================================================================================================================
 Package                               Arch                 Version                        Repository          Size
====================================================================================================================
Installing:
 fontconfig                            x86_64               2.13.0-4.3.el7                 base               254 k
Installing for dependencies:
 dejavu-fonts-common                   noarch               2.33-6.el7                     base                64 k
 dejavu-sans-fonts                     noarch               2.33-6.el7                     base               1.4 M
 fontpackages-filesystem               noarch               1.44-8.el7                     base               9.9 k

Transaction Summary
====================================================================================================================
Install  1 Package (+3 Dependent packages)

Total download size: 1.7 M
Installed size: 5.9 M
Downloading packages:
(1/4): dejavu-fonts-common-2.33-6.el7.noarch.rpm                                             |  64 kB  00:00:00
(2/4): fontconfig-2.13.0-4.3.el7.x86_64.rpm                                                  | 254 kB  00:00:00
(3/4): fontpackages-filesystem-1.44-8.el7.noarch.rpm                                         | 9.9 kB  00:00:00
(4/4): dejavu-sans-fonts-2.33-6.el7.noarch.rpm                                               | 1.4 MB  00:00:01
--------------------------------------------------------------------------------------------------------------------
Total                                                                               1.2 MB/s | 1.7 MB  00:00:01
Running transaction check
Running transaction test
Transaction test succeeded
Running transaction
  Installing : fontpackages-filesystem-1.44-8.el7.noarch                                                        1/4
  Installing : dejavu-fonts-common-2.33-6.el7.noarch                                                            2/4
  Installing : dejavu-sans-fonts-2.33-6.el7.noarch                                                              3/4
  Installing : fontconfig-2.13.0-4.3.el7.x86_64                                                                 4/4
  Verifying  : fontpackages-filesystem-1.44-8.el7.noarch                                                        1/4
  Verifying  : dejavu-fonts-common-2.33-6.el7.noarch                                                            2/4
  Verifying  : fontconfig-2.13.0-4.3.el7.x86_64                                                                 3/4
  Verifying  : dejavu-sans-fonts-2.33-6.el7.noarch                                                              4/4

Installed:
  fontconfig.x86_64 0:2.13.0-4.3.el7

Dependency Installed:
  dejavu-fonts-common.noarch 0:2.33-6.el7                     dejavu-sans-fonts.noarch 0:2.33-6.el7
  fontpackages-filesystem.noarch 0:1.44-8.el7

Complete!
Unpacking JRE ...
Starting Installer ...

This will install Confluence 7.2.0 on your computer.
OK [o, Enter], Cancel [c]

Click Next to continue, or Cancel to exit Setup.
Choose the appropriate installation or upgrade option.
Please choose one of the following:
Express Install (uses default settings) [1],
Custom Install (recommended for advanced users) [2, Enter],
Upgrade an existing Confluence installation [3]


Select the folder where you would like Confluence 7.2.0 to be installed,
then click Next.
Where should Confluence 7.2.0 be installed?
[/opt/atlassian/confluence]


Default location for Confluence data
[/var/atlassian/application-data/confluence]


Configure which ports Confluence will use.
Confluence requires two TCP ports that are not being used by any other
applications on this machine. The HTTP port is where you will access
Confluence through your browser. The Control port is used to Startup and
Shutdown Confluence.
Use default ports (HTTP: 8090, Control: 8000) - Recommended [1, Enter], Set custom value for HTTP and Control ports [2]


Confluence can be run in the background.
You may choose to run Confluence as a service, which means it will start
automatically whenever the computer restarts.
Install Confluence as Service?
Yes [y, Enter], No [n]


Extracting files ...


Please wait a few moments while we configure Confluence.

Installation of Confluence 7.2.0 is complete
Start Confluence now?
Yes [y, Enter], No [n]
安装完之后,最后一个问题选择No,暂时不启动服务.
安装和配置MariaDB数据库
[root@localhost opt]# yum -y install mariadb mariadb-server
[root@localhost opt]# systemctl start mariadb
[root@localhost opt]# mysql_secure_installation

NOTE: RUNNING ALL PARTS OF THIS SCRIPT IS RECOMMENDED FOR ALL MariaDB
      SERVERS IN PRODUCTION USE!  PLEASE READ EACH STEP CAREFULLY!

In order to log into MariaDB to secure it, we'll need the current
password for the root user.  If you've just installed MariaDB, and
you haven't set the root password yet, the password will be blank,
so you should just press enter here.

Enter current password for root (enter for none):
OK, successfully used password, moving on...

Setting the root password ensures that nobody can log into the MariaDB
root user without the proper authorisation.

Set root password? [Y/n] y
New password:
Re-enter new password:
Password updated successfully!
Reloading privilege tables..
 ... Success!


By default, a MariaDB installation has an anonymous user, allowing anyone
to log into MariaDB without having to have a user account created for
them.  This is intended only for testing, and to make the installation
go a bit smoother.  You should remove them before moving into a
production environment.

Remove anonymous users? [Y/n] y
 ... Success!

Normally, root should only be allowed to connect from 'localhost'.  This
ensures that someone cannot guess at the root password from the network.

Disallow root login remotely? [Y/n] n
 ... skipping.

By default, MariaDB comes with a database named 'test' that anyone can
access.  This is also intended only for testing, and should be removed
before moving into a production environment.

Remove test database and access to it? [Y/n] y
 - Dropping test database...
 ... Success!
 - Removing privileges on test database...
 ... Success!

Reloading the privilege tables will ensure that all changes made so far
will take effect immediately.

Reload privilege tables now? [Y/n] y
 ... Success!

Cleaning up...

All done!  If you've completed all of the above steps, your MariaDB
installation should now be secure.

Thanks for using MariaDB!
安装和初始化完,创建confluence用户和数据库,并授权:
[root@localhost opt]# mysql -u root -p
Enter password:
Welcome to the MariaDB monitor.  Commands end with ; or \g.
Your MariaDB connection id is 9
Server version: 5.5.64-MariaDB MariaDB Server

Copyright (c) 2000, 2018, Oracle, MariaDB Corporation Ab and others.

Type 'help;' or '\h' for help. Type '\c' to clear the current input statement.

MariaDB [(none)]> create database confluence default character set utf8 collate utf8_bin;                #需要设置utf8字符集,否则后面初始化confluence时会报错
Query OK, 0 rows affected (0.00 sec)

MariaDB [(none)]> grant all on confluence.* to 'confluence'@'%' identified by 'conf#2020';
Query OK, 0 rows affected (0.00 sec)

MariaDB [(none)]> flush privileges;
Query OK, 0 rows affected (0.00 sec)
修改/etc/my.cnf文件设置字符集等设置:
[mysqld]
datadir=/var/lib/mysql
socket=/var/lib/mysql/mysql.sock
# Disabling symbolic-links is recommended to prevent assorted security risks
symbolic-links=0
transaction-isolation=READ-COMMITTED                                   #需要添加此设置,否则初始化confluence时会报错
init_connect='SET collation_connection = utf8_unicode_ci'
init_connect='SET NAMES utf8'
character-set-server=utf8
collation-server=utf8_unicode_ci
skip-character-set-client-handshake

[mysqld_safe]
log-error=/var/log/mariadb/mariadb.log
pid-file=/var/run/mariadb/mariadb.pid

[client]
default-character-set=utf8

[mysql]
default-character-set=utf8
重要:将Mysql JDBC driver(mysql-connector-java-5.1.42.jar)上传至/opt/atlassian/confluence/confluence/WEB-INF/lib
破解Confluence
使用WinSCP传输工具从Linux系统/opt/atlassian/confluence/confluence/WEB-INF/lib下载atlassian-extras-decoder-v2-3.4.1.jar至Windows客户端系统,并重命名为atlassian-extras-2.4.jar。
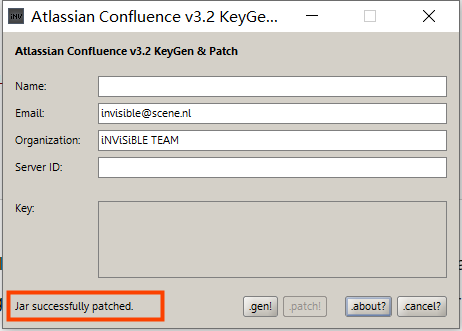
然后在Windows客户端系统解压破解工具,运行confluence_keygen.jar,点击Patch,选择刚才保存的atlassian-extras-2.4.jar,选择后提示"Jar successfully Patched":
将破解后的atlassian-extras-2.4.jar再传回/opt/atlassian/confluence/confluence/WEB-INF/lib,并重命名替换掉atlassian-extras-decoder-v2-3.4.1.jar。
执行/opt/atlassian/confluence/bin/start-confluence.sh启动Conflunce,可以通过查看/opt/atlassian/confluence/logs/catalina.out文件来检查启动过程是否有错误信息。
启动后检查一下端口是否存在,开启防火墙规则放行tcp 8090并重新加载
[root@localhost bin]# netstat -tlnp | grep 8090
tcp6       0      0 :::8090                 :::*                    LISTEN      11278/java
[root@localhost bin]# firewall-cmd --zone='public' --add-port=8090/tcp --permanent
success
[root@localhost bin]# firewall-cmd --reload
success
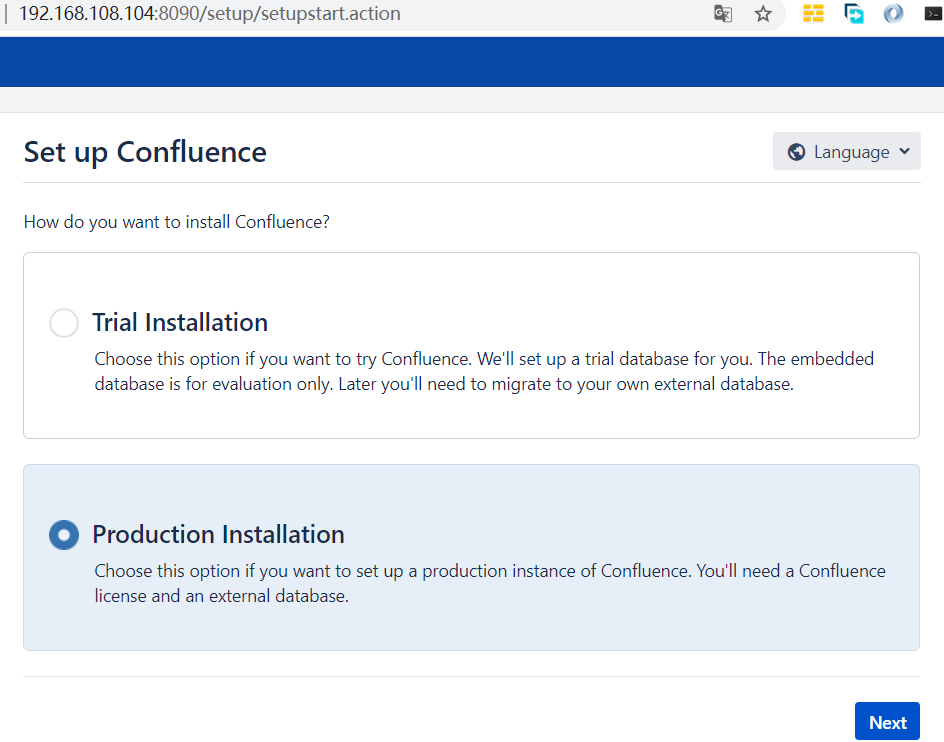
客户端浏览器访问http://server IP:8090进入系统初始化页面,选择"Production Installation"
跳过扩展模块的选择环节,进入License key激活页面,
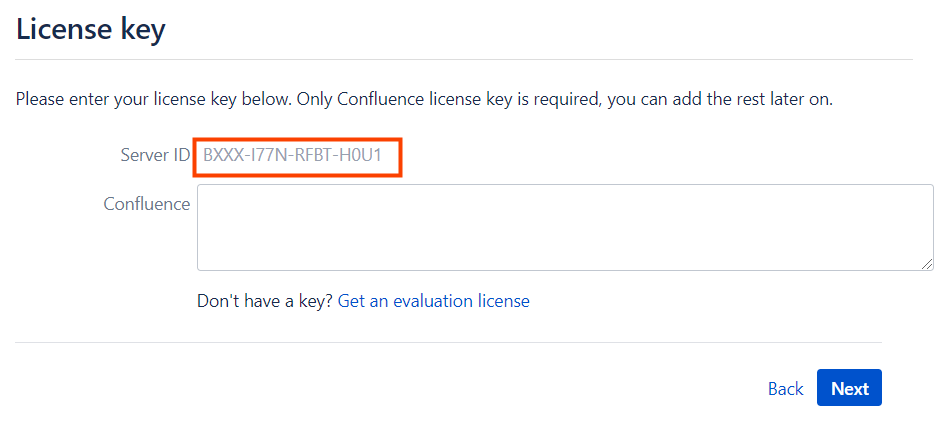
将Server ID输入到之前的激活程序界面,输入Name,点击generate

将Key的内容,复制粘贴至初始化页面。
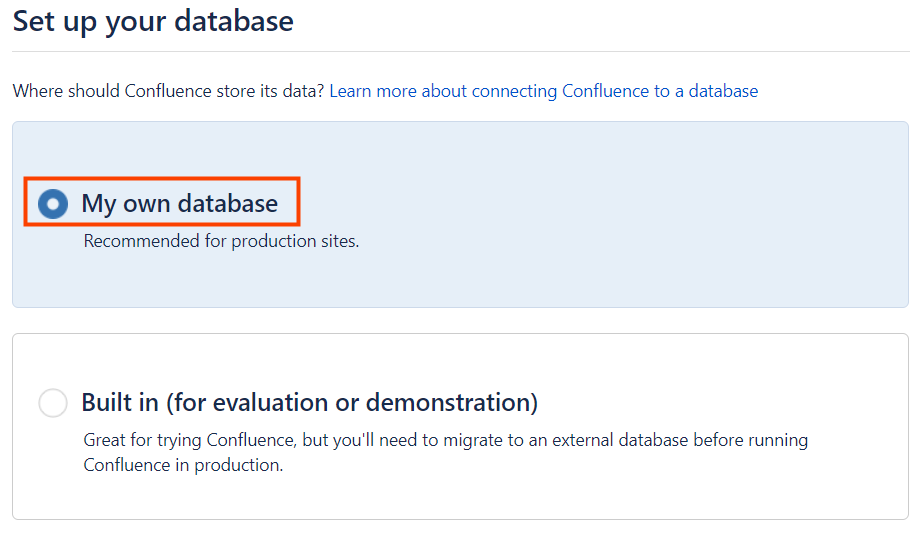
选择自建数据库
设置数据库参数,测试连接:

成功后点击Next,进入DB初始化。
初始化完成,看到这个页面,安装部署就算完成了,后面的步骤自己随意玩 ^_^
