为了说明Vuex的基础用法,我们写了一些简单的例子,并将源码上传至了git仓库,仓库地址: https://github.com/evanGity/vuex-use master分支。
当然,Vuex官方文档更为详细,传送门: https://vuex.vuejs.org/zh/

写在使用前:
- Vuex 是一个专为 Vue.js 应用程序开发的状态管理模式。用于全局状态管理,以及组件之间数据传递。
- 更改 Vuex 的 store 中的状态的唯一方法是提交 mutation,尽量避免直接操作state状态值。
- 开发过程中为严格避免,不使用mutation而改变状态的情况,开发模式可设置为严格模式。
strict: process.env.NODE_ENV !== 'production' - mutation必须为同步函数,action可以是同步也可以是异步函数。
- 使用mutation变更状态,可以更方便的跟踪状态的变化。开发过程中可配合chrome浏览器的devtool工具跟踪状态变化。

使用步骤:
- 创建项目
vue init webpack vuex-use
- 安装依赖
npm install
- 安装vuex
npm i vuex -S
- 引入vuex,并创建对象
import Vue from 'vue'
import Vuex from 'vuex'

Vue.use(Vuex)

const state = {}
const mutations = {}
const getters = {}
const actions = {}

const store = new Vuex.Store({
  strict: process.env.NODE_ENV !== 'production',
  state,
  mutations,
  getters,
  actions
})

export default store
- 在main.js中引入store
import Vue from 'vue'
import App from './App'
import router from './router'
import store from './store/index.js'

Vue.config.productionTip = false

/* eslint-disable no-new */
new Vue({
  el: '#app',
  router,
  store,
  components: { App },
  template: '<App/>'
})
基础骨架已经搭建完成,接下来我们实际操作一下使用vuex:
- 创建如下文件结构:
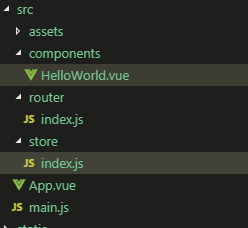
- store/index.js中写入的是vuex的核心功能,代码如下:
import Vue from 'vue'
import Vuex from 'vuex'

Vue.use(Vuex)

const state = {
  counter: 10
}

const mutations = {
  // payload也可以是基本数据类型
  changeCounter (state, payload = 10) {
    state.counter += payload
  },
  // payload也可以是引用数据类型
  changeCounterObj (state, payload) {
    state.counter += payload.amount || 10
  }
}

const getters = {
  counterGetter (state, getters) {
    return state.counter
  }
}

const actions = {
  // 参数context对象: 与 store 实例具有相同方法和属性
  changeCounterSync ({state, commit, dispatch}, payload) {
    setTimeout(() => {
      commit('changeCounter', payload)
    }, 1000)
  },
  changeCounterSync1 (context, payload) {
    setTimeout(() => {
      context.commit('changeCounter', payload)
    }, 1000)
  }
}

const store = new Vuex.Store({
  strict: process.env.NODE_ENV !== 'production',
  state,
  mutations,
  getters,
  actions
})

export default store
- main.js中引入vuex实例, 代码如下:
// The Vue build version to load with the `import` command
// (runtime-only or standalone) has been set in webpack.base.conf with an alias.
import Vue from 'vue'
import App from './App'
import router from './router'
import store from './store/index.js'

Vue.config.productionTip = false

/* eslint-disable no-new */
new Vue({
  el: '#app',
  router,
  store,
  components: { App },
  template: '<App/>'
})
- 在页面组件中使用和操作vuex, 代码如下
<template>
  <div class="hello">
    <h2>vuex 基础用法</h2>
    <div class="item-wrap">
      <div class='item'>
        <h2>state的四种引用方法:</h2>
        <p><strong>counter: {{$store.state.counter}}</strong></p>
        <p><strong>counter: {{counter}}</strong></p>
        <p><strong>counter: {{storeState1}}</strong></p>
        <p><strong>counter: {{storeState2}}</strong></p>
      </div>
      <div class='item'>
        <h2>getter的两种引用方法:</h2>
        <p><strong>counter: {{counterGetter}}</strong></p>
        <p><strong>counter: {{counterGetter1}}</strong></p>
      </div>
      <div class='item'>
        <h2>mutation的三种引用方法:</h2>
        <button @click='changeCounter()'>点击,counter每次加10</button>
        <button @click='changeCounter1(20)'>点击,counter每次加20</button>
        <button @click='changeCounter2(20)'>点击,counter每次加20</button>
        <button @click='changeCounter3({amount: 20})'>点击,counter每次加20</button>
        <p><strong>counter: {{$store.state.counter}}</strong></p>
        <p><strong>counter: {{counter}}</strong></p>
        <p><strong>counter: {{storeState1}}</strong></p>
        <p><strong>counter: {{storeState2}}</strong></p>
      </div>
      <div class='item'>
        <h2>action的三种引用方法:</h2>
        <button @click='changeCounterSync()'>点击,1秒后counter每次加10</button>
        <button @click='changeCounterSync1(20)'>点击,1秒后counter每次加20</button>
        <button @click='changeCounterSync2(20)'>点击,1秒后counter每次加20</button>
        <p><strong>counter: {{$store.state.counter}}</strong></p>
        <p><strong>counter: {{counter}}</strong></p>
        <p><strong>counter: {{storeState1}}</strong></p>
        <p><strong>counter: {{storeState2}}</strong></p>
      </div>
    </div>
  </div>
</template>

<script>
import { mapState, mapGetters, mapMutations, mapActions } from 'vuex'
export default {
  name: 'HelloWorld',
  data () {
    return {
    }
  },
  computed: {
    // state 的用法 (相比于state, 更推荐getter来获取state的值)
    ...mapState(['counter']),
    storeState1 () {
      return this.$store.state.counter
    },
    ...mapState({
      storeState2: 'counter'
    }),
    // getter 的用法
    ...mapGetters(['counterGetter']),
    ...mapGetters({
      counterGetter1: 'counterGetter'
    })
  },
  methods: {
    // mutations 函数payload(负载)为基本数据类型,有如下三种写法
    ...mapMutations(['changeCounter']),
    ...mapMutations({
      changeCounter1: 'changeCounter'
    }),
    changeCounter2 (payload) {
      this.$store.commit('changeCounter', payload)
    },
    // 当且仅当mutations 函数payload(负载)为引用数据类型时可以用如下 ‘对象风格的提交方式’
    changeCounter3 (payload) {
      this.$store.commit({
        type: 'changeCounterObj',
        amount: payload.amount
      })
    },
    // actions 使用方法
    ...mapActions(['changeCounterSync']),
    ...mapActions({
      changeCounterSync1: 'changeCounterSync'
    }),
    changeCounterSync2 (payload) {
      this.$store.dispatch('changeCounterSync', payload)
    }
  }
}
</script>

<!-- Add "scoped" attribute to limit CSS to this component only -->
<style scoped>
h1, h2 {
  font-weight: normal;
}
.item-wrap{
  display: flex;
  flex-direction: row;
  justify-content: center;
  align-items: stretch;
}
.item {
  flex: 1;
  border: 1px solid #eeeeee;
  margin: 15px;
  transition: all .2s ease-in-out;
}
.item:hover{
  box-shadow: 0 0 20px #eeeeee;
}
</style>
源码git仓库地址: https://github.com/evanGity/vuex-use master分支。
