文章目录
- 一:案例前置知识点————mysql读写分离原理
- 二:案例实施
- 2.1 所有服务器关闭firewalld或者进行规则设置
- 2.2 搭建mysql主从复制环境
- 2.3 Amoeba服务器环境安装
- 2.4 配置amoeba读写分离,两个slave读负载均衡
- 2.5 启动Amoeba软件
- 2.6 测试读负载均衡
- 三:实操
- 3.1 接上篇博客环境
- 3.2 实验步骤
- 3.2.1 在amoeba服务器上安装amoeba需要先安装jdk依赖包
- 3.2.2 依赖包安装完毕,接下来解压amoeba源码包
- 3.2.3 这个时候amoeba已经装好了,接下来绑定三台节点服务器,amoeba需要获得相应的权限的账号
- 3.2.4 这个时候就需要对所有的数据库进行配置
- 3.2.5 回到amoeba服务器继续配置
- 3.2.6 验证
- ①此时确保四台服务器的防火墙已经关闭,然后去client客户端去验证
- ②此时先查看一下主服务器mysql中的数据库,此时school中是没有数据的
- ③回到链接到amoeba服务器的客户端client
- ④此时查看一下主从服务器,info表都出现
- 3.2.7下面就开始做读写分离实验了
- 3.2.8 实验得到验证,此时在两台从服务器开启主从同步,再次查看
- 四:拓展:devops 思想
前言:
- 案例概述
- 案例前置知识点
- 案例环境
- 案例实施
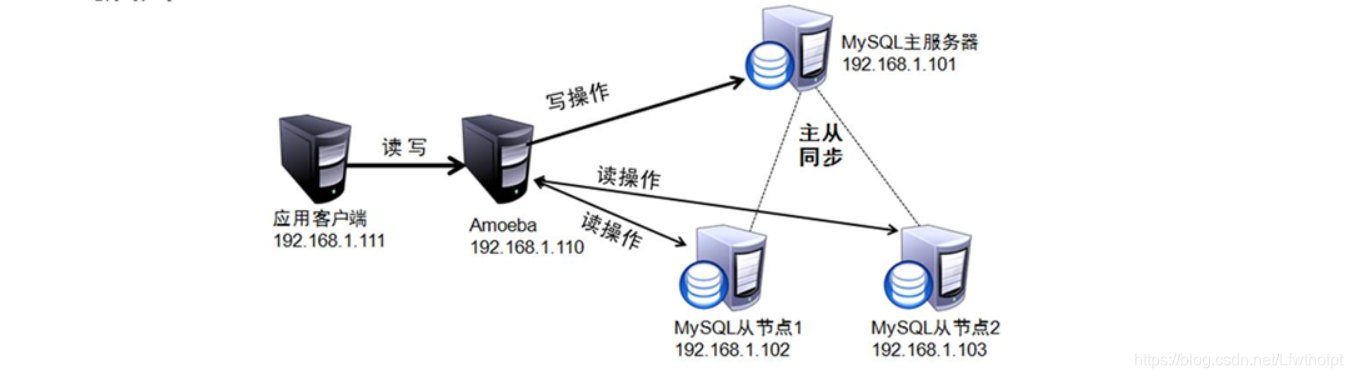
一:案例前置知识点————mysql读写分离原理
- 读写分离就是只在主服务器上写,只在从服务器上读
- 主数据库处理事务性查询,从而数据库处理select查询
- 数据库复制被用来把事务性查询导致的变更同步到集群中的从数据库
二:案例实施
2.1 所有服务器关闭firewalld或者进行规则设置
2.2 搭建mysql主从复制环境
2.3 Amoeba服务器环境安装
2.4 配置amoeba读写分离,两个slave读负载均衡
- mysql1、mysql2和mysql3中执行以下操作开放权限给Amoeba

- 修改amoeba配置文件
- /usr/local/amoeba/conf/amoeba.xml
- /usr/local/amoeba/conf/dbServers.xml


2.5 启动Amoeba软件

2.6 测试读负载均衡
- client访问数据库

- 在数据库db_test中创建zang,并自动同步到2台从服务器

- 两台从服务器数据库中关闭主从复制

- 分别在mysql1、mysql2、mysql3的zang表中上插入不同的数据

三:实操
3.1 接上篇博客环境

3.2 实验步骤
3.2.1 在amoeba服务器上安装amoeba需要先安装jdk依赖包
3.2.1.1 挂载依赖包
[root@amoeba ~]# mkdir /abc
mkdir: cannot create directory ‘/abc’: File exists
[root@amoeba ~]#
[root@amoeba ~]# mount.cifs //192.168.254.10/linuxs /abc
Password for root@//192.168.254.10/linuxs:
[root@amoeba ~]# cd /abc
[root@amoeba abc]# ls
12.17                             error.png                  LAMP-php5.6.txt
8.tar.gz                          extundelete-0.2.4.tar.bz2  LNMP-C7
amoeba-mysql-binary-2.2.0.tar.gz  fiddler (1).exe            mysql
apache-tomcat-9.0.16.tar.gz       httpd2.4.2版本             mysql5.7.17.TXT
awstats-7.6.tar.gz                jb                         qq.jpg
centos7 samba匿名.txt             jdk-6u14-linux-x64.bin     server2016-key.txt
cronolog-1.6.2-14.el7.x86_64.rpm  jdk-8u201-linux-x64.rpm    shells-ceshi
doc                               john-1.8.0.tar.gz          shells.rar
epel-release-latest-7.noarch.rpm  LAMP-C7                    tomcat压测
error.jpg                         LAMP-C7.rar                学习资料
3.2.1.2 把jdk包复制到/use/local/下
[root@amoeba abc]# cp jdk-6u14-linux-x64.bin /usr/local
3.2.1.3 安装jdk
[root@amoeba abc]# cd /usr/local
[root@amoeba local]# ls
bin           etc    include                 lib    libexec  share  tomcat9
boost_1_59_0  games  jdk-6u14-linux-x64.bin  lib64  sbin     src
[root@amoeba local]# ./jdk-6u14-linux-x64.bin
//more,往下回车继续看,直到让你输入yes
Do you agree to the above license terms? [yes or no]
yes
Press Enter to continue.....


Done.
[root@amoeba local]#
3.2.1.4 改个名字,便于管理
[root@amoeba local]# mv jdk1.6.0_14/ /usr/local/jdk1.6
[root@amoeba local]# ls
bin           etc    include  jdk-6u14-linux-x64.bin  lib64    sbin   src
boost_1_59_0  games  jdk1.6   lib                     libexec  share  tomcat9
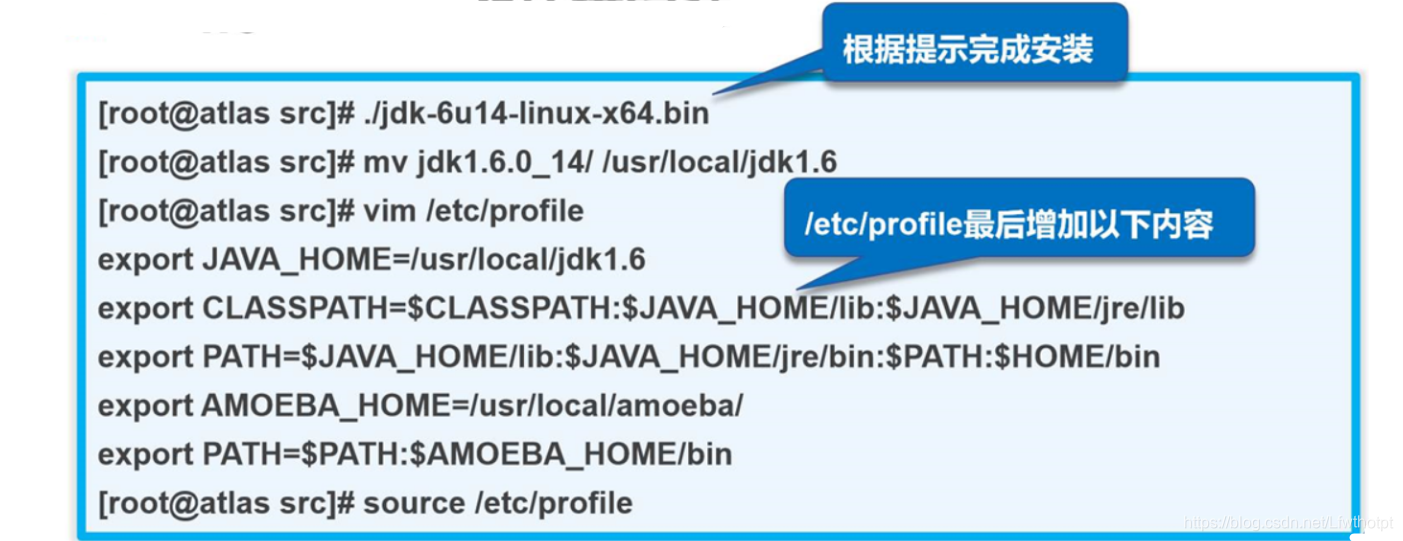
3.2.1.5 优化环境变量
[root@amoeba local]# vim /etc/profile
export JAVA_HOME=/usr/local/jdk1.6
export CLASSPATH=$CLASSPATH:$JAVA_HOME/lib:$JAVA_HOME/jre/lib
export PATH=$JAVA_HOME/lib:$JAVA_HOME/jre/bin/:$PATH:$HOME/bin
export AMOEBA_HOME=/usr/local/amoeba
export PATH=$PATH:$AMOEBA_HOME/bin
[root@amoeba local]# source /etc/profile
[root@amoeba local]# echo $PATH
/usr/local/jdk1.6/lib:/usr/local/jdk1.6/jre/bin/:/usr/java/jdk1.8.0_201-amd64/bin:/usr/local/sbin:/usr/local/bin:/usr/sbin:/usr/bin:/root/bin:/root/bin:/usr/local/amoeba/bin
3.2.2 依赖包安装完毕,接下来解压amoeba源码包
[root@amoeba local]# mkdir /usr/local/amoeba
[root@amoeba local]# cd /abc
[root@amoeba abc]# tar zxvf amoeba-mysql-binary-2.2.0.tar.gz -C /usr/local/amoeba/
[root@amoeba abc]# chmod -R 755 /usr/local/amoeba/
[root@amoeba abc]# /usr/local/amoeba/bin/amoeba
amoeba start|stop
3.2.3 这个时候amoeba已经装好了,接下来绑定三台节点服务器,amoeba需要获得相应的权限的账号
3.2.4 这个时候就需要对所有的数据库进行配置
mysql> grant all on *.* to test@'192.168.247.%' identified by '123.com';
Query OK, 0 rows affected (0.01 sec)
3.2.5 回到amoeba服务器继续配置
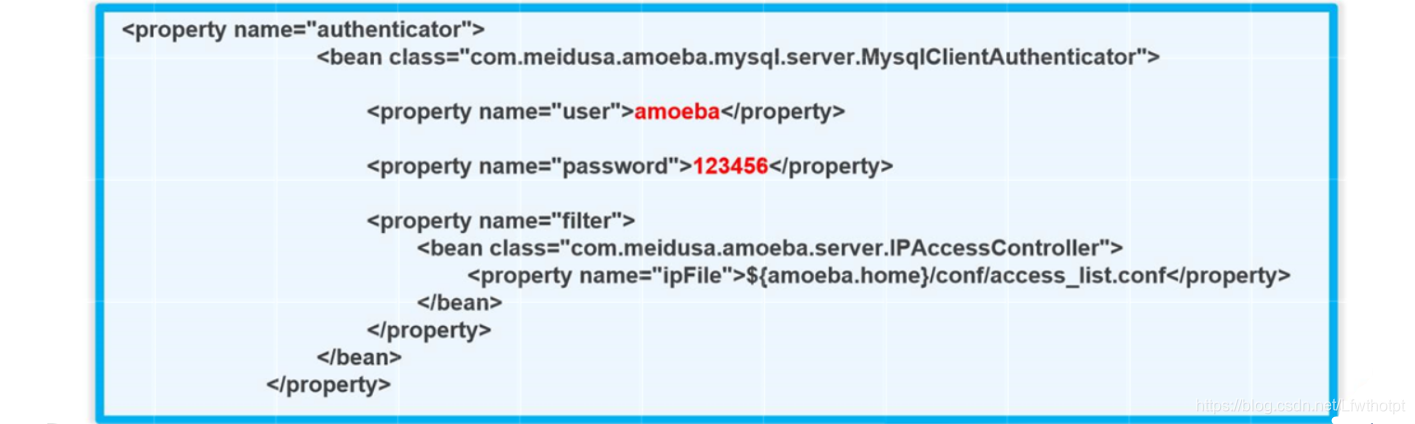
① 首先配置主配置文件
[root@amoeba abc]# cd /usr/local/amoeba/
[root@amoeba amoeba]# vim conf/amoeba.xml
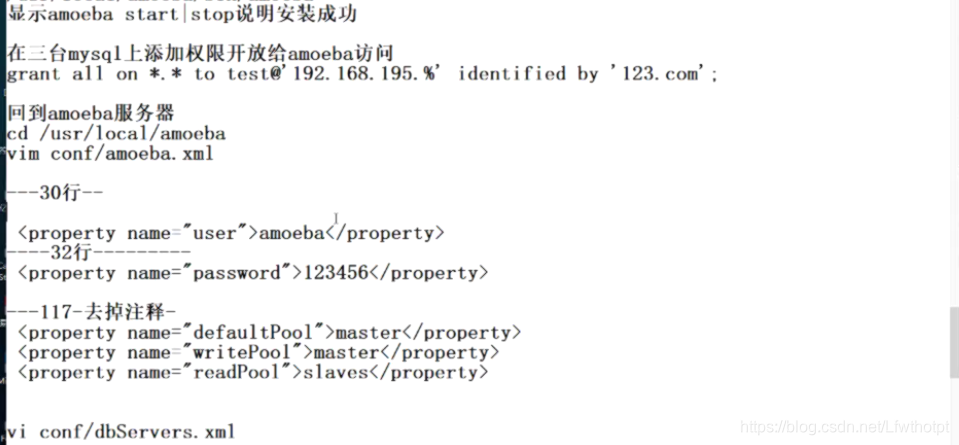
30 <property name="user">amoeba</property>
//这里是数据库访问amoeba服务器时使用的账号
31
32 <property name="password">123123</property>
//这里是数据库访问amoeba服务器时使用账号时用的密码
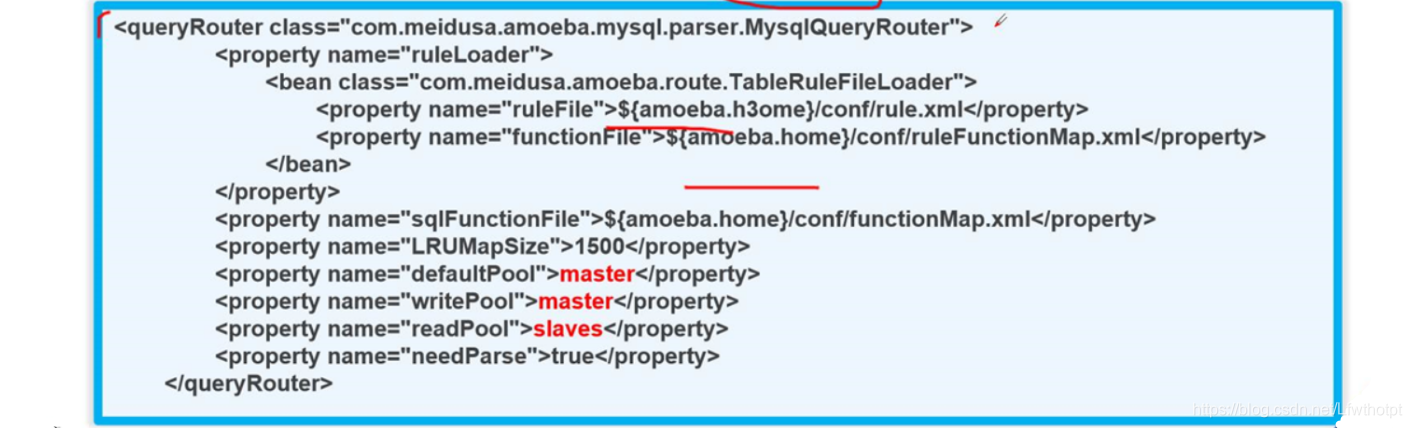
115 <property name="defaultPool">master</property>
116
117 <!-- --> //取消下面的注释符号-->,改到这里
118 <property name="writePool">master</property>
119 <property name="readPool">slaves</property>
120 <property name="needParse">true</property>
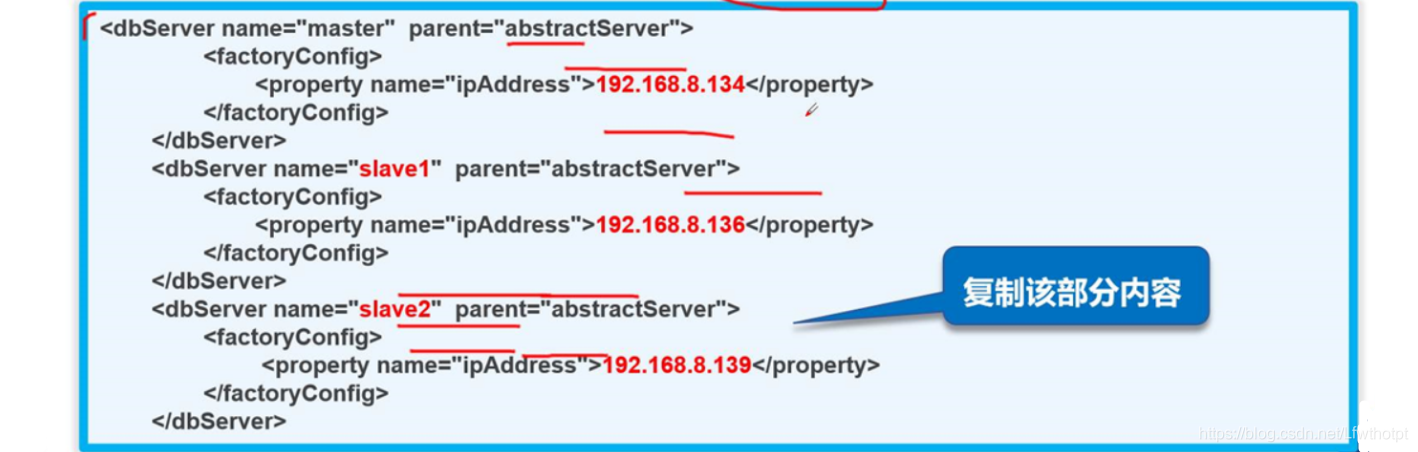
②然后设置服务器文件/usr/local/amoeba/conf/dbServers.xml
[root@amoeba amoeba]# cd conf/
[root@amoeba conf]# ls
access_list.conf amoeba.xml dbServers.xml functionMap.xml log4j.xml ruleFunctionMap.xml
amoeba.dtd dbserver.dtd function.dtd log4j.dtd rule.dtd rule.xml
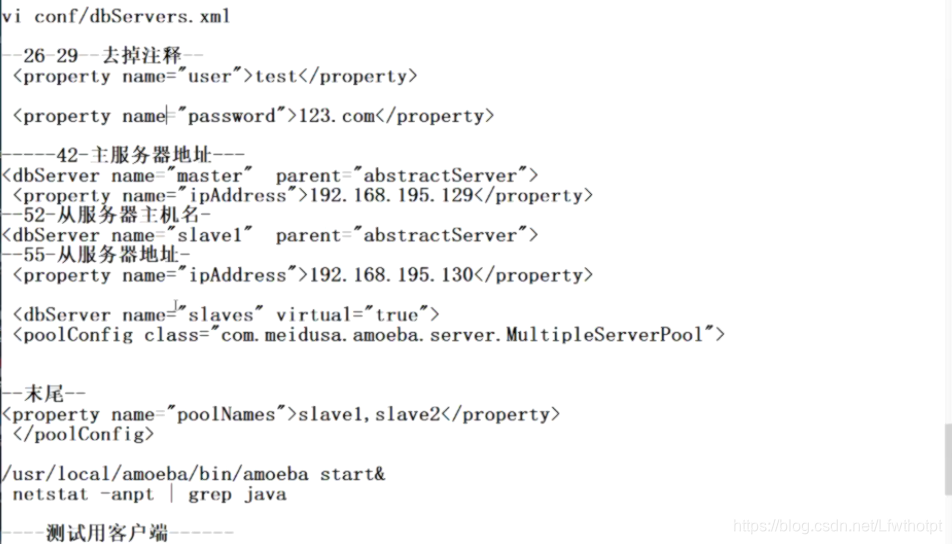
[root@amoeba conf]# vim dbServers.xml
25 <!-- mysql user -->
26 <property name="user">test</property>
//这里是amoeba访问mysql时使用的账号
27
28 <!-- mysql password -->
29 <property name="password">123.com</property>
//这里是amoeba访问mysql时使用账号的密码
44 <dbServer name="master" parent="abstractServer">
45 <factoryConfig>
46 <!-- mysql ip -->
47 <property name="ipAddress">192.168.247.160</property>
48 </factoryConfig>
49 </dbServer>
50
//上面6行是指定主服务器的地址
51 <dbServer name="slave1" parent="abstractServer">
52 <factoryConfig>
53 <!-- mysql ip -->
54 <property name="ipAddress">192.168.247.161</property>
55 </factoryConfig>
56 </dbServer>
57
//上面6行是指定从服务器1的地址
58 <dbServer name="slave2" parent="abstractServer">
59 <factoryConfig>
60 <!-- mysql ip -->
61 <property name="ipAddress">192.168.247.154</property>
62 </factoryConfig>
63 </dbServer>
64
//在原配置文件中,上面6行不存在,此处是由复制粘贴的得来,是指定从服务器2的地址
65 <dbServer name="slaves" virtual="true">
//此处设置从服务器地址池slaves
66 <poolConfig class="com.meidusa.amoeba.server.MultipleServerPool">
67 <!-- Load balancing strategy: 1=ROUNDROBIN , 2=WEIGHTBASED , 3=HA-->
68 <property name="loadbalance">1</property>
69
70 <!-- Separated by commas,such as: server1,server2,server1 -->
71 <property name="poolNames">slave1,slave2</property>
//此处填入从服务器名
72 </poolConfig>
73 </dbServer>
④开启amoeba服务
保存退出配置文件,开启amoeba服务,因为它内部有一个实时监控,持续性开启,所以需要在后台启动,而且无法再进行命令操作,若想再对它进行操作,可以重新开启一台远程,去连接
[root@amoeba conf]# /usr/local/amoeba/bin/amoeba start &
[1] 114206
[root@amoeba conf]# log4j:WARN log4j config load completed from file:/usr/local/amoeba/conf/log4j.xml
2020-01-09 09:43:01,367 INFO  context.MysqlRuntimeContext - Amoeba for Mysql current versoin=5.1.45-mysql-amoeba-proxy-2.2.0
log4j:WARN ip access config load completed from file:/usr/local/amoeba/conf/access_list.conf
2020-01-09 09:43:01,883 INFO  net.ServerableConnectionManager - Amoeba for Mysql listening on 0.0.0.0/0.0.0.0:8066.
2020-01-09 09:43:01,918 INFO  net.ServerableConnectionManager - Amoeba Monitor Server listening on /127.0.0.1:52838.
⑤ 查看端口验证
8066端口已开
[root@amoeba ~]# netstat -natp | grep java
tcp6       0      0 :::8066                 :::*                    LISTEN      114206/java
3.2.6 验证
①此时确保四台服务器的防火墙已经关闭,然后去client客户端去验证
[root@client ~]# systemctl stop firewall
Failed to stop firewall.service: Unit firewall.service not loaded.
[root@client ~]# setenforce 0
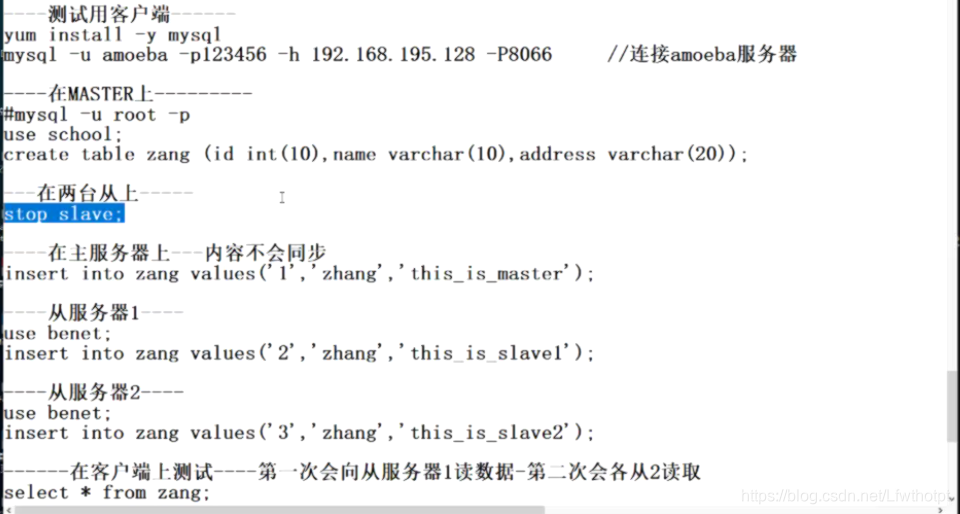
[root@client ~]# yum install mysql -y
//安装mysql去连接即可,client不需要安装数据库取存储数据
[root@client ~]# mysql -u amoeba -p123123 -h 192.168.247.206 -P8066
//连接amoeba服务器
mysql: [Warning] Using a password on the command line interface can be insecure.
Welcome to the MySQL monitor. Commands end with ; or \g.
Your MySQL connection id is 494299142
Server version: 5.1.45-mysql-amoeba-proxy-2.2.0 Source distribution
Copyright (c) 2000, 2017, Oracle and/or its affiliates. All rights reserved.
Oracle is a registered trademark of Oracle Corporation and/or its
affiliates. Other names may be trademarks of their respective
owners.
Type 'help;' or '\h' for help. Type '\c' to clear the current input statement.
mysql>
②此时先查看一下主服务器mysql中的数据库,此时school中是没有数据的
mysql> show databases;
+--------------------+
| Database           |
+--------------------+
| information_schema |
| mysql              |
| performance_schema |
| school             |
| test               |
+--------------------+
5 rows in set (0.01 sec)

mysql> show tables;
ERROR 1046 (3D000): No database selected
mysql> use school;
Database changed
mysql> show tables;
Empty set (0.00 sec)
③回到链接到amoeba服务器的客户端client
mysql> show databases;
//查看数据库
+--------------------+
| Database           |
+--------------------+
| information_schema |
| mysql              |
| performance_schema |
| school             |
| test               |
+--------------------+
5 rows in set (0.01 sec)

mysql> use school;
Database changed
mysql> create table info (id int(4)not null primary key,name varchar(10) not null,score decimal(4,1) not null);
//创建一个新表
Query OK, 0 rows affected (0.11 sec)
mysql> desc info;
+-------+--------------+------+-----+---------+-------+
| Field | Type         | Null | Key | Default | Extra |
+-------+--------------+------+-----+---------+-------+
| id    | int(4)       | NO   | PRI | NULL    |       |
| name  | varchar(10)  | NO   |     | NULL    |       |
| score | decimal(4,1) | NO   |     | NULL    |       |
+-------+--------------+------+-----+---------+-------+
3 rows in set (0.02 sec)

mysql> use school;
Database changed
mysql> show tables;
+------------------+
| Tables_in_school |
+------------------+
| info             |
+------------------+
1 row in set (0.00 sec)

mysql> select * from info;
Empty set (0.01 sec)

mysql>
④此时查看一下主从服务器,info表都出现
mysql> show databases;
+--------------------+
| Database           |
+--------------------+
| information_schema |
| mysql              |
| performance_schema |
| school             |
| test               |
+--------------------+
5 rows in set (0.01 sec)
mysql> use school;
Database changed

mysql> show tables;
Empty set (0.00 sec)

mysql> show tables;
+------------------+
| Tables_in_school |
+------------------+
| info             |
+------------------+
1 row in set (0.01 sec)
3.2.7下面就开始做读写分离实验了
先在从服务器上stop slave;
mysql> stop slave;
Query OK, 0 rows affected (0.01 sec)

mysql> show slave status\G
*************************** 1. row ***************************
               Slave_IO_State:
                  Master_Host: 192.168.247.160
                  Master_User: myslave
                  Master_Port: 3306
                Connect_Retry: 60
              Master_Log_File: master-bin.000001
          Read_Master_Log_Pos: 900
               Relay_Log_File: relay-log-bin.000002
                Relay_Log_Pos: 772
        Relay_Master_Log_File: master-bin.000001
‘             Slave_IO_Running: No
’            Slave_SQL_Running: No
        Seconds_Behind_Master: NULL
             Master_Server_Id: 11
                  Master_UUID: e9a82741-3223-11ea-af25-000c29524d89
             Master_Info_File: /home/mysql/master.info
                    SQL_Delay: 0
          SQL_Remaining_Delay: NULL

           Master_Retry_Count: 86400
1 row in set (0.00 sec)

mysql>
此时在客户端写如数据
mysql> insert into info (id,name,score) values (1,'zhangsan',88);
Query OK, 1 row affected (0.02 sec)
然后到主服务器查看,发现写入成功
mysql> select * from info;
+----+----------+-------+
| id | name     | score |
+----+----------+-------+
|  1 | zhangsan |  88.0 |
+----+----------+-------+
1 row in set (0.00 sec)
然后查看从服务器
mysql> select * from school.info;
Empty set (0.00 sec)

mysql>
此时查看客户端
mysql> select * from info;
Empty set (0.02 sec)
由此可以发现读写已经分离,读从服务器,写主服务器
此时在从服务器1内写入数据
mysql>  insert into info (id,name,score) values (2,'lisi',99);
Query OK, 1 row affected (0.01 sec)
从服务器2内写入数据
mysql>  insert into school.info (id,name,score) values (3,'wangwu',60);
Query OK, 1 row affected (0.01 sec)
此时再到客户端去读取数据,可以发现实在轮流依次读取两台从服务器上的数据
mysql> select * from info;
+----+--------+-------+
| id | name   | score |
+----+--------+-------+
|  3 | wangwu |  60.0 |
+----+--------+-------+
1 row in set (0.08 sec)

mysql> select * from info;
+----+------+-------+
| id | name | score |
+----+------+-------+
|  2 | lisi |  99.0 |
+----+------+-------+
1 row in set (0.01 sec)

mysql> select * from info;
+----+--------+-------+
| id | name   | score |
+----+--------+-------+
|  3 | wangwu |  60.0 |
+----+--------+-------+
1 row in set (0.01 sec)

mysql> select * from info;
+----+------+-------+
| id | name | score |
+----+------+-------+
|  2 | lisi |  99.0 |
+----+------+-------+
1 row in set (0.01 sec)

mysql>
3.2.8 实验得到验证,此时在两台从服务器开启主从同步,再次查看
mysql> start slave;
Query OK, 0 rows affected (0.01 sec)
先查看客户端,可以发现查看的并不是所有的数据,可以得出结论,主从同步只会从服务器去同步主服务器,主服务器不可以同步从服务器
mysql> select * from info;
+----+----------+-------+
| id | name     | score |
+----+----------+-------+
|  1 | zhangsan |  88.0 |
|  3 | wangwu   |  60.0 |
+----+----------+-------+
2 rows in set (0.01 sec)

mysql> select * from info;
+----+----------+-------+
| id | name     | score |
+----+----------+-------+
|  1 | zhangsan |  88.0 |
|  2 | lisi     |  99.0 |
+----+----------+-------+
2 rows in set (0.00 sec)

mysql>
四:拓展:devops 思想
CI:持续性的集成
CD:持续性的交付
CD:持续性的部署
传统开发思想
需求——设计——开发——测试——发布
测试分为:单元测试,项目的各个功能测试
项目测试:中间有个构建,make(把源码文件转化为机器识别的二进制文件)
开发和测试是一个集成的过程,在git来回周折,也就是CI 持续集成
分层开发架构:三层
表示层:前端,效果
业务逻辑层:管理数据
持久层:数据库
分布式开发(微服务,docker容器,一个容器放一个服务,集合起来)
docker灵活性增加,不需要在意底层系统环境,只要可以跑docker引擎就可以
难点在于服务之间的通讯
docker与宿主机共享cpu资源,有安全隐患
发布方式:1.蓝绿部署2.灰度部署3.金丝雀部署
蓝绿部署:就是热更新,不关机更新,以群集的模式,一半更新,一半不更新
灰度部署:横着滚动更新
金丝雀:竖着滚动部署
测试-发布之间是交付过程
docker 由群集管理:compose+machine+swavm
com是一个
machine是负责初始化节点
swavm是群集
mesos+马拉松
kubernets=k8s——他是一个生态圈,是一个中心化的机制
