什么是LNMP
- 主流的企业网站平台之一
L : Linux操作系统
N : nginx网站服务软件
M : mysql. mariadb数据库
P : 网站开发语言(PHP. Perl.Python)
LNMP是指一组通常一起使用来运行动态网站或者服务器的自由软件名称首字母缩写。
即Linux+Nginx+Mysql+PHP网站服务器架构
这四种软件均为免费开源软件,组合到一起,成为一个免费、高效、扩展性强的网站服务系统。
目前的网站一般都会有动态和静态数据,默认nginx仅可以处理静态数据,用户访问任何数据都是直接返回对应的文件,如果如果访问的是一个脚本的话,就会导致直接返回一个脚本给用户,而用户没有脚本解释器,也看不懂脚本源代码!如图所示。
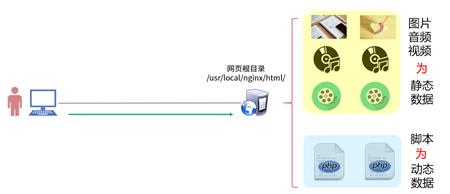
因此需要整合LNMP(Linux、Nginx、MySQL、PHP)实现动态网站效果。
LNMP在CentOS系统中,源码安装Nginx,使用RPM包安装MariaDB、PHP、PHP-FPM软件。
什么是静态网页?
在网站设计中,纯粹HTML(标准通用标记语言下的一个应用)格式的网页通常被称为“静态网页”,静态网页是标准的HTML文件,它的文件扩展名是.htm、.html,可以包含文本、图像、声音、FLASH动画、客户端脚本和ActiveX控件及JAVA小程序等。
静态数据: 图片 音频 视频
静态网页使用语言:HTML
静态网页的特点
可以公开(即副本可以证明给任何人)。
托管没得任何特殊的要求。(不需要特殊的中间软件比如超文本预处理器、公共网关接口)
没得网络服务器或应用服务器,比如直接从CD-ROM(激光唱片-只读存储器)或USB闪存驱动器读取内容,可以通过网络浏览器直接访问。
网站更安全,HTML页面不会受Asp相关漏洞的影响;而且可以减少攻击,防SQL注入。数据库出错时,不影响网站正常访问。
不需要编译,所以速度快,节省服务器资源。
网址格式友好,搜索引擎容易识别。
什么是动态网站?
动态网站并不是指具有动画功能的网站,而是指网站内容可根据不同情况动态变更的网站,一般情况下动态网站通过数据库进行架构。 动态网站除了要设计网页外,还要通过数据库和编程序来使网站具有更多自动的和高级的功能。动态网站体现在网页一般是以asp,jsp,php,aspx等技术
也可以简单理解为是由脚本写的
即 动态网页是指网页文件里包含了程序代码,通过后台数据库与Web服务器的信息交互,
由后台数据库提供实时数据更新和数据查询服务。
比如: shell PHP Java Python …
动态网页使用语言:HTML+ASP或HTML+PHP或HTML+JSP等
动态网页特点:
动态网站可以实现交互功能,如用户注册、信息发布、产品展示、订单管理等等;
动态网页并不是独立存在于服务器的网页文件,而是浏览器发出请求时才反馈网页;
动态网页中包含有服务器端脚本,所以页面文件名常以asp、jsp、php等为后缀。但也可以使用URL静态化技术,使网页后缀显示为HTML。所以不能以页面文件的后缀作为判断网站的动态和静态的唯一标准。
动态网页由于需要数据库处理,所以动态网站的访问速度大大减慢;
动态网页由于存在特殊代码,所以相比较静态网页,其对搜索引擎的友好程度相对要弱一些。
但随着计算机性能的提升以及网络带宽的提升,最后两条已经基本得到解决。
动态网页与静态网页的区别
1、网页制作使用的制作语言:
静态网页使用语言:超文本标记语言(标准通用标记语言的一个应用)
动态网页使用语言:超文本标记语言+ASP或超文本标记语言+PHP或超文本标记语言+JSP等。
2、程序是否在服务器端运行,是重要标志。
在服务器端运行的程序、网页、组件,属于动态网页,它们会随不同客户、不同时间,返回不同的网页, ASP、PHP、JSP、ASPnet、CGI等。运行于客户端的程序、网页、插件、组件,属于静态网页,例如 html 页、Flash、JavaScript、VBScript等等,它们是永远不变的。
常见的4种动态网页技术
- 1、PHP (超文本预处理器),它是脚本语言,其语法借鉴了C、Java、PERL等语言,但只需要很少的编程知识你就能使用PHP建立一个真正交互的Web站点。
- 2、ASP (活跃服务器页),它是微软开发的一种类似超文本标识语言(HTML)、脚本与CGI的结合体,它没有提供自己专门的编程语言,而是允许用户使用许多已有的脚本语言编写ASP的应用程序。ASP的程序编制比HTML更方便且更有灵活性。它是在Web服务器端运行,运行后再将运行结果以HTML格式传送至客户端的浏览器。因此ASP与一般的脚本语言相比,要安全得多。
- 3、JSP (爪哇服务器页面),是基于Java Servlet以及整个Java(爪哇)体系的Web开发技术。
- 4、CGI(公用网关接口)是较早用来建立动态网页的技术。当客户端向Web服务器上指定的CGI程序发出请求时,Web服务器会启动一个新的进程执行某些CGI程序,程序执行后将结果以网页的形式再发送回客户端。
CGI的优点是它可以用很多语言编写,如 C 、C++ 、VB和Perl语言。在语言的选择上有很大的灵活性。最常用的CGI开发语言为Perl。
部署LNMP环境
安装的软件列表如下:
- nginx (源码安装ngixn)
- mariadb、mariadb-server、mariadb-devel
- php、php-fpm、php-mysql
软件包的作用:
mariadb(数据库客户端软件)、
mariadb-server(数据库服务器软件)、
mariadb-devel(其他客户端软件的依赖包)、
php(解释器)、
php-fpm(进程管理器服务)、
php-mysql(PHP的数据库扩展包)。
1)使用yum安装基础依赖包(如果已经安装依赖包,则忽略这一步)
[root@proxy ~]# yum -y install gcc openssl-devel pcre-devel
2)源码安装Nginx(如果已经安装Nginx,则忽略这一步)
[root@proxy ~]# useradd -s /sbin/nologin  nginx
[root@proxy ~]# tar -xvf nginx-1.12.2.tar.gz
[root@proxy ~]# cd nginx-1.12.2
[root@proxy nginx-1.12.2]# ./configure   \
> --user=nginx   --group=nginx \
> --with-http_ssl_module
[root@proxy ~]# make && make install
3)安装MariaDB
root@proxy ~]# yum -y install mariadb mariadb-server mariadb-devel
4)php和php-fpm php-mysql
[root@proxy ~]# yum -y  install  php   php-mysql
[root@proxy ~]# yum -y  install  php-fpm
5)启动Nginx服务(如果已经启动nginx,则可以忽略这一步)
这里需要注意的是,如果服务器上已经启动了其他监听80端口的服务软件(如httpd),则需要先关闭该服务,否则会出现冲突。
[root@proxy ~]# systemctl stop httpd            ##如果该服务存在则关闭该服务
[root@proxy ~]# /usr/local/nginx/sbin/nginx     ##启动Nginx服务
[root@proxy ~]# netstat -utnlp | grep :80
tcp    0    0 0.0.0.0:80        0.0.0.0:*        LISTEN        32428/nginx
6)启动MySQL服务
[root@proxy ~]# systemctl start  mariadb           //启动服务器
[root@proxy ~]# systemctl status mariadb           //查看服务状态
[root@proxy ~]# systemctl enable mariadb           //设置开机启动
7)启动PHP-FPM服务
[root@proxy ~]# systemctl start php-fpm           //启动服务
[root@proxy ~]# systemctl status php-fpm          //查看服务状态
[root@proxy ~]# systemctl enable php-fpm          //设置开机启动
这样一个LNMP环境就搭好了
配置nginx+PHP实现两个如果
- 如果用户访问的是静态资料,则直接找数据返回
- 如果用户访问的是动态资料,则转发给9000(PHP)
localtion (匹配用户的地址拦,支持正则,从域名后面开始匹配)
server {
listen 80;
server_name www.a.com
location /test { dney 1.1;allow all}
location /qq {allow 2.2;deny all}
location / {allow all}  (##优先级最低,跟顺序无关,动静匹配)
}
firefox http://www.a.com/qq    ##结果[2.2打开,不是则打不开]
firefox http://www.a.com/test  ##结果[只要不是1.1就能打开]
firefox http://www.a.com/      ##匹配第三个localtion
firefox http://www.a.com/nb    ##匹配第三个localtion
firefox http://www.a.com/xyz   ##匹配第三个localtion
firefox http://www.a.com/123   ##匹配第三个localtion

server {     ##匹配静态的网站
listen 80;
server_name www.a.com
location / {
root html;
}
location ~ \.php$ {    ##匹配动态的网站
	root heml;
	fastcgi_pass 127.0.0.1:9000; (转发给PHP翻译)
   }
}
firefox http://www.a.com/a.jpg   ##只要不是以.php结尾,都是静态处理
firefox http://www.a.com/test.php ##动态处理,显示动态页面
什么是动静分离?
- 是指动态网站是一种处理方式静态网站是一种处理方式,两种处理方式不一样叫动静分离.
- 动静分离是指在web服务器架构中,将静态页面与动态页面或者静态内容接口和动态内容接口分开不同系统访问的架构设计方法,进而提升整个服务访问性能和可维护性。
FastCGI简介
- FastCGI技术目前支持语言有PHP,C/C++, Java Perl Python Ruby等
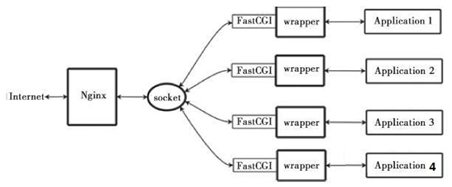
FastCGI工作原理
- 1.web server启动时载入FastCGI进程管理器
- 2.FastCGI进程管理器初始化,启动多个解释器进程
- 3.当客户请求到达Web Server时,FastCGI进程管理器选择并连接到一个解释器
- 4.FastCGI子进程完成处理后返回结果,将标准输出和错误信息从同一连接返回Web Server
FastCGI缺点:
内存消耗大
因为是多进程,所以比CGI多线程消耗更多的服务器内存
PHP-CGI解释器每进程消耗7至25兆内存,将这个数字乘以50或100就是很大的内存数
nginx+PHP(FastCGI)服务器在3万并发连接下开10个nginx进程消耗150M内存(1015M)
开64个php_cgi进程消耗1280M内存(20M64)
部署Nginx+FastCGI
通过调整Nginx服务端配置,实现以下目标:
- 配置Fast-CGI支持PHP网页
- 创建PHP测试页面,测试使用PHP连接数据库的效果
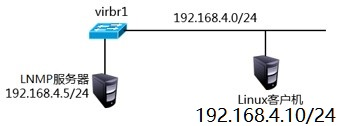
下面使用两台虚拟机,一台作为LNMP服务器(192.168.4.5).另外一台作为测试用的客户的(192.168.4.10),如图所示。
Nginx结合FastCGI技术即可支持PHP页面架构,如图所示。
- 通过修改Nginx及php-fpm配置文件实现对PHP页面的支持。
- 注意,FastCGI的内存消耗问题,一个PHP-FPM解释器将消耗约25M的内存。
1.修改配置文件
[root@proxy ~]# vim /usr/local/nginx/conf/nginx.conf
location / {
            root   html;
            index  index.php  index.html   index.htm;
#设置默认首页为index.php,当用户在浏览器地址栏中只写域名或IP,不说访问什么页面时,服务器会把默认首页index.php返回给用户
        }
 location  ~  \.php$  {
            root           html;
            fastcgi_pass   127.0.0.1:9000;    #将请求转发给本机9000端口,PHP解释器
            fastcgi_index  index.php;
            #fastcgi_param   SCRIPT_FILENAME              $document_root$fastcgi_script_name;
            include        fastcgi.conf;       #加载其他配置文件
        }
[root@proxy ~]# /usr/local/nginx/sbin/nginx -s reload
#请先确保nginx是启动状态,否则运行该命令会报错,报错信息如下:
#[error] open() "/usr/local/nginx/logs/nginx.pid" failed (2: No such file or directory)

注:/usr/local/nginx/conf这个配置文件目录下nginx.conf.default 这个配置文件可以帮助我们还原配置文件
用法:
[root@proxy ~]# cd /usr/local/nginx/conf/
[root@proxy ~]# cp nginx.conf.default  nginx.conf
2.创建PHP测试页面,测试LNMP架构能否解析PHP页面
[root@proxy ~]# vim /usr/local/nginx/html/test.php
<?php
$i=33;
echo $i;
?>
[root@proxy ~]# /usr/local/nginx/sbin/nginx -s reload
[root@proxy conf]# curl localhost/test.php
33
3.创建PHP测试页面,连接并查询MariaDB数据库。
可以参考lnmp_soft/php_scripts/mysql.php:
[root@proxy ~]# vim /usr/local/nginx/html/mysql.php
<?php
$mysqli = new mysqli('localhost','root','密码','mysql');
##注意:root为mysql数据库的账户名称,密码需要修改为实际mysql密码,无密码则留空即可
##localhost是数据库的域名或IP,mysql是数据库的名称
if (mysqli_connect_errno()){
    die('Unable to connect!'). mysqli_connect_error();
}
$sql = "select * from user";
$result = $mysqli->query($sql);
while($row = $result->fetch_array()){
    printf("Host:%s",$row[0]);
    printf("</br>");
    printf("Name:%s",$row[1]);
    printf("</br>");
}
?>
[root@proxy html]# firefox 192.168.4.5/mysql.php
访问结果如图:

[root@proxy html]# mysql -e "grant all on *.* to dc@localhost identified by '123'"  ##给数据库添加一个用户
[root@proxy html]# firefox 192.168.4.5/mysql.php
访问结果如图:
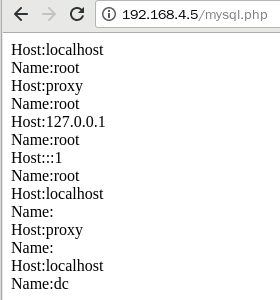
动态网页会实时更新显示内容
4)LNMP常见问题
- Nginx的默认访问日志文件为/usr/local/nginx/logs/access.log
- Nginx的默认错误日志文件为/usr/local/nginx/logs/error.log
- PHP默认错误日志文件为/var/log/php-fpm/www-error.log
- 如果动态网站访问失败,可用参考错误日志,查找错误信息。
Nginx高级技术 地址重写
什么是地址重写?
- 获得一个来访的URL请求,然后改写成服务器可以处理的另一个URL的过程
地址重写的好处
- 缩短URL, 隐藏实际路径提高安全性
- 易于用户记忆和键入
- 易于被搜索引擎收录
rewrite语法
 - rewrite 基本语句
 - rewrite  regex  replacement  flag
 - rewrite 旧地址 新地址 [选项]
 - flag:  break, last, redirect, permanent
 - last:  停止执行其他重写规则,根据URI继续搜索其他location,地址栏不变(不再读其他rewrite)
 - break: 停止执行其他的重写规则,完成本次请求(不再读其他语句,结束请求  location语句)
 - redirect: 302临时重定向.地址栏改变,爬虫不更新
 - permanent: 301永久重定向,地址栏改变,爬虫更新
 - if (条件){...}
正则表达式
- 正则表达式匹配模式如下:
- 区分大小写匹配: ~
- 不区分大小写匹配: ~*
- 区分大小写不匹配: !~
- 区分大小写不匹配: !~*
沿用上面的例子,通过调整Nginx服务端配置,实现以下目标:
所有访问a.html的请求,重定向到b.html;
所有访问192.168.4.5的请求重定向至www.tmooc.cn;
所有访问192.168.4.5/下面子页面,重定向至www.tmooc.cn/下相同的页面;
实现firefox与curl访问相同页面文件,返回不同的内容。
访问a.html重定向到b.html
[root@proxy ~]# vim /usr/local/nginx/conf/nginx.conf
35 server {
36 listen 80;
37 server_name localhost;
38 rewrite /a.html /b.html; ##(地址重写,访问a.html重定向到b.html)
[root@proxy conf]# echo "BBB" > /usr/local/nginx/html/b.html ##创建b网页
[root@proxy ~]# /usr/local/nginx/sbin/nginx -s reload
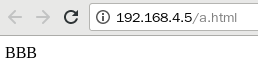
[root@proxy conf]# curl 192.168.4.5/a.html ##访问a.html的测试结果
BBB
[root@proxy conf]# firefox 192.168.4.5/a.html ##访问a.html的测试结果
测试结果:
[root@proxy ~]# vim /usr/local/nginx/conf/nginx.conf
35 server {
36 listen 80;
37 server_name localhost;
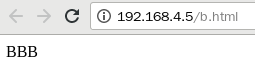
38 rewrite /a.html /b.html redirect;
[root@proxy conf]# curl 192.168.4.5/a.html ##访问a.html的测试结果
BBB
[root@proxy conf]# firefox 192.168.4.5/a.html ##访问a.html的测试结果
测试结果;
访问192.168.4.5的请求重定向至www.tmooc.cn
[root@proxy ~]# vim /usr/local/nginx/conf/nginx.conf
 35     server {
 36         listen       80;
 37         server_name  localhost;
 38         rewrite  ^/  http://www.tmooc.cn;
[root@proxy conf]# /usr/local/nginx/sbin/nginx -s reload
[student@room9pc01 ~]$ firefox 192.168.4.5 ##用真机测试
测试结果如图:

[root@proxy ~]# vim /usr/local/nginx/conf/nginx.conf
 35     server {
 36         listen       80;
 37         server_name  localhost;
 38         rewrite  ^/(.*)  http://www.tmooc.cn/$1;
[root@proxy conf]# /usr/local/nginx/sbin/nginx -s reload
[student@room9pc01 ~]$ firefox 192.168.4.5
[student@room9pc01 ~]$ firefox 192.168.4.5/free ##用真机测试
访问192.168.4.5的结果:

访问192.168.4.5/free的结果:

实现firefox与curl访问相同页面文件,返回不同的内容
思路:
浏览器 : curl   firefox
①:/usr/local/nginx/html/test.html  网页根目录: html
②:/usr/local/nginx/html/firefox/test.html 网页根目录下的子目录: firefox

>curl http://192.168.4.5/test.html
>firefox http://192.168.4.5/test.html
两个浏览器:访问相同(结果为第①个)

假设用rewrite处理:
>rewrite  /test.html  /firefox/test.html;

>curl http://192.168.4.5/test.html
>firefox http://192.168.4.5/test.html
两个浏览器访问相同(结果为第②个)

假设使用if判断语句配和rewrite地址重写处理:
>if(如果用户的浏览器是火狐){....}
>rewrite  /test.html  /firefox/test.html;

>curl http://192.168.4.5/test.html   访问网页根目录
>firefox http://192.168.4.5/test.html  访问/firefox/test.html
[root@proxy logs]# mkdir -p /usr/local/nginx/html/firefox
[root@proxy logs]# echo "I am tian" > /usr/local/nginx/html/test.html
[root@proxy logs]# echo "firefox tian" > /usr/local/nginx/html/firefox/test.html
[root@proxy ~]# vim /usr/local/nginx/conf/nginx.conf
35 server {
36 listen 80;
37 server_name localhost;
38 if ($http_user_agent ~* firefox) {
39 rewrite ^/(.*) /firefox/$1;
40 }
##$http_user_agent :存着用户信息和操作系统的信息
[root@proxy conf]# /usr/local/nginx/sbin/nginx -s reload
[student@room9pc01 ~]$ curl 192.168.4.5/test.html
I am tian
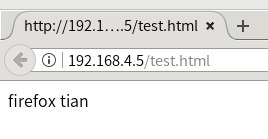
[student@room9pc01 ~]$ firefox 192.168.4.5/test.html
firefox的结果:
break, last, redirect, permanent的用法
下面简单解释一下,仅供参考
rewrite  /a.html  /b.html;
rewtite  /b.html  /c.html;
访问a.html打开c.html

rewrite  /a.html  /b.html last;
rewtite  /b.html  /c.html;
访问a.html打开b.htlm

location /a.html {
rewrite  /a.html  /b.html;
}
location  /b.html {
rewrite /b.html  c.html;
}
访问a.html打开c.html

location /a.html {
rewrite  /a.html  /b.html last;
}
location  /b.html {
rewrite /b.html  c.html;
}
访问a.html打开c.html

location /a.html {
rewrite  /a.html  /b.html break;
}
location  /b.html {
rewrite /b.html  c.html;
}
访问a.html打开b.html

redirect  临时重定向,一般用于a.html临时有问题且能恢复的情况下
permanent  永久重定向,一般用于a.html永久不能访问,但是为了方便客户端访问而用
