提炼Spring+MVC核心功能
1、前言
在学习一门框架的源码之前,我们可以通过对该框架提供的开发者所需配置项、框架在项目中所承担的功能、框架在项目中的展现形式的了解来进行思考,思考如果通过上述的三点,自己来写这们框架,我们应该如何来实现,内部的思路是什么样的。这样我们自己梳理了一套相应的实现方式后,再带着自己的一套东西去看源码,看看源码是如何优雅的实现其框架的功能,从而在其中通过比较、琢磨来打磨自己的编码和思想。
2、梳理
- 开发者所需配置项
- 框架在项目中的展现形式
- 框架在项目中所承担的功能
2.1 开发者所需配置项
我们以spring + springMVC为例,暂不提及spring boot。
首先我们需要引入spring的依赖包,紧接着去配置web.xml。
2.1.1 配置Spring Web的启动
有过Web开发经验的读者都知道可以在web.xml中配置自启动的Servlet或定义Web容器监听器(ServletContextListener),借助这两者中的任何一个,我们就可以完成启动Spring Web应用上下文的工作。
Spring分别提供了用于启动WebApplicationContext的Servlet和Web容器监听器:
org.springframework.web.context.ContextLoaderServlet
org.springframework.web.context.ContextLoaderListener
两者的内部都实现了启动WebApplicationContext实例的逻辑,我们只要根据Web容器的具体情况选择两者之一,并在web.xml中完成配置就可以了.
比如我们选择了Web容器监听器,那么在web.xml中配置为:
<listener>
	<description>启动spring容器</description>
	<listener-class>org.springframework.web.context.ContextLoaderListener</listener-class>
</listener>
2.1.2 配置Spring Web配置文件的扫描路径
ContextLoaderListener通过Web容器上下文参数contextConfigLocation获取Spring配置文件的位置。用户可以指定多个配置文件,用逗号、空格或冒号分隔均可。对于未带资源类型前缀的配置文件路径,WebApplicationContext默认这些路径相对于Web的部署根路径。当然,我们可以采用带资源类型前缀的路径配置,如"classpath*:/spring-*.xml"和上面的配置是等效的。
<context-param>
	<param-name>contextConfigLocation</param-name>
	<param-value>classpath:spring-context.xml</param-value>
</context-param>
2.1.3 spring MVC分发器和匹配规则配置
要想使用spring MVC,我们需要在web.mxl中引入DispatcherServlet,同时指明配置文件所在路径以及匹配规则。
<servlet>
	<servlet-name>spring-mvc</servlet-name>
	<servlet-class>org.springframework.web.servlet.DispatcherServlet</servlet-class>
	<!-- 指定路径 -->
	<init-param>
		<param-name>contextConfigLocation</param-name>
		<param-value>classpath:spring-mvc.xml</param-value>
	</init-param>
</servlet>

<servlet-mapping>
	<servlet-name>spring-mvc</servlet-name>
	<url-pattern>*.do</url-pattern>
</servlet-mapping>
上述配置表示,声明一个DispatcherServlet(DispatcherSerlet是前端控制器,核心功能是分发请求,分发给对应的java类),其配置文件的路径地址为resources/spring-mvc.xml,匹配规则为请求url的结尾为.do的均在DispatcherServlet中匹配、分发一次。
2.1.4 spring的xml配置文件
我们在项目的resources文件夹下创建一个spring-context.xml用于配置spring相关的配置信息,创建一个spring-mvc.xml用于配置springMVC相关的配置信息。
其中spring-mvc.xml中配置信息如下:
<?xml version="1.0" encoding="UTF-8"?>
<beans xmlns="http://www.springframework.org/schema/beans"
    xmlns:xsi="http://www.w3.org/2001/XMLSchema-instance"
    xmlns:p="http://www.springframework.org/schema/p"
    xmlns:mvc="http://www.springframework.org/schema/mvc"
    xmlns:context="http://www.springframework.org/schema/context"
    xmlns:util="http://www.springframework.org/schema/util"
    xmlns:aop="http://www.springframework.org/schema/aop"
    xmlns:tx="http://www.springframework.org/schema/tx"
    xsi:schemaLocation=
            "
            http://www.springframework.org/schema/beans http://www.springframework.org/schema/beans/spring-beans-3.0.xsd
            http://www.springframework.org/schema/context http://www.springframework.org/schema/context/spring-context-3.0.xsd
            http://www.springframework.org/schema/mvc http://www.springframework.org/schema/mvc/spring-mvc-3.0.xsd
            http://www.springframework.org/schema/util http://www.springframework.org/schema/util/spring-util-3.0.xsd
            http://www.springframework.org/schema/tx
            http://www.springframework.org/schema/tx/spring-tx.xsd
            http://www.springframework.org/schema/aop
            http://www.springframework.org/schema/aop/spring-aop.xsd
            "
            >

    <context:component-scan base-package="com.spring.test.aop" />

    <mvc:annotation-driven />
</beans>
其中最重要的是 <context:component-scan base-package=“com.spring.test.aop” /> ,其明确了配置spring的bean扫描路径,该路径下的注解声明(@Controller、@Service、@Component)的bean将被注册至bean容器中。
2.2 框架在项目中的展现形式
当我们完成上述的配置,就可以使用该框架提供的一些注解来完成相应的功能实现。
- 常用的有类上声明的注解有@Controller、@Service、@Component这三类
- 属性上声明的注解有@Autowired、@Resource
- 方法上声明的注解有@RequestMapping、@PostMapping、@GetMapping
- 方法参数上的注解有@RequestBody、@RequestParam。
比如以下的例子:
@Controller
@RequestMapping("/test")
public class TestController {

    @Autowired
    private Config Config;

    @RequestMapping("/testMethod.do")
    public void testMethod(@RequestBody Test test) {

    }

    @RequestMapping("/testMethodParam.do")
    public void testMethodParam(@RequestParam("param") String param) {

    }
}
2.3 框架在项目中所承担的功能
spring在项目中所承担的功能,即spring的核心功能便是 IOC、DI、AOP,并且作为一个粘合剂,能够集成一些外有的框架。
通过spring的核心功能,我们能够很方便的处理好bean与bean之间的依赖关系,不需要再关注创建bean和管理bean,我们声明好的bean交给spring管理,直接拿来使用即可。
3、模拟
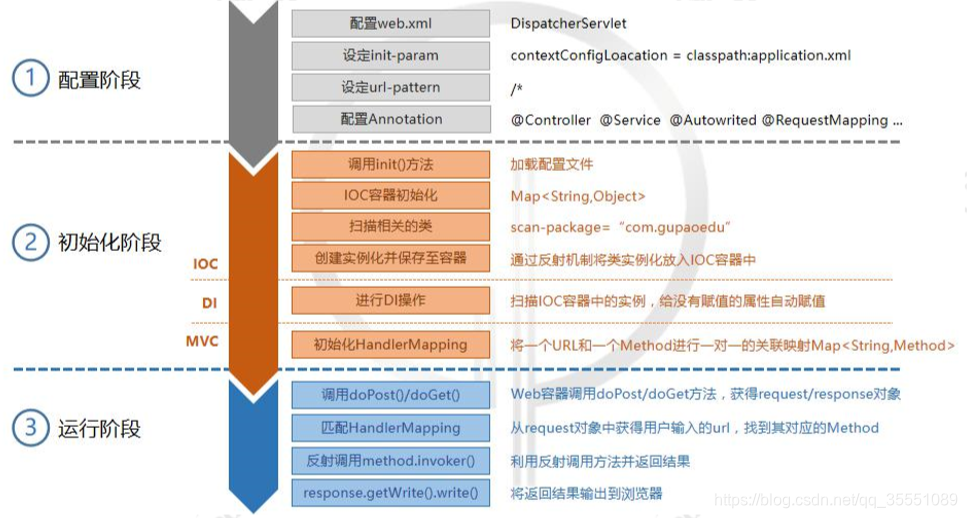
模拟spring、spring MVC的核心功能,整体思路如下:
3.1 配置application.properties
为了方便解析,我们可以使用application.properties来代替spring-content.xml和spring-mvc.xml的配置,具体配置内容如下:
scanPackage=com.peng.demo
定义需要扫描的路径。
3.2 自定义注解类
我们根据spring的对外呈现的注解类,我们模拟自建相应的注解类
@PDController
import java.lang.annotation.*;

@Target({ElementType.TYPE})
@Retention(RetentionPolicy.RUNTIME)
@Documented
public @interface PDController {
    String value() default "";
}
@PDService
import java.lang.annotation.*;

@Target({ElementType.TYPE})
@Retention(RetentionPolicy.RUNTIME)
@Documented
public @interface PDService {
    String value() default "";
}
@PDAutowired
import java.lang.annotation.*;

@Target({ElementType.FIELD})
@Retention(RetentionPolicy.RUNTIME)
@Documented
public @interface PDAutowired {
    String value() default "";
}
@PDRequestMapping
import java.lang.annotation.*;

@Target({ElementType.TYPE,ElementType.METHOD})
@Retention(RetentionPolicy.RUNTIME)
@Documented
public @interface PDRequestMapping {
    String value() default "";
}
@PDRequestParam
import java.lang.annotation.*;

@Target({ElementType.PARAMETER})
@Retention(RetentionPolicy.RUNTIME)
@Documented
public @interface PDRequestParam {
    String value() default "";
}
3.3 模拟创建DispatcherServlet
新建个PDDispatcherServlet,继承HttpServlet,重写init()、doGet()、doPost()方法。
import java.io.IOException;

import javax.servlet.ServletException;
import javax.servlet.http.HttpServlet;
import javax.servlet.http.HttpServletRequest;
import javax.servlet.http.HttpServletResponse;

public class PDDispatcherServlet extends HttpServlet{

    @Override
    public void init(ServletConfig config) throws ServletException {
        super.init(config);
    }

    @Override
    protected void doGet(HttpServletRequest req, HttpServletResponse resp) throws ServletException, IOException {
        super.doGet(req, resp);
    }


    @Override
    protected void doPost(HttpServletRequest req, HttpServletResponse resp) throws ServletException, IOException {
        super.doPost(req, resp);
    }
}
3.4 配置web.xml
<?xml version="1.0" encoding="UTF-8"?>
<web-app xmlns:xsi="http://www.w3.org/2001/XMLSchema-instance"
	xmlns="http://java.sun.com/xml/ns/j2ee" xmlns:javaee="http://java.sun.com/xml/ns/javaee"
	xmlns:web="http://java.sun.com/xml/ns/javaee/web-app_2_5.xsd"
	xsi:schemaLocation="http://java.sun.com/xml/ns/j2ee http://java.sun.com/xml/ns/j2ee/web-app_2_4.xsd"
	version="2.4">
	<servlet>
		<servlet-name>pdmvc</servlet-name>
		<servlet-class>com.peng.mvcframework.servlet.PDDispatcherServlet</servlet-class>
		<init-param>
			<param-name>contextConfigLocation</param-name>
			<param-value>application.properties</param-value>
		</init-param>
		<load-on-startup>1</load-on-startup>
	</servlet>
	<servlet-mapping>
		<servlet-name>pdmvc</servlet-name>
		<url-pattern>/*</url-pattern>
	</servlet-mapping>
</web-app>
我们使用自己的DispatchServlet以及application.properties。
3.5 配置注解,创建controller/service类
controller层
import java.io.IOException;

import javax.servlet.http.HttpServletRequest;
import javax.servlet.http.HttpServletResponse;

import com.peng.demo.service.IDemoService;
import com.peng.mvcframework.annotation.PDAutowired;
import com.peng.mvcframework.annotation.PDController;
import com.peng.mvcframework.annotation.PDRequestMapping;
import com.peng.mvcframework.annotation.PDRequestParam;

@PDController
@PDRequestMapping("/demo")
public class DemoController {

  	@PDAutowired private IDemoService demoService;

	@PDRequestMapping("/query")
	public void query(HttpServletRequest req, HttpServletResponse resp,
					  @PDRequestParam("name") String name){
		String result = demoService.get(name);
		try {
			resp.getWriter().write(result);
		} catch (IOException e) {
			e.printStackTrace();
		}
	}

	@PDRequestMapping("/add")
	public void add(HttpServletRequest req, HttpServletResponse resp,
					@PDRequestParam("a") Integer a, @PDRequestParam("b") Integer b){
		try {
			resp.getWriter().write(a + "+" + b + "=" + (a + b));
		} catch (IOException e) {
			e.printStackTrace();
		}
	}
}
service层
public interface IDemoService {

	String get(String name);
}
import com.peng.demo.service.IDemoService;
import com.peng.mvcframework.annotation.PDService;

/**
 * 核心业务逻辑
 */
@PDService
public class DemoServiceImpl implements IDemoService{

	public String get(String name) {
		return "My name is " + name;
	}
}
至此,配置阶段就已经完成。
3.6 容器初始化-编写DispatchServlet
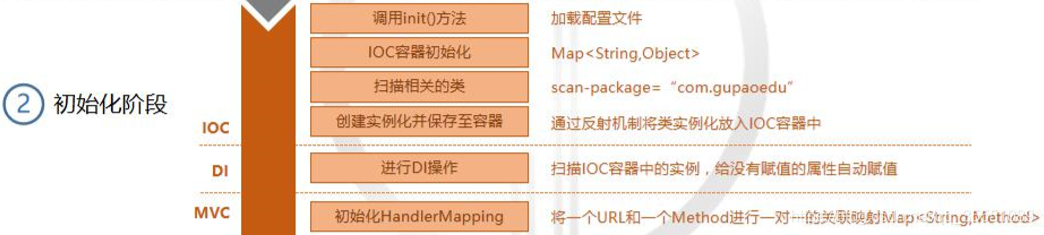
我们按照这个流程,来编写DispatchServlet。
首先在init()方法中编写如下的初始化流程。
public class PDDispatcherServlet extends HttpServlet{

    //存储aplication.properties的配置内容
    private Properties contextConfig = new Properties();

    @Override
    public void init(ServletConfig config) throws ServletException {
        //1、加载配置文件
        doLoadConfig(config.getInitParameter("contextConfigLocation"));
        //2、扫描相关的类
        doScanner(contextConfig.getProperty("scanPackage"));
        //3、初始化所有相关的类的实例,并且放入到IOC容器之中
        doInstance();
        //4、完成依赖注入
        doAutowired();
        //5、初始化HandlerMapping
        initHandlerMapping();

        System.out.println("PD Spring framework is init.");
    }

    private void initHandlerMapping() {

    }

    private void doAutowired() {

    }

    private void doInstance() {

    }

    private void doScanner(String property) {

    }

    private void doLoadConfig(String initParameter) {

    }
3.6.1 加载配置文件
    private void doLoadConfig(String contextConfigLocation) {
        InputStream fis = null;
        try {
            //从resource中获取 application.perperties的输入流
            fis = this.getClass().getClassLoader().getResourceAsStream(contextConfigLocation);
            //利用Properties对象来读取配置文件
            contextConfig.load(fis);
        }catch(Exception e){
            System.out.println("加载配置文件时,出现error,异常信息:" + Arrays.toString(e.getStackTrace()));
        }finally{
            try {
                if(null != fis){
                    fis.close();
                }
            } catch (IOException e) {
                System.out.println("加载配置文件时,出现error,异常信息:" + Arrays.toString(e.getStackTrace()));
            }
        }
    }
3.6.2 扫描相关的类
    //存储所有扫描到的类
    private List<String> classNames = new ArrayList<String>();

	private void doScanner(String scanPackage) {
        //scanPackage = com.peng.demo
        //路径传过来,该路径下面的所有的类全部扫描进来的
        URL url = this.getClass().getClassLoader()
                .getResource("/" + scanPackage.replaceAll("\\.","/"));
        //一个包对应在系统层面即为一个文件夹,将路径转为File文件夹来表示和操作。
        File classPath = new File(url.getFile());

        //遍历该文件夹下的所有文件夹以及文件
        for (File file : classPath.listFiles()) {
            //如果该file对象是文件夹,则递归继续扫描
            if(file.isDirectory()){
                doScanner(scanPackage + "." + file.getName());
            }else {
                //判断该file文件对象是否为class文件,如果不为class文件则不进行扫猫。
                if(!file.getName().endsWith(".class")){ continue; }
                //如果为class文件,将class文件及其路径地址加入到List中
                //比如: com.peng.demo.mvc.controller.DemoController
                String className = (scanPackage + "." + file.getName()).replace(".class","");
                classNames.add(className);
            }
        }
    }
4、构思
由于篇幅问题,下一章我们继续来提炼、模拟DispatchServlet的init()方法的编写以及运行阶段如何通过DispatcherServlet来完成请求的转发。
后续的大体构思:
- 初始化扫描到的类,使用反射,将其类进行实例化。并定义一个Map<String,Object> map 来保存实例化后的对象。key值为类的名称,value为实例化的对象
- 依赖注入,同样使用反射,获取类的属性上是否有自定义注解@Autowired,如果存在,通过修饰的属性类型,从上述map中寻找相应的实例化后的类,使用反射注入属性值。
