简答题
解释 游戏对象(GameObjects) 和 资源(Assets)的区别与联系
游戏对象(GameObject)
指的是一个能够容纳实现实际功能的组件。游戏中的每个对象都是一个游戏对象 (GameObject)。然而,游戏对象 (GameObjects) 本身不做任何事情。它们需要特殊属性 (special properties) 才能成为一个角色、一种环境或者一种特殊效果。但是每个对象要做很多不同的事情。如果每个对象都是一个游戏对象 (GameObject)
资源(Assets)
指的是在游戏中可能用到的各种东西,比如模型、声音文件、贴图文件等等
两者之间的联系
资源可以作为模板,实例化成具体的游戏对象,也可以作为游戏对象中的某种属性,同时也可以被多个游戏对象同时使用。
游戏案例分析
下载几个游戏案例,分别总结资源、对象组织的结构(指资源的目录组织结构与游戏对象树的层次结构)
资源的结构

- 上面的样例可见,该游戏资源的内容分为预制、脚本等等,按照文件的类型的不同,添加到不同的文件夹当中,便于后面的资源整理和利用
游戏对象的结构

- 由上面的样例可见,该游戏将游戏对象分为游戏的控制,环境的设置,玩家以及目标,符合游戏的各个必要的环节
触发条件分析
编写一个代码,使用 debug 语句来验证 MonoBehaviour 基本行为或事件触发的条件
基本行为包括 Awake() Start() Update() FixedUpdate() LateUpdate()
常用事件包括 OnGUI() OnDisable() OnEnable()
执行代码
using System.Collections;
using System.Collections.Generic;
using UnityEngine;

public class intbesh : MonoBehaviour {

    // Use this for initialization

    private void Awake()
    {
        Debug.Log("It is an awake!");
    }

    void Start () {
        Debug.Log("It is a start!");
	}

	// Update is called once per frame
    void Update () {
        Debug.Log("It is an update!");
	}

    private void FixedUpdate()
    {
        Debug.Log("It is a fixedupdate!");
    }

    private void OnGUI()
    {
        Debug.Log("It is ONGUI!");
    }

    private void OnDisable()
    {
        Debug.Log("It is OnDisable!");
    }

    private void OnEnable()
    {
        Debug.Log("It is OnEnable!");
    }
}
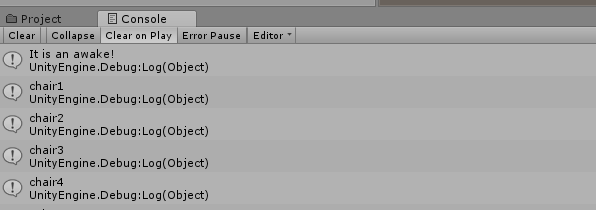
控制台的输出

分析
- awake:当一个脚本实例被载入时被调用
- start:在所有update函数之前被调用一次
- update:当行为启用时,其update在每一帧被调用
- fixedupdate:当行为启用时,其fixedupdate在每一时间片被调用
- OnGUI:渲染和处理GUI事件时调用
- OnEnable:当对象变为可用或激活状态时被调用
- OnDisable:当对象变为不可用或非激活状态时被调用
分析三个对象
查找脚本手册,了解 GameObject,Transform,Component 对象
分别翻译官方对三个对象的描述(Description)
描述下图中 table 对象(实体)的属性、table 的 Transform 的属性、 table 的部件
本题目要求是把可视化图形编程界面与 Unity API 对应起来,当你在 Inspector 面板上每一个内容,应该知道对应 API。
例如:table 的对象是 GameObject,第一个选择框是 activeSelf 属性。
用 UML 图描述 三者的关系(请使用 UMLet 14.1.1 stand-alone版本出图)
翻译
- GameObject:是Unity场景里面所有实体的基类.
- Transform:物体的位置、旋转和缩放。
- Component:一切附加到游戏物体的基类。
描述属性
- 第一个选择框是activeSelf:可以定义对象的名称,动静态等属性
- 第二个选择框是Transform:可以定义对象的位置、面向方向、大小
- 第三个选择框是Box Collider:可以调整坐标系的位置、大小
- 第四个选择框是Component:可以给对象增加行为
UML图

对对象进行相关操作
整理相关学习资料,编写简单代码验证以下技术的实现:
查找对象
添加子对象
遍历对象树
清除所有子对象
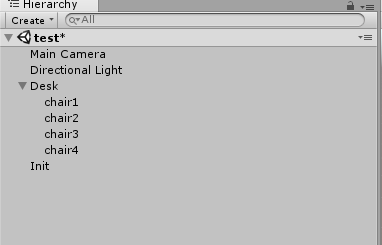
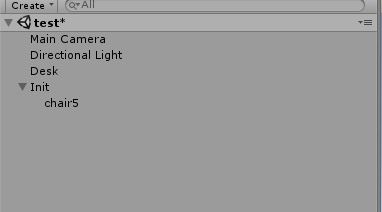
一开始存在的对象树如下:
查找对象
using System.Collections;
using System.Collections.Generic;
using UnityEngine;

public class InitBeh : MonoBehaviour {

    public Transform Table;

    // Use this for initialization

    private void Awake()
    {
        Debug.Log("It is an awake!");
    }

    void Start () {

        Debug.Log("It is a start!");
        var cube = GameObject.Find("chair1");

        if(cube != null)
        {
            Debug.Log(cube);
        }
        else
        {
            Debug.Log("It is nothing!");
        }
	}

	// Update is called once per frame
	void Update () {

	}
}
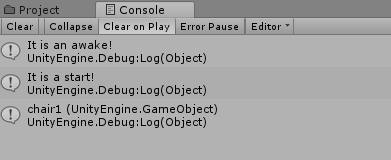
- 利用GameObject中的find函数即可对对象进行查找,首先声明一个变量,如果存在查找的对象,则返回该对象的名称,如果不存在,则返回null
添加子对象
using System.Collections;
using System.Collections.Generic;
using UnityEngine;

public class InitBeh : MonoBehaviour {

    public Transform Table;

    // Use this for initialization

    private void Awake()
    {
        Debug.Log("It is an awake!");
    }

    void Start () {

        Debug.Log("It is a start!");
        var cube = GameObject.Find("chair5");

        if(cube != null)
        {
            Debug.Log(cube);
        }
        else
        {
            Debug.Log("It is nothing!");
        }

        GameObject temp = GameObject.CreatePrimitive(PrimitiveType.Cube);
        temp.name = "chair5";
        temp.transform.position = new Vector3(0, Random.Range(0, 5), 0);
        temp.transform.parent = this.transform;

        cube = GameObject.Find("chair5");

        if (cube != null)
        {
            Debug.Log(cube);
        }
        else
        {
            Debug.Log("It is nothing!");
        }
    }

	// Update is called once per frame
	void Update () {

	}
}
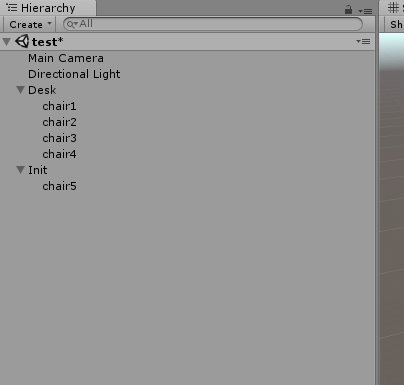
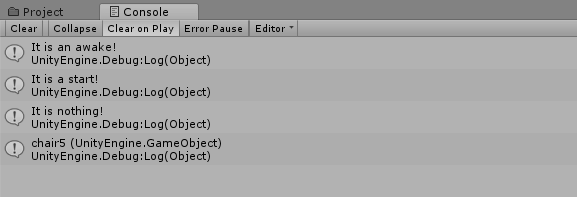
- 通过GameObject中的CreatePrimitive函数,即可创建出一个制定类型的对象。同时通过创建的对象中的transform中的parent属性可以定义该对象所属的上级对象,同时通过name等属性,可以进一步对该新对象的属性进行修改。
遍历对象树
using System.Collections;
using System.Collections.Generic;
using UnityEngine;

public class DeskBeh : MonoBehaviour {

	// Use this for initialization
	void Start () {

        foreach(Transform child in transform)
        {
            Debug.Log(child.name);
        }
	}

	// Update is called once per frame
	void Update () {

	}
}
- 通过一个循环,即可对当前行为添加的对象的子对象进行遍历。
清除所有子对象
using System.Collections;
using System.Collections.Generic;
using UnityEngine;

public class DeskBeh : MonoBehaviour {

	// Use this for initialization
	void Start () {

        foreach(Transform child in transform)
        {
            Destroy(child.gameObject);
        }
	}

	// Update is called once per frame
	void Update () {

	}
}
资源预设(Prefabs)与 对象克隆 (clone)
预设(Prefabs)有什么好处?
预设与对象克隆 (clone or copy or Instantiate of Unity Object) 关系?
制作 table 预制,写一段代码将 table 预制资源实例化成游戏对象
预设(Prefabs)的好处
预设可以提前将设计游戏中所需要的游戏对象进行设计打包,成为一个模板。在设计的过程中,随时可以直接从资源当中加载,成为一个游戏对象。预设的存在,方便了面向对象思想的应用,方便我们在设计游戏中更加便捷。
预设和克隆之间的关系
克隆是将已经存在的游戏对象,或者是资源当中的预设进行复制。克隆可以是对已经添加在视图当中的游戏对象进行复制,也可以是对资源当中,我们提前预设好的模板进行克隆。因此,预设一般来说是克隆的一个基础步骤,在预设之后,就可以在资源当中随心所欲地为自己想要的对象进行克隆了。
代码实现
using System.Collections;
using System.Collections.Generic;
using UnityEngine;

public class InitBeh : MonoBehaviour {

	// Use this for initialization
	void Start () {

        Debug.Log("start!");
        Object temp = Resources.Load("desk");
        GameObject cube = Instantiate(temp) as GameObject;

        cube.transform.position = new Vector3(0, Random.Range(5, 7), 0);
        cube.transform.parent = this.transform;
	}

	// Update is called once per frame
	void Update () {

	}
}

- 通过提前制作出预制的desk,并且添加到Resources文件夹中,在空对象的行为当中,通过Resources中的load函数加载该预制,并将其进行实例化,再设置各种属性即可实现预制的实例化。
组合模式
尝试解释组合模式(Composite Pattern / 一种设计模式)。使用 BroadcastMessage() 方法
向子对象发送消息
组合模式的解释
组合模式(Composite Pattern),又叫部分整体模式,是用于把一组相似的对象当作一个单一的对象。组合模式依据树形结构来组合对象,用来表示部分以及整体层次。这种类型的设计模式属于结构型模式,它创建了对象组的树形结构。这种模式创建了一个包含自己对象组的类。该类提供了修改相同对象组的方式。组合模式是将对象组合成树形结构以表示“部分-整体”的层次结构,它使得用户对单个对象和组合对象的使用具有一致性。
代码实现
父对象
using System.Collections;
using System.Collections.Generic;
using UnityEngine;

public class DeskBeh : MonoBehaviour {

	// Use this for initialization
	void Start () {

        Debug.Log("Start!");
        this.BroadcastMessage("test");
	}

	// Update is called once per frame
	void Update () {

	}
}
子对象
using System.Collections;
using System.Collections.Generic;
using UnityEngine;

public class ChairBeh : MonoBehaviour {

	// Use this for initialization
	void Start () {

	}

	// Update is called once per frame
	void Update () {

	}

    void test()
    {
        Debug.Log("It is just a test");
    }
}
结果

- 通过父对象调用BroadcastMessage函数,向所有的子对象广播test信息。所有的子对象接收该信息,并自动调用自身定义的test函数。
编程实践:小游戏
- 游戏内容: 井字棋 或 贷款计算器 或 简单计算器 等等
- 技术限制: 仅允许使用 IMGUI 构建 UI
- 作业目的:
- 提升 debug 能力
- 提升阅读 API 文档能力
井字棋游戏
代码实现
using System.Collections;
using System.Collections.Generic;
using UnityEngine;

public class game : MonoBehaviour
{

    private int empty = 9;
    private int turn = 1;
    private int[,] chess = new int[3, 3];

    // Use this for initialization
    void Start()
    {
        reset();
    }

    // Update is called once per frame
    void reset()
    {

        empty = 9;
        turn = 1;
        for (int i = 0; i < 3; i++)
        {
            for (int j = 0; j < 3; j++)
            {
                chess[i, j] = 0;
            }
        }
    }

    private void OnGUI()
    {
        GUI.skin.button.fontSize = 20;
        GUI.skin.label.fontSize = 30;
        if(GUI.Button(new Rect(450,400,200,80), "Reset"))
        {
            reset();
        }

        int result = is_win();

        if(result == 1)
        {
            GUI.Label(new Rect(500, 20, 100, 50), "O wins");
        }
        else if (result == 2)
        {
            GUI.Label(new Rect(500, 20, 100, 50), "X wins");
        }
        else if (result == 3)
        {
            GUI.Label(new Rect(470, 20, 200, 50), "no one wins");
        }

        for(int i = 0; i < 3; i++)
        {
            for(int j = 0; j < 3; j++)
            {
                if (chess[i, j] == 1) GUI.Button(new Rect(i * 100 + 400, j * 100 + 80, 100, 100), "O");
                if (chess[i, j] == 2) GUI.Button(new Rect(i * 100 + 400, j * 100 + 80, 100, 100), "X");
                if(GUI.Button(new Rect(i * 100 + 400, j * 100 + 80, 100, 100), ""))
                {
                    if(result == 0)
                    {
                        if (turn == 1) chess[i, j] = 1;
                        if (turn == 2) chess[i, j] = 2;
                        empty--;
                        if(empty%2 == 1)
                        {
                            turn = 1;
                        }
                        else
                        {
                            turn = 2;
                        }
                    }
                }
            }
        }
    }

    int is_win()
    {
        int temp = chess[1, 1];
        if(temp != 0)
        {
            if (temp == chess[0, 0] && temp == chess[2, 2])
            {
                return temp;
            }
            if (temp == chess[0, 2] && temp == chess[2, 0])
            {
                return temp;
            }
            if (temp == chess[0, 1] && temp == chess[2, 1])
            {
                return temp;
            }
            if (temp == chess[1, 0] && temp == chess[1, 2])
            {
                return temp;
            }
        }
        //判断是否中心的十字形或者X字形
        temp = chess[0, 0];
        if(temp != 0)
        {
            if(temp == chess[0,1] && temp == chess[0,2])
            {
                return temp;
            }
            if (temp == chess[1, 0] && temp == chess[2, 0])
            {
                return temp;
            }
        }
        //判断是否是第一行或者第一列相同
        temp = chess[2, 2];
        if(temp != 0)
        {
            if(temp == chess[2,0] && temp == chess[2,1])
            {
                return temp;
            }
            if(temp == chess[0,2] && temp == chess[1,2])
            {
                return temp;
            }
        }
        //判断是否是第三行或者第三列相同
        if(empty == 0)
        {
            return 3;//没有空的地方,因此双方平局
        }
        else
        {
            return 0;//还未分出胜负
        }
    }
}
- 首先是完善reset函数,以及判断输赢的is_win函数,再通过OnGUI进行UI的渲染
- 之后将上述代码文件直接添加为摄像头的行为文件即可
界面效果
