要求:在根目录下创建/www/wang文件夹,并在文件夹内创建欢迎页面。
使用yum安装httpd

yum install httpd -y
2.配置httpd.conf文件
vim /etc/httpd/conf/httpd.conf


20
    31  ServerRoot "/etc/httpd"
    32
    42  Listen 80
    43
    56  Include conf.modules.d/*.conf
    57
    66  User apache
    67  Group apache
    68
    80
    86  ServerAdmin root@localhost
    87
    96
   102  <Directory />
   103      AllowOverride none
   104      Require all denied
   105  </Directory>
   106
   113
   119  DocumentRoot "/var/www/html"
   120
   124  <Directory "/var/www">
   125      AllowOverride None
   127      Require all granted
   128  </Directory>
   129
   131  <Directory "/var/www/html">
   144      Options Indexes FollowSymLinks
   145
   151      AllowOverride None
   152
   156      Require all granted
   157  </Directory>
   158
   163  <IfModule dir_module>
   164      DirectoryIndex index.html
   165  </IfModule>
   166
   171  <Files ".ht*">
   172      Require all denied
   173  </Files>
   174
   182  ErrorLog "logs/error_log"
   183
   189  LogLevel warn
   190
   191  <IfModule log_config_module>
   196      LogFormat "%h %l %u %t "%r" %>s %b "%{Referer}i" "%{User-Agent}i"" combined
   197      LogFormat "%h %l %u %t "%r" %>s %b" common
   198
   199      <IfModule logio_module>
   201        LogFormat "%h %l %u %t "%r" %>s %b "%{Referer}i" "%{User-Agent}i" %I %O" combinedio
   202      </IfModule>
   203
   212
   217      CustomLog "logs/access_log" combined
   218  </IfModule>
   219
   220  <IfModule alias_module>
   227
   238
   247      ScriptAlias /cgi-bin/ "/var/www/cgi-bin/"
   248
   249  </IfModule>
   250
   255  <Directory "/var/www/cgi-bin">
   256      AllowOverride None
   257      Options None
   258      Require all granted
   259  </Directory>
   260
   261  <IfModule mime_module>
   266      TypesConfig /etc/mime.types
   267
   283      AddType application/x-compress .Z
   284      AddType application/x-gzip .gz .tgz
   285
   295
   298
   305      AddType text/html .shtml
   306      AddOutputFilter INCLUDES .shtml
   307  </IfModule>
   308
   316  AddDefaultCharset UTF-8
   317
   318  <IfModule mime_magic_module>
   324      MIMEMagicFile conf/magic
   325  </IfModule>
   326
   337
   348  EnableSendfile on
   349
   353  IncludeOptional conf.d/*.conf
配置文件如上,开启httpd服务。终端输入ifconfig

可以看出我的内网ip是172.16.200.138
于是在浏览器中访问172.16.200.138,结果如下

可以看出httpd服务已经启动,再看一下端口
ss -tunlp

从图中可以看到,80端口已被httpd服务监听,并且生成的6个子进程,我们httpd工作方式是Refork。
二、配置httpd服务
2.1更改配置文件将配置中默认的/var/www/html,更改为要求的/www/html

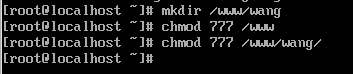
2.2 创建/www/wang文件夹
mkdir /www/wang
chmod 777 /www
chmod 777 /www/wang
#vim /www/wang/1.html

 <html>
    <head>
        <title>hello word </title>
    </head>
    <body>
        <h1>this a first title</h1>
        <p1>Welcome to the new web site </p1>
    </body>
 </html>
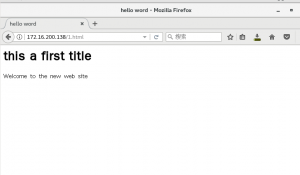
看,我们写的html文本已经在浏览器上显示,使用ip解析的。并是不是特别挺有意思!!
三、更改索引配置
那个test123…页面是不是不太好看。哪个是我们的欢迎页面,httpd读取配置文件时,会默认加载/etc/httpd/conf.d/welcome。conf文件,而这个文件就是test欢迎页面,所以我们把它换个名字mv welcome.conf welcome.conf.bak
然后再访问172.16.200.138,如下图

是不是我们的test页面已经不见了,不过产生了一个索引页面,这个页面包括了/www/wang下的所有文件,这样很危险,太尴尬了,可是这个页面是怎么出来的呢?
再来看配置文件
再来看配置文件

   131  <Directory "/var/www/html">
   144      Options Indexes FollowSymLinks
   145
   151      AllowOverride None
   152
   156      Require all granted
   157  </Directory>
将Options Indexes FollowSymLinks更改为Options FollowSymLinks
然后重启httpd服务
#vim /etc/httpd/conf/httpd.conf
   131  <Directory "/var/www/html">
   144 #    Options Indexs FollowSymLinks
  145
   151      AllowOverride None
   152
   156      Require all granted
   157  </Directory>
#service httpd restart

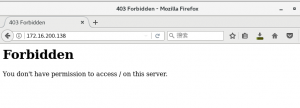
再打开172.16.200.138

Options FollowSymLinks
显示403You don’t have permission to access / on this server.没有权限访问,是不是索引文件不能访问了。哈哈!!就是这么简单
四、脚本路径别名 CGI
# vim /var/www/html/test
     1  #!/bin/bash
     2  cat << EOF
     3  Conten-Type: text/html
     4
     5  <pre>
     6
     7  the hostname is :`hostname`
     8  the day is `date
     9  echo "hello,word"
    10
    11  </pre>`
    12  EOF
因为在配置文件已经定义了 ScriptAlias /cgi-bin/ “/var/www/cgi-bin/”所以
就可以直接显示脚本执行的结果

五、基于用户的访问控制,要求用户访问/www/wang/fin时需要帐号密码,帐号密码存放于/etc/httpd/conf下并命名为.htpasswd
129 <Directory "/www/wang/fin">
130 options none
131 AllowOverride AuthConfig
132 AuthType Basic
133 AuthName "Private Basic"
134 AuthUserFile /etc/httpd/conf/.htpasswd
135 Require valid-user
136 # Allow open access:
137 # Require all granted
138 </Directory>
#cd /www/html
#mkdir fin
#vim index.html
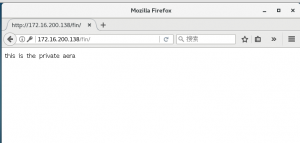
<p1>this is the private aera</p1>
<img src="http://119.29.214.107/wp-content/uploads/2018/01/选区_021.png" alt="" width="295" height="46" class="alignnone size-full wp-image-469" />#service httpd restart
#service httpd restart
打开172.16.200.138/fin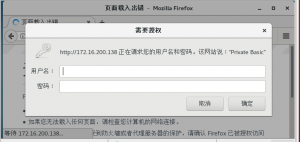
此时需要账户密码登录,但是我们没有创建密码文件,所以创建.htpasswd
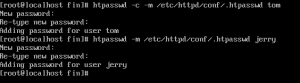
我们使用命令来创建密码文件
htpasswd -c -m /etc/htppd/conf/.htpasswd tom
htpasswd -m /etc/htppd/conf/.htpasswd jerry
再次访问172.16.200.138
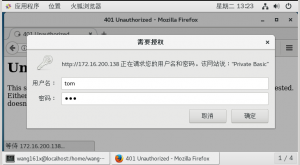
现在我们输入刚刚设置的帐号密码
哈哈!!好玩吗,赶快试一试把!
