准备
1、建立一个空工程
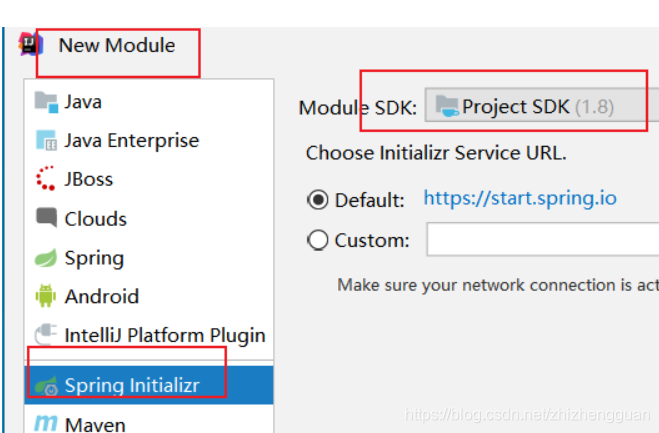
2、建立一个SpringBoot子模块
- 选中空工程, New----Module


选中web模块

模板引擎选择 Thymeleaf

添加jquery和bootstrap
- 进入webjars官网,把依赖拷贝下来放在pom文件中,当然可以选择自己要的版本
![[外链图片转存失败,源站可能有防盗链机制,建议将图片保存下来直接上传(img-3XtmunRu-1579143080704)(C:\Users\LENOVO\AppData\Roaming\Typora\typora-user-images\1579142693795.png)]](https://img-blog.csdnimg.cn/202001161052307.png?x-oss-process=image/watermark,type_ZmFuZ3poZW5naGVpdGk,shadow_10,text_aHR0cHM6Ly9ibG9nLmNzZG4ubmV0L3poaXpoZW5nZ3Vhbg==,size_16,color_FFFFFF,t_70)
指定首页
1、访问http://localhost:8080/时,SpringBoot会依次从下面静态文件夹下寻找index.html,如果找到了就不找了。
“classpath:/META-INF/resources/”,“classpath:/resources/”,“classpath:/static/”,“classpath:/public/”
如果到上面文件夹下找不到的话,才会去 “classpath:/templates/”寻找index.html
现在我们在templates创建一个login.html
<!DOCTYPE html>
<html lang="en">
	<head>
		<meta http-equiv="Content-Type" content="text/html; charset=UTF-8">
		<meta name="viewport" content="width=device-width, initial-scale=1, shrink-to-fit=no">
		<meta name="description" content="">
		<meta name="author" content="">
		<title>Signin Template for Bootstrap</title>
		<!-- Bootstrap core CSS -->
		<link href="asserts/css/bootstrap.min.css" rel="stylesheet">
		<!-- Custom styles for this template -->
		<link href="asserts/css/signin.css" rel="stylesheet">
	</head>

	<body class="text-center">
		<form class="form-signin" action="dashboard.html">
			<img class="mb-4" src="asserts/img/bootstrap-solid.svg" alt="" width="72" height="72">
			<h1 class="h3 mb-3 font-weight-normal">Please sign in</h1>
			<label class="sr-only">Username</label>
			<input type="text" class="form-control" placeholder="Username" required="" autofocus="">
			<label class="sr-only">Password</label>
			<input type="password" class="form-control" placeholder="Password" required="">
			<div class="checkbox mb-3">
				<label>
          <input type="checkbox" value="remember-me"> Remember me
        </label>
			</div>
			<button class="btn btn-lg btn-primary btn-block" type="submit">Sign in</button>
			<p class="mt-5 mb-3 text-muted">© 2017-2018</p>
			<a class="btn btn-sm">中文</a>
			<a class="btn btn-sm">English</a>
		</form>

	</body>

</html>
2、如果我们想要指定一个页面作为首页,可以采用以下方法
- 方法1:
package com.oceanstar.controller;

import org.springframework.stereotype.Controller;
import org.springframework.web.bind.annotation.RequestMapping;

@Controller
public class testController {

    @RequestMapping({"/", "/index.html"})
    public String index(){
        return "login";
    }
}
- 方法2:
package com.oceanstar.config;

import org.springframework.context.annotation.Configuration;
import org.springframework.web.servlet.config.annotation.ViewControllerRegistry;
import org.springframework.web.servlet.config.annotation.WebMvcConfigurationSupport;

@Configuration
public class MyMvcConfig  extends WebMvcConfigurationSupport {

    @Override
    public void addViewControllers(ViewControllerRegistry registry) {
        // 会优先去静态文件夹中寻找
        registry.addViewController("/").setViewName("login");
        registry.addViewController("/login.html").setViewName("login");
    }
}
- 方法三:【没有作用, 为什么】
package com.oceanstar.config;

import org.springframework.context.annotation.Bean;
import org.springframework.context.annotation.Configuration;
import org.springframework.web.servlet.config.annotation.ViewControllerRegistry;
import org.springframework.web.servlet.config.annotation.WebMvcConfigurationSupport;

@Configuration
public class MyMvcConfig  extends WebMvcConfigurationSupport {
    @Bean // 注意必须将组件注册到容器,它才能生效
    public WebMvcConfigurationSupport webMvcConfigurationSupport(){
        WebMvcConfigurationSupport support = new WebMvcConfigurationSupport(){
            public void addViewControllers(ViewControllerRegistry registry) {
                // 会优先去静态文件夹中寻找
                registry.addViewController("/").setViewName("login");
                registry.addViewController("/login.html").setViewName("login");
            }

        };
        return support;
    }
}
国际化【最终:remeber me没有国际化,不知道哪里错了】
思路
1)、编写国际化配置文件;
2)、使用ResourceBundleMessageSource管理国际化资源文件
3)、在页面使用fmt:message取出国际化内容
步骤
0)准备
- File—》Other Setting----UTF-8&转为ASCII

否则页面出现乱码:

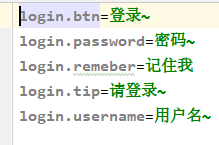
1)、编写国际化配置文件,抽取页面需要显示的国际化消息
- resources目录下创建Directory文件夹i18n,
- i18n下创建file文件login.properties,
- i18n下创建file文件login_en_US.properties,这时IDEA会自动识别到要做国际化,从而出现Resouces Bundler ‘login’
- 选中Resouces Bundler ‘login’ ----> New—>Add Property Files to Resources Bundler,IDEA会自动跳出一个对话框,点击右边对话框的+,IDEA跳出对话框,输入zh_CN

- 打开login_en_US.properties,选中Resource Bundler[下边栏]视图,点击上边栏的+添加属性,


2)、SpringBoot自动配置好了管理国际化资源文件的组件,查看源代码
@ConfigurationProperties(prefix = "spring.messages")
public class MessageSourceAutoConfiguration {

    /**
	 * Comma-separated list of basenames (essentially a fully-qualified classpath
	 * location), each following the ResourceBundle convention with relaxed support for
	 * slash based locations. If it doesn't contain a package qualifier (such as
	 * "org.mypackage"), it will be resolved from the classpath root.
	 */
	private String basename = "messages";
    //我们的配置文件可以直接放在类路径下叫messages.properties;

    @Bean
	public MessageSource messageSource() {
		ResourceBundleMessageSource messageSource = new ResourceBundleMessageSource();
		if (StringUtils.hasText(this.basename)) {
            //设置国际化资源文件的基础名(去掉语言国家代码的)
			messageSource.setBasenames(StringUtils.commaDelimitedListToStringArray(
					StringUtils.trimAllWhitespace(this.basename)));
		}
		if (this.encoding != null) {
			messageSource.setDefaultEncoding(this.encoding.name());
		}
		messageSource.setFallbackToSystemLocale(this.fallbackToSystemLocale);
		messageSource.setCacheSeconds(this.cacheSeconds);
		messageSource.setAlwaysUseMessageFormat(this.alwaysUseMessageFormat);
		return messageSource;
	}
从上面我们可以看出,默认国际化配置文件叫做messages.properties,是放在类路径下的,而我的是放在i18n上,叫做login*.properties,因此我们需要在配置文件中配置:

3)在页面上获取国际化值
修改login.html
<!DOCTYPE html >
<html lang="en"  xmlns:th="http://www.thymeleaf.org">
	<head>
		<meta http-equiv="Content-Type" content="text/html; charset=UTF-8">
		<meta name="viewport" content="width=device-width, initial-scale=1, shrink-to-fit=no">
		<meta name="description" content="">
		<meta name="author" content="">
		<title>Signin Template for Bootstrap</title>
		<!-- Bootstrap core CSS -->
		<link href="asserts/css/bootstrap.min.css" rel="stylesheet">
		<!-- Custom styles for this template -->
		<link href="asserts/css/signin.css" rel="stylesheet">
	</head>

	<body class="text-center">
		<form class="form-signin" action="dashboard.html">
			<img class="mb-4" src="asserts/img/bootstrap-solid.svg" alt="" width="72" height="72">
			<h1 class="h3 mb-3 font-weight-normal" th:text="#{login.tip}">Please sign in</h1>
			<label class="sr-only">Username</label>
			<input type="text" class="form-control" th:text="#{login.username}" placeholder="Username" required="" autofocus="">
			<label class="sr-only">Password</label>
			<input type="password" class="form-control" th:text="#{login.password}" placeholder="Password" required="">
			<div class="checkbox mb-3">
				<label>
					<input name="remember" type="checkbox" value="Remember Me">[[#{login.remember}]]
        </label>
			</div>
			<button class="btn btn-lg btn-primary btn-block" type="submit" th:text="#{login.btn}">Sign in</button>
			<p class="mt-5 mb-3 text-muted">© 2017-2018</p>
			<a class="btn btn-sm" th:href="@{/login.html(l='zh_CN')}">中文</a>
			<a class="btn btn-sm" th:href="@{/login.html(l='en_US')}">English</a>
		</form>

	</body>

</html>

效果:

4)点击链接切换国际化
-
修改链接

-
实现自己的locale
package com.oceanstar.conponent;

import org.springframework.util.StringUtils;
import org.springframework.web.servlet.LocaleResolver;

import javax.servlet.http.HttpServletRequest;
import javax.servlet.http.HttpServletResponse;
import java.util.Locale;

/**
 * 可以在连接上携带区域信息
 */
public class MyLocaleResolver implements LocaleResolver {

    @Override
    public Locale resolveLocale(HttpServletRequest request) {
        String l = request.getParameter("l");
        Locale locale = Locale.getDefault();
        if(!StringUtils.isEmpty(l)){
            String[] split = l.split("_");
            locale = new Locale(split[0],split[1]);
        }
        return locale;
    }

    @Override
    public void setLocale(HttpServletRequest request, HttpServletResponse response, Locale locale) {

    }
}
4、因为LocaleResolver是没有LocaleResolver自动配置才会生效:

所以在MyMvcConfig中注入自己写的localeResovler组件即可
package com.oceanstar.webcrud.config;
****
@Configuration
public class MyMvcConfig  extends WebMvcConfigurationSupport {
	****
    @Bean
    public LocaleResolver localeResolver(){
        return new MyLocaleResolver();
    }
}
原理: Spring boot通过LocaleResolver获取区域信息对象,默认根据请求头带来的区域信息获取locale进行国际化

如果想要不从浏览器请求中国际化,可以自己实现localeResovler
