java实现微信网页授权登录
开发前的准备:
1.需要有一个公众号(我这里用的测试号),拿到AppID和AppSecret;
申请测试号网址:http://mp.weixin.qq.com/debug/cgi-bin/sandbox?t=sandbox/login
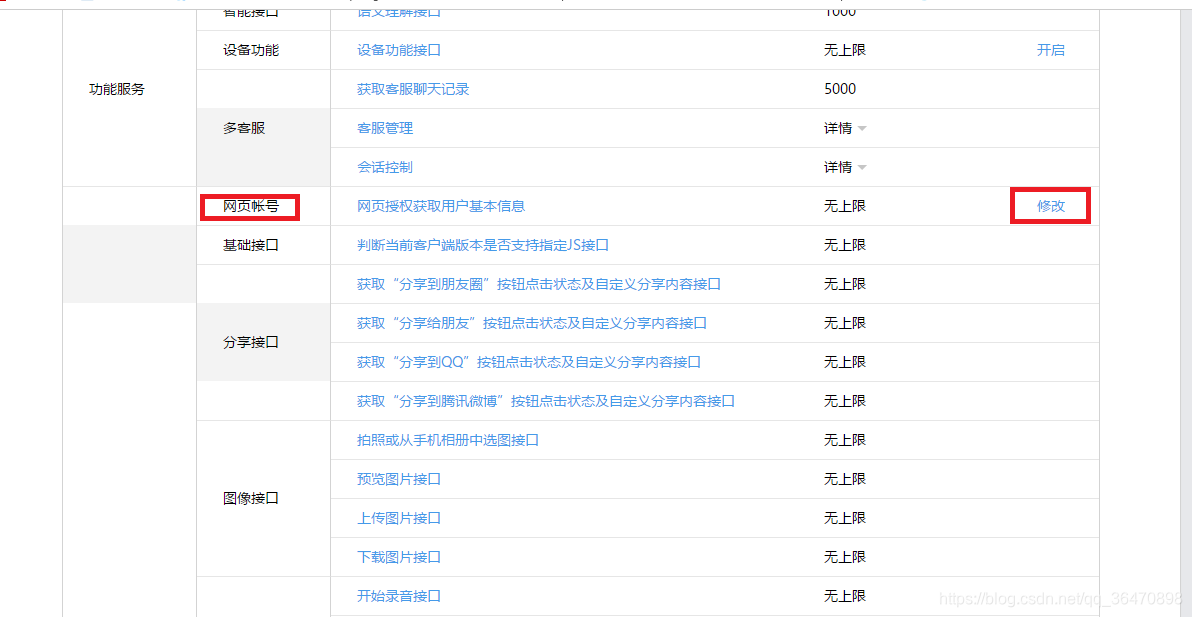
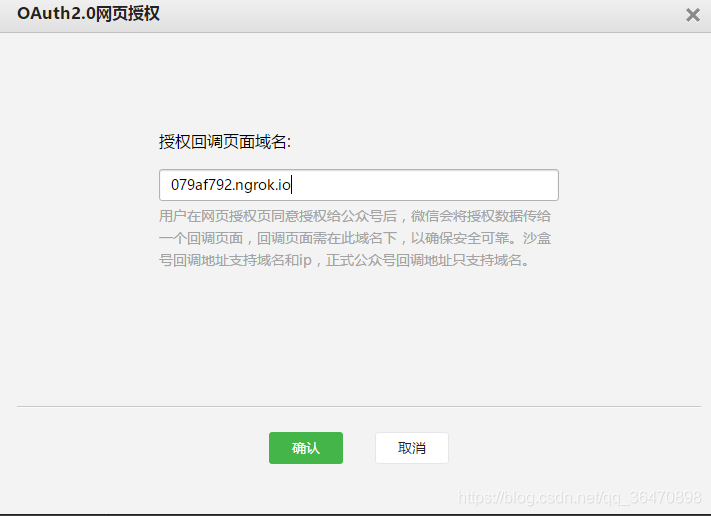
2.进入公众号开发者中心页配置授权回调域名。具体位置:接口权限-网页服务-网页账号-网页授权获取用户基本信息-修改
注意,这里仅需填写全域名(如www.qq.com、www.baidu.com),勿加 http:// 等协议头及具体的地址字段;
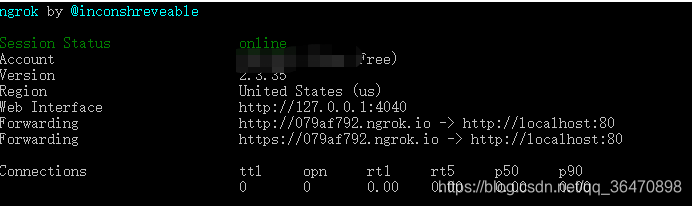
我们可以通过使用Ngrok来虚拟一个域名映射到本地开发环境,网址https://www.ngrok.cc/
这里推荐一篇Ngrok的下载使用博客:使用Ngrok进行内网穿透(Windows)
开启内网穿透如下图:
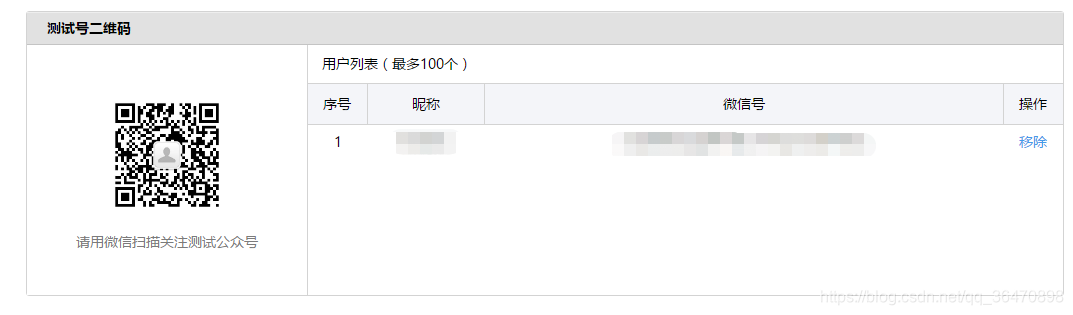
在测试平台页面也进行设置

同时拉下去进行网页授权配置
同时还需要扫一下这个二维码
授权步骤:
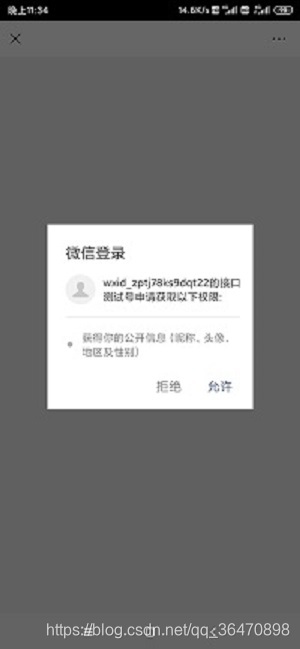
1、引导用户进入授权页面同意授权,获取code
2、通过code换取网页授权access_token(与基础支持中的access_token不同)
3、通过网页授权access_token和openid获取用户基本信息
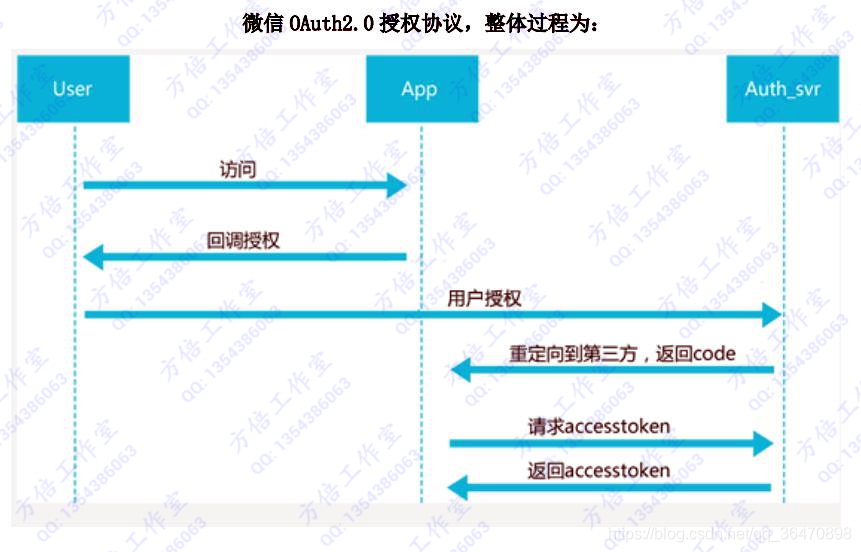
具体请参考: 微信网页授权开发文档
代码实现
先看一下项目结构:
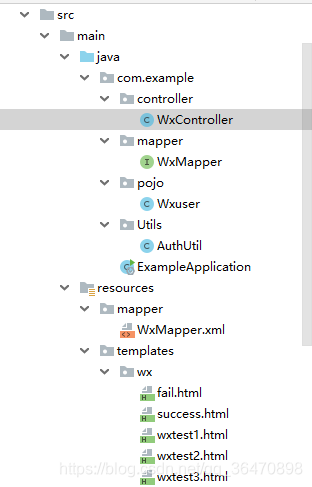
AuthUtil工具类:
public class AuthUtil {

    public static final String APPID = "wx2937ac88882f085d";
    public static final String APPSECRET = "b5fc16834dc96242a61b070679f3b7fc";
    //回调地址
    public static final String backUrl="http://079af792.ngrok.io/callBack";
    public static JSONObject doGetJson(String url) throws ClientProtocolException, IOException{
        JSONObject jsonObject = null;
        //首先初始化HttpClient对象
        DefaultHttpClient client = new DefaultHttpClient();
        //通过get方式进行提交
        HttpGet httpGet = new HttpGet(url);
        //通过HTTPclient的execute方法进行发送请求
        HttpResponse response = client.execute(httpGet);
        //从response里面拿自己想要的结果
        HttpEntity entity = response.getEntity();
        if(entity != null){
            String result = EntityUtils.toString(entity,"UTF-8");
            jsonObject = jsonObject.fromObject(result);
        }
        //把链接释放掉
        httpGet.releaseConnection();
        return jsonObject;
    }
}
1、引导用户进入授权页面同意授权,获取code
   @RequestMapping(value="wxlogin")
    public void wx(HttpServletRequest request, HttpServletResponse response) throws IOException {
        //第一步:引导用户进入授权页面同意授权,获取code
        StringBuilder builder = new StringBuilder("https://open.weixin.qq.com/connect/oauth2/authorize?appid=");
        builder.append(AuthUtil.APPID);
        builder.append("&redirect_uri=");
        builder.append(URLEncoder.encode(AuthUtil.backUrl));//开发文档要求转换
        builder.append("&response_type=code");
        builder.append("&scope=snsapi_userinfo");
        builder.append("&state=STATE#wechat_redirect");
        //授权页面地址
        //将StringBuilder转换成String
        String url=builder.toString();
        //重定向到授权页面
        response.sendRedirect(url);
    }
2、通过第一步获取的code换取网页授权access_token和openid
这一步需要在控制器中获取微信回传给我们的code,通过这个code来请求access_token,通过access_token和openid获取用户基本信息:
  @RequestMapping(value="callBack")
    public String wxcallback(@RequestParam("code") String code, Model model)throws IOException {
        System.out.println("code:" + code);
        //获取code后,请求以下链接获取access_token
        StringBuilder builder = new StringBuilder("https://api.weixin.qq.com/sns/oauth2/access_token?appid=");
        builder.append(AuthUtil.APPID);
        builder.append("&secret=");
        builder.append(AuthUtil.APPSECRET);
        builder.append("&code=");
        builder.append(code);
        builder.append("&grant_type=authorization_code");

        //通过网络请求方法来请求上面这个接口
        //将StringBuilder转换成String
        String url=builder.toString();
        JSONObject jsonObject = AuthUtil.doGetJson(url);

        System.out.println("==========================jsonObject" + jsonObject);
        //从返回的JSON数据中取出access_token和openid,拉取用户信息时用
        String token = jsonObject.getString("access_token");
        String openid = jsonObject.getString("openid");

        // 第三步:刷新access_token(如果需要)

        // 第四步:拉取用户信息(需scope为 snsapi_userinfo)
        StringBuilder builder1 = new StringBuilder("https://api.weixin.qq.com/sns/userinfo?access_token=");
        builder1.append(token);
        builder1.append("&openid=");
        builder1.append(openid);
        builder1.append("&lang=zh_CN");
        //通过网络请求方法来请求上面这个接口
        //将StringBuilder转换成String
        String infoUrl=builder1.toString();
        JSONObject userInfo = AuthUtil.doGetJson(infoUrl);

        System.out.println("userInfo=======" + userInfo);

        //第1种情况:使用微信用户信息直接登录,无需注册和绑定
//        model.addAttribute("info",userInfo);
//        return "wx/wxtest1";
//

        //第2种情况:查看数据库是否存在相对应用户
        try {
            Wxuser wxuser = new Wxuser();
            wxuser = wxMapper.findnameByopenId(openid);
            if (wxuser != null) {
                //已绑定
                model.addAttribute("info",userInfo);
                model.addAttribute("name", wxuser.getName());
                return "wx/wxtest2";

            } else {
                //未绑定
                model.addAttribute("openid", openid);
                return "wx/wxtest3";
            }
        } catch (Exception e) {
            e.printStackTrace();
        }
        return "wx/fail";   //跳转到登录失败页面
    }
数据库查询等操作是使用了mybatis
WxMapper.xml
<?xml version="1.0" encoding="UTF-8"?>
<!DOCTYPE mapper PUBLIC "-//mybatis.org//DTD Mapper 3.0//EN" "http://mybatis.org/dtd/mybatis-3-mapper.dtd">
<mapper namespace="com.example.mapper.WxMapper">
    <select id="findnameByopenId"   parameterType="String" resultType="com.example.pojo.Wxuser" >
    select name from user where openid = #{value}
  </select>
    <insert id="addWxuser" parameterType="com.example.pojo.Wxuser">
        insert into user(
       openid,name,sex
        )
        values(
        	#{openid},
			#{name},
			#{sex}
        )

    </insert>
</mapper>
@Repository
public interface WxMapper {
    public Wxuser findnameByopenId(String openid);
    public void  addWxuser(Wxuser wxuser);
}
前端显示页面是使用thymeleaf模板
wxtest1 无需验证数据库登录成功时的页面
<html lang="en" xmlns="http://www.w3.org/1999/xhtml"
      xmlns:th="http://www.thymeleaf.org">
<head>
    <meta charset="UTF-8">
    <title>Title</title>
</head>
<body>
<div>登陆成功!</div>
<div>用户昵称:<p th:text="${info.nickname}"></p>}</div>
<div>用户头像:<img  width="100" th:src="${info.headimgurl }"></div>
</body>
</html>
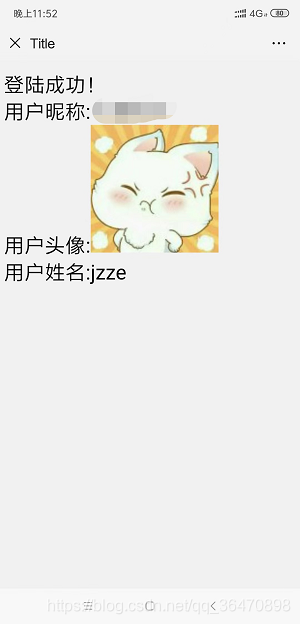
wxtest2 验证成功后跳转的页面
<html lang="en" xmlns="http://www.w3.org/1999/xhtml"
      xmlns:th="http://www.thymeleaf.org">
<head>
    <meta charset="UTF-8">
    <title>Title</title>
</head>
<body>
<div>登陆成功!</div>
<div>用户昵称:<font th:text="${info.nickname}"></font></div>
<div>用户头像:<img  width="100" th:src="${info.headimgurl }"></div>
<div>用户姓名:<font  width="100" th:text="${name}"/></div>
</body>
</html>
wxtest3 验证失败进行绑定跳转的页面
<html lang="en" xmlns="http://www.w3.org/1999/xhtml"
      xmlns:th="http://www.thymeleaf.org">
<head>
    <meta charset="UTF-8">
    <title>Title</title>
</head>
<body>

<form action="/addwxuser" method="post">
   姓名: <input type="text" name="name" />
   性别:  <input type="text" name="sex" />
    <input type="hidden" name="openid" th:value="${openid }" />
    <input type="submit" value="提交并绑定" />
</form>
</body>
</html>
整个WxController
@Controller
public class WxController {
    @Autowired
   private WxMapper wxMapper;

    @RequestMapping(value="wxlogin")
    public void wx(HttpServletRequest request, HttpServletResponse response) throws IOException {
        //第一步:引导用户进入授权页面同意授权,获取code
        StringBuilder builder = new StringBuilder("https://open.weixin.qq.com/connect/oauth2/authorize?appid=");
        builder.append(AuthUtil.APPID);
        builder.append("&redirect_uri=");
        builder.append(URLEncoder.encode(AuthUtil.backUrl));//开发文档要求转换
        builder.append("&response_type=code");
        builder.append("&scope=snsapi_userinfo");
        builder.append("&state=STATE#wechat_redirect");
        //授权页面地址
        //将StringBuilder转换成String
        String url=builder.toString();
        //重定向到授权页面
        response.sendRedirect(url);
    }


    @RequestMapping(value="callBack")
    public String wxcallback(@RequestParam("code") String code, Model model)throws IOException {
        System.out.println("code:" + code);
        //获取code后,请求以下链接获取access_token
        StringBuilder builder = new StringBuilder("https://api.weixin.qq.com/sns/oauth2/access_token?appid=");
        builder.append(AuthUtil.APPID);
        builder.append("&secret=");
        builder.append(AuthUtil.APPSECRET);
        builder.append("&code=");
        builder.append(code);
        builder.append("&grant_type=authorization_code");

        //通过网络请求方法来请求上面这个接口
        //将StringBuilder转换成String
        String url=builder.toString();
        JSONObject jsonObject = AuthUtil.doGetJson(url);

        System.out.println("==========================jsonObject" + jsonObject);
        //从返回的JSON数据中取出access_token和openid,拉取用户信息时用
        String token = jsonObject.getString("access_token");
        String openid = jsonObject.getString("openid");

        // 第三步:刷新access_token(如果需要)

        // 第四步:拉取用户信息(需scope为 snsapi_userinfo)
        StringBuilder builder1 = new StringBuilder("https://api.weixin.qq.com/sns/userinfo?access_token=");
        builder1.append(token);
        builder1.append("&openid=");
        builder1.append(openid);
        builder1.append("&lang=zh_CN");
        //通过网络请求方法来请求上面这个接口
        //将StringBuilder转换成String
        String infoUrl=builder1.toString();
        JSONObject userInfo = AuthUtil.doGetJson(infoUrl);

        System.out.println("userInfo=======" + userInfo);

        //第1种情况:使用微信用户信息直接登录,无需注册和绑定
//        model.addAttribute("info",userInfo);
//        return "wx/wxtest1";
//

        //第2种情况:查看数据库是否存在相对应用户
        try {
            Wxuser wxuser = new Wxuser();
            wxuser = wxMapper.findnameByopenId(openid);
            if (wxuser != null) {
                //已绑定
                model.addAttribute("info",userInfo);
                model.addAttribute("name", wxuser.getName());
                return "wx/wxtest2";

            } else {
                //未绑定
                model.addAttribute("openid", openid);
                return "wx/wxtest3";
            }
        } catch (Exception e) {
            e.printStackTrace();
        }
        return "wx/fail";   //跳转到登录失败页面
    }

    @RequestMapping(value="addwxuser")
     public String addWXuser(String name,String openid,String sex){
        Wxuser wxuser = new Wxuser();
        wxuser.setName(name);
        wxuser.setOpenid(openid);
        wxuser.setSex(sex);
        wxMapper.addWxuser(wxuser);
        return "wx/success";//跳转绑定成功页面

    }
}
效果:
而实现扫二维码授权登录原理也跟这里差不多。不过需要域名和服务号。
这里推荐一篇实现二维码授权网页登录:
微信开放平台————拼接获取扫码地址
