前言
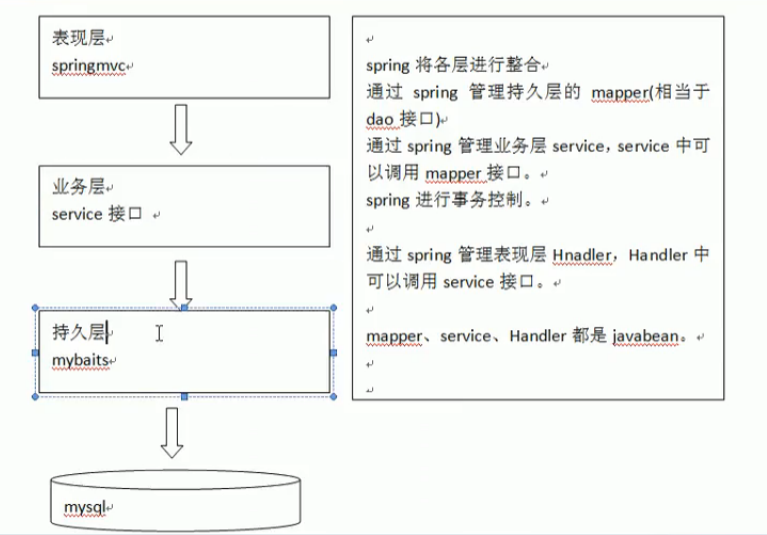
在整合之前,我们先来整理一下Spring,SpringMVC和mybatis之间的关系
三者分别可以对应到Java开发的三层架构中(表现层,持久层和业务层)
springmvc框架总体介绍
- DispatcherServlet前端控制器:用来接收request请求,进行response回应
- HandlerMapping处理器映射器:根据url来查找Handler(可以通过xml配置,也可以注解方式配置)
- HandlerAdapter处理器适配器:根据特定规则执行Handler,需要根据适配器规则编写Handler
- Handler(controller)处理器:需要自己编写,常使用注解开发方式
- viewResolver视图解析器:配置视图路径,在springmvc中使用view对象表示
- 视图(jsp页面):用来显示数据
整合思路
- 整合dao:通过spring管理持久层的mapper接口(注解方式)
- 整合service:通过spring管理service接口(配置service接口到spring中)service可以调用dao
- 整合controller:通过spring管理controller,controller可以调用service
准备环境
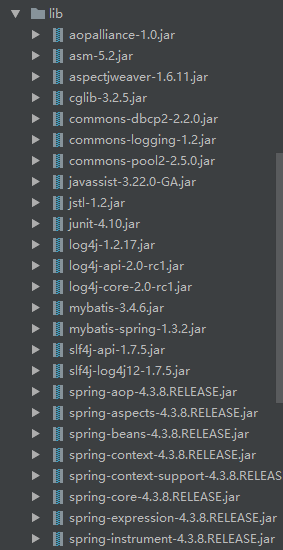
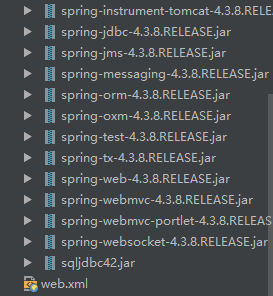
1.导入jar包
- spring的jar包
- mybatis包
- spring和mybatis的整合包
- 记录日志文件的log4j包
- dbcp数据库连接池包
- 数据库驱动(这里使用的是sqlserver的数据库驱动)
- jstl包
lib目录下的jar包
2.工程结构
整体目录如下:
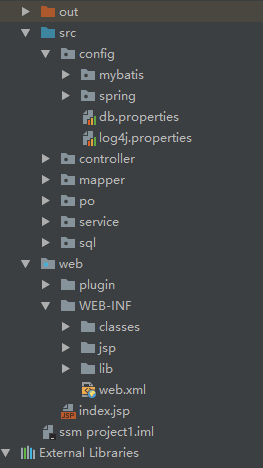
各个包的说明如下:
1.src目录下:
- config包放置mybatis,spring,dbcp和log4j的配置文件
- controller包放置充当控制器的类
- mapper和po包存放包装好的类和相应的配置文件,通过mybatis逆向工程生成
- service包负责事务处理
- sql包放置建表用的sql语句和数据
2.web目录下:
- plugin放置前端所用到的插件
- WEB-INF下除了jsp目录是存放jsp文件外,另外两个包作用应该都清楚,不再多说
整合dao层
1.配置mybatis映射文件
在/config/mybatis目录下创建mybatis映射文件:SqlMapConfig.xml
<?xml version="1.0" encoding="UTF-8"?>
<!DOCTYPE configuration
        PUBLIC "-//mybatis//DTD Config 3.0//EN"
        "http://mybatis.org/dtd/mybatis-3-config.dtd">
<configuration>
    <typeAliases>
        <!-- 单个别名的定义,type:别名映射类型,alias:别名 -->
        <!-- <typeAlias type="cn.itcast.mybatis.po.User" alias="user"/> -->
        <!-- 批量定义别名,指定包的路径,自动扫描包下的pojo,定义别名,别名默认为类名,首字母大写或小写 -->
        <package name="po"/>
    </typeAliases>

    <!-- 加载mapper映射,和spring整合之后,可以使用整合包中的mapper扫描器,此处的mappers就可以不用配置了 -->
    <!-- 但是,必须是mapper的xml配置文件和mapper的java文件在同一个包中,并且要同名 -->
    <!--<mappers>
        <mapper resource="mapper/Users.xml"/>
        <package name="mapper"/>
    </mappers>-->

</configuration>
2.配置spring和mybatis整合文件
在/config/spring目录下创建applicationContext-dao.xml
主要配置三部分:
- 数据源(dbcp连接池)
- SqlSessionFactory
- mapper扫描器
<?xml version="1.0" encoding="UTF-8"?>
<beans xmlns="http://www.springframework.org/schema/beans"
       xmlns:xsi="http://www.w3.org/2001/XMLSchema-instance" xmlns:mvc="http://www.springframework.org/schema/mvc"
       xmlns:context="http://www.springframework.org/schema/context"
       xmlns:aop="http://www.springframework.org/schema/aop" xmlns:tx="http://www.springframework.org/schema/tx"
       xsi:schemaLocation="http://www.springframework.org/schema/beans
		http://www.springframework.org/schema/beans/spring-beans.xsd
		http://www.springframework.org/schema/mvc
		http://www.springframework.org/schema/mvc/spring-mvc.xsd
		http://www.springframework.org/schema/context
		http://www.springframework.org/schema/context/spring-context.xsd
		http://www.springframework.org/schema/aop
		http://www.springframework.org/schema/aop/spring-aop.xsd
		http://www.springframework.org/schema/tx
		http://www.springframework.org/schema/tx/spring-tx.xsd ">

    <!-- 加载数据库配置文件,其中db.properties文件中key的命名要符合一定的规范 -->
    <context:property-placeholder location="classpath:config/db.properties"/>

    <!-- 配置数据库连接池 -->
    <!-- 在db.properties文件找到对应的value值 -->
    <bean id="dataSource" class="org.apache.commons.dbcp2.BasicDataSource" destroy-method="close">
        <property name="driverClassName" value="${jdbc.driverClassName}"/>
        <property name="url" value="${jdbc.url}"/>
        <property name="username" value="${jdbc.username}"/>
        <property name="password" value="${jdbc.password}"/>
        <property name="maxIdle" value="${jdbc.maxIdle}"/>
    </bean>


    <!-- 配置SqlsessionFactory,引入的是mybatis和spring整合包下的SqlsessionFactoryBean类 -->
    <bean id="sqlSessionFactory" class="org.mybatis.spring.SqlSessionFactoryBean">
        <!-- mybatis和spring整合的重要步骤:1.注入数据源 -->
        <property name="dataSource" ref="dataSource"/>
        <!-- 2.mybatis全局配置文件 -->
        <property name="configLocation" value="classpath:config/mybatis/SqlMapConfig.xml"/>
    </bean>

    <!-- 配置mapper
        MapperScannerConfigurer:mapper的扫描器,为包下边的mapper接口自动创建代理对象,
	    自动创建到spring容器中,bean的id是mapper的类名(首字母小写)
        -->
    <bean class="org.mybatis.spring.mapper.MapperScannerConfigurer">
        <!-- 配置扫描包的路径
            如果要扫描多个包,中间用半角逗号隔开
            要求:Mapper.java与Mapper.xml文件在同一目录下
            -->
        <property name="basePackage" value="mapper"/>
        <!-- 使用sqlSessionFactoryBeanName -->
        <property name="sqlSessionFactoryBeanName" value="sqlSessionFactory"/>
    </bean>
</beans>
配置的时候用到了config目录下的db.properties文件,代码如下:
# 驱动名
jdbc.driverClassName=com.microsoft.sqlserver.jdbc.SQLServerDriver
# url
jdbc.url=jdbc:sqlserver://localhost:1433;databaseName=mybatis
# 用户名
jdbc.username=mysql
# 密码
jdbc.password=123456
# 初试连接数
jdbc.initialSize=30
# 最大活跃数
jdbc.maxTotal=30
# 最大闲置数
jdbc.maxIdle=10
# 最小闲置数
jdbc.minIdle=5
3.逆向工程生成mapper和po包下的文件
通过前面所写的mybatis逆向工程生成mapper和po包下的文件,拷贝到项目中
为了方便查询,再自定义一个ItemsCustomMapper的java类和xml配置文件
mapper包下的ItemsCustomMapper.xml
<?xml version="1.0" encoding="UTF-8"?>
<!DOCTYPE mapper
        PUBLIC "-//mybatis//DTD Mapper 3.0//EN"
        "http://mybatis.org/dtd/mybatis-3-mapper.dtd">

<mapper namespace="mapper.ItemsCustomMapper">
    <!-- 定义商品查询的sql片段,
        建议以单表为单位定义查询条件
        建议将常用的查询条件都写出来
        -->
    <sql id="query_items_where">
        <!-- 使用动态sql语句,通过if判断是否满足条件,满足则进行拼接 -->
        <if test="itemCustom!=null">
            <if test="itemCustom.name!=null and itemCustom.name!=''">
                name like '%${itemCustom.name}%'
            </if>
            <if test="itemCustom.id!=null">
                and id = #{itemCustom.id}
            </if>
        </if>
    </sql>

    <!-- 商品查询
        parameterType:输入查询条件(po包下的ItemsQueryVo包装类)
        resultType建议使用拓展对象(即Items的拓展类ItemCustom)
        便于之后再添加select子查询时使用 -->
    <select id="findItemsList" parameterType="po.ItemsQueryVo" resultType="po.ItemCustom">
        select * from items
        <where>
            <include refid="query_items_where"/>
        </where>
    </select>
</mapper>
mapper包下的ItemsCustomMapper.java
package mapper;

import java.util.List;
import po.ItemCustom;
import po.ItemsQueryVo;

public interface ItemsCustomMapper {
    // 商品查询列表
    public List<ItemCustom> findItemsList(ItemsQueryVo itemsQueryVo) throws Exception;
}
其中涉及到了po包下的ItemCustom和ItemsQueryVo如下
ItemCustom
package po;

// 为了便于需求拓展,编写继承Items的ItemCustomer类
// 并且编写继承Items类的包装类ItemsQueryVo类
public class ItemCustom extends Items{
    //编写商品信息的拓展
}
ItemQueryVo
package po;

/**
 * 编写商品的包装类ItemsQueryVo
 */
public class ItemsQueryVo {
    private Items items;
    private ItemCustom itemCustom;
    public ItemCustom getItemCustom(){
        return itemCustom;
    }

    public void setItemCustom(ItemCustom itemCustom){
        this.itemCustom=itemCustom;
    }
}
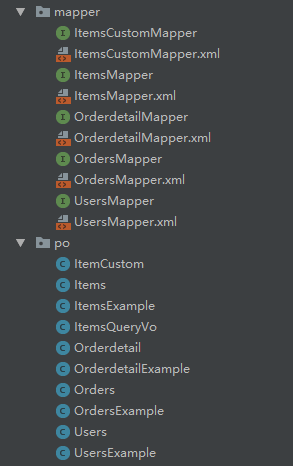
编写完成后,mapper和po包的总体结构
整合service层
1.定义ItemsService接口
在service包下编写ItemsService接口
package service;

import po.ItemCustom;
import po.ItemsQueryVo;

import java.util.List;

//定义service接口
public interface ItemsService {
    // 商品查询列表
    List<ItemCustom> findItemsList(ItemsQueryVo itemsQueryVo) throws Exception;
}
2.管理Service接口
在service/impl目录下编写ItemsServiceImpl来继承Service接口
package service.impl;

import java.util.List;
import org.springframework.beans.factory.annotation.Autowired;
import org.springframework.stereotype.Service;
import po.ItemCustom;
import mapper.ItemsCustomMapper;
import po.ItemsQueryVo;
import service.ItemsService;

/**
 * 继承ItemsService接口
 *
 * 将Service对象注入到spring的IOC容器中的两种方法:
 * 1.通过@Service方式(即在ItemsServiceImpl上标注@Service)
 * 2.通过bean标签方式
 *     在applicationContext-service.xml文件中添加如下bean语句配置
 *     <bean id="itemService" class="service.impl.ItemsServiceImp1"/>
 *
 * 两种方式可以并存
 */

@Service
public class ItemsServiceImpl implements ItemsService{
    //注入mapper,之前已经在applicationContext-dao中使用扫描器扫描mapper包,可以直接注入
    @Autowired
    private ItemsCustomMapper itemsCustomMapper;

    //商品查询列表(重写ItemsService接口中的findItemsList方法)
    @Override
    public List<ItemCustom> findItemsList(ItemsQueryVo itemsQueryVo) throws Exception{
        return itemsCustomMapper.findItemsList(itemsQueryVo);
    }
}
3.在spring中配置service
在config/spring目录下编写applicationContext-service.xml
<?xml version="1.0" encoding="UTF-8"?>
<beans xmlns="http://www.springframework.org/schema/beans"
       xmlns:xsi="http://www.w3.org/2001/XMLSchema-instance" xmlns:mvc="http://www.springframework.org/schema/mvc"
       xmlns:context="http://www.springframework.org/schema/context"
       xmlns:aop="http://www.springframework.org/schema/aop" xmlns:tx="http://www.springframework.org/schema/tx"
       xsi:schemaLocation="http://www.springframework.org/schema/beans
		http://www.springframework.org/schema/beans/spring-beans.xsd
		http://www.springframework.org/schema/mvc
		http://www.springframework.org/schema/mvc/spring-mvc.xsd
		http://www.springframework.org/schema/context
		http://www.springframework.org/schema/context/spring-context.xsd
		http://www.springframework.org/schema/aop
		http://www.springframework.org/schema/aop/spring-aop.xsd
		http://www.springframework.org/schema/tx
		http://www.springframework.org/schema/tx/spring-tx.xsd ">

    <!-- 商品配置的service -->
    <bean id="itemService" class="service.impl.ItemsServiceImp1"/>
</beans>
还需要在同一目录下编写实现事务控制的applicationContext-transaction.xml
<?xml version="1.0" encoding="UTF-8"?>
<beans xmlns="http://www.springframework.org/schema/beans"
       xmlns:xsi="http://www.w3.org/2001/XMLSchema-instance" xmlns:mvc="http://www.springframework.org/schema/mvc"
       xmlns:context="http://www.springframework.org/schema/context"
       xmlns:aop="http://www.springframework.org/schema/aop" xmlns:tx="http://www.springframework.org/schema/tx"
       xsi:schemaLocation="http://www.springframework.org/schema/beans
		http://www.springframework.org/schema/beans/spring-beans.xsd
		http://www.springframework.org/schema/mvc
		http://www.springframework.org/schema/mvc/spring-mvc.xsd
		http://www.springframework.org/schema/context
		http://www.springframework.org/schema/context/spring-context.xsd
		http://www.springframework.org/schema/aop
		http://www.springframework.org/schema/aop/spring-aop.xsd
		http://www.springframework.org/schema/tx
		http://www.springframework.org/schema/tx/spring-tx.xsd ">

    <!-- 使用声明式的控制配置,可以有效的规范代码 -->
    <!-- 事务管理器的配置 -->
    <bean id="transactionManager" class="org.springframework.jdbc.datasource.DataSourceTransactionManager">
        <!-- 这里引用的是applicationContext-dao.xml中的dataSource -->
        <property name="dataSource" ref="dataSource"/>
    </bean>

    <!-- 配置通知,通知给事务管理器 -->
    <tx:advice id="txAdvice" transaction-manager="transactionManager">
        <tx:attributes>
            <!-- 传播行为 -->
            <tx:method name="save*" propagation="REQUIRED"/>
            <tx:method name="insert*" propagation="REQUIRED"/>
            <tx:method name="delete*" propagation="REQUIRED"/>
            <tx:method name="update*" propagation="REQUIRED"/>
            <tx:method name="find*" propagation="SUPPORTS" read-only="true"/>
            <tx:method name="select*" propagation="SUPPORTS" read-only="true"/>
            <tx:method name="get*" propagation="SUPPORTS" read-only="true"/>
        </tx:attributes>
    </tx:advice>

    <!-- 配置aop,通过aop来管理通知 -->
    <!-- spring配置aop时,一般都需要定义切入点pointcut
        而execution(* service.impl.*.*(..))是切入点的表达式
        execution指表达式主体
        第一个*表示返回类型,*表示所有类型都可以
        service.impl是要拦截的包名
        第二个*表示类名,*表示所有的类
        *(..)中的*表示所有的方法,而括号中的..表示任何参数
        -->
    <aop:config>
        <aop:advisor advice-ref="txAdvice" pointcut="execution(* service.impl.*.*(..))" />
    </aop:config>

</beans>
至此,完成service整合工作
整合controller
1.配置springmvc.xml文件
在config/spring目录下编写springmvc.xml文件来配置映射器,适配器和视图解析器
<?xml version="1.0" encoding="UTF-8"?>
<beans xmlns="http://www.springframework.org/schema/beans"
       xmlns:xsi="http://www.w3.org/2001/XMLSchema-instance" xmlns:mvc="http://www.springframework.org/schema/mvc"
       xmlns:context="http://www.springframework.org/schema/context"
       xmlns:aop="http://www.springframework.org/schema/aop" xmlns:tx="http://www.springframework.org/schema/tx"
       xsi:schemaLocation="http://www.springframework.org/schema/beans
		http://www.springframework.org/schema/beans/spring-beans.xsd
		http://www.springframework.org/schema/mvc
		http://www.springframework.org/schema/mvc/spring-mvc.xsd
		http://www.springframework.org/schema/context
		http://www.springframework.org/schema/context/spring-context.xsd
		http://www.springframework.org/schema/aop
		http://www.springframework.org/schema/aop/spring-aop.xsd
		http://www.springframework.org/schema/tx
		http://www.springframework.org/schema/tx/spring-tx.xsd ">

    <!-- 使用spring组件扫描,一次性配置此包下所有handle(处理器) -->
    <context:component-scan base-package="controller"/>

    <!-- 配置注解驱动,代替注解的映射器和适配器 -->
	<!-- 在controller处理器中必须加@Controller和@RequestMapping注解 -->
    <mvc:annotation-driven></mvc:annotation-driven>

    <!-- 配置视图解析器 -->
    <!-- 要求将jstl加到classpath中
        prefix:代表请求url的前缀
        suffix:代表请求的url后缀
        设置了这两个属性值之后,在controller中进行代码开发时返回的
        modelandview对象设置的页面路径就不需要带前缀名和后缀名了 -->
    <bean class="org.springframework.web.servlet.view.InternalResourceViewResolver">
        <property name="prefix" value="/WEB-INF/jsp/"/>
        <property name="suffix" value=".jsp"/>
    </bean>

</beans>
2.配置前端控制器
在web目录下编写web.xml文件
<?xml version="1.0" encoding="UTF-8"?>
<web-app xmlns="http://xmlns.jcp.org/xml/ns/javaee"
         xmlns:xsi="http://www.w3.org/2001/XMLSchema-instance"
         xsi:schemaLocation="http://xmlns.jcp.org/xml/ns/javaee http://xmlns.jcp.org/xml/ns/javaee/web-app_3_1.xsd"
         version="3.1">

<!-- 前端控制器配置 -->
<!--
    DispatcherServlet主要用作职责调度工作,本身主要用于控制流程,主要职责如下:
    1、文件上传解析,如果请求类型是multipart将通过MultipartResolver进行文件上传解析;
    2、通过HandlerMapping,将请求映射到处理器(返回一个HandlerExecutionChain,它包括一个处理器、多个HandlerInterceptor拦截器);
    3、通过HandlerAdapter支持多种类型的处理器(HandlerExecutionChain中的处理器);
    4、通过ViewResolver解析逻辑视图名到具体视图实现;
    5、本地化解析;
    6、渲染具体的视图等;
    7、如果执行过程中遇到异常将交给HandlerExceptionResolver来解析。
    -->

    <servlet>
        <servlet-name>springmvc</servlet-name>
        <servlet-class>org.springframework.web.servlet.DispatcherServlet</servlet-class>
        <!-- 加载springmvc配置文件 -->
        <init-param>
            <param-name>contextConfigLocation</param-name>
            <!-- 配置文件的地址,如果不配置contextConfigLocation,
                 默认查找的配置文件名称是classpath下的:servlet名称+"-servlet.xml"即springmvc-servlet.xml-->
            <param-value>classpath:config/spring/springmvc.xml</param-value>
        </init-param>
    </servlet>

    <!-- 配置spring容器监听器 -->
	<!-- 监听器在这里暂时不用配置 -->
    <!--<context-param>
        <param-name>contextConfigLocation</param-name>
        <!-- 建议使用通配符方式配置,而不是使用include一个一个文件加 -->
        <param-value>/WEB-INF/classes/config/spring/applicationContext-*.xml</param-value>
    </context-param>
    <listener>
        <listener-class>org.springframework.web.context.ContextLoaderListener</listener-class>
    </listener> -->

    <!-- 映射 -->
    <servlet-mapping>
        <servlet-name>springmvc</servlet-name>
        <!-- 可以配置/  表示此工程所有请求全部由springmvc解析,此方式可以实现RESTful(表征性状态转移,总结起来应该是是一种简洁的架构风格)方式,
                        静态文件不能由springmvc解析,需要特殊处理
            可以配置*.do或者*.action,所有请求的url扩展名为.do或.action由springmvc解析,此方法常用
            不可以配置/* ,如果配置/* ,则返回的jsp也有springmvc解析,这是不对的 -->

        <url-pattern>*.action</url-pattern>
    </servlet-mapping>

</web-app>
3.编写controller
在controller包下编写ItemController.java来进行开发
package controller;

import java.util.List;
import org.springframework.beans.factory.annotation.Autowired;
import org.springframework.stereotype.Controller;
import org.springframework.web.bind.annotation.RequestMapping;
import org.springframework.web.servlet.ModelAndView;
//import org.springframework.web.portlet.ModelAndView; 之前引用成这个包了(找了半天错误..)
import po.ItemCustom;
import service.ItemsService;

@Controller
public class ItemsController {
    //注入service(通过service来调用数据库的数据)
    @Autowired
    private ItemsService itemsService;

    @RequestMapping("/queryItems")
    public ModelAndView queryItems() throws Exception{
        //调用service来查询商品列表
        List<ItemCustom> itemsList=itemsService.findItemsList(null);

        ModelAndView modelAndView=new ModelAndView();   //创建视图对象
        modelAndView.addObject("itemsList",itemsList);
        modelAndView.setViewName("itemList");  //指定用户访问的jsp页面地址,前缀和后缀已在前端控制器中配好
        return modelAndView;
    }
}
4.编写jsp文件
在WEB-INF/jsp目录下创建itemList.jsp(即根据视图解析器所设置的名字来命名)
<%--
  Created by IntelliJ IDEA.
  User: 光玉
  Date: 2018/4/3
  Time: 18:35
  To change this template use File | Settings | File Templates.
--%>
<%@ page contentType="text/html;charset=UTF-8" language="java" pageEncoding="UTF-8" %>
<%@ taglib prefix="c" uri="http://java.sun.com/jsp/jstl/core" %>
<%@ taglib prefix="fmt" uri="http://java.sun.com/jsp/jstl/fmt" %>

<!DOCTYPE html>
<head>
    <title>查询商品列表</title>
    <meta http-equiv="Content-Type" content="text/html; charset=UTF-8">
    <script type="text/javascript" src="<%= request.getContextPath()%>/plugin/layui/layui.all.js"></script>
    <link rel="stylesheet" href="<%= request.getContextPath()%>/plugin/layui/css/layui.css">
</head>
<body>
    <form class="layui-form" action="${pageContext.request.contextPath}/queryItems.action" method="post">
        <label class="layui-form-label">查询条件</label>
        <button class="layui-btn" type="submit" value="查询">查询</button>

        <table class="layui-table" lay-size="sm">
            <thead>
                <th>商品名称</th>
                <th>商品价格</th>
                <th>商品详情</th>
                <th>生产日期</th>
                <th>操作</th>
            </thead>
            <tbody>
                <c:forEach items="${itemsList}" var="item">
                    <tr>
                        <td>${item.name}</td>
                        <td>${item.price}</td>
                        <td>${item.detail}</td>
                        <td><fmt:formatDate value="${item.createtime}" pattern="yyyy-MM-dd HH:mm:ss"/> </td>
                        <!-- 修改功能暂时没用 -->
                        <td><a href="${pageContext.request.contextPath}/editItems.action?id=${item.id}">修改</a></td>
                    </tr>
                </c:forEach>
            </tbody>
        </table>
    </form>

    <script>
        layui.use('form', function () {
            var form = layui.form;
            form.render('radio');
        });
    </script>
</body>
</html>
注意:这里使用到了前端插件layui。如果不想使用layui,则使用原始的html标签进行编写
至此,完成service整合工作
加载spring容器
将mapper,service,controller加载到spring的IOC容器中
小知识:IOC(即控制反转)
- 控制
通过IOC容器控制对象的创建,控制外部资源获取(包括对象,文件…) - 反转
通过IOC容器来创建对象,而不是直接在客户端创建对象,
客户端只需通过IOC容器直接获取对象
在web.xml中添加spring容器的监听器,来加载spring容器
<!-- 配置spring容器监听器 -->
<context-param>
    <param-name>contextConfigLocation</param-name>
    <!-- 建议使用通配符方式配置,而不是使用include一个一个文件加 -->
    <param-value>/WEB-INF/classes/config/spring/applicationContext-*.xml</param-value>
</context-param>
<listener>
    <listener-class>org.springframework.web.context.ContextLoaderListener</listener-class>
</listener>
其实就是之前web.xml文件中注释掉的那一部分
另外,给出log4j.properties配置文件代码
# 用于输出日志
log4j.rootLogger=DEBUG,stdout
log4j.appender.stdout=org.apache.log4j.ConsoleAppender
log4j.appender.stdout.layout=org.apache.log4j.PatternLayout
log4j.appender.stdout.layout.ConversionPattern=%5p [%t] - %m%n
注意:如果控制台输出Please initialize the log4j system properly.的话,
请将log4j.properties放在WEB-INF/classes下便可正常显示日志
至此,全部整合工作完成
输入http://localhost:8080/spring/queryItems.action查看效果

在下篇文章ssm简单使用中,将添加一些新功能,并且给出相应源码下载地址。