在使用组件化开发的时候,我们往往会遇到组件间传递数据的问题,如果一个数据需要从组件树的顶端传递到底端,且两个组件之间有非常多的组件,那我们要通过props来一级一级传递就相当麻烦了,所以在React中,我们可以使用context来为一个组件树创建一个“全局的变量”。
context的基本使用
// 创建一个context
// light为默认值
const ThemeContext = React.createContext('light');

class App extends React.Component {
  render() {
    return (
      // 通过provider在顶部组件使用context将值传递下去
      // value为要传递的值
      <ThemeContext.Provider value="dark">
        <Toolbar />
      </ThemeContext.Provider>
    );
  }
}

function Toolbar(props) {
  return (
    <div>
      <ThemedButton />
    </div>
  );
}

class ThemedButton extends React.Component {
  // 将context指向ThemeContext
  static contextType = ThemeContext;
  render() {
    // 调用context
    return <Button theme={this.context} />;
  }
}
class Button extends React.Component{
    render(){
        return(
        <button>{this.props.theme}</button>
        )
    }
}
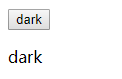
上面的例子中,我们在全局使用React.createContext创建了一个context,通过在顶部组件App使用provider来将context的值传递下去,在子组件中通过使用contextType来将当前组件的context指向自己定义的context,然后使用this.context来获取值。
API
React.createContext
const MyContext=React.createContext('default');
React.createContext是用于创建一个context对象的方法,当React的一个组件订阅了一个context后,会往上找到最近的该context的provider的值。当没有找到provider时,括号内的默认值就会被读取到。
我们将上面的代码修改一下
const ThemeContext = React.createContext('light');

class App extends React.Component {
  static contextType=ThemeContext;
  render() {
    return (
      // 通过provider在顶部组件使用context将值传递下去
      // value为要传递的值
      <ThemeContext.Provider value="dark">
        <Toolbar />
        <Button theme={this.context}/>
      </ThemeContext.Provider>
    );
  }
}
在App组件中添加一个Button组件,将App组件的contextType指向ThemeContext,将this.context赋值给Button组件的theme属性,发现页面上多了一个light的按钮
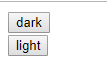
这就是因为App组件上面已经没有Provider了,所以会使用默认值"light"。
即便是传递一个undefined给一个provider,也不会触发默认值。
Context.Provider
<MyContext.Provider value="val">
	// ...
</MyContext>
Context.Provider用于设置要往下传递的Context的值,Context为我们自定义的context的名字,value为我们要传递下去的值,使用多个Context.Provider的时候,因为订阅的组件会往上找最近的Context.Provider,所以里层的Context.Provider会覆盖外层的
当Context.Provider的value发生变化时,订阅的组件也同样会发生变化
修改一下上面的例子
const ThemeContext = React.createContext('light');

class App extends React.Component {
  constructor(props){
      super(props);
      this.state={
          themeVal:"dark"
      }
      this.clickBtn=this.clickBtn.bind(this);
  }
  clickBtn(){
    this.setState({
        themeVal:"white"
    })
  }
  static contextType=ThemeContext;
  render() {
    return (
      // 通过provider在顶部组件使用context将值传递下去
      // value为要传递的值
      <ThemeContext.Provider value={this.state.themeVal}>
        <Toolbar />
        <button onClick={this.clickBtn}>btn</button>
      </ThemeContext.Provider>
    );
  }
}
这里将state里的值赋值给ThemeContext的value,增加一个按钮来修改该value值,当没有点击的时候

点击之后
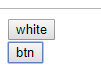
发现子组件按钮中的dark变成了white,实际上,我们可以把这个看成是订阅-发布,子组件订阅了context,当context的值发生变化时,就会将内容发布给订阅了的子组件,这些子组件就会相应地修改值
tip:context.Provider不会生成具体的元素,但是可以在react-devtools看到
class.contextType
React通过class.contextType可以将this.context指向React.createContext()创建的context对象,可以在生命周期的任何位置调用this.context获取对应的context对象
class MyClass extends React.Component {
  componentDidMount() {
    let value = this.context;
    /* 在组件挂载完成后,使用 MyContext 组件的值来执行一些有副作用的操作 */
  }
  componentDidUpdate() {
    let value = this.context;
    /* ... */
  }
  componentWillUnmount() {
    let value = this.context;
    /* ... */
  }
  render() {
    let value = this.context;
    /* 基于 MyContext 组件的值进行渲染 */
  }
}
MyClass.contextType = MyContext;
使用该API只能订阅一个context对象
Context.Consumer
<MyContext.Consumer>
	{value=>{
		return(
		// ...
		)
	}}
</MyContext.Consumer>
Context.Consumer可以获取最近的Provider的值,如果没有的话就使用默认值,value为获取的值,可以通过该值来进行渲染。
修改上面的代码
const ThemeContext = React.createContext('light');

class App extends React.Component {
  render() {
    return (
      // 通过provider在顶部组件使用context将值传递下去
      // value为要传递的值
      <ThemeContext.Provider value="dark">
        <Toolbar />
      </ThemeContext.Provider>
    );
  }
}

function Toolbar(props) {
  return (
    <div>
      <ThemedButton />
      <ThemeContext.Consumer>
          {value=>{
              return(
                  <p>{value}</p>
              )
          }}
      </ThemeContext.Consumer>
    </div>
  );
}
页面显示