关于docker的概念,我在这里就不作说明了,直接切入正题吧!
有些客户对保密性要求比较高,因此去现场部署项目的时候,是没有网络的,这样的话,就比较难受了,网上许多无网的安装教程中需要yum指令,前提得有网络才能使用yum呀。下面将会分别介绍下有网和无网情况下docker的安装。
有网
docker ce支持64位版本 Centos 7,并且要求内核版本不低于3.10(可通过uname -r 指令查看内核信息),如果版本低于这个,不用慌,yum update 即可。
1.安装依赖包: yum install -y yum-utils device-mapper-persistent-data lvm2
2.设置阿里镜像源: yum-config-manager --add-repo https://mirrors.aliyun.com/docker-ce/linux/centos/docker-ce.repo
3.安装docker: yum install docker-ce
4.启动docker: systemctl start docker
5.设置开机自启动docker: systemctl enable docker
至此有网情况下docker的安装就完成了。
无网
前提准备:下载docker二进制包,如果下载的是docker-ce这种包,会需要安装其他依赖比较麻烦,我们直接使用官方提供的二进制包进行安装,
下载链接: https://download.docker.com/linux/static/stable/ 版本自行选择
准备安装:
1.准备安装文件
(1)daemon.json
{
"insecure-registries": [
"192.168.59.128:5000",
"registry.scrcu.com:80"
],
"registry-mirrors":[
"https://m5gxo8hk.mirror.aliyuncs.com"
]
}
(2)docer.service
[Unit]
Description=Docker Application Container Engine
Documentation=https://docs.docker.com
After=network-online.target firewalld.service
Wants=network-online.target
[Service]
Type=notify
# the default is not to use systemd for cgroups because the delegate issues still
# exists and systemd currently does not support the cgroup feature set required
# for containers run by docker
ExecStart=/usr/bin/dockerd
ExecReload=/bin/kill -s HUP $MAINPID
# Having non-zero Limit*s causes performance problems due to accounting overhead
# in the kernel. We recommend using cgroups to do container-local accounting.
LimitNOFILE=infinity
LimitNPROC=infinity
LimitCORE=infinity
# Uncomment TasksMax if your systemd version supports it.
# Only systemd 226 and above support this version.
#TasksMax=infinity
TimeoutStartSec=0
# set delegate yes so that systemd does not reset the cgroups of docker containers
Delegate=yes
# kill only the docker process, not all processes in the cgroup
KillMode=process
# restart the docker process if it exits prematurely
Restart=on-failure
StartLimitBurst=3
StartLimitInterval=60s
[Install]
WantedBy=multi-user.target
(3)安装包
docker-18.09.7.tgz(这是本人使用的版本,具体版本自行选择)
2.执行安装命令
#1. unzip the docker bin.
tar zxvf docker-18.09.4.tgz
#2. move docker* into /usr/bin
cp docker/* /usr/bin/
cp docker.service /etc/systemd/system/docker.service
至此已安装成功了,接下来设置开机自启动
chmod +x /etc/systemd/system/docker.service
systemctl daemon-reload
systemctl start docker #启动Docker
systemctl enable docker.service#设置开机自启
在docker build时,若出现如下图所示的错误的话,不用担心,解决方案直接贴出。
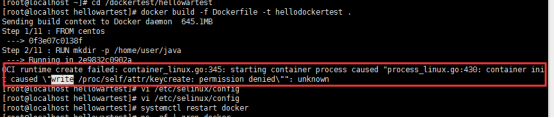
解决方案:(1)执行setenforce 0
(2)修改 vi/etc/selinux/config,将selinux里的属性改为disabled,然后重启Linux即可。
至此docker的安装教程已结束,欢迎大家留言一起探讨心得。
