目录
1.同一个Pod中的容器通信
Each Pod is assigned a unique IP address. Every container in a Pod shares the network namespace, including the IP address and network ports.
K8S最小的操作单位是Pod,由官网的这段话可以看出,同一个pod中的容器是共享网络ip地址和端口号的,通信显然没问题
在docker中,如果想在docker的网络中使用docker 的container name来进行通信,就需要通过connect命令将这些容器都加入到
同一个容器的网络中
k8s中也是这样做的,Pod里的这个容器被称之为pause container。
每个Pod里除了我们在yaml文件里定义的容器等,都会有一个默认的pause container
apiVersion: v1
kind: Pod
metadata:
  name: nginx-pod
  namespace: cppns
spec:
  containers:
  - name: nginx1
    image: nginx
    ports:
    - containerPort: 80
  - name: nginx2
    image: nginx
    ports:
    - containerPort: 80
如下图所示:

因为在一个网络内,Pod里的容器可以通过ip和容器名进行通信
k8s进入容器命令:
kubectl exec -it <podName> -c <containerName> -n <namespace> -- shell comand

2.集群内Pod之间的通信
我们都知道Pod会有独立的IP地址,这个IP地址是被Pod中所有的Container共享的
那么在多个Pod之间的通信能通过这个IP地址吗?
从两个角度考虑这个问题:一是集群中同一台机器中的Pod,二是集群中不同机器中的Pod
准备两个pod:一个Nginx,一个Busybox(运行一段小程序的应用)
 apiVersion: v1
 kind: Pod
 metadata:
   name: nginx-pod
   labels:
     app: nginx
 spec:
   containers:
   - name: nginx-container
     image: nginx
     ports:
     - containerPort: 80
---
 apiVersion: v1
 kind: Pod
 metadata:
  name: busybox
  labels:
     app: busybox
 spec:
  containers:
   - name: busybox
     image: busybox
     command: ['sh', '-c', 'echo The app is running! && sleep 3600']
运行后查看两个容器的运行情况,这里刚好两个pod都运行在同一个Node上

发现:nginx-pod的ip为192.168.80.202 busybox-pod的ip为192.168.80.203 这里的ip是由calico网络插件帮助pod生成的
在任意一个Node,都可以通过Pod的ip进行访问(这里是Master节点)

可以多试几次,就有可能分别在不同的Node上 : 注意此时在两个节点上都不能有对应类型的Pod(nginx和busybox,否则k8s会默认把Pod分配给不含有该类型Pod的节点


注意:这里在nginx容器内ping busybox的ip无法成功,不是因为网络原因,而是在容器内不支持ping命令,根本原因是因为nginx的image镜像里没有对应的layer层.(可以参考下这篇文章:docker学习笔记(二)创建自己的镜像)
结论:centos上的任一集群nginx机器都能通过pod ip访问对应的pod
pods on a node can communicate with all pods on all nodes without NAT
pods in the host network of a node can communicate with all pods on all nodes without NAT
3 集群内Service-Cluster IP
上述的Pod虽然实现了集群内部互相通信,但是Pod是不稳定的,比如通过Deployment管理Pod,随时可能对Pod进行扩缩容,这时候Pod的IP地址是变化的。这就希望能够有一个固定的IP,使得集群内能够访问。
也就是前面在架构描述的时候所提到的,能够把相同或者具有关联的Pod,打上Label,组成一个Service。由Service提供固定的IP访问Pod集群。这样一来,不管Pod怎么创建和销毁,都可以通过不变的Service IP进行访问(这点其实跟docker swarm里的service很像)
An abstract way to expose an application running on a set of Pods as a network service.
Kubernetes gives Pods their own IP addresses and a single DNS name for a set of Pods, and can load-balance across them.
(1)创建一个有3个副本的whoami的yaml(Deployment)
apiVersion: apps/v1
kind: Deployment
metadata:
  name: whoami-deployment
  labels:
    app: whoami
spec:
  replicas: 3
  selector:
    matchLabels:
      app: whoami
  template:
    metadata:
      labels:
        app: whoami
    spec:
      containers:
      - name: whoami
        image: jwilder/whoami
        ports:
        - containerPort: 8000
(2)查看pod以及service
kubectl get svc:可以发现目前并没有关于whoami的service
在集群内可以通过任一节点访问whoami的Pod

(3)创建对应的Service
kubectl expose deployment whoami-deployment
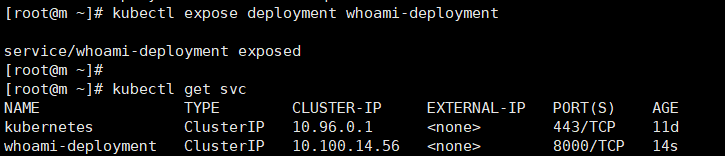
发现有一个Cluster IP类型的service,名称为whoami-deployment,IP地址为10.100.14.56
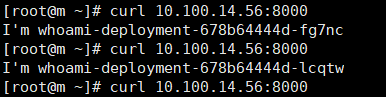
(4)通过对应的Cluster IP访问
这里的ClusterIP只能供集群内部访问
不难看出该service对三个pod实现了负载均衡
(5)具体查看一下whoami-deployment的详情信息,发现有一个Endpoints连接了具体3个Pod
[root@m ~]# kubectl describe svc whoami-deployment
扩容后,service里的Endpoints的Pod信息也会发生变化
[root@m ~]# kubectl scale deployment whoami-deployment --replicas=5
deployment.extensions/whoami-deployment scaled
[root@m ~]# kubectl describe svc whoami-deployment
Name:              whoami-deployment
Namespace:         default
Labels:            app=whoami
Annotations:       <none>
Selector:          app=whoami
Type:              ClusterIP
IP:                10.100.14.56
Port:              <unset>  8000/TCP
TargetPort:        8000/TCP
Endpoints:         192.168.190.75:8000,192.168.190.76:8000,192.168.190.77:8000 + 2 more...
Session Affinity:  None
Events:            <none>
(6)Service的创建除了前面的命令行kubectl expose的形式,还有yaml的方式
apiVersion: v1
kind: Service
metadata:
  name: my-service
spec:
  selector:
    app: MyApp
  ports:
    - protocol: TCP
      port: 80
      targetPort: 9376
  type: Cluster
4.外部服务访问集群中的Pod
4.1 Service-NodePort
Service的一种类型,可以通过NodePort的方式让外部服务访问集群的Pod
因为外部是能够访问到集群机器的物理机器IP,所以NodePort就是在集群中每台物理机器Node上暴露一个相同的IP,然后暴露一个端口将集群中的Pod映射到对应的端口
(1)创建一个whoami的yaml
apiVersion: apps/v1
kind: Deployment
metadata:
  name: whoami-deployment
  labels:
    app: whoami
spec:
  replicas: 3
  selector:
    matchLabels:
      app: whoami
  template:
    metadata:
      labels:
        app: whoami
    spec:
      containers:
      - name: whoami
        image: jwilder/whoami
        ports:
        - containerPort: 8000
(2)创建NodePort类型的service,名称为whoami-deployment
kubectl expose deployment whoami-deployment --type=NodePort

通过NodePort将容器内部的8000端口映射到了宿主机的32717端口

注意:从请求的结果可以看出,虽然集群的每个Node都开放了一个端口供外部访问service,但哪怕请求同一个ip:port,其内部也是实现了负载均衡的
结论:NodePort虽然能够实现外部访问Pod的需求,但其实不好,因为会占用了各个物理主机上的端口(3个Node就会在3台Node上各占用一个端口)
4.2.Service-LoadBalance
在Service上做端口映射 通常需要第三方云提供商支持,有约束性
4.3.Ingress
https://kubernetes.io/docs/concepts/services-networking/ingress/
An API object that manages external access to the services in a cluster, typically HTTP.
Ingress can provide load balancing, SSL termination and name-based virtual hosting.Ingress exposes HTTP and HTTPS routes from outside the cluster to services within the cluster. Traffic routing is controlled by rules defined on the Ingress resource.
简单来说,Ingress就是帮助我们访问集群内的服务
ingress包括:ingress controller和ingress resources
ingress controller:核心是一个deployment,实现方式有很多,比如nginx, Contour, Haproxy, trafik, Istio,需要编写的yaml有:Deployment, Service, ConfigMap, ServiceAccount(Auth),其中service的类型可以是NodePort或者LoadBalancer。
ingress resources:这个就是一个类型为Ingress的k8s api对象了,这部分面向开发人员,用来配置一些映射规则
Ingress就相当于一个负载均衡器,是k8s对反向代理的一个抽象。大概的工作原理类似于Nginx,可以理解成在 Ingress 里建立一个个映射规则 , Ingress Controller 通过监听 Ingress 这个api对象里的配置规则并转化成 Nginx 的配置 , 然后对外部提供服务。
之所以需要分成ingress-controller和ingress resources,我觉得是由于网关部分的功能,大部分的组件都帮我们实现了,所以ingress直接提供controller接口,让厂商去实现负载均衡等网关功能,使用方只需要关注映射配置了(相当于把Nginx里的配置拿出来在yaml里进行配置,不需要进入容器内去修改配置文件)
https://github.com/kubernetes/ingress-nginx
https://kubernetes.github.io/ingress-nginx/
(1)先定义我们要运行的Service
apiVersion: apps/v1
kind: Deployment
metadata:
  name: tomcat-deployment
  labels:
    app: tomcat
spec:
  replicas: 1
  selector:
    matchLabels:
      app: tomcat
  template:
    metadata:
      labels:
        app: tomcat
    spec:
      containers:
      - name: tomcat
        image: tomcat
        ports:
        - containerPort: 8080
---
apiVersion: v1
kind: Service
metadata:
  name: tomcat-service
spec:
  ports:
  - port: 80
    protocol: TCP
    targetPort: 8080
  selector:
    app: tomcat
(2)以Deployment方式创建Ingress Nginx Controller Pod
可以通过Service的NodePort或者HostPort方式让外界访问到,这里选择HostPort,比如指定worker01运行该Pod(给Node打标签,然后在指定标签的Node上运行)
对应的mandatory.yaml下载:https://raw.githubusercontent.com/kubernetes/ingress-nginx/master/deploy/static/mandatory.yaml
安装指导:https://github.com/kubernetes/ingress-nginx/blob/master/docs/deploy/index.md
# 确保nginx-controller运行到w1节点上
kubectl label node w1 name=ingress

# 使用HostPort方式运行,需要增加配置
hostNetwork: true
nginx-ingress-controller在w1启动成功

(3) 定义ingress规则
#ingress  访问tomcat.chenpp.com的默认路径,转发到tomcat-service的80端口
apiVersion: extensions/v1beta1
kind: Ingress
metadata:
  name: nginx-ingress
spec:
  rules:
  - host: tomcat.chenpp.com
    http:
      paths:
      - path: /
        backend:
          serviceName: tomcat-service
          servicePort: 80
在本地的hosts(C:\Windows\System32\drivers\etc)文件下添加对应的域名映射:
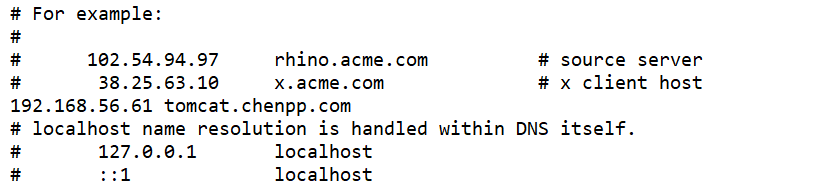
打开浏览器访问成功

如果以后想要使用Ingress网络,其实只要定义ingress和service和pod即可,前提是要保证nginx ingress controller已经配置好了。
在使用ingress的时候,如果发现当pod和nginx-ingress-controller不在一个节点上无法访问时,可以设置下iptables,设置允许端口转发: iptables -P FORWARD ACCEPT或者如下图让pod和ingress在一个节点上也可以
XXXX
    spec:
      containers:
      - name: tomcat
        image: tomcat
        ports:
        - containerPort: 8080
      nodeSelector:
        name: ingress