关于博客简介
本篇博客介绍的是一个经典的小天气入门项目——天气预报的制作过程,包含了详细的步骤:
- WXML标记和WXSS样式
- 获取经纬度信息
- 获取位置信息
- 获取实况天气
- 数据绑定
- 小程序发布
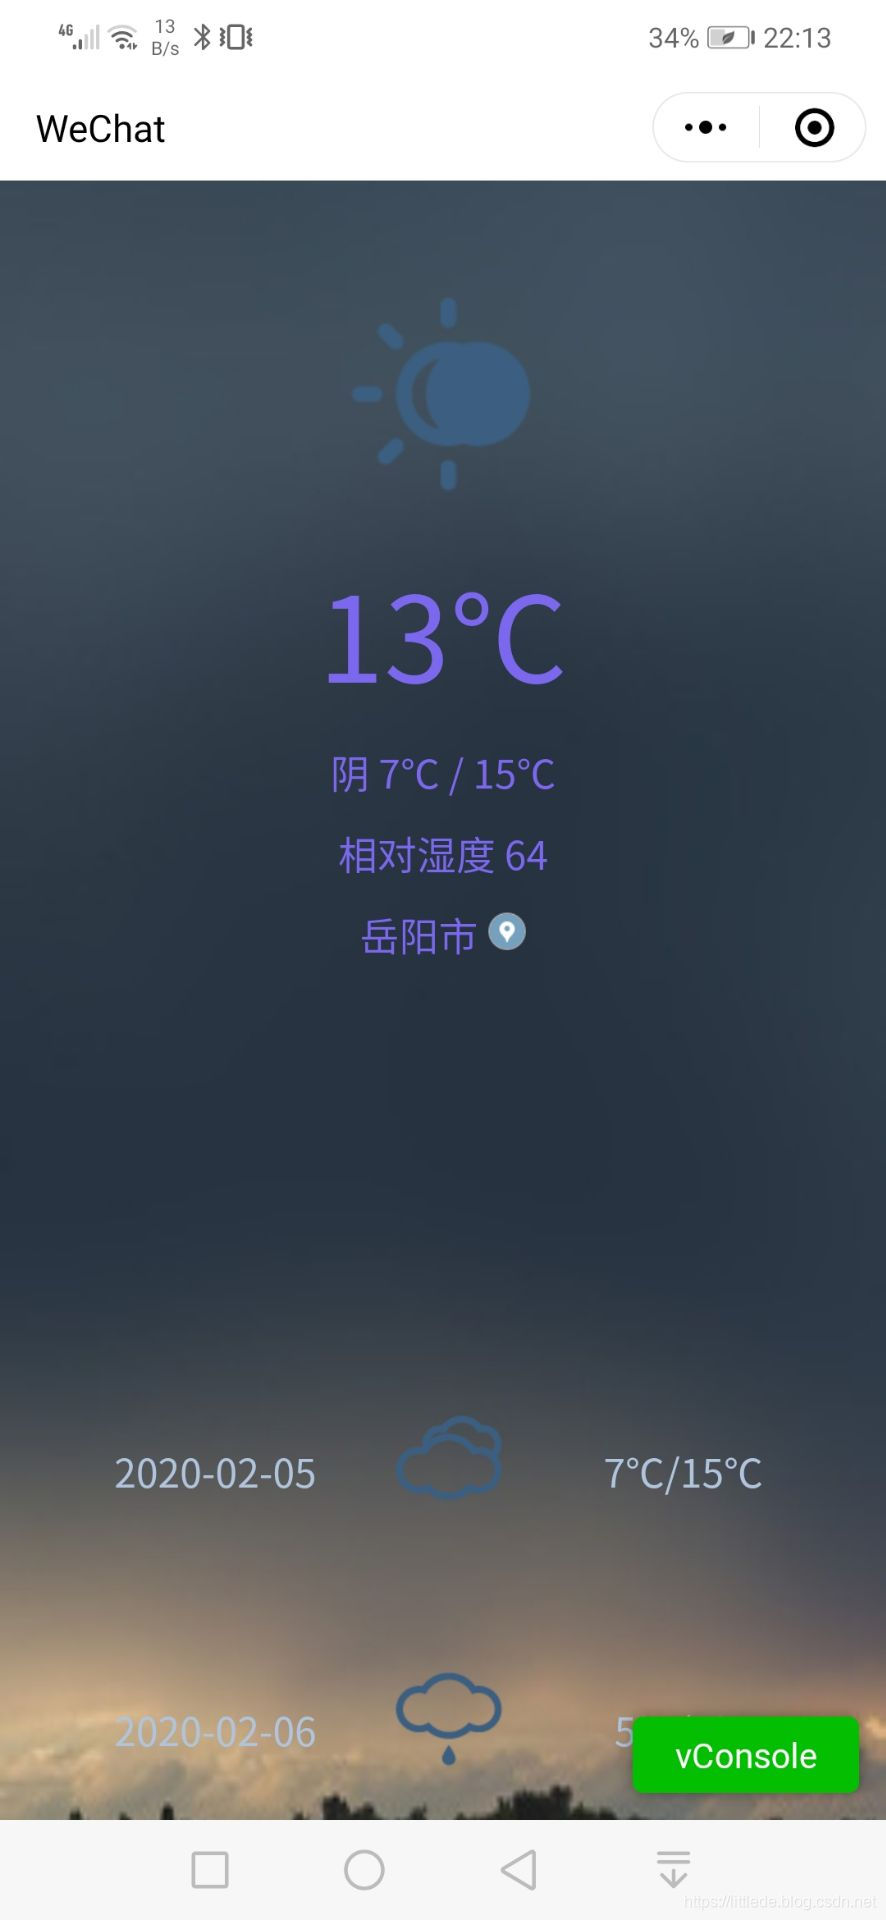
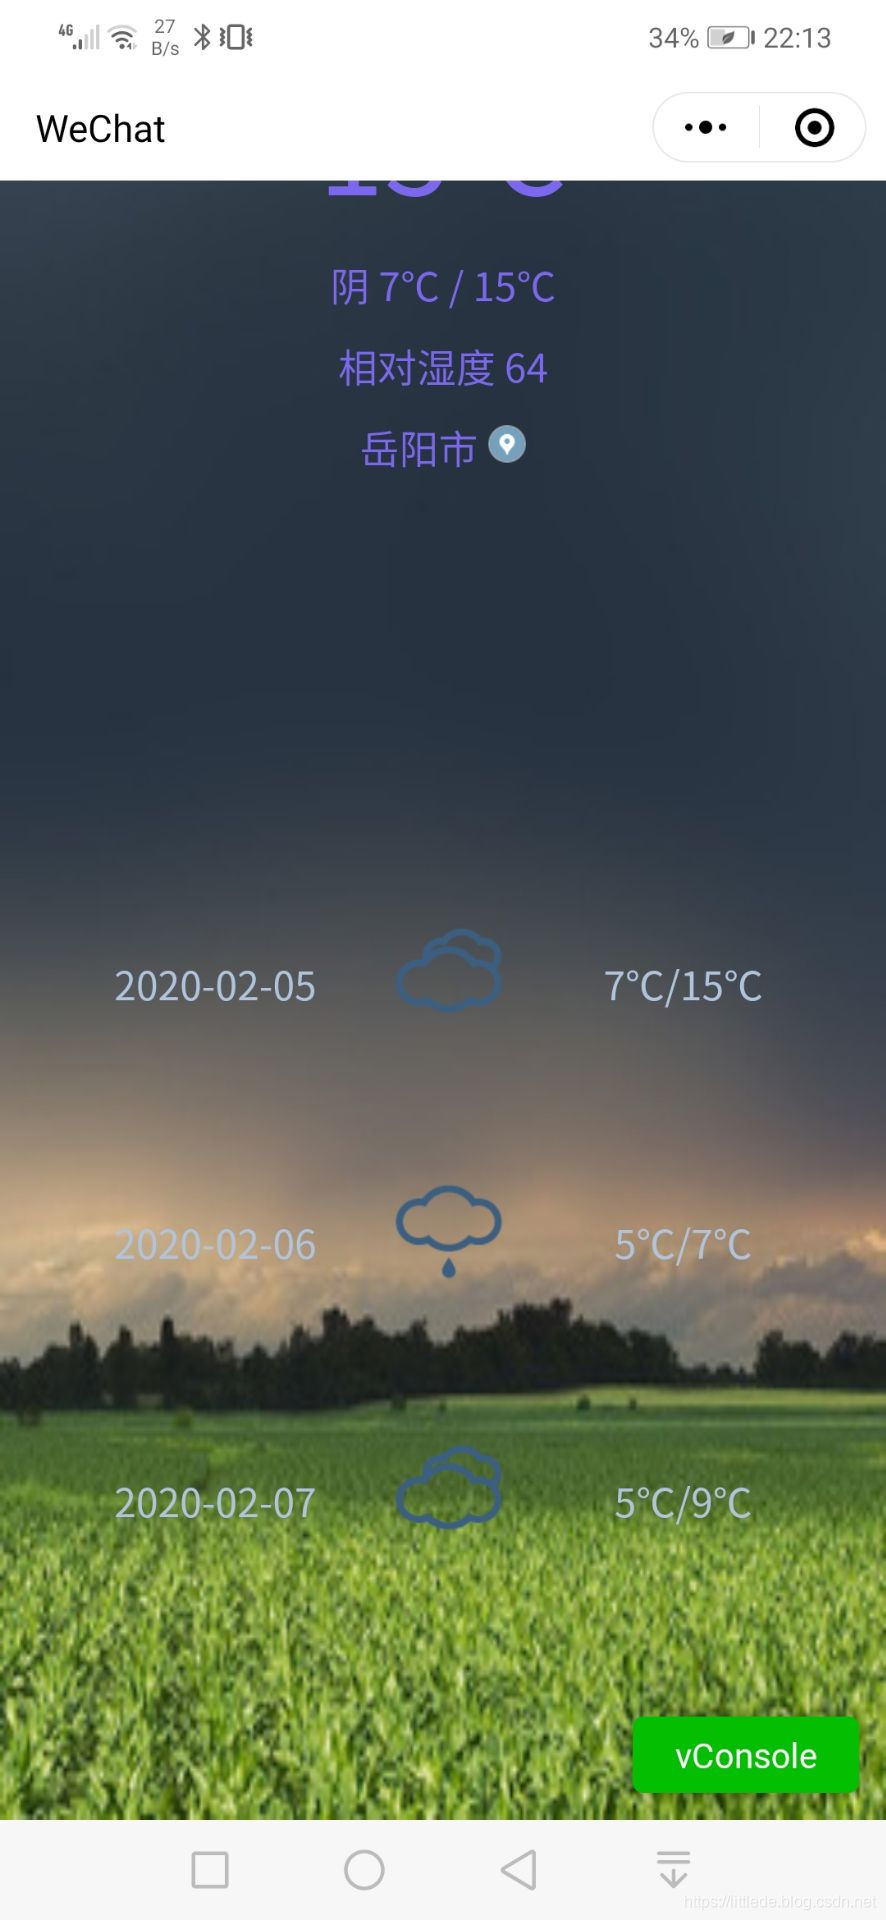
效果展示
那么话不多述,开始设计
WXML标记和WXSS样式
关于在开始编写WXML标记和WXSS样式时,我们要先给整个程序的布局做出规划,这个程序布局十分简单:
- 整个页面分为两个部分
- 实况天气上面部分
- 近三天预报的表格下面部分
- 在两个大的局部之下还有一个背景图片
这个部分我们无需赘述,给出详细代码:
<image src="../../images/bg.png" id="background" mode="scaleToFill"></image>
<view id="container">
    <view id="display">
        <image src="../../images/{{cond_code_d}}.png" mode="scaleToFill" wx:if="{{cond_code_d.length>0}}"></image>
        <view id="now">{{tmp}}℃</view>
        <view id="temp"> {{cond_txt}}  {{tmp_min}}℃ / {{tmp_max}}℃</view>
        <view id="hum">	相对湿度 {{hum}}</view>
        <view id="city">
          {{city}}
          <image src="../../images/location.png" mode="scaleToFill"></image>
        </view>
    </view>
    <view id="form">
      <view wx:for="{{daily_forecast}}" wx:for-index="i" wx:for-item="item">
          <view class="list">
            <view class="td">{{item.date}}</view>
            <view class="td">
                <image src="../../images/{{item.cond_code_d}}.png" wx:if="{{item.cond_code_d.length>0}}" mode="scaleToFill"></image>
            </view>
            <view class="td">{{item.tmp_min}}℃/{{item.tmp_max}}℃</view>
          </view>
      </view>
    </view>
</view>
局部根据自己的想法来,各种颜色可以自行设置:
/*index.wxss**/
#background{
  width: 100%;
  height: 1800rpx;
  display: block;
}
#now{
  font-size: 100rpx;
  margin-top: 20rpx;
}
#container{
  color:		#7B68EE;
  position: absolute;
  top: 80rpx;
  text-align: center;/*居中*/
  width: 100%;
}
#container image{
  width: 200rpx;
  height:200rpx;
}
#air,#weather{
  margin: 20rpx;
}
#temp,#hum,#city{
  margin-top: 20rpx;
  text-align: center;
}
#city image{
  width: 35rpx;
  height: 35rpx;
}
#form{
  color:#B0C4DE;
  width: 100%;
  height:600rpx;
  text-align: center;
  margin-top:350rpx;
  margin-left:10rpx;
}
#form image{
  width: 120rpx;
  height: 120rpx;
  margin-top:10rpx;
}
.list{
  width: 80%;
  height: 220rpx;
  margin-left:10%;
}
.td{
  display: block;
  width:33%;
  height:160rpx;
  float: left;
  line-height: 160rpx;
}
整个布局页面就设计完毕了:
获取位置和天气信息
关于天气位置信息的获取,在这两篇博客中有详细的介绍
-
获取位置信息:小程序通过API获取位置信息 微信API 百度地图API
-
获取实况天气:调用和风天气API获取天气实况
数据绑定
我们在JScript层通过API获取了地理信息以及天气实况,如何将这些数据绑定到WXML中呢?微信官方文档给出了答案:
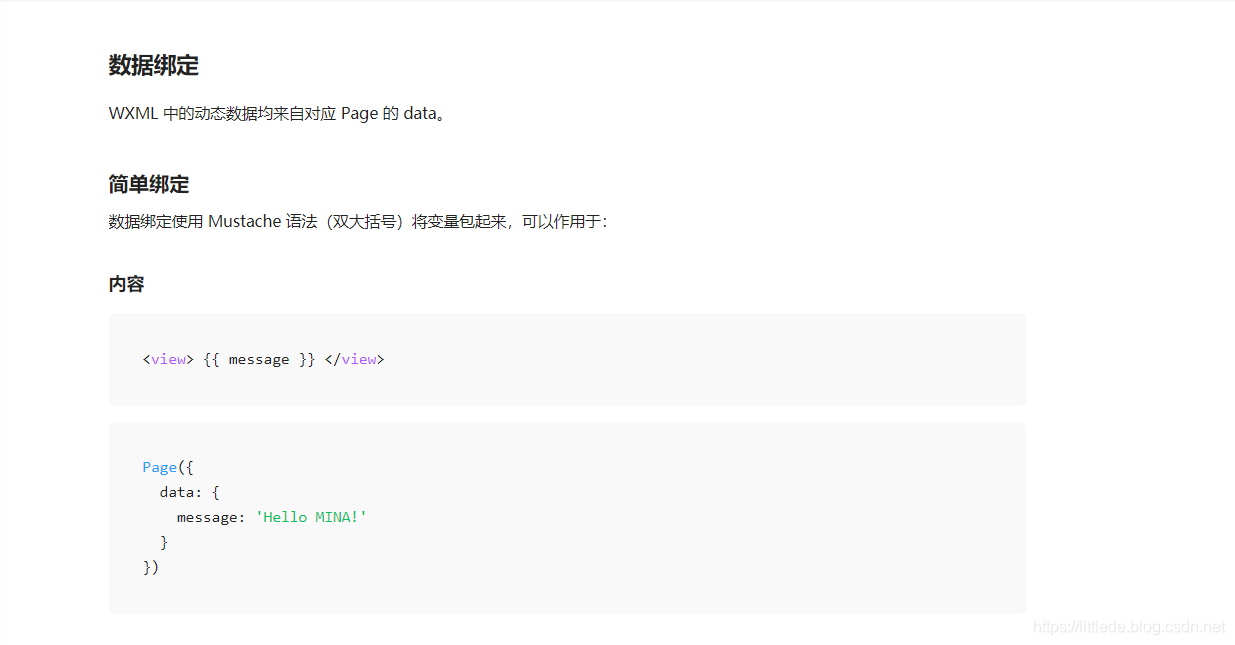
绑定方法:
- 设置 Page 的 data数据
- 通过两对花括号来绑定JScript中的数据
Jcript:
//index.js
//获取应用实例
const app = getApp()
Page({
  onLoad: function () {
    var that=this;
    console.log("load");
    that.getLocation();
  },
  //获取坐标
  getLocation:function()
  {
    var that=this
    wx.getLocation({
      type: 'wgs84',
      success(res) {
        const latitude = res.latitude
        const longitude = res.longitude
        console.log("经纬度" + latitude + ":" + longitude);
        that.getCity(latitude, longitude);
      }
    })
  },

  //将经纬度坐标转化为实际位置
  getCity: function (latitude, longitude)
  {
    var that=this
    var url= "https://api.map.baidu.com/reverse_geocoding/v3/";
    var struct={
      location: latitude+ "," +longitude,
      ak: "amH0AbevGXZMHeGGIWgEPeVcmiVhGz9k",
        output:"json"
    }
    wx.request({
      url: url,
      data: struct,
      success: function(res) {
        console.log(JSON.stringify(res));
        var city = res.data.result.addressComponent.city;//获取城市信息
        that.setData({
          city:city,
        })
        //获取天气
        that.getWeather(city);
      },
      fail: function(res) {},
      complete: function(res) {},
    })
  },

  //获取city的天气信息
  getWeather:function(city)
  {
    var that = this
    var url ="https://free-api.heweather.net/s6/weather"
    var struct={
        location:city,
        key : "8570f6b17578432d86eabe3290e5c659"
    }
    wx.request({
      url: url,
      data:struct,
      success: function(res) {
        console.log(JSON.stringify(res));
        var cond_txt = res.data.HeWeather6[0].now.cond_txt;//天气
        var cond_code_d = res.data.HeWeather6[0].now.cond_code;
        var tmp = res.data.HeWeather6[0].now.tmp;//当前温度
        var hum = res.data.HeWeather6[0].now.hum;//空气质量
        var tmp_min = res.data.HeWeather6[0].daily_forecast[0].tmp_min;//最高温度
        var tmp_max = res.data.HeWeather6[0].daily_forecast[0].tmp_max;//最低温度
        var daily_forecast = res.data.HeWeather6[0].daily_forecast;//连续三天的天气情况数组
        that.setData({
          cond_txt: cond_txt,
          cond_code_d: cond_code_d,
          tmp: tmp,
          hum:hum,
          tmp_min: tmp_min,
          tmp_max: tmp_max,
          daily_forecast: daily_forecast
        })
      },
      fail: function(res) {},
      complete: function(res) {},
    })
  }
})
关于数据绑定的错误:
在图片加载过程中,往往会遇到这样的问题:
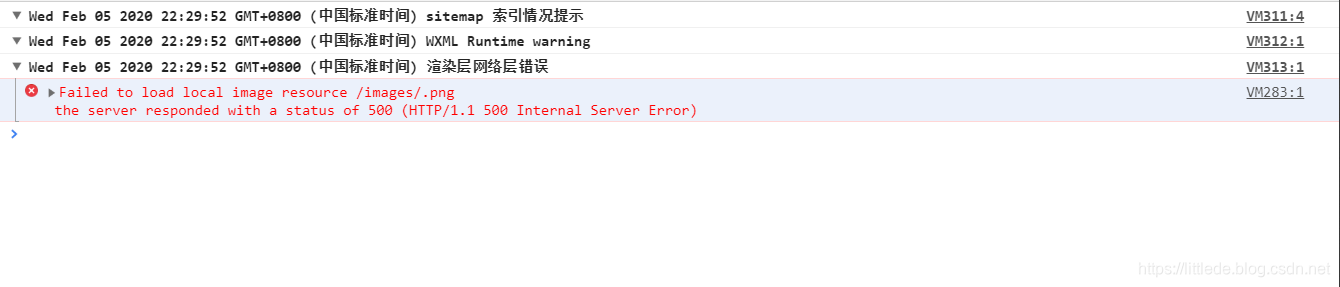
我的图片字符串为什么会是空串呢?由于这是因为初始化的时候,变量还没渲染进去导致的。
所以为了确保变量渲染完之后才初始化,我们加入这样一段代码:
wx:if="{{cond_code_d.length>0}}
//示例:
<image src="../../images/{{cond_code_d}}.png" wx:if="{{cond_code_d.length>0}}"></image>
这个时候就能确保变量渲染完之后才进行初始化了。
小程序的发布
- 上传代码
- 提交审核

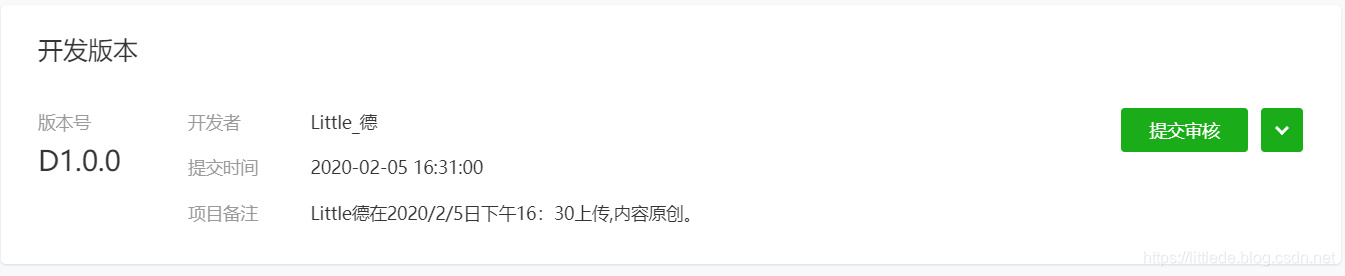
提交审核后1~7个工作日可以审核通过,通过后发布,发布后24h左右可以上线。