XML:
<beans xmlns="http://www.springframework.org/schema/beans"
       xmlns:xsi="http://www.w3.org/2001/XMLSchema-instance"
       xmlns:aop="http://www.springframework.org/schema/aop"
       xmlns:context="http://www.springframework.org/schema/context"
       xsi:schemaLocation="http://www.springframework.org/schema/beans
        http://www.springframework.org/schema/beans/spring-beans.xsd
        http://www.springframework.org/schema/aop
        http://www.springframework.org/schema/aop/spring-aop.xsd
        http://www.springframework.org/schema/context
        http://www.springframework.org/schema/context/spring-context.xsd">

    <!--配置Spring创建容器时要扫描的包-->
    <context:component-scan base-package="com.fy"></context:component-scan>
    <!-- 配置spring开启注解AOP的支持-->
    <aop:aspectj-autoproxy></aop:aspectj-autoproxy>
</beans>
package com.fy.utils;
import org.aspectj.lang.ProceedingJoinPoint;
import org.aspectj.lang.annotation.*;
import org.springframework.stereotype.Component;
@Component("logger")
@Aspect //表示当前类时一个切面类
public class logger {
@Pointcut("execution(* com.fy.service.impl.*.*(..))")
private void pt(){}
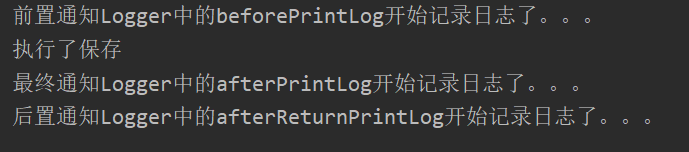
@Before("pt()")
public void beforePrintLog(){
System.out.println("前置通知Logger中的beforePrintLog开始记录日志了。。。");
}
@AfterReturning("pt()")
public void afterReturnPrintLog(){
System.out.println("后置通知Logger中的afterReturnPrintLog开始记录日志了。。。");
}
@AfterThrowing("pt()")
public void afterThrowingPrintLog(){
System.out.println("异常通知Logger中的afterThrowingPrintLog开始记录日志了。。。");
}
@After("pt()")
public void afterPrintLog(){
System.out.println("最终通知Logger中的afterPrintLog开始记录日志了。。。");
}
// @Around("pt()")
public Object aroundPrintLog(ProceedingJoinPoint pjp){
Object rtValue = null;
try{
Object[] args = pjp.getArgs();//得到方法执行所需的参数
System.out.println("前置通知");
rtValue = pjp.proceed(args);//明确调用业务层方法(切入点方法)
System.out.println("后置通知");
return rtValue;
}catch (Throwable t){
System.out.println("异常通知");
throw new RuntimeException(t);
}finally {
System.out.println("最终通知");
}
}
}
测试类:
package com.fy.test;

import com.fy.service.AccountService;
import org.springframework.context.ApplicationContext;
import org.springframework.context.support.ClassPathXmlApplicationContext;

public class AOPTest {
    public static void main(String[] args) {
         ApplicationContext ac = new ClassPathXmlApplicationContext("bean.xml");
        AccountService as = (AccountService)ac.getBean("accountService");
        as.saveAccount();
    }
}
普通通知结果:
环绕通知结果:
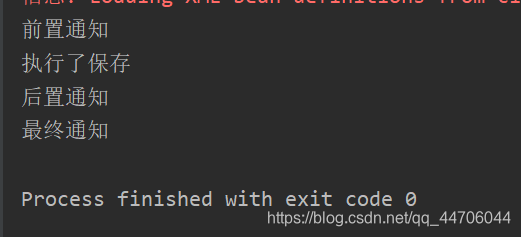
两者结果有差异是因为Spring设定了普通通知的顺序
