工作中,我们可能直接使用我们需要的工具方法,但是不曾了解其中的原理内涵,这样并不能很好的让我们理解其运行机制,在复杂项目和疑难问题时无从入手。作为开发想要提高并设计架构,一是要先学习优秀的设计理念,再就是了解其内部原理,为自己在复杂使用场景和发生疑难问题时能够透过表象看到本质。
Handler,Message,looper 和 MessageQueue 构成了安卓的消息机制,handler创建后可以通过 sendMessage 将消息加入消息队列,然后 looper不断的将消息从 MessageQueue 中取出来,回调到 Hander 的 handleMessage方法,从而实现线程的通信。
从两种情况来说,第一在UI线程创建Handler,此时我们不需要手动开启looper,因为在应用启动时,在ActivityThread的main方法中就创建了一个当前主线程的looper,并开启了消息队列,消息队列是一个无限循环,为什么无限循环不会ANR?因为可以说,应用的整个生命周期就是运行在这个消息循环中的,安卓是由事件驱动的,Looper.loop不断的接收处理事件,每一个点击触摸或者Activity每一个生命周期都是在Looper.loop的控制之下的,looper.loop一旦结束,应用程序的生命周期也就结束了。我们可以想想什么情况下会发生ANR,第一,事件没有得到处理,第二,事件正在处理,但是没有及时完成,而对事件进行处理的就是looper,所以只能说事件的处理如果阻塞会导致ANR,而不能说looper的无限循环会ANR
另一种情况就是在子线程创建Handler,此时由于这个线程中没有默认开启的消息队列,所以我们需要手动调用looper.prepare(),并通过looper.loop开启消息
主线程Looper从消息队列读取消息,当读完所有消息时,主线程阻塞。子线程往消息队列发送消息,并且往管道文件写数据,主线程即被唤醒,从管道文件读取数据,主线程被唤醒只是为了读取消息,当消息读取完毕,再次睡眠。因此loop的循环并不会对CPU性能有过多的消耗。
Handler源码部分解读:
初级程序员使用handler时有时会出现异常。Can’t create handler inside thread that has not called Looper.prepare()
为什么呢。
在core/java/android/os/Handler.java 中
 @hide
     */
    public Handler(@Nullable Callback callback, boolean async) {
        if (FIND_POTENTIAL_LEAKS) {
            final Class<? extends Handler> klass = getClass();
            if ((klass.isAnonymousClass() || klass.isMemberClass() || klass.isLocalClass()) &&
                    (klass.getModifiers() & Modifier.STATIC) == 0) {
                Log.w(TAG, "The following Handler class should be static or leaks might occur: " +
                    klass.getCanonicalName());
            }
        }

        mLooper = Looper.myLooper();
        if (mLooper == null) {
            throw new RuntimeException(
                "Can't create handler inside thread " + Thread.currentThread()
                        + " that has not called Looper.prepare()");
        }
        mQueue = mLooper.mQueue;
        mCallback = callback;
        mAsynchronous = async;
    }
在其初始化的结构体中,获取mLooper = Looper.myLooper();通过检测mLooper是否为空,为空则报上述异常。如果不为空, 再通过mQueue = mLooper.mQueue;获取消息队列,可以看到messageQuene对象是在Looper中获取的。
再往下看,Handler中提供获取主线程Handler的方法。
  /** @hide */
    @UnsupportedAppUsage
    @NonNull
    public static Handler getMain() {
        if (MAIN_THREAD_HANDLER == null) {
            MAIN_THREAD_HANDLER = new Handler(Looper.getMainLooper());
        }
        return MAIN_THREAD_HANDLER;
    }
之后,我们我们发现了我们常用的obtainMessage方法。为何建议使用obtainMessage而不是new Message()呢,从obtainMessage的注释中也可以看出来,其会从一个全局message pool中返回一个新的message,比新建一个实例更有效率。另外的比如obtainMessage(int what)和obtainMessage(int what, @Nullable Object obj)则同步设置了message.what和obj消息。
/**
     * Returns a new {@link android.os.Message Message} from the global message pool. More efficient than
     * creating and allocating new instances. The retrieved message has its handler set to this instance (Message.target == this).
     *  If you don't want that facility, just call Message.obtain() instead.
     */
    @NonNull
    public final Message obtainMessage()
    {
        return Message.obtain(this);
    }
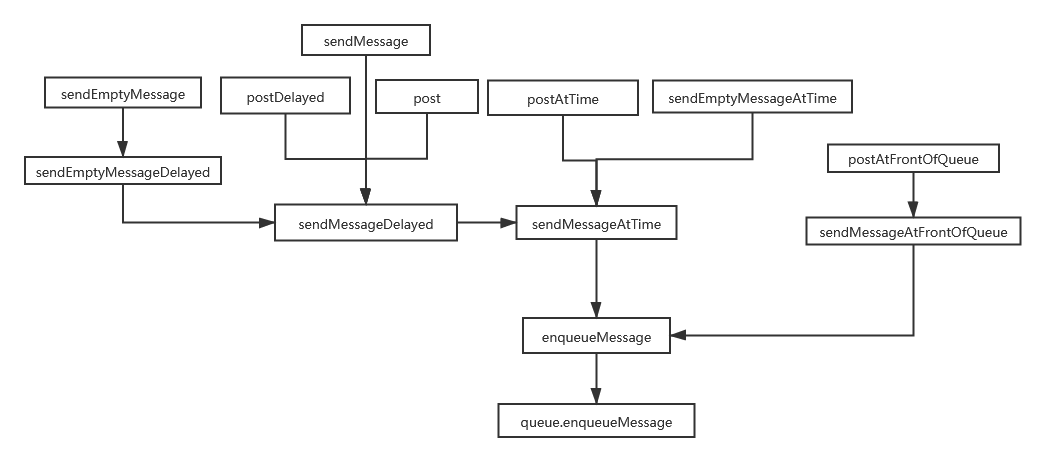
然后是各种发送消息的方法,包括发送message消息的和post(runnable)的方法。可以看到无论是send还是post还是带时间参数的,最终都走到了queue.enqueueMessage。这个messagequeue在下边的小节会解读。
Looper源码解读:
在Handler源码中我们看到其Looper是用Looper.myLooper获取的,这里looper相当于消息的传送带,不断的循环检测是否有消息发过来。
在Looper类文件的开头我们就看到了谷歌给我们的注释和一个例子,清楚的说明了普通现场默认是没有looper的,需要手动创建,然后创建的方法就是Looper.prepare(),然后下面的例子也清楚的解释了上节中报错信息如何防止,Can’t create handler inside thread that has not called Looper.prepare()。然后启动looper循环用Looper.loop(),以启动消息循环,直到loop被停止。
/**
  * Class used to run a message loop for a thread.  Threads by default do
  * not have a message loop associated with them; to create one, call
  * {@link #prepare} in the thread that is to run the loop, and then
  * {@link #loop} to have it process messages until the loop is stopped.
  *
  * <p>Most interaction with a message loop is through the
  * {@link Handler} class.
  *
  * <p>This is a typical example of the implementation of a Looper thread,
  * using the separation of {@link #prepare} and {@link #loop} to create an
  * initial Handler to communicate with the Looper.
  *
  * <pre>
  *  class LooperThread extends Thread {
  *      public Handler mHandler;
  *
  *      public void run() {
  *          Looper.prepare();
  *
  *          mHandler = new Handler() {
  *              public void handleMessage(Message msg) {
  *                  // process incoming messages here
  *              }
  *          };
  *
  *          Looper.loop();
  *      }
  *  }</pre>
  */
然后prepare的方法定义,可以看到sThreadLocal.get() != null的判断,这里可以看出,一个线程只能创建一个looper,但是如何保证的呢,代码如何实现一个线程一个looper的呢。这里就需要看代码中的sThreadLocal的get和set方法了。
/** Initialize the current thread as a looper.
      * This gives you a chance to create handlers that then reference
      * this looper, before actually starting the loop. Be sure to call
      * {@link #loop()} after calling this method, and end it by calling
      * {@link #quit()}.
      */
    public static void prepare() {
        prepare(true);
    }

    private static void prepare(boolean quitAllowed) {
        if (sThreadLocal.get() != null) {
            throw new RuntimeException("Only one Looper may be created per thread");
        }
        sThreadLocal.set(new Looper(quitAllowed));
    }
如果新建线程,第一次创建looper,当然会走到set那,然后看变量初始化
ThreadLocal sThreadLocal = new ThreadLocal()
通过网络查询我们知道,ThreadLocal类提供了线程局部 (thread-local) 变量,多线程数据不能共享。
而其set方法源码为
public void set(T value) {
//获取当前线程
        Thread t = Thread.currentThread();
//在ThreadLocal 中,以t来获取当前线程的一个ThreadLocalMap
        ThreadLocalMap map = getMap(t);
//如果ThreadLocal中有这个map,就把当前类和对应的值传进去
        if (map != null)
            map.set(this, value);
//如果没有这个map,就新建一个t线程的ThreadLocalMap,并将value值传进去
        else
            createMap(t, value);
    }
可见,是用hashmap类似的结构存储了当前线程id,和Looper的对应关系,保证一个线程一个looper, 关于ThreadLocal还有很多知识点,这里我们只简单带过,之后有时间新开一章详细解读。
然后根据上述threadlocal的set方法,这里获取这个map中此线程对应的唯一looper,这里就是Handler中获取looper的实现,保证了唯一性。
 /**
     * Return the Looper object associated with the current thread.  Returns
     * null if the calling thread is not associated with a Looper.
     */
    public static @Nullable Looper myLooper() {
        return sThreadLocal.get();
    }
之后看Looper.loop的代码,这个是消息传送带的动力来源,如果不调用这个方法,消息是没法获取到的。
/**
     * Run the message queue in this thread. Be sure to call
     * {@link #quit()} to end the loop.
     */
    public static void loop() {
        final Looper me = myLooper();
        if (me == null) {
            throw new RuntimeException("No Looper; Looper.prepare() wasn't called on this thread.");
        }
        final MessageQueue queue = me.mQueue;
        .......
         for (; ; ) {
            Message msg = queue.next(); // might block
            if (msg == null) {
                // No message indicates that the message queue is quitting.
                return;
            }
            ........
            long origWorkSource = ThreadLocalWorkSource.setUid(msg.workSourceUid);
            try {
                msg.target.dispatchMessage(msg);
                if (observer != null) {
                    observer.messageDispatched(token, msg);
                }
                dispatchEnd = needEndTime ? SystemClock.uptimeMillis() : 0;
            } catch (Exception exception) {
            .........
从代码中可以看到,一个for(; ; ),代表开始了一个无线循环,然后从queue.next中获取消息,如果为空则返回。另注意queue.next后注释了 might block, 这里是不是类似socket方法中的read,读不到消息就阻塞在这,这个在下一节中寻找答案。之后我们发现msg.target.dispatchMessage(msg);通过msg对象中的target,分发了消息出去。
最后是looper的quit方法和quitSafely方法,二者区别是,前者立即停止当前消息队列中消息的处理,后者是待现存消息队列中的消息处理完后再推出消息循环。
然后怀着激动的心情,我们来看messageQueue的源码。
MessageQueue源码解读
首先把类的注释贴下,谷歌的注释最能完整体现这个类的意义了。
/**
 * Low-level class holding the list of messages to be dispatched by a
 * {@link Looper}.  Messages are not added directly to a MessageQueue,
 * but rather through {@link Handler} objects associated with the Looper.
 *
 * <p>You can retrieve the MessageQueue for the current thread with
 * {@link Looper#myQueue() Looper.myQueue()}.
 */
public final class MessageQueue {
看源码的开始部分,没那么好看,很多和native code交互的方法和变量,
@UnsupportedAppUsage
Message mMessages;
@UnsupportedAppUsage
private final ArrayList<IdleHandler> mIdleHandlers = new ArrayList<IdleHandler>();
private SparseArray<FileDescriptorRecord> mFileDescriptorRecords;
private IdleHandler[] mPendingIdleHandlers;
private boolean mQuitting;

// Indicates whether next() is blocked waiting in pollOnce() with a non-zero timeout.
private boolean mBlocked;
.....
private native static long nativeInit();
private native static void nativeDestroy(long ptr);
@UnsupportedAppUsage
private native void nativePollOnce(long ptr, int timeoutMillis); /*non-static for callbacks*/
private native static void nativeWake(long ptr);
private native static boolean nativeIsPolling(long ptr);
private native static void nativeSetFileDescriptorEvents(long ptr, int fd, int events);
这里我们应该可以不用去太详细了解其内涵,我们需要寻找上述小节中调用到的messagequeue的方法。
 @UnsupportedAppUsage
    Message next() {
        // Return here if the message loop has already quit and been disposed.
        // This can happen if the application tries to restart a looper after quit
        // which is not supported.
        final long ptr = mPtr;
        if (ptr == 0) {
            return null;
        }

        int pendingIdleHandlerCount = -1; // -1 only during first iteration
        int nextPollTimeoutMillis = 0;
        for (;;) {
            if (nextPollTimeoutMillis != 0) {
                Binder.flushPendingCommands();
            }

            nativePollOnce(ptr, nextPollTimeoutMillis);

            synchronized (this) {
                // Try to retrieve the next message.  Return if found.
                final long now = SystemClock.uptimeMillis();
                Message prevMsg = null;
                Message msg = mMessages;
                if (msg != null && msg.target == null) {
                    // Stalled by a barrier.  Find the next asynchronous message in the queue.
                    do {
                        prevMsg = msg;
                        msg = msg.next;
                    } while (msg != null && !msg.isAsynchronous());
                }
                if (msg != null) {
                    if (now < msg.when) {
                        // Next message is not ready.  Set a timeout to wake up when it is ready.
                        nextPollTimeoutMillis = (int) Math.min(msg.when - now, Integer.MAX_VALUE);
                    } else {
                        // Got a message.
                        mBlocked = false;
                        if (prevMsg != null) {
                            prevMsg.next = msg.next;
                        } else {
                            mMessages = msg.next;
                        }
                        msg.next = null;
                        if (DEBUG) Log.v(TAG, "Returning message: " + msg);
                        msg.markInUse();
                        return msg;
                    }
                } else {
                    // No more messages.
                    nextPollTimeoutMillis = -1;
                }

                // Process the quit message now that all pending messages have been handled.
                if (mQuitting) {
                    dispose();
                    return null;
                }
...........
        }
    }
首先,在其 synchronized (this) 代码块中,保证messagequeue的队列不被多线程更改。然后获取下一条消息时,先获取当前时间final long now = SystemClock.uptimeMillis();我们可以想到前边handler中各种sendattime或者postdelay等消息也带着时间参数。
这里看到检测如果msg不为空,并且msg.target也不为空,这里又出现了target变量,什么东西,我们继续看。
if (msg != null && msg.target == null) {
                    // Stalled by a barrier.  Find the next asynchronous message in the queue.
                    do {
                        prevMsg = msg;
                        msg = msg.next;
                    } while (msg != null && !msg.isAsynchronous());
                }
一个do-while句式不断的寻找下一个消息msg.next,这里可以看出这是队列或链表的获取下一个的方法。注释显示,寻找下一个异步方法。如果msg.isAsynchronous()为真则退出循环。
之后就是now 和msg.when的比较,如果时间未到,则设一个超时时间。如果msg可以被处理,然后
if (prevMsg != null) {
prevMsg.next = msg.next;
} else {
mMessages = msg.next;
}
msg.next = null;
这里又可以看出来,如果prevMsg不为空,就把下一个的指针指向当前处理msg的下一个消息,否则,这个类的mMessage直接设置为msg.next.可以看出这里的意思是在队列中删除这个msg,相当于出队列。然后这个出队的msg就不需要next节点信息了,置空,然后msg.markInUse,字面意思是标记在使用,至此,next()方法返回了消息。
之后是enqueueMessage,在Handler中我们看到,最终消息发送是走到这个方法的,所以这个方法也比较重要。
boolean enqueueMessage(Message msg, long when) {
        if (msg.target == null) {
            throw new IllegalArgumentException("Message must have a target.");
        }
        if (msg.isInUse()) {
            throw new IllegalStateException(msg + " This message is already in use.");
        }

        synchronized (this) {
            if (mQuitting) {
                IllegalStateException e = new IllegalStateException(
                        msg.target + " sending message to a Handler on a dead thread");
                Log.w(TAG, e.getMessage(), e);
                msg.recycle();
                return false;
            }

            msg.markInUse();
            msg.when = when;
            Message p = mMessages;
            boolean needWake;
            if (p == null || when == 0 || when < p.when) {
                // New head, wake up the event queue if blocked.
                msg.next = p;
                mMessages = msg;
                needWake = mBlocked;
            } else {
                // Inserted within the middle of the queue.  Usually we don't have to wake
                // up the event queue unless there is a barrier at the head of the queue
                // and the message is the earliest asynchronous message in the queue.
                needWake = mBlocked && p.target == null && msg.isAsynchronous();
                Message prev;
                for (;;) {
                    prev = p;
                    p = p.next;
                    if (p == null || when < p.when) {
                        break;
                    }
                    if (needWake && p.isAsynchronous()) {
                        needWake = false;
                    }
                }
                msg.next = p; // invariant: p == prev.next
                prev.next = msg;
            }

            // We can assume mPtr != 0 because mQuitting is false.
            if (needWake) {
                nativeWake(mPtr);
            }
        }
        return true;
    }
一开始又检测了msg.target为空,会报异常,又一次出现target,一会儿一定要找下是干啥的。
第二句就是 if (msg.isInUse()) {
throw new IllegalStateException(msg + " This message is already in use.");
}
有些同学应该出现过这个异常,即在handleMessage时,收到的消息再次发送,会报这个错误,就是因为这个标记。
然后在类的同步块中,检测是否当前线程looper在quit状态中,是的话则报异常并回收msg。
之后msg.when = when, 发送消息时传过来的时间参数放到了msg里。
然后如果当前mMessages变量为空或者延时时间为0,或者新插入的msg消息的延时时间小于当前消息的时间,则把新来的消息插入到当前消息的前面作为队列头部。
  if (p == null || when == 0 || when < p.when) {
                // New head, wake up the event queue if blocked.
                msg.next = p;
                mMessages = msg;
                needWake = mBlocked;
否则,不断的循环在队列中查找延时时间大于新插入消息延时时间的节点。然后插入到队列,这里可以看出,此队列是按时间顺序排列的队列,时间最短的在队列最底部,时间长的在尾部,然后先进先出,即延时最少的消息先处理。
prev即
				Message prev;
                for (;;) {
                    prev = p;
                    p = p.next;
                    if (p == null || when < p.when) {
                        break;
                    }
                    if (needWake && p.isAsynchronous()) {
                        needWake = false;
                    }
                }
                msg.next = p; // invariant: p == prev.next
                prev.next = msg;
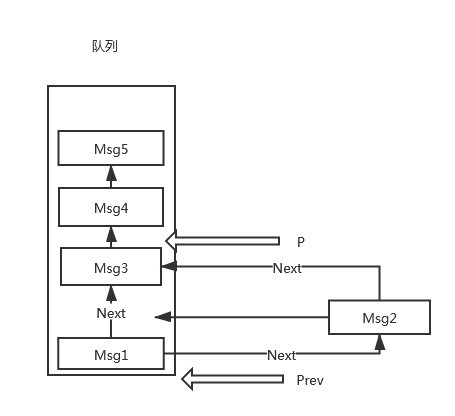 如图所示,原P指针在最下方,现由于判断条件新加入消息的when为时间2,由prev保存原p节点,p节点= p.next, 然后找到msg2消息的延时时间小于Msg3,则插入到当前位置。
Message类源码
这里看出Message类继承了Parcelable方法,是android推荐的序列化方法,用在跨进程传输数据上,常见的又aidl中的序列化。而这里message需要不同的线程间切换,打到从一个线程传到另一个线程处理的目的。
 *
 * Defines a message containing a description and arbitrary data object that can be
 * sent to a {@link Handler}.  This object contains two extra int fields and an
 * extra object field that allow you to not do allocations in many cases.
 *
 * <p class="note">While the constructor of Message is public, the best way to get
 * one of these is to call {@link #obtain Message.obtain()} or one of the
 * {@link Handler#obtainMessage Handler.obtainMessage()} methods, which will pull
 * them from a pool of recycled objects.</p>
 */
public final class Message implements Parcelable
然后我们发现了令我们疑惑的
Handler target;
然后我们寻找Handler中的代码,发现所有的obtainMessage中已经将Handler.this参数传到Message, 如果不是obtainMessage,在最终发送消息时,即如下的enqueueMessage,也已经将msg.target 赋值this,即当前Handler。
private boolean enqueueMessage(@NonNull MessageQueue queue, @NonNull Message msg,
long uptimeMillis) {
msg.target = this;
msg.workSourceUid = ThreadLocalWorkSource.getUid();
if (mAsynchronous) {
    msg.setAsynchronous(true);
}
return queue.enqueueMessage(msg, uptimeMillis);
}
其实Handler的整个源码还有待新的解读,但是目前我们能了解这些已经算是足够用了,下次有疑问的时候可以自己翻看源码,这样在我们以后的工作中,如果遇到什么异常或者其他相关问题,能够从原理上说出这种问题的原因,对我们的工作和个人水平会有很大的提高。
