前言
之前写的一篇博客简单介绍了springboot的自动装配机制,这个其实就是starter的基础,starter机制帮我们完成了项目起步所需要的相关引用,传统的spring应用需要在application.xml中配置很多bean,但是有了springboot却不需要了,因为springboot已经为我们封装了SPI机制,可自动根据相关条件依赖完成一些注入,详细请参看上一篇博客:springboot——自装配机制初探
什么是Starter
简单的命名规则
springboot中的starter帮我们自动引入了相关模块需要的jar包,一般spring-boot-starter-XXX是springboot官方提供的starter,XXX-spring-boot-starter是第三方提供的starter。例如:mybatis-spring-boot-starter则是由mybatis第三方提供的starter。spring-boot-starter-web则是由springboot官方提供的web开发的starter。下面解构一下mybatis-spring-boot-starter
starter中有什么
我们引入了mybatis-spring-boot-starter之后,发现其中并没有什么,就简简单单是一个pom文件,如下所示:

点开之后,发现其中引入的依赖如下:

这里最重要的就是mybatis-spring-boot-autoconfigure这个模块,这个模块中配置了springboot中的自动装配点,在这个模块的META-INF文件夹下,有一个spring.factories文件,这个就和上一篇博客中的内容一致了,其中的配置内容如下:

我们可以看出,这里的可以看出,MybatisAutoConfiguration就是springboot自动装载的容器类,点进去可以发现,这个类中定义了很多我们使用mybatis的类,例如SqlSessionFactory等,这里就不一一贴出来了,总的来说starter就是autoconfiguration与springboot应用之间的一个桥梁,starter封装了autoconfigure模块,真正要用到指定模块的时候直接引入starter时即可,springboot就可以动态注入autoconfigure中的XXXAutoConfiguration的容器类。可以用如下图来表示

一个简单的starter实例
下面简单手写一个starter实例,需求:根据导入不同的jar包,进行不同的数据格式化操作,如果引入了JSON的数据包,则对传入的数据进行JSON格式化,如果没有引入JSON包,则直接返回String类型。
1、新建一个springboot项目。
整个项目结构如下:
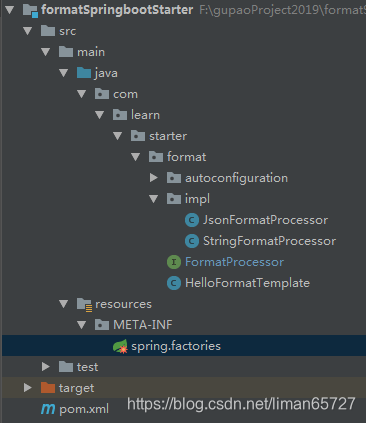
这里为了简单,并没有将autoconfiguration独立出去,这里就简单用一个文件夹来表示了。
2、在项目中定义一个格式转换的接口,并新增两种不同的实现:
package com.learn.starter.format;

/**
 * autor:liman
 * createtime:2019/9/29
 * comment:
 */
public interface FormatProcessor {

    <T> String format(T Obj);

}
JsonFormatProcessor的实现
/**
 * autor:liman
 * createtime:2019/9/29
 * comment:
 */
public class JsonFormatProcessor implements FormatProcessor {
    public <T> String format(T Obj) {
        return "json format result:"+JSON.toJSONString(Obj);
    }
}
StringFormatProcessor的实现
/**
 * autor:liman
 * createtime:2019/9/29
 * comment:
 */
public class StringFormatProcessor implements FormatProcessor {
    public <T> String format(T Obj) {
        return "String format result:"+Objects.toString(Obj);
    }
}
定义template进行格式转化。
/**
 * autor:liman
 * createtime:2019/9/29
 * comment:
 */
public class HelloFormatTemplate {

    private FormatProcessor formatProcessor;

    public HelloFormatTemplate(FormatProcessor formatProcessor) {
        this.formatProcessor = formatProcessor;
    }

    public <T> String doFormat(T obj){
        StringBuilder stringBuilder = new StringBuilder();
        stringBuilder.append("Execute format : ").append("<br/>");
        stringBuilder.append("Obj format result :").append(formatProcessor.format(obj)).append("<br/>");
        return stringBuilder.toString();
    }
}
3、进行容器的包装
定义一个configuration容器,封装根据条件注入的功能。
/**
 * autor:liman
 * createtime:2019/9/29
 * comment:
 * 通常情况下,formatAutoConfiguration在一般的项目中是单独的模块存在。
 * 这里为了简单,就使用一个文件夹
 */
@Configuration
public class FormatAutoConfiguration {

    //如果没有引入JSON的装换包,则使用默认的StringFormat
    @ConditionalOnMissingClass("com.alibaba.fastjson.JSON")
    @Bean
    @Primary//默认的实现
    public FormatProcessor stringFormat(){
        return new StringFormatProcessor();
    }

    //如果引入了JSON的转换包,则用JSON数据格式转换
    @ConditionalOnClass(name="com.alibaba.fastjson.JSON")
    @Bean
    public FormatProcessor jsonFormat(){
        return new JsonFormatProcessor();
    }
}
但是还需要封装springboot的扩展点,
@Import(FormatAutoConfiguration.class)//引入之前的容器配置
@Configuration
public class HelloAutoConfiguration {

    @Bean
    public HelloFormatTemplate helloFormatTemplate(FormatProcessor formatProcessor){
        return new HelloFormatTemplate(formatProcessor);
    }

}
配置完成之后还需要在resource目录下建立META-INF文件夹,并在这个文件夹下建立spring.factories文件,在spring.factories文件中指定该容器配置类,这就和上一篇博客中的内容一致了。
org.springframework.boot.autoconfigure.EnableAutoConfiguration=\
 com.learn.starter.format.autoconfiguration.HelloAutoConfiguration
这样在springboot项目中会自动引入HelloAutoConfiguration的容器。
4、新建另一个springboot项目
在pom.xml中引入之前编写的starter
如下所示:
<dependency>
    <groupId>com.liman</groupId>
    <artifactId>format-spring-boot-starter</artifactId>
    <version>1.0-SNAPSHOT</version>
</dependency>
用于进行测试,写一个简单的controller
/**
* autor:liman
* createtime:2019/9/29
* comment:
*
*/
@RestController
public class HelloController {
@Autowired
private HelloFormatTemplate helloFormatTemplate;
@RequestMapping("/hello")
public String helloTemplate(){
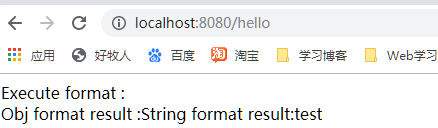
return helloFormatTemplate.doFormat("test");
}
}启动项目之后浏览器中输入localhost:8080/hello如下所示:
之后引入JSON的依赖包之后,可以看到如下输出

这个时候已经是JSON的格式转换方式了。
springboot中多个数据源的配置
在平时使用mybatis的过程中,我们使用mybatis的时候,只需要引入starter之后,在springboot的配置文件中就可自动引入mybatis的配置,其实这个功能也是starter提供的,核心就是@EnableConfigurationProperties和@ConfigurationProperties注解,这里先总结这两个注解的实例,然后借此实现springboot多数据源的配置。
先引入jdbc和mysql依赖
<dependency>
    <groupId>org.springframework.boot</groupId>
    <artifactId>spring-boot-starter-jdbc</artifactId>
    <version>RELEASE</version>
</dependency>

<dependency>
    <groupId>mysql</groupId>
    <artifactId>mysql-connector-java</artifactId>
    <version>8.0.15</version>
</dependency>
1、自定义配置
在starter模块中定义HelloProperties,然后通过@ConfigurationProperties指定属性名称的前缀。
/**
 * autor:liman
 * createtime:2019/9/29
 * comment:
 */
@ConfigurationProperties(prefix = SPI_HELLO_TEST_PREFIX)//指定配置的前缀
public class HelloProperties {

    public static final String SPI_HELLO_TEST_PREFIX = "hello.spi.test";

    private Map<String,Object> infos;

    private String testPropertiesConfig;

    public Map<String, Object> getInfos() {
        return infos;
    }

    public void setInfos(Map<String, Object> infos) {
        this.infos = infos;
    }

    public String getTestPropertiesConfig() {
        return testPropertiesConfig;
    }

    public void setTestPropertiesConfig(String testPropertiesConfig) {
        this.testPropertiesConfig = testPropertiesConfig;
    }
}
在AutoConfiguration中指定HelloProperties类即可
@Import(FormatAutoConfiguration.class)
@Configuration
@EnableConfigurationProperties(HelloProperties.class)//在AutoConfiguration中指定自定义的配置类HelloProperties.class即可
public class HelloAutoConfiguration {

    @Bean
    public HelloFormatTemplate helloFormatTemplate(FormatProcessor formatProcessor,HelloProperties helloProperties){
        return new HelloFormatTemplate(formatProcessor,helloProperties);
    }

}
为了有明显的测试结果,这里修改了构造函数。在我们定义的另一个springboot项目中,我们可以直接在配置文件中配置如下属性
hello.spi.test.infos.name=liman
hello.spi.test.infos.lovers=zhouhuifang
hello.spi.test.testPropertiesConfig=this is config
最后测试结果如下:
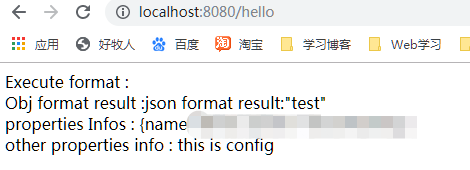
最后一行中可以看出,该配置信息被正确读取到。这些就是自定义配置的实现,基于这些,我们可以完成多数据源的配置。
2、多数据源的配置
其实这个这里也就是实现了springboot官方文档中实现的多数据源配置的实例。这里实现了可以针对不同的数据库不同的表结构实现数据的更新。如果我们不引入任何的数据库的依赖,springboot会给我们提供一个数据源的默认实现——hikari,这个我们后面在详谈。
配置文件中配置如下信息:
app.datasource.db1.url=jdbc:mysql://127.0.0.1/takeaway
app.datasource.db1.username=root
app.datasource.db1.password=root
app.datasource.db1.dirver-class-name=com.mysql.jdbc.Driver

app.datasource.db2.url=jdbc:mysql://127.0.0.1/springtx
app.datasource.db2.username=root
app.datasource.db2.password=root
app.datasource.db2.dirver-class-name=com.mysql.jdbc.Driver
针对app.datasource.db1的前缀表示针对数据源1的配置,app.datasource.db2的前缀表示针对数据源2的配置。我们需要配置一个JdbcConfiguration,文件如下:
/**
 * autor:liman
 * createtime:2019/9/29
 * comment:
 */
@Configuration
public class JdbcConfiguration {

    @Bean
    @ConfigurationProperties(prefix = "app.datasource.db1")//指定数据源1的连接配置
    public DataSourceProperties db1DatasourceProperties(){
        return new DataSourceProperties();
    }

    @Bean
    @ConfigurationProperties(prefix = "app.datasource.db2")//指定数据源2的连接配置
    public DataSourceProperties db2DataSourceProperties(){
        return new DataSourceProperties();
    }

    @Bean//数据源1
    public DataSource db1DataSource(){
        return db1DatasourceProperties().initializeDataSourceBuilder().build();
    }

    @Bean//数据源2
    public DataSource db2DataSource(){
        return db2DataSourceProperties().initializeDataSourceBuilder().build();
    }

    //针对不同的数据源配置成不同的JdbcTemplate
    @Bean
    public JdbcTemplate db1JdbcTemplate(){
        return new JdbcTemplate(db1DataSource());
    }

    @Bean
    public JdbcTemplate db2JdbcTemplate(){
        return new JdbcTemplate(db2DataSource());
    }
}
在之前的controller中配置不同的service,不同的service引入不同的数据源。这个就比较简单了直接贴上代码。
DB1Service
@Service
public class DB1Service {

    @Autowired
    private JdbcTemplate db1JdbcTemplate;

    public String update(String userName){
        String sql = "INSERT INTO USER(username,openId,tel,PASSWORD) VALUES('route01Test','testdb1','testdb1','testdb1')";
        db1JdbcTemplate.update(sql);
        return "success";
    }
}
DB2Service
/**
 * autor:liman
 * createtime:2019/10/5
 * comment:
 */
@Service
public class DB2Service {

    @Autowired
    private JdbcTemplate db2JdbcTemplate;

    public String update(String userName){
        String sql = "INSERT INTO t_user(user_name,sex,note) VALUES('route02Test','1','testdb2')";
        db2JdbcTemplate.update(sql);
        return "success";
    }
}
controller中增加两个访问路径
@RequestMapping("/dbroute1")
public String dbRouteDb1(){
    return db1Service.update();
}

@RequestMapping("/dbroute2")
public String dbRouteDb2(){
    return db2Service.update();
}
但是这个时候我们直接执行发现会出现问题,因为针对JdbcTemplate的实现,我们在springboot中有两个实现,这个时候回抛出一个经典的错误。

这个意思很明显,针对JdbcTemplate有多个实现,springboot不知道注入哪一个,所以我们需要排除springboot的默认数据源实现,即我们前面提供的hikari,所以我们需要在springboot的启动类中屏蔽掉默认的数据源实现。
@SpringBootApplication(exclude = {
        DataSourceAutoConfiguration.class,
        DataSourceTransactionManagerAutoConfiguration.class
})
public class SpringStarterDemoApplication {

    public static void main(String[] args) {
        SpringApplication.run(SpringStarterDemoApplication.class, args);
    }

}
之后的结果都相当给力,这里就不贴出测试结果了。
总结
本篇博客其实比较偏实例,通过说明了starter与autoconfigure的关系,同时在此基础上实现了springboot多数据源的配置。本篇博客中所用到实例可以在这个地方下载:https://download.csdn.net/download/liman65727/11833097
