关于spring的AOP的原理及其概念就不赘述了,要用的时候面向百度,神清气爽,这里涉及了动态代理相关,在不改变原方法的情况下对方法进行增强
我对新东西的原则是:
先知道这个东西的大概,比如能简化什么,什么作用—>简单的会用这个东西—>在几次使用中有助于加深对整个顺序流程的把握—>有余力再回头看相关原理
一、新建maven项目

二、往pom.xml文件中添加依赖
打包方式为jar
添加的依赖比较简单,一个是spring框架的依赖,一个是aspectj的依赖
<?xml version="1.0" encoding="UTF-8"?>
<project xmlns="http://maven.apache.org/POM/4.0.0"
         xmlns:xsi="http://www.w3.org/2001/XMLSchema-instance"
         xsi:schemaLocation="http://maven.apache.org/POM/4.0.0 http://maven.apache.org/xsd/maven-4.0.0.xsd">
    <modelVersion>4.0.0</modelVersion>

    <groupId>com.itheima</groupId>
    <artifactId>spring_day03_AOP</artifactId>
    <version>1.0-SNAPSHOT</version>
    <packaging>jar</packaging>
    <dependencies>
    <dependency>
        <groupId>org.springframework</groupId>
            <artifactId>spring-context</artifactId>
            <version>5.0.2.RELEASE</version>
        </dependency>
        <dependency>
            <groupId>org.aspectj</groupId>
            <artifactId>aspectjweaver</artifactId>
            <version>1.8.7</version>
        </dependency>
    </dependencies>
</project>
三、编写案例需要的类
又是非常熟悉的这几个接口和类…
只不过这次多了一个Logger类来模拟打印日志
类中内容有所修改

IAccountDao接口:
public interface IAccountDao {
    void saveAccount();
    int updateAccount(Integer id);
    void deleteAccount();
}
AccountDaoImpl类:
使用注解往spring的ioc容器中添加对象
@Repository("accountDao")
public class AccountDaoImpl implements IAccountDao {
    public void saveAccount() {
        System.out.println("新建账户");
    }
    public int updateAccount(Integer id) {
        System.out.println("更新了id为:"+id+"的用户");
        return id;
    }
    public void deleteAccount() {
        System.out.println("删除了一个账户");
    }
}
IAccountService接口:
就和IAccountDao接口里的一样
public interface IAccountService {
    void saveAccount();
    int updateAccount(Integer id);
    void deleteAccount();
}
AccountServiceImpl类:
同样是通过注解让spring的ioc容器为我们创建对象
使用@Autowired注入IAccountDao对象
@Service("accountService")
public class AccountServiceImpl implements IAccountService {
    @Autowired
    private IAccountDao accountDao;

    public void saveAccount() {
        accountDao.saveAccount();
    }

    public int updateAccount(Integer id) {
        accountDao.updateAccount(id);
        return id;
    }
    public void deleteAccount() {
        accountDao.deleteAccount();
    }
}
新成员Logger类:
@Component("logger")
public class Logger {
    public void beginLog(){
        System.out.println("开始执行方法...");
    }
    public void endLog(){
        System.out.println("方法执行结束...");
    }
}
Client类:
public class Client {
    public static void main(String[] args) {
        ApplicationContext ac = new ClassPathXmlApplicationContext("bean.xml");
        IAccountService as = ac.getBean("accountService",IAccountService.class);
        as.saveAccount();
        as.updateAccount(1);
        as.deleteAccount();
    }
}
四、编写bean.xml配置文件
重点在代码的中文注释(为了观察方便去掉了注释符号)
特别注意第4点的几个通知以及常用的execution写法
<?xml version="1.0" encoding="UTF-8"?>
<beans xmlns="http://www.springframework.org/schema/beans"
       xmlns:xsi="http://www.w3.org/2001/XMLSchema-instance"
       xmlns:context="http://www.springframework.org/schema/context"
       xmlns:aop="http://www.springframework.org/schema/aop"
       xmlns:tx="http://www.springframework.org/schema/tx"
       xsi:schemaLocation="http://www.springframework.org/schema/beans
    http://www.springframework.org/schema/beans/spring-beans.xsd
    http://www.springframework.org/schema/context
    http://www.springframework.org/schema/context/spring-context.xsd
    http://www.springframework.org/schema/aop
    http://www.springframework.org/schema/aop/spring-aop.xsd
    http://www.springframework.org/schema/tx
    http://www.springframework.org/schema/tx/spring-tx.xsd">
    <context:component-scan base-package="com.itheima"></context:component-scan>

    spring中基于XML的AOP配置步骤
        1、把通知Bean也交给spring来管理
        2、使用aop:config标签表明开始aop配置
        3、使用aop:aspect标签配置切面
                id属性:是给切面提供一个唯一标识
                ref属性:是指定通知类bean的id
        4、在aop:aspect标签的内部使用对应标签来配置通知的类型
                我们现在示例是让beginLog在切入点方法之前执行,所以是前置通知
                         让endLog在切入点方法执行之后执行,所以是后置通知
                aop:before 前置通知,在执行业务代码前执行
                aop:afterRetuning 返回通知,在业务代码成功执行后执行
                aop:after  后置通知,无论代码成功执行成功与否,都会执行(类似异常处理的finally)
                sop:afterThrowing 执行业务代码时发生异常,需要做的操作(类似异常处理的catch)
                    method属性:用于指定Logger类中哪个方法是前置通知
                    pointcut属性:用于指定切入点表达式,该表达式的含义指的是对业务层中的哪些方法增强

           切入点表达式的写法:
                关键字:execution(表达式)
                表达式:
                    访问修饰符 返回值 包名.包名.包名.....包名。类名.方法名(参数列表)
                标准的表达式写法:
                    public void com.itheima.service.impl.AccountServiceImpl.saveAccount()
                访问修饰符可以省略:
                    void com.itheima.service.impl.AccountServiceImpl.saveAccount()
                返回值可以用通配符 * 表示任意返回值
                    * com.itheima.service.impl.AccountServiceImpl.saveAccount()
                包名可以使用通配符,表示任意包,但是有几级包就要写几个*.
                    包名可以使用..来表示当前包以及其子包
                        * *..AccountServiceImpl.saveAccount()
                类名和方法名都可以使用*来使用通配
                        * *..*.*()
                参数列表:
                    可以直接写基本数据类型
                    引用数据类型要使用全限定类名,如Integer为java.lang。Integer
                    任意数据类型(包括无参)
                        使用(..)
                全通配写法:
                    * *..*.*(..)
                实际开发中切入点表达式的通常写法:
                    * com.itheima.service.impl.*.*(..)

    <aop:config>
        <aop:aspect id="log" ref="logger">
            <aop:before method="beginLog" pointcut="execution(* *..AccountServiceImpl.saveAccount())"></aop:before>
            <aop:after method="endLog" pointcut="execution(* *..AccountServiceImpl.saveAccount())"></aop:after>
        </aop:aspect>
    </aop:config>
</beans>
在这里还有一个东西,我们可以通过引用来简化我们的pointcut后面这一堆很长的重复很多的东西,来变成一个很短可读性也比较好的东西
使用aop:pointcut
id用来指定唯一标识,expression填写的是具体的表达式 也就是原来的pointcut里的内容

五、运行Client.main()
可以看到在新建账户的开始和结束分别执行了beginLog和endLog方法

环绕通知:
将这块环绕通知和上面四个通知分开,是因为这不是一个单独的通知,而是将上面四个通知的综合
Spring框架为我们提供了一个接口,proceedingJoinPoint.该接口有一个方法proceed()此方法就相当于明确调用切入点方法.
该接口可以作为环绕通知的方法参数,在程序执行时,Spring框架会为我们提供该接口的实现类供我们使用
Spring中的环绕通知:
它是spring框架为我们提供的一种可以在代码中手动控制增强方法何时执行的方式
可能看上面云里雾里的,看代码就很容易清楚是怎么一回事啦!
1、在Logger类中添加方法arroundLogger
注意这里一定要使用返回值,具体下面会说
public Object arroundLogger(ProceedingJoinPoint pdj){
        Object rtValue = null;
        try {
            Object args[] = pdj.getArgs();
            System.out.println("前置方法执行");
            rtValue=pdj.proceed(args);
            System.out.println("后置方法执行");
        } catch (Throwable throwable) {
            System.out.println("异常方法执行");
            throwable.printStackTrace();
        }finally {
            System.out.println("最终方法执行");
        }
        return rtValue;
    }
2、bean.xml
<aop:config>
        <aop:aspect id="log" ref="logger">
            <aop:around method="arroundLogger" pointcut="execution(* *..AccountServiceImpl.*(..))"></aop:around>
        </aop:aspect>
    </aop:config>
3、Client.main
public class Client {
    public static void main(String[] args) {
        ApplicationContext ac = new ClassPathXmlApplicationContext("bean.xml");
        IAccountService as = ac.getBean("accountService",IAccountService.class);
        as.saveAccount();
        as.updateAccount(1);
        as.deleteAccount();
    }
}
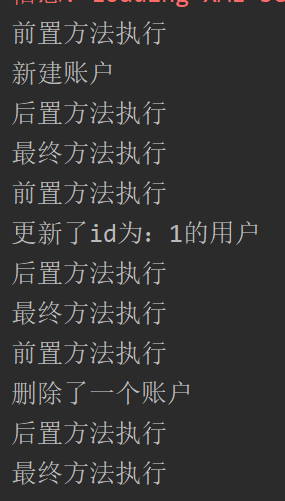
4、执行结果

可以看到对每个方法都执行了增强,所以这里可以看到,我们可以直接在一个方法中对一个方法直接编写各种通知,而不用通过编写4个方法以及4个xml来实现4个通知方式
上面提到,如果arroundLogger方法无返回值会怎么样呢?
返回值类型为void 方法内无return

运行报错:
前置方法执行
新建账户
后置方法执行
最终方法执行
前置方法执行
更新了id为:1的用户
后置方法执行
最终方法执行
Exception in thread "main" org.springframework.aop.AopInvocationException: Null return value from advice does not match primitive return type for: public abstract int com.itheima.service.IAccountService.updateAccount(java.lang.Integer)
	at org.springframework.aop.framework.JdkDynamicAopProxy.invoke(JdkDynamicAopProxy.java:226)
	at com.sun.proxy.$Proxy12.updateAccount(Unknown Source)
	at com.itheima.ui.Client.main(Client.java:12)
可以看到,执行了update方法之后,delete方法没有执行,并产生了一个异常
看一下报错信息:Null return value from advice does not match primitive return type for: public abstract int com.itheima.service.IAccountService.updateAccount(java.lang.Integer)
没有收到通知的返回值类型:位置为updateAccount的int类型没有返回
这里我们可以看出来,由于我们的updateAccount方法有一个int类型的返回值,但是方法执行完之后,我们并没有返回这个该返回的int,所以我们应当返回一个object类型,用于返回任何可能出现的类型的参数(此处为int,但是可能有别的返回String或者类对象的方法),所以使用Object接收并返回。
根据这个例子,再回头看spring的环绕通知:它是spring框架为我们提供的一种可以在代码中手动控制增强方法何时执行的方式,加深了对这句话的理解。
踩坑记录

刚开始我的pointcut是这么写的,意为调用service业务层的saveAccountImpl时切入,结果发现执行结果是这样的:

经过思考后,发现,由于pointcut写错,导致同时也执行了dao包下的AccountDaoImpl实现类里面的saveAccount方法,导致在执行方法之前调用了两次Logger
所以我们在写pointcut的时候,由于我们的dao接口的实现类和service接口的实现类的方法是一模一样的,所以我们一定要指明清楚包名,而同一个包下的类名是不同的,此时可以用*通配符
要注意上面代码内的中文注释提到的推荐pointcut写法,使用
* 包...包.包.*.方法名(..)
