对于图片服务器,常常需要和nginx一起使用,利用nginx可以反向代理的特点,所以在搭建vsftpd服务器之前需要在linux上安装nginx,安装参考之前的文章nginx的入门安装
vsftpd服务器的安装
使用yum安装,命令如下
yum -y install vsftpd
安装完成后,有/etc/vsftpd/vsftpd.conf 文件,是vsftp的配置文件。
我们先来设置用户名和密码,后面再来修改这个配置文件
设置ftp用户名
此用户名就是用来登录ftp服务器用的。
这样一个用户建完,可以用这个登录,记得用普通登录不要用匿名了。登录后默认的路径为 /home/ftpuser.
useradd ftpuser
用户名设置完成之后,nginx的默认安装目录是在/usr/local/nginx/sbin/nginx,需要先来对nginx配置一下,修改nginx.conf文件
进入目录
/usr/local/nginx/nginx/conf
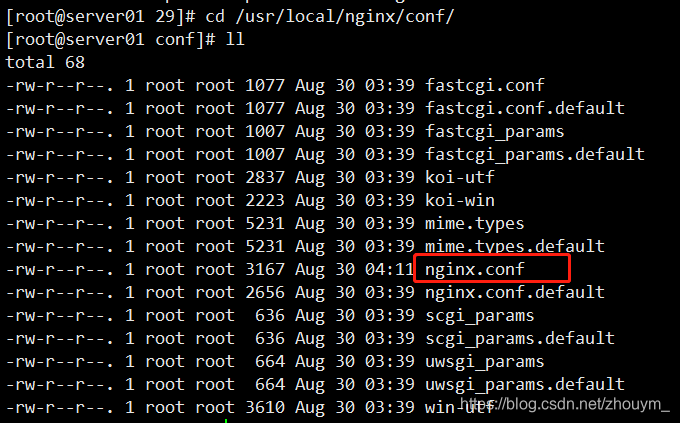
配置文件如下
#user  nobody;
worker_processes  1;

#error_log  logs/error.log;
#error_log  logs/error.log  notice;
#error_log  logs/error.log  info;

#pid        logs/nginx.pid;


events {
    worker_connections  1024;
}


http {
    include       mime.types;
    default_type  application/octet-stream;

    #log_format  main  '$remote_addr - $remote_user [$time_local] "$request" '
    #                  '$status $body_bytes_sent "$http_referer" '
    #                  '"$http_user_agent" "$http_x_forwarded_for"';

    #access_log  logs/access.log  main;

    sendfile        on;
    #tcp_nopush     on;

    #keepalive_timeout  0;
    keepalive_timeout  65;

    #gzip  on;

	#设置上游服务器,端口是要没有被占用的
    upstream zhouym{
       server 127.0.0.1:8080 weight=1;  #weight表示权重,谁的权重大则表示请求被分配的机会越大
       server 127.0.0.1:8081 weight=2;
    }
    server {
        listen       80;
        server_name  localhost;

        #charset koi8-r;

        #access_log  logs/host.access.log  main;

		#/表示拦截所有的请求
        location / {
            proxy_pass http://zhouym; #这里的名字就是上面设置的上游服务器的的名字
            proxy_redirect default;
            #root   html;
            #index  index.html index.htm;
        }
#拦截所有的请求,括号中为静态资源的匹配规则
location ~ .*\.(js|css|ico|png|jpg|eot|svg|ttf|woff|html|txt|pdf|) {
   #所有静态文件直接读取硬盘
   root /home/ftpuser;
   expires 30d; #缓存30天
}

        #error_page  404              /404.html;

        # redirect server error pages to the static page /50x.html
        #
        error_page   500 502 503 504  /50x.html;
        location = /50x.html {
            root   html;
        }

        # proxy the PHP scripts to Apache listening on 127.0.0.1:80
        #
        #location ~ \.php$ {
        #    proxy_pass   http://127.0.0.1;
        #}

        # pass the PHP scripts to FastCGI server listening on 127.0.0.1:9000
        #
        #location ~ \.php$ {
        #    root           html;
        #    fastcgi_pass   127.0.0.1:9000;
        #    fastcgi_index  index.php;
        #    fastcgi_param  SCRIPT_FILENAME  /scripts$fastcgi_script_name;
        #    include        fastcgi_params;
        #}

        # deny access to .htaccess files, if Apache's document root
        # concurs with nginx's one
        #
        #location ~ /\.ht {
        #    deny  all;
        #}
    }


    # another virtual host using mix of IP-, name-, and port-based configuration
    #
    #server {
    #    listen       8000;
    #    listen       somename:8080;
    #    server_name  somename  alias  another.alias;

    #    location / {
    #        root   html;
    #        index  index.html index.htm;
    #    }
    #}


    # HTTPS server
    #
    #server {
    #    listen       443 ssl;
    #    server_name  localhost;

    #    ssl_certificate      cert.pem;
    #    ssl_certificate_key  cert.key;

    #    ssl_session_cache    shared:SSL:1m;
    #    ssl_session_timeout  5m;

    #    ssl_ciphers  HIGH:!aNULL:!MD5;
    #    ssl_prefer_server_ciphers  on;

    #    location / {
    #        root   html;
    #        index  index.html index.htm;
    #    }
    #}

}
为ftp用户设置密码
passwd ftpuser
需要输入两次密码
防火墙开启21端口
因为ftp默认的端口为21,而centos默认是没有开启的,所以要修改iptables文件
在/etcsysconfig/iptables下,但是进入这个文件之后,并没有发现这iptables文件,只有ip6tables-config和iptables-config这样的两个文件。centos7下默认没有了iptables文件,如果有对防火墙的操作,需要更新或者重新安装防火墙服务。
具体的解决办法:
1.安装或者更新iptables-services
yum install iptables-services;
2.启动iptables
systemctl enable iptables
这个时候,/etc/sysconfig目录下面就有了iptables文件了。
3.打开iptables
systemctl start iptables
4.编辑
vim /etc/sysconfig/iptables
内容如下:
# sample configuration for iptables service
# you can edit this manually or use system-config-firewall
# please do not ask us to add additional ports/services to this default configuration
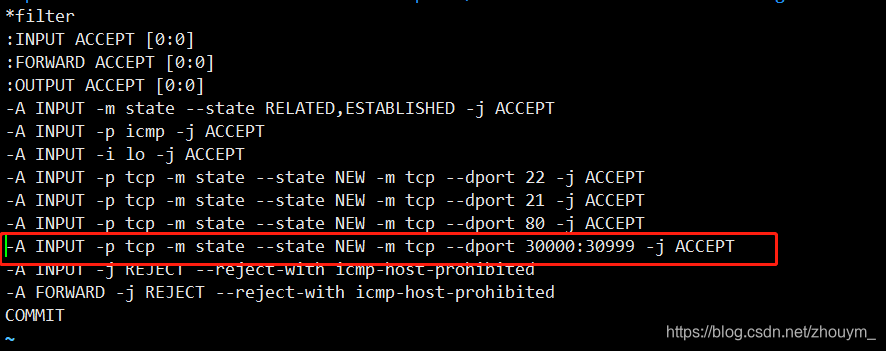
*filter
:INPUT ACCEPT [0:0]
:FORWARD ACCEPT [0:0]
:OUTPUT ACCEPT [0:0]
-A INPUT -m state --state RELATED,ESTABLISHED -j ACCEPT
-A INPUT -p icmp -j ACCEPT
-A INPUT -i lo -j ACCEPT
-A INPUT -p tcp -m state --state NEW -m tcp --dport 22 -j ACCEPT
-A INPUT -p tcp -m state --state NEW -m tcp --dport 21 -j ACCEPT
-A INPUT -p tcp -m state --state NEW -m tcp --dport 80 -j ACCEPT
-A INPUT -j REJECT --reject-with icmp-host-prohibited
-A FORWARD -j REJECT --reject-with icmp-host-prohibited
COMMIT
~
~
~
"/etc/sysconfig/iptables" 17L, 754C
在端口22 -j ACCEPT 下面新建一行,内容一样,只是要把22换成21,然后在新建一行开放80端口,然后:wq保存。
5.重启防火墙
service iptables restart
修改selinux
外网是可以访问上去了,可是发现没法返回目录(使用ftp的主动模式,被动模式还是无法访问),也上传不了,因为是selinux作怪了。
修改selinux:
执行以下命令查看状态:
getsebool -a | grep ftp
发现报SELinux is disabled
这意思是selinux已经被彻底的关闭了,如果需要重新开启selinux,执行如下命令:
vi /etc/selinux/config
更改为:SELINUX=1
然后必须重启linux,不重启是没办法立刻开启selinux的,重启完在执行一遍service iptables restart吧
之后执行如下命令查看状态
getsebool -a | grep ftp
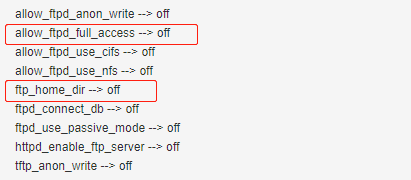
看到这两行都是off,代表,没有开启外网的访问,我们需要开启外网访问,前缀根据你的来
执行如下命令设置开启外网访问
setsebool -P allow_ftpd_full_access on
setsebool -P ftp_home_dir on
这样应该没问题了(如果,还是不行,看看是不是用了ftp客户端工具用了passive模式访问了,如提示Entering Passive mode,就代表是passive模式,默认是不行的,因为ftp passive模式被iptables挡住了,下面会讲怎么开启,如果懒得开的话,就看看你客户端ftp是否有port模式的选项,或者把passive模式的选项去掉。如果客户端还是不行,看看客户端上的主机的电脑是否开了防火墙,如果开启了就关闭防火墙)
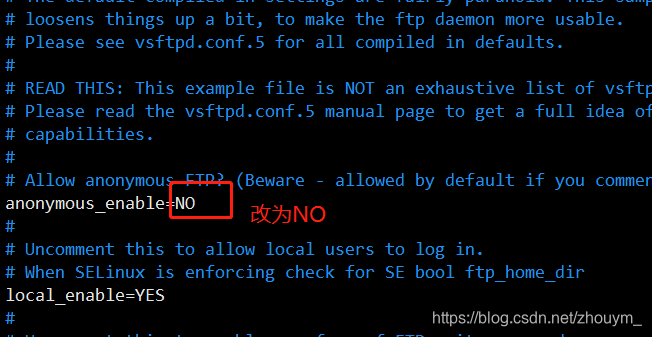
关闭匿名访问
修改 vim /etc/vsftpd/vsftpd.conf文件
然后再重启iptables服务
service vsftpd restart
开启被动模式
默认是开启的,但是要指定一个端口范围,还是打开/etc/vsftpd/vsftpd.conf文件,在后面加上
pasv_min_port=30000
pasv_max_port=30999
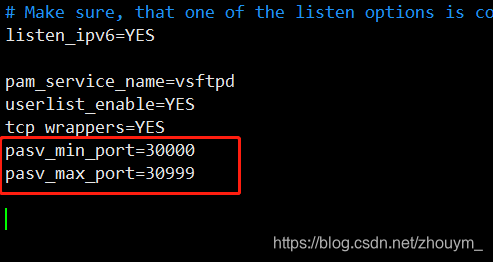
表示端口范围为30000~30999,这个可以随意改。改完重启一下vsftpd
service vsftpd restart
由于指定这段端口范围,iptables也要相应的开启这个范围,所以像上面那样打开iptables文件。
/etc/sysconfig/iptables
也是在21上下面新建一行,内容差不多,只需要把21 改为30000:30999,然后:wq保存,重启下iptables。
设置开机启动vsftpd ftp服务
执行如下命令
chkconfig vsftpd on
我们在spring boot项目中,在application.properties中配置服务器的信息
ftp.host=10.0.0.11  //图片服务器的地址
ftp.port=21  //默认21端口
ftp.username=ftpuser //前面设置的用户名
ftp.password=123456  //用户的密码
ftp.base_path=/home/ftpuser //图片在服务器中存放的地址
后端定义上传接口
package com.zhouym.baiwei.controller.dishes;
import com.zhouym.baiwei.bean.Food;
import com.zhouym.baiwei.bean.RespBean;
import com.zhouym.baiwei.service.FoodService;
import com.zhouym.baiwei.utils.FtpProperties;
import com.zhouym.baiwei.utils.FtpUtil;
import org.springframework.beans.factory.annotation.Autowired;
import org.springframework.web.bind.annotation.*;
import org.springframework.web.multipart.MultipartFile;
import javax.servlet.http.HttpServletRequest;
import java.io.File;
import java.io.IOException;
import java.text.SimpleDateFormat;
import java.util.Date;
import java.util.HashMap;
import java.util.Map;
import java.util.UUID;
/**
* 〈〉
*
* @author zhouym
* @create 2019/8/29
* @since 1.0.0
*/
@RestController
@RequestMapping("/food/mana")
public class FoodController {
@Autowired
FoodService foodService;
@Autowired
FtpProperties ftpProperties;
SimpleDateFormat sdf = new SimpleDateFormat("/yyyy/MM/dd/");
/**
*@Description 图片上传接口
*@Param [file, food, req] 文件对象,实体类、httpservletrequest请求对象
*@Return com.zhouym.baiwei.bean.RespBean
*@Author zhouym
*@Date 2019/8/29
*@Time 10:48
*/
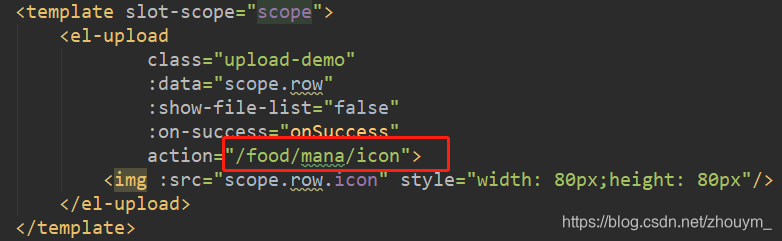
@PostMapping("/icon")
public RespBean updateFoodIcon(MultipartFile file, Food food, HttpServletRequest req) {
String realPath = req.getServletContext().getRealPath("/img");
String format = sdf.format(new Date());
File folder = new File(realPath + format);
if (!folder.exists()) {
folder.mkdirs();
}
String oldName = file.getOriginalFilename();
String newName = UUID.randomUUID().toString() + oldName.substring(oldName.lastIndexOf("."));
try {
FtpUtil.uploadFile(ftpProperties.getHost(), ftpProperties.getPort(), ftpProperties.getUsername(), ftpProperties.getPassword(), ftpProperties.getBasePath(), format, newName, file.getInputStream());
food.setIcon("http://" + ftpProperties.getHost() + ":80" + format + newName);
if (foodService.updateFoodIcon(food) == 1) {
return RespBean.ok("更新成功");
}
} catch (IOException e) {
e.printStackTrace();
}
return RespBean.error("更新失败");
}
}
FTP上传工具类参考上篇文章FTP上传工具类
前端请求
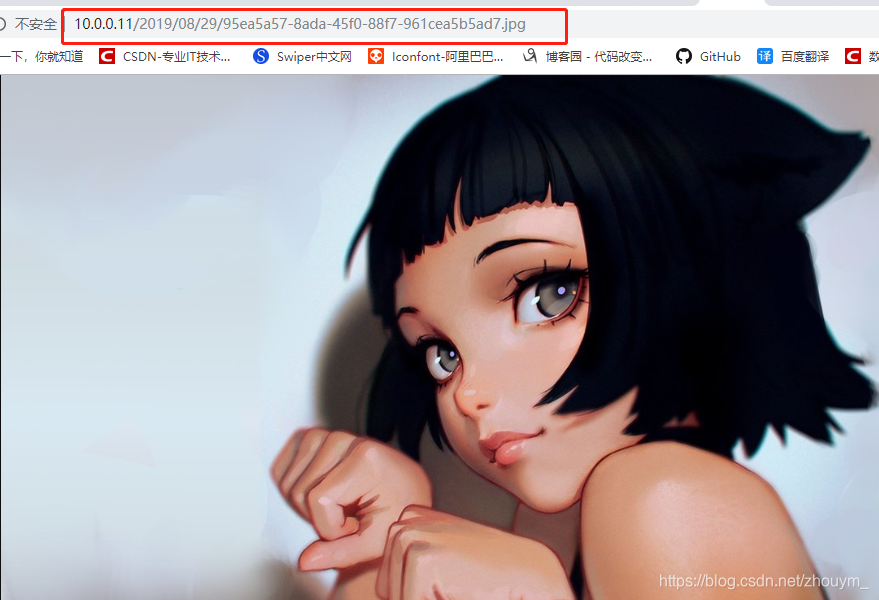
图片上传后,我们来看看服务器中是否有该图片,进入/home/ftpuser/2019/08/29目录下

上传成功,页面图片的地址看看是否能访问