对于源代码分析有一个基本原则:要找到它的最早期的版本,比如1.0版本。1.0版本奠定了一款框架的基础结构,之后的版本迭代都是基于这套结构进行更新的。所以掌握了基础结构,那也就掌握了这个框架。这个原则适用于世界上绝大多数事务:
- 计算机基本组成结构
- 汽车等各类交通工具的基本结构
- Android等框架类的基本结构
所以基于以上原则,我在分析Vue源代码时采用的是它的0.10版本,这是我能找到的最早的、也能顺利运行的版本。
执行以下命令便可以得到0.10版本:
	git clone https://github.com/vuejs/vue.git
	git checkout 0.10
之后便可以通过顺手的IDE工具比如VS Code将这个项目加载,开始正式进入我们的解析过程。
本篇文章的目的
读完这篇文章,你可以学到以下内容:
- Vue对于JS文件的解析。
- Vue对于DOM树的解析。
- 简单的TEXT赋值更新事件的整个执行过程。
引用结构图
一切从这张图开始: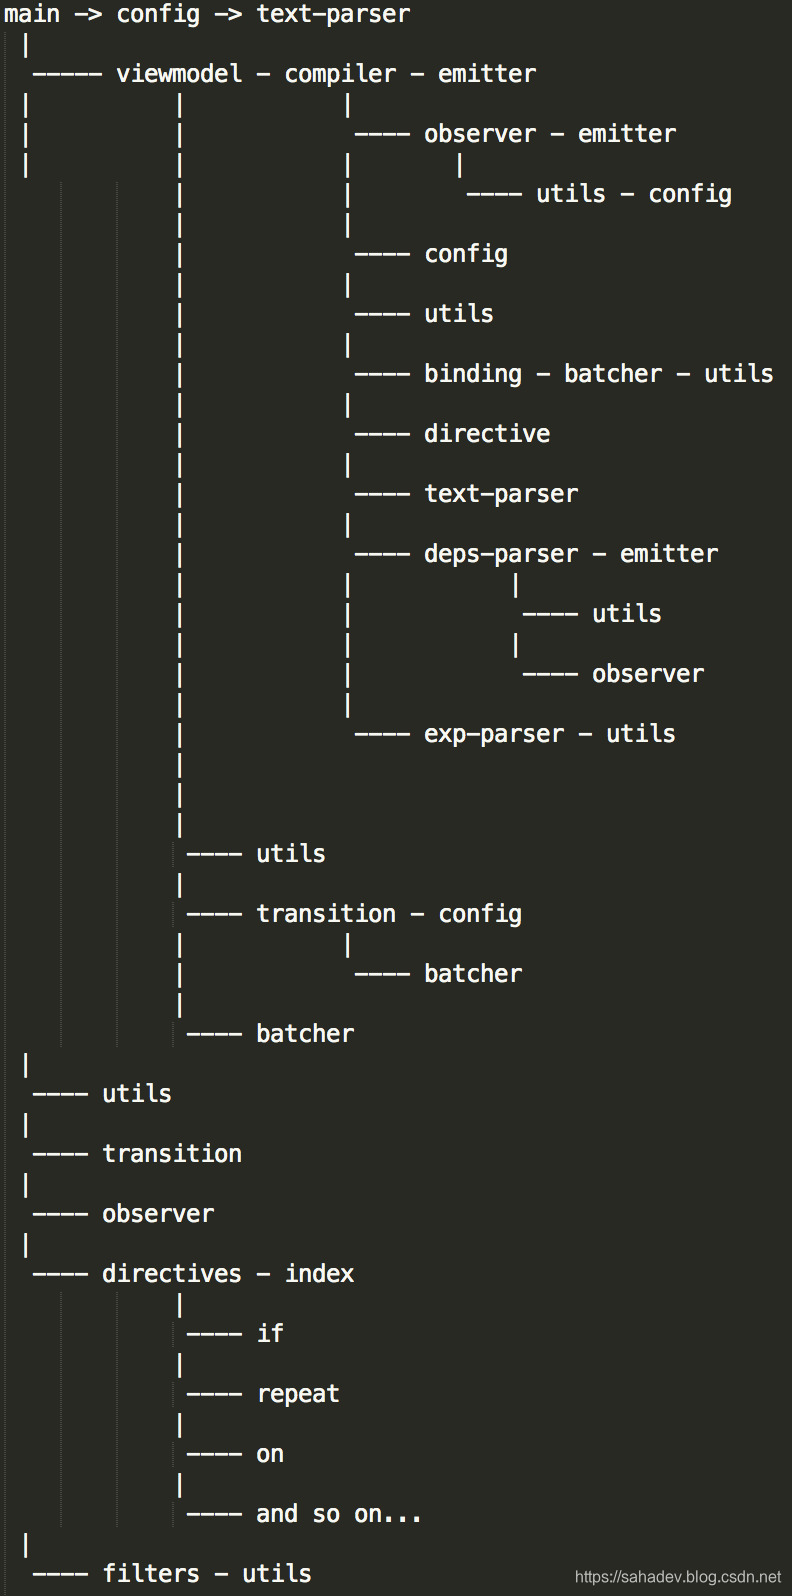
上面这张图描述了Vue各个部分的引用关系,它有助于我们梳理Vue的主体结构。
从上图中我们可以确认,compiler应当是Vue的核心部分。
分析所需要的环境
一切从我们熟悉的Vue用法开始说起,以下内容是摘自于项目中的./examples/commits文件夹:
// app.js
var demo = new Vue({

    el: '#demo',

    data: {
        branch: 'master', title: 'tl'
    },

    created: function () {
        this.$watch('branch', function () {
            this.fetchData()
        })
    },

    filters: {
        truncate: function (v) {
            var newline = v.indexOf('\n')
            return newline > 0 ? v.slice(0, newline) : v
        },
        formatDate: function (v) {
            return v.replace(/T|Z/g, ' ')
        }
    },

    methods: {
        fetchData: function () {
            var xhr = new XMLHttpRequest(),
                self = this
            xhr.open('GET', 'https://api.github.com/repos/yyx990803/vue/commits?per_page=3&sha=' + self.branch)
            xhr.onload = function () {
                self.commits = JSON.parse(xhr.responseText)
            }
            xhr.send()
        }
    }
})
<!-- index.html -->
<!DOCTYPE html>

<style>
    #demo {
        font-family: 'Helvetica', Arial, sans-serif;
    }
    a {
        text-decoration: none;
        color: #f66;
    }
    li {
        line-height: 1.5em;
        margin-bottom: 20px;
    }
    .author, .date {
        font-weight: bold;
    }
</style>

<div id="demo">
    <h1>Latest Vue.js Commits</h1>
    <p>
        {{title}}
    </p>
    <input type="radio" id="master" name="branch" v-model="branch" value="master">
    <label for="master">master</label>
    <br>
    <input type="radio" id="dev" name="branch" v-model="branch" value="dev">
    <label for="dev">dev</label>
    <ul>
        <li v-repeat="commits">
            <a href="{{html_url}}" target="_blank" class="commit">{{sha.slice(0, 7)}}</a>
            - <span class="message">{{commit.message | truncate}}</span><br>
            by <span class="author">{{commit.author.name}}</span>
            at <span class="date">{{commit.author.date | formatDate}}</span>
        </li>
    </ul>
</div>

<script src="../../dist/vue.js"></script>
<script src="app.js"></script>
典型的Vue用法如上,那我们的分析就从new Vue()开始说起。
*注意:
如果要达到良好的学习效果,需要自己clone一份源代码,跟着查看,反复查看。
为了节省篇幅,不影响主流程的代码都以“…”代替。
不是核心的代码,会直接略过。
Vue的入口
我们可以在Vue的源代码中找到:
    if (typeof exports == 'object') {
        module.exports = require('vue');
    } else if (typeof define == 'function' && define.amd) {
        define(function () { return require('vue'); });
    } else {
        window['Vue'] = require('vue');
    }
那也就是说我们在new Vue时,调用的构造方法应当是require('vue');方法所返回的。
经过一轮探寻(这个过程可自行探寻,这不是我们的关注的重点),可以找到Vue实际的入口为vue/src/main.js方法中所返回的内容:
    require.register("vue/src/main.js", function (exports, require, module) {
        var config = require('./config');
        var ViewModel = require('./viewmodel');
		...
        module.exports = ViewModel
    });
所以我们真正的入口便是ViewModel的构造方法。
真正的入口ViewModel()
数据的执行入口:
         /**
         *  ViewModel exposed to the user that holds data,
         *  computed properties, event handlers
         *  and a few reserved methods
         */
        function ViewModel(options) {
            //对外暴露的入口
            console.info(options);
            // compile if options passed, if false return. options are passed directly to compiler
            if (options === false) return
            new Compiler(this, options)
        }
而后开始进入Compiler构造方法:
        /**
         *  The DOM compiler
         *  scans a DOM node and compile bindings for a ViewModel
         * 	options: custom data.
         */
        function Compiler(vm, options) {
        	...
        }
最开始processOptions内部会对自定义的四种类型做初步处理:components,partials,template,filters,我们没有定义,也不是核心流程,直接跳过。
			/**
             *  convert certain option values to the desired format.
             */
			processOptions:(options);
接下来将自定义编译选项与主编译器合并:
            // copy compiler options
            extend(compiler, options.compilerOptions);
通过setupElement方法查找el所定义的元素,其内部使用了document.querySelector()方法,参数为id选择器的值#demo。
            // initialize element
            var el = compiler.el = compiler.setupElement(options);
这里的el就代表了整个根节点。接下来的操作都围绕着这个根节点进行操作。
接下来给compiler添加了一些属性,这些属性为接下来做铺垫:
            // set other compiler properties
            compiler.vm = el.vue_vm = vm
            compiler.bindings = utils.hash()
            compiler.dirs = []
            compiler.deferred = []
            compiler.computed = []
            compiler.children = []
            compiler.emitter = new Emitter(vm)
上面给el赋了一个属性:el.vue_vm。
vue_vm拥有以下属性:
            vm.$ = {}
            vm.$el = el
            vm.$options = options
            vm.$compiler = compiler
            vm.$event = null
            vm.$root = getRoot(compiler).vm
其中这些为循环引用,需要注意:
	vue_vm.el = vm.el = el
	compiler.options = vm.$options = options
	vm.$compiler = compiler,而compiler.vm = el.vue_vm = vm
接下来我们需要进入compiler.setupObserver()方法一探究竟,这是个关键的地方。
        CompilerProto.setupObserver = function () {
            var compiler = this,
                bindings = compiler.bindings,
                options = compiler.options,
                observer = compiler.observer = new Emitter(compiler.vm)
            ...

            // add own listeners which trigger binding updates
            observer
                .on('get', onGet)
                .on('set', onSet)
                .on('mutate', onSet)

            // register hooks
            // 对自定义的钩子方法做处理
            hooks = [
                'created', 'ready',
                'beforeDestroy', 'afterDestroy',
                'attached', 'detached'
            ]
            var i = hooks.length, j, hook, fns
            while (i--) {
                hook = hooks[i]
                fns = options[hook]
                if (Array.isArray(fns)) {
                    j = fns.length
                    // since hooks were merged with child at head,
                    // we loop reversely.
                    while (j--) {
                        registerHook(hook, fns[j])
                    }
                } else if (fns) {
                    registerHook(hook, fns)
                }
            }

            // broadcast attached/detached hooks
            observer
                .on('hook:attached', function () {
                    broadcast(1)
                })
                .on('hook:detached', function () {
                    broadcast(0)
                })

            function onGet(key) {
                check(key)
                DepsParser.catcher.emit('get', bindings[key])
            }

            function onSet(key, val, mutation) {
                observer.emit('change:' + key, val, mutation)
                check(key)
                bindings[key].update(val)
            }

            function registerHook(hook, fn) {
                observer.on('hook:' + hook, function () {
                    fn.call(compiler.vm)
                })
            }

            function broadcast(event) {
                ...
            }
           ...
        }
上面做了这么几件重要的事情:
compiler.observer初始化,其中compiler.observer是一个Emitter对象的实例。- 给
compiler.observer注册需要观察的事件,需要观察的事件包含:get、set、mutate、hook:attached、hook:detached。其中后两项会在事件被触发时,将事件广播出去。 - 将自定义生命周期方法与生命周期事件挂钩。
observer.on方法实现如下,它用来注册事件与回调的关系。是一对多的关系。
        EmitterProto.on = function (event, fn) {
            this._cbs = this._cbs || {};
            (this._cbs[event] = this._cbs[event] || [])
                    .push(fn)
            return this
        }
通过setupObserver方法的执行,我们可知如下对应关系:
compiler.observer._cbs.get = ['onGet']
compiler.observer._cbs.set = ['onSet']
compiler.observer._cbs.mutate = ['onSet']
compiler.observer._cbs.hook:attached = ['broadcast function']
compiler.observer._cbs.hook:detached = ['broadcast function']
...
自定义生命周期观察者,如果有的话
以上对分析最重要的就是onSet的回调,在这里先有个印象,后面很关键。onSet实现如下:
            function onSet(key, val, mutation) {
                observer.emit('change:' + key, val, mutation)
                check(key)
                bindings[key].update(val)
            }
到这里跳出setupObserver方法,回到Compiler(vm, options)构造方法内继续往下:
接下来对自定义方法处理,我们的示例中有自定义方法fetchData:
            // create bindings for computed properties
            if (options.methods) {
                for (key in options.methods) {
                    compiler.createBinding(key)
                }
            }
内部实现如下:
        CompilerProto.createBinding = function (key, directive) {
            ...
            var compiler = this,
                methods = compiler.options.methods,
                isExp = directive && directive.isExp,
                isFn = (directive && directive.isFn) || (methods && methods[key]),
                bindings = compiler.bindings,
                computed = compiler.options.computed,
                binding = new Binding(compiler, key, isExp, isFn)

            if (isExp) {
                ...
            } else if (isFn) {
                bindings[key] = binding
                compiler.defineVmProp(key, binding, methods[key])
            } else {
                bindings[key] = binding
                ...
            }
            return binding
        }
这里的key是fetchData,它是一个方法,所以isFn = true。然后将这些关键的信息生成了一个Binding对象。Binding通过类似的建造者模式将所有的关键信息维护在一起。现在这个binding对象是专门为fetchData方法所产生的。
然后代码进入isFn条件继续执行,便产生了如下关系:
compiler.bindings.fetchData = new Binding(compiler, 'fetchData', false, true);
然后继续执行:
compiler.defineVmProp('fetchData', binding, fetchDataFunc);//fetchDataFunc为fetchData所对应的自定义方法。
方法内部如下:
       CompilerProto.defineVmProp = function (key, binding, value) {
           var ob = this.observer
           binding.value = value
           def(this.vm, key, {
               get: function () {
                   if (Observer.shouldGet) ob.emit('get', key)
                   return binding.value
               },
               set: function (val) {
                   ob.emit('set', key, val)
               }
           })
       }
经过 defineVmProp代码的执行,可以得出以下结论:
compiler.vm.fetchData有了代理get/set方法,后期对于自定义方法的读取或者赋值都需要经过这一层代理。binding.value也指向了用户自定义的方法。当读取vm.fetchData时就会得到自定义的方法。
我们跳出defineVmProp方法,然后继续向下执行,createBinding方法执行完毕,我们返回到createBinding方法调用处,也就是Compiler的构造方内,继续向下执行。
我们的示例中没有computed的相关定义,这里跳过。
接下来对defaultData做处理,我们没有定义,跳过。
也没有对paramAttributes的定义,跳过。
走到这里:
    // copy data properties to vm
    // so user can access them in the created hook
    extend(vm, data)
    vm.$data = data
这里将data里面的属性全部赋值给了vm。并且vm.$data属性也指向data。
	// extend方法的实现如下:
    extend: function (obj, ext) {
        for (var key in ext) {
            if (obj[key] !== ext[key]) {
                obj[key] = ext[key]
            }
        }
        return obj
    }
extend方法将第二个参数的所有属性全部赋值给了第一个参数。对于示例会产生如下关系:
vm.branch = 'master'
vm.title = 'tl'
vm.$data = data
接着向下,触发created生命周期方法:
    // beforeCompile hook
    compiler.execHook('created')
我们没有定义created生命周期方法,然后继续。
对于自定义数据的事件监听
略过中间的数据处理,到达这里:
    // now we can observe the data.
    // this will convert data properties to getter/setters
    // and emit the first batch of set events, which will
    // in turn create the corresponding bindings.
    compiler.observeData(data)
observeData方法内部如下:
        CompilerProto.observeData = function (data) {

            var compiler = this,
                observer = compiler.observer

            // recursively observe nested properties
            Observer.observe(data, '', observer)

			...
        }
observeData方法中比较重要的地方是:
Observer.observe(data, '', observer)
然后是observe方法内部:
	...
	// 第一次执行alreadyConverted = false
    if (alreadyConverted) {
        // for objects that have already been converted,
        // emit set events for everything inside
        emitSet(obj)
    } else {
        watch(obj)
    }
所以第一次走的是watch方法:
/**
 *  Watch target based on its type
 */
function watch (obj) {
    if (isArray(obj)) {
        watchArray(obj)
    } else {
        watchObject(obj)
    }
}
watch方法对对象做了一个初步的分拣。示例的代码不是Array,走watchObject:
/**
 *  Watch an Object, recursive.
 */
function watchObject (obj) {
	// 用户给对象添加$add/$delete两个属性
    augment(obj, ObjProxy)
    for (var key in obj) {
        convertKey(obj, key)
    }
}
我们到这里稍微等一下,这里的obj还是:
    data: {
        branch: 'master',
        title: 'tl'
    }
watchObject对对象的每个属性进行遍历,而convertKey方法内做了比较重要的事情:
        function convertKey(obj, key, propagate) {
            var keyPrefix = key.charAt(0)
            // 初步对以$开头的、以_开头的做过滤
            if (keyPrefix === '$' || keyPrefix === '_') {
                return
            }
            ...
			// 重要之所在
            oDef(obj, key, {
                enumerable: true,
                configurable: true,
                get: function () {
                    var value = values[key]
                    // only emit get on tip values
                    if (pub.shouldGet) {
                        emitter.emit('get', key)
                    }
                    return value
                },
                set: function (newVal) {
                    var oldVal = values[key]
                    unobserve(oldVal, key, emitter)
                    copyPaths(newVal, oldVal)
                    // an immediate property should notify its parent
                    // to emit set for itself too
                    init(newVal, true)
                }
            })

            ...
        }
convertKey方法中比较重要的就是这里了,这里对new Vue()时传入的对象的data对象中的每个属性添加相应的get/set方法,也就是说在给某个属性赋值时,就会触发这里。如果给branch/title赋予新值,就会触发上面提到的set方法。到这里我们有理由相信,set方法中的init方法是用来更新界面的。
好了,到了这里convertKey方法就分析完了,我们再一路往回:convertKey -> watchObject -> watch -> observe -> observeData。回到observeData方法内,接下的代码是对compiler.vm.$data添加观察事件,它暂时不是我们关心的内容,observeData返回调用处,并接着向下:
            // before compiling, resolve content insertion points
            if (options.template) {
                this.resolveContent()
            }
上面这段代码我们没有定义template,略过。
对于DOM树的解析
向下到了又一个很关键的地方:
            // now parse the DOM and bind directives.
            // During this stage, we will also create bindings for
            // encountered keypaths that don't have a binding yet.
            compiler.compile(el, true)
compile内部实现:
        CompilerProto.compile = function (node, root) {
            var nodeType = node.nodeType
            if (nodeType === 1 && node.tagName !== 'SCRIPT') { // a normal node
                this.compileElement(node, root)
            } else if (nodeType === 3 && config.interpolate) {
                this.compileTextNode(node)
            }
        }
执行到这里el使我们的根节点demo,其中node = demoNode, root = true。上面的分发会进入compileElement:
        CompilerProto.compileElement = function (node, root) {

            // textarea is pretty annoying
            // because its value creates childNodes which
            // we don't want to compile.
            if (node.tagName === 'TEXTAREA' && node.value) {
                node.value = this.eval(node.value)
            }

            // only compile if this element has attributes
            // or its tagName contains a hyphen (which means it could
            // potentially be a custom element)
            if (node.hasAttributes() || node.tagName.indexOf('-') > -1) {
                ...

            }

            // recursively compile childNodes
            if (node.hasChildNodes()) {
                slice.call(node.childNodes).forEach(this.compile, this)
            }
        }
compileElement方法内部细节比较多也比较长。
先来说说compileElement方法的作用,compileElement方法用来对dom树的所有节点进行遍历,会处理所有的属性节点与文本节点。其中就会遇到v-model等指令以及{{value}}这样的占位符。
compileElement方法内分为几大块:
- 1.对TEXTAREA的处理:
if (node.tagName === 'TEXTAREA' && node.value) - 2.对用于属性的或者tag的名称中包含’-'的处理:
if (node.hasAttributes() || node.tagName.indexOf('-') > -1) { - 3.如果不符合1或2的条件,则对其子节点进行处理。
子节点的处理会进一步进行递归,走compile方法。compile方法继续进行分发,如果是元素节点则走compileElement,如果是文本节点,则走compileTextNode。这个过程直到将整颗DOM树遍历完毕。
        CompilerProto.compile = function (node, root) {
            var nodeType = node.nodeType
            if (nodeType === 1 && node.tagName !== 'SCRIPT') { // a normal node
                this.compileElement(node, root)
            } else if (nodeType === 3 && config.interpolate) {
                this.compileTextNode(node)
            }
        }
以下代码从index.html摘除,它有利于我们的继续分析:
    <p>
        {{title}}
    </p>
如果渲染以上内容,那么它的处理就会被分发到compileTextNode方法中:
        CompilerProto.compileTextNode = function (node) {

            var tokens = TextParser.parse(node.nodeValue)
            if (!tokens) return
            var el, token, directive

            for (var i = 0, l = tokens.length; i < l; i++) {

                token = tokens[i]
                directive = null

                if (token.key) { // a binding
                    if (token.key.charAt(0) === '>') { // a partial
                        el = document.createComment('ref')
                        directive = this.parseDirective('partial', token.key.slice(1), el)
                    } else {
                        if (!token.html) {
                            // text binding
                            // 示例中,会在这里处理{{title}}的逻辑,并绑定与之对应的directive处理函数。
                            el = document.createTextNode('')
                            directive = this.parseDirective('text', token.key, el)
                        } else { // html binding
                            el = document.createComment(config.prefix + '-html')
                            directive = this.parseDirective('html', token.key, el)
                        }
                    }
                } else { // a plain string
                    el = document.createTextNode(token)
                }

                // insert node
                node.parentNode.insertBefore(el, node)
                // bind directive
                this.bindDirective(directive)

            }
            node.parentNode.removeChild(node)
        }
上面方法中的TextParser.parse(node.nodeValue)的实现细节不去了解了,它是用来匹配各种占位符和表达式的,纯算法型代码。
对于<p>{{title}}</p>这种类型的处理会进入:
el = document.createTextNode('')
directive = this.parseDirective('text', token.key, el)
其中token.key = ‘title’, el为刚刚创建好的新文本节点。parseDirective方法内:
        CompilerProto.parseDirective = function (name, value, el, multiple) {
            var compiler = this,
                definition = compiler.getOption('directives', name)
            if (definition) {
                // parse into AST-like objects
                var asts = Directive.parse(value)
                return multiple
                    ? asts.map(build)
                    : build(asts[0])
            }
            function build(ast) {
                return new Directive(name, ast, definition, compiler, el)
            }
        }
上面代码最为核心的调用是getOption,其中type = ‘directives’, id = ‘text’, silent = undefined:
        CompilerProto.getOption = function (type, id, silent) {
            var opts = this.options,
                parent = this.parent,
                globalAssets = config.globalAssets,
                res = (opts[type] && opts[type][id]) || (
                    parent
                        ? parent.getOption(type, id, silent)
                        : globalAssets[type] && globalAssets[type][id]
                )
            if (!res && !silent && typeof id === 'string') {
                utils.warn('Unknown ' + type.slice(0, -1) + ': ' + id)
            }
            return res
        }
其中globalAssets存储了vue所支持类型的所有对应关系:
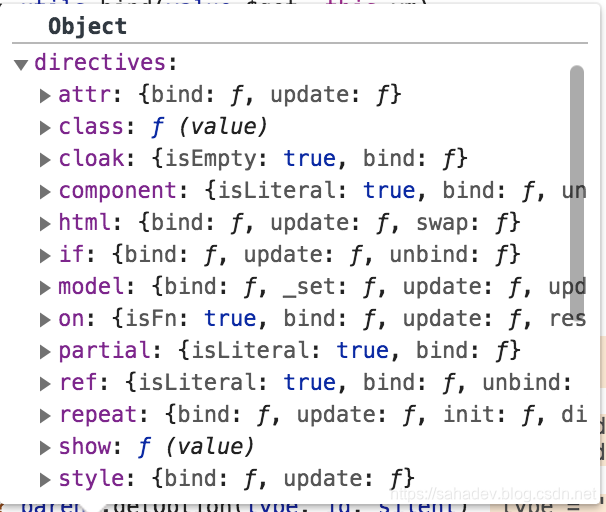
然后getOption返回的就是处理类型与处理方法的对应关系对象。最后parseDirective方法返回一个新的Directive对象。这个对象包含了处理类型与处理方法的相关关系。这是很重要的一点。
对于text类型的,它的Directive对象则是:
        directives.text = {
            bind: function () {
                this.attr = this.el.nodeType === 3
                    ? 'nodeValue'
                    : 'textContent'
            },
            update: function (value) {
                this.el[this.attr] = utils.guard(value)
            }
        }
回到compileTextNode方法继续向下执行:
        CompilerProto.bindDirective = function (directive, bindingOwner) {
            if (!directive) return
            ...
            if (directive.isExp) {
                // expression bindings are always created on current compiler
                binding = compiler.createBinding(key, directive)
            } else {
                // recursively locate which compiler owns the binding
                ...
                compiler = compiler || this
                binding = compiler.bindings[key] || compiler.createBinding(key)
            }
            binding.dirs.push(directive)
            ...
        }
上面又执行了compiler.createBinding(key),这里的key = ‘title’。
经过bindDirective方法的执行,最后会产生如下关系(这里很重要):
compiler.bindings.title = new Binding(compiler, 'ttile', false, false);
compiler.bindings.title.binding.dirs = [directive]; // 这里存放的是title对应的处理方法
执行到了这里就可以返回至compileTextNode方法的调用处。compileTextNode的初始化到这里就算完成了一步。
到这里可以返回至function Compiler(vm, options)方法处,继续向下。中间略过一些非核心的内容:
            // done!
            compiler.init = false

            // post compile / ready hook
            compiler.execHook('ready')
到这里初始化就算完成,并通过ready方法告知Vue已经准备好了。
事件的执行
接下来如果执行demo.title = 'Hello',就会触发set方法的内部的init方法,而init方法内部有这样的关键:
            function init(val, propagate) {
                values[key] = val
                /////重要/////
                emitter.emit('set', key, val, propagate)
                /////重要/////
                if (isArray(val)) {
                    emitter.emit('set', key + '.length', val.length, propagate)
                }
                observe(val, key, emitter)
            }
能看到上面的emitter.emit('set', key, val, propagate)方法被执行,我们就根据这个set查看它是怎么执行的:
        EmitterProto.emit = function (event, a, b, c) {
            this._cbs = this._cbs || {}
            var callbacks = this._cbs[event]

            if (callbacks) {
                callbacks = callbacks.slice(0)
                for (var i = 0, len = callbacks.length; i < len; i++) {
                    callbacks[i].call(this._ctx, a, b, c)
                }
            }

            return this
        }
上面这段代码通过event获取到对应的callbacks并进行回调,我们在上面已经得知set所对应的callbacks是onSet方法,我们再来回顾一下onSet:
            function onSet(key, val, mutation) {
                observer.emit('change:' + key, val, mutation)
                check(key)
                compiler.bindings[key].update(val)
            }
而compiler.bindings的属性添加是在createBinding中进行的,这个我们上面就有提到。执行到这里key = ‘title’。
于是这里执行的便是:
        BindingProto.update = function (value) {
            if (!this.isComputed || this.isFn) {
                this.value = value
            }
            if (this.dirs.length || this.subs.length) {
                var self = this
                bindingBatcher.push({
                    id: this.id,
                    execute: function () {
                        if (!self.unbound) {
                            self._update()
                        }
                    }
                })
            }
        }
以下是bindingBatcher.push的实现细节:
BatcherProto.push = function (job) {
    if (!job.id || !this.has[job.id]) {
        this.queue.push(job)
        this.has[job.id] = job
        if (!this.waiting) {
            this.waiting = true
            utils.nextTick(utils.bind(this.flush, this))
        }
    } else if (job.override) {
        var oldJob = this.has[job.id]
        oldJob.cancelled = true
        this.queue.push(job)
        this.has[job.id] = job
    }
}
bindingBatcher.push方法会将参数对象经过包装交给:
    /**
     *  used to defer batch updates
     */
    nextTick: function (cb) {
        defer(cb, 0)
    },
而这里的defer为requestAnimationFrame方法,requestAnimationFrame会在下一次浏览器绘制时,触发cb回调方法。
其中的cb回调对象是由这个bind方法生成的:
    /**
     *  Most simple bind
     *  enough for the usecase and fast than native bind()
     */
    bind: function (fn, ctx) {
        return function (arg) {
            return fn.call(ctx, arg)
        }
    },
这里的fn是:
BatcherProto.flush = function () {
    // before flush hook
    if (this._preFlush) this._preFlush()
    // do not cache length because more jobs might be pushed
    // as we execute existing jobs
    for (var i = 0; i < this.queue.length; i++) {
        var job = this.queue[i]
        if (!job.cancelled) {
            job.execute()
        }
    }
    this.reset()
}
也就说紧接着flush方法会被requestAnimationFrame方法调用:
flush方法的核心是:
job.execute()
而这里的job对象就是刚刚被Push进去的:
	{
            id: this.id,
            execute: function () {
                if (!self.unbound) {
                    self._update()
                }
            }
    }
这里会执行self._update():
/**
 *  Actually update the directives.
 */
BindingProto._update = function () {
    var i = this.dirs.length,
        value = this.val()
    while (i--) {
        this.dirs[i].$update(value)
    }
    this.pub()
}
可以理解为这是一个事件分发过程。
这里从dirs中取出是一个与text相关的directive对象,这里执行的是directive对象的$update方法:
        DirProto.$update = function (value, init) {
            if (this.$lock) return
            if (init || value !== this.value || (value && typeof value === 'object')) {
                this.value = value
                if (this.update) {
                    this.update(
                        this.filters && !this.computeFilters
                            ? this.$applyFilters(value)
                            : value,
                        init
                    )
                }
            }
        }
上面的this对应的是之前提到的与text对应的处理器:
        directives.text = {
            bind: function () {
                this.attr = this.el.nodeType === 3
                    ? 'nodeValue'
                    : 'textContent'
            },
            update: function (value) {
                this.el[this.attr] = utils.guard(value)
            }
        }
而这里的update则是执行整个text更新的核心所在,通过对相应元素的nodeValue赋值便达到的更新值的效果。
以上内容仅仅是更新data值的粗略过程。vue还包括其它内容:如列表渲染、条件渲染、生命周期方法等等。
对于列表渲染和条件渲染它们分别有对应的处理器,对于它们的执行过程也和text的过程是一致的。
零散的记录一下:
emitter是vue引擎的核心,负责各种事件的分发。
它含有两个关键的方法:
		// 注册观察者方法,每个event可以理解为观察者,fn为观察者对应的事件回调对象集合。
        EmitterProto.on = function (event, fn) {
            this._cbs = this._cbs || {};
            (this._cbs[event] = this._cbs[event] || []).push(fn)
            return this
        }

        // 通知观察者,针对于观察的事件进行事件的分发处理
        EmitterProto.emit = function (event, a, b, c) {
            this._cbs = this._cbs || {}
            var callbacks = this._cbs[event]

            if (callbacks) {
                callbacks = callbacks.slice(0)
                for (var i = 0, len = callbacks.length; i < len; i++) {
                    callbacks[i].call(this._ctx, a, b, c)
                }
            }

            return this
        }
其中在vue中注册的观察者为:
    compiler.observer
            .on('get', onGet)
            .on('set', onSet)
            .on('mutate', onSet)
            .on('hook:attached', function () {
                    broadcast(1)
            })
            .on('hook:detached', function () {
                    broadcast(0)
            })
            .on('created', '自定义生命周期方法')
            .on('ready', '自定义生命周期方法')
            .on('beforeDestroy', '自定义生命周期方法')
            .on('afterDestroy', '自定义生命周期方法')
            .on('attached', '自定义生命周期方法')
            .on('detached', '自定义生命周期方法')
            .on('set', function (key) {
                if (key !== '$data') update()
            })
            .on('mutate', function (key) {
                if (key !== '$data') update()
            })
            ......
当某个Key所对应的事件被触发时,它所对应的回调就会被触发并执行。
总结
所以到此为止,我们搞清楚了Vue的主体框架。上文中有些乱,我们来梳理一下:
- 最开始new Vue = new ViewModel = new Compiler
- Compiler执行了对于自定义数据、自定义方法、自定义生命周期、自定义模板等等的处理。我们的示例演示了如何为自定义数据添加观察者方法。
- Compiler解析了整颗DOM树,为树里面定义的占位符、v-指令、自定义组件做了处理。示例中演示了如何对占位符中的值进行解析以及添加观察者。
- Compiler.bindings中存放了所有需要观察对象的绑定关系Binding对象。Binding中的dirs存放了相关key的处理对象Directive。
- Emitter负责关键中转事件的注册与分发。
- Batcher负责更新事件的提交。它将事件交给浏览器,由浏览器触发事件的执行。
- Directives中存放了所有的指令。包括:if,repeat,on,model,with等等。
- TextParser负责文本的萃取,解析。
- Directive负责单个事件的触发,通过directive使更新执行。
- Observer用于添加观察者。
- Binding用于维护一些运行时的关键信息。
- Utils中提供了一些非常棒的基础工具。
- Config提供了一些可配的配置信息。
- main.js是整个程序的执行入口,负责一些模块的加载和组装。
额外学习到的内容
除了摸清楚Vue的基础框架之外,我从代码中读到了以下信息:
- 代码非常整洁,注释全面,结构合理、清晰。无额外注释和冗余代码。
- 对于日志的输出做了控制,这也是一个优秀程序员所必备的。
- 对于JS语言针对于类的使用值得借鉴。
- 一些非常奇妙的用法。
良好的日志管控无处不在:
        function enableDebug() {
            /**
             *  log for debugging
             */
            utils.log = function (msg) {
                if (config.debug && console) {
                    console.log(msg)
                }
            }

            /**
             *  warnings, traces by default
             *  can be suppressed by `silent` option.
             */
            utils.warn = function (msg) {
                if (!config.silent && console) {
                    console.warn(msg)
                    if (config.debug && console.trace) {
                        console.trace()
                    }
                }
            }
        }
很多地方会看到这种写法:
slice.call(node.childNodes).forEach(this.compile, this);
slice方法在这里的作用是拷贝了一个副本出来,对于副本的操作不会引起原型的变动。这个对于拷贝数组副本的用法很妙。
以上。
