在前面讲到,微服务的架构涉及到服务提供者和消费者,利用RPC去建立连接,那么一个公共的注册中心是不可或缺的。在这里,我们需要用的的组件上Spring Cloud Netflix的Eureka ,eureka是一个服务注册和发现模块。
1.Eureka
1.1 什么是Eureka
官方的介绍在这里Eureka wiki。Eureka是Netflix开源的一个RESTful服务,主要用于服务的注册发现。
Eureka由两个组件组成:Eureka服务器和Eureka客户端。
Eureka服务器用作服务注册服务器。Eureka客户端是一个java客户端,用来简化与服务器的交互、作为轮询负载均衡器,并提供服务的故障切换支持。Netflix在其生产环境中使用的是另外的客户端,它提供基于流量、资源利用率以及出错状态的加权负载均衡。集群方案逻辑架构图如下:
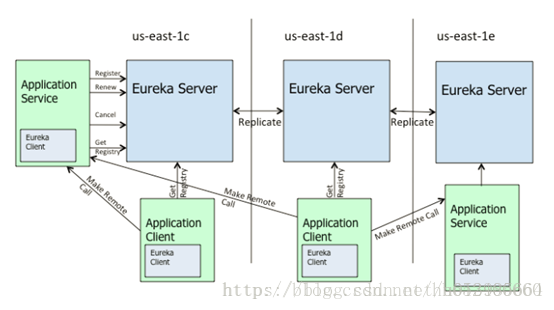
上面的体系结构描述了Netflix如何部署Eureka,这是通常运行的方式。每个区域一个Eureka集群区域,负责该区域内的服务实例。每个区域至少有一台Eureka服务器来处理区域故障。
服务注册Eureka,然后发送心跳每30秒更新一次租约。如果客户端无法续租几次,则会在大约90秒内将其从服务器注册表中取出。注册信息和更新被复制到群集中的所有Eureka节点。来自任何区域的客户端可以查找注册表信息(每30秒发生一次)以找到他们的服务(可能位于任何区域)并进行远程调用。
通过了解之后,我觉得Eureka有以下几点吸引我的地方:
开源:可以了解实现原理,有必要还能修改源码。
可靠:经过Netflix多年的生产环境考验,使用应该比较靠谱省心
功能齐全:不但提供了完整的注册发现服务,还有Ribbon等配合使用的服务。
基于Java:对于Java程序员来说,使用起来更加有底。
spring cloud:可以使用Spring Cloud,与Eureka进行了很好的集成,使用起来非常方便。
1.2 Eureka-server

    搭建一个eureka-server服务,可以延续上一篇博客中,构建一个子项目eureka-server
pom.xml
 <!--eureka server -->
        <dependency>
            <groupId>org.springframework.cloud</groupId>
            <artifactId>spring-cloud-starter-eureka-server</artifactId>
            <version>1.4.3.RELEASE</version>
        </dependency>
        <!-- spring boot test -->
        <dependency>
            <groupId>org.springframework.boot</groupId>
            <artifactId>spring-boot-starter-test</artifactId>
            <scope>test</scope>
        </dependency>
        <!-- 安全依赖-->
        <dependency>
            <groupId>org.springframework.boot</groupId>
            <artifactId>spring-boot-starter-security</artifactId>
        </dependency>
application.yml
server:
  port: 10000
# 由于当前eureka是单机,所以需要做一些配置
eureka:
  instance:
    hostname: localhost
  client:
    register-with-eureka: false
    fetch-registry: false
    server-url:
      defaultZone: http://${eureka.instance.hostname}:${server.port}/eureka/
EurekaApp.java
package com.ithzk.spring.cloud;

import org.springframework.boot.SpringApplication;
import org.springframework.boot.autoconfigure.SpringBootApplication;
import org.springframework.cloud.netflix.eureka.server.EnableEurekaServer;

/**
 * Hello world!
 *
 */
@SpringBootApplication
@EnableEurekaServer//将当前项目标记为eureka server

public class EurekaApp
{
    public static void main( String[] args )
    {
        SpringApplication.run(EurekaApp.class);
    }
}
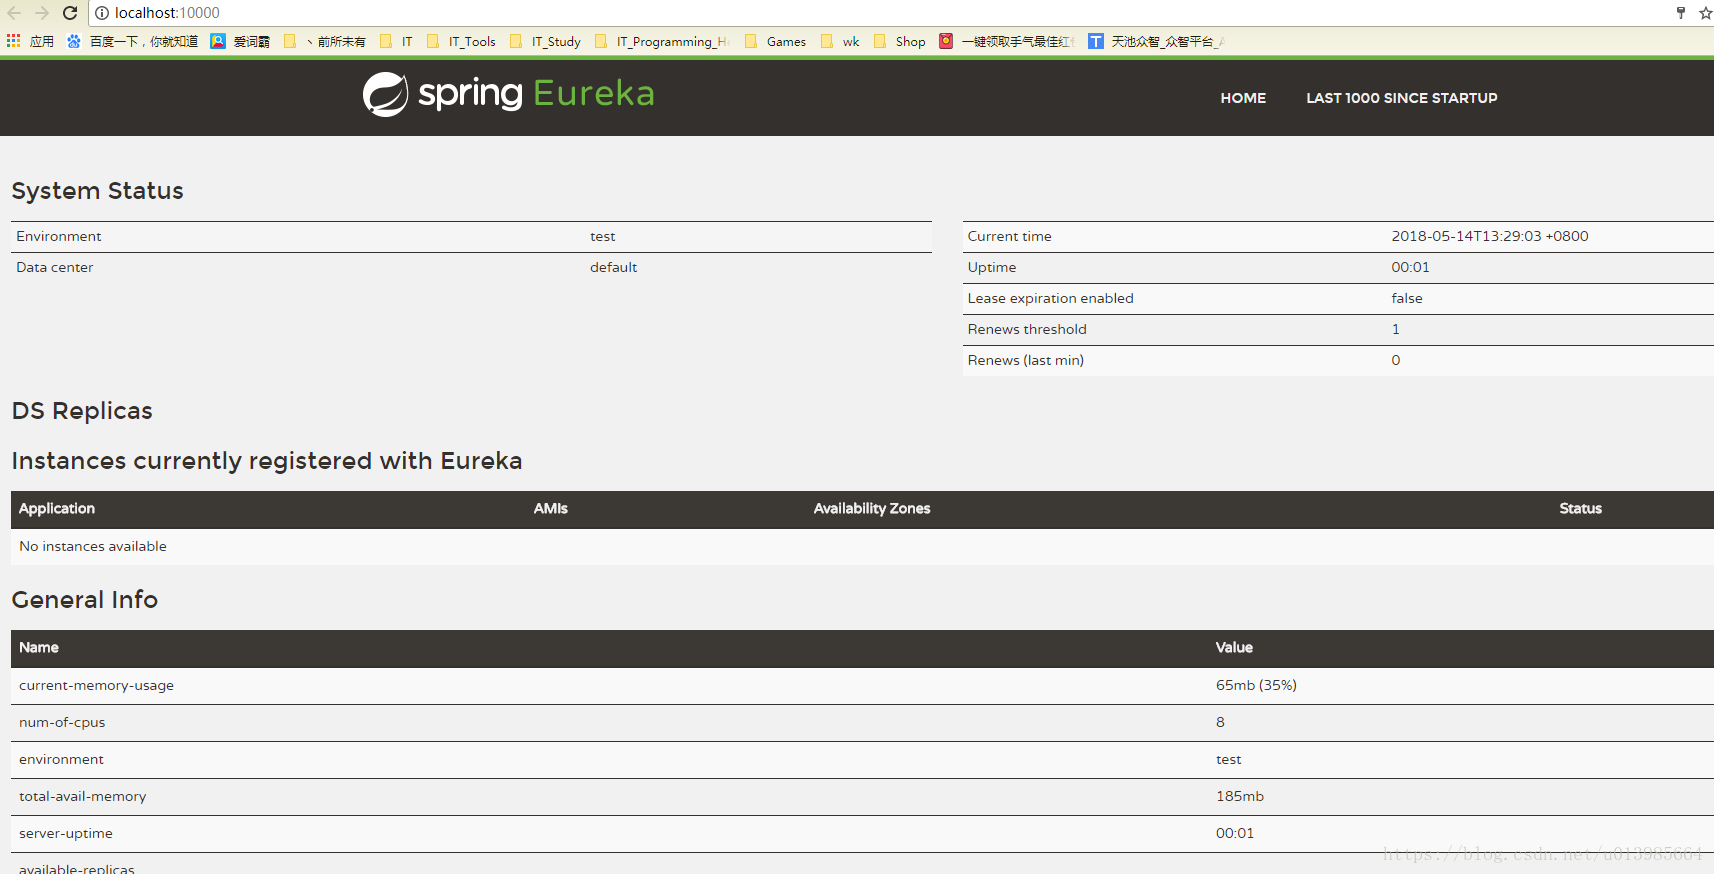
这样就搭建好了一个eureka服务,访问http://localhost:10000/
此时需要输入一个用户名和密码,用户名默认user,密码在启动项目时自动生成

进入到这个界面说明搭建成功
修改配置文件,可以达到免密登录
application.yml
server:
  port: 10000
# 由于当前eureka是单机,所以需要做一些配置
eureka:
  instance:
    hostname: localhost
  client:
    register-with-eureka: false
    fetch-registry: false
    server-url:
      defaultZone: http://user:user@${eureka.instance.hostname}:${server.port}/eureka/
security:
  basic:
    enabled: true  # 开启安全配置 需要密码 若不需要则设为false 注意该参数必须放在application.yml中而不能放在bootstrap.yml
  user:
    name: user
    password: user # 在配置用户和密码后 可以修改地址的访问风格为curl风格
2.服务提供者 provider-user
改装之前简单样例中的项目注册eureka
pom.xml
        <!-- spring boot test -->
        <dependency>
            <groupId>org.springframework.boot</groupId>
            <artifactId>spring-boot-starter-test</artifactId>
            <scope>test</scope>
        </dependency>
        <dependency>
            <groupId>org.springframework.boot</groupId>
            <artifactId>spring-boot-starter-web</artifactId>
        </dependency>
        <!--eureka client -->
        <dependency>
            <groupId>org.springframework.cloud</groupId>
            <artifactId>spring-cloud-starter-netflix-eureka-client</artifactId>
            <version>1.4.3.RELEASE</version>
        </dependency>
        <dependency>
            <groupId>org.springframework.boot</groupId>
            <artifactId>spring-boot-starter-actuator</artifactId>
        </dependency>
application.yml
server:
  port: 7900 #程序启动后的端口,也就是tomcat的端口,可自定义
spring:
 application:
   name: provider-user
eureka:
  client:
    service-url:
      defaultZone:  http://user:user@localhost:10000/eureka/
UserController.java
package com.ithzk.spring.cloud.controller;

import com.ithzk.spring.cloud.entity.User;
import com.netflix.appinfo.InstanceInfo;
import com.netflix.discovery.EurekaClient;
import org.springframework.beans.factory.annotation.Autowired;
import org.springframework.web.bind.annotation.GetMapping;
import org.springframework.web.bind.annotation.PathVariable;
import org.springframework.web.bind.annotation.RestController;

/**
 * @author hzk
 * @date 2018/5/13
 */
@RestController("/")
public class UserController {

    @Autowired
    private EurekaClient eurekaClient;

    @GetMapping("/user/{id}")
    public User getUser(@PathVariable Integer id){
        return new User(id,"zs",20);
    }

    @GetMapping("/eureka/info")
    public String info(){
        InstanceInfo instanceInfo = eurekaClient.getNextServerFromEureka("PROVIDER-USER", false);
        return instanceInfo.getHostName();
    }
}
UserApp.java
package com.ithzk.spring.cloud;

import org.springframework.boot.SpringApplication;
import org.springframework.boot.autoconfigure.SpringBootApplication;
import org.springframework.cloud.netflix.eureka.EnableEurekaClient;

/**
 * Hello world!
 *
 */
@SpringBootApplication
@EnableEurekaClient//eureka 客户端
public class UserApp {

    public static void main(String[] args )
    {
        SpringApplication.run(UserApp.class);
    }
}
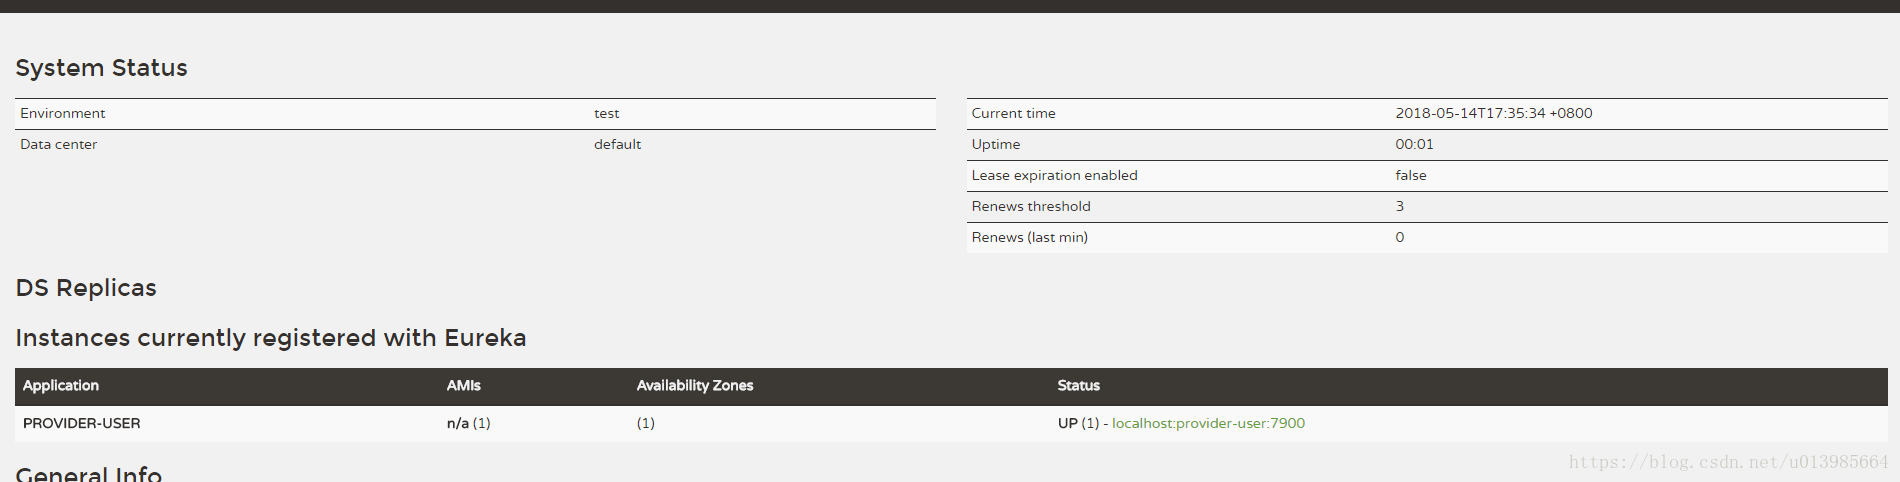
此时启动UserApp,在eureka服务中可以查看到服务者上线
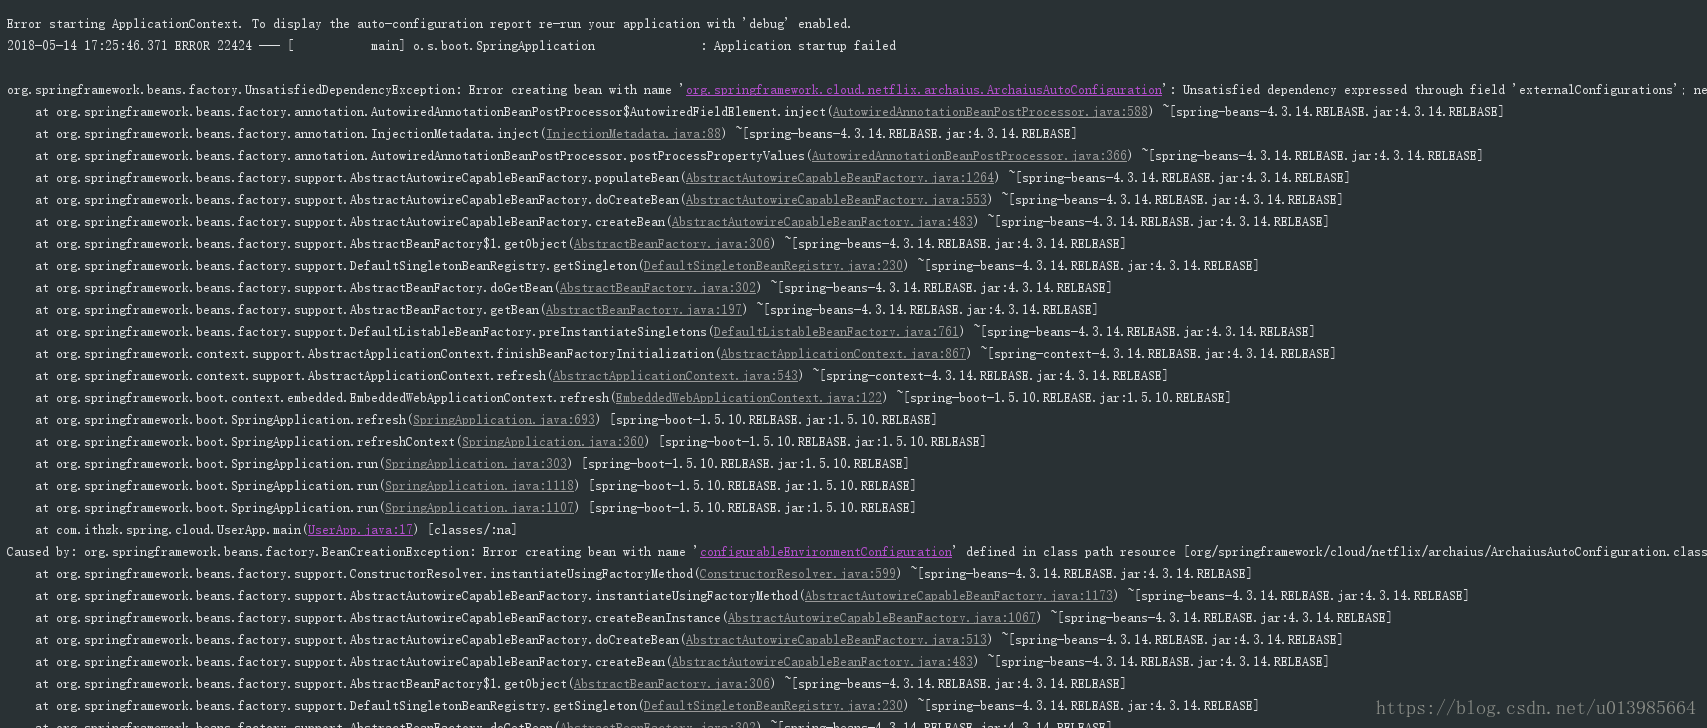
ps:在构建过程中遇到过一次问题导致无法启动 java.lang.NoSuchMethodError:
java.util.concurrent.ConcurrentHashMap.keySet()Ljava/util/concurrent
这是由于JDK版本问题造成,部分方法从JDK8开始支持,所以需要将项目变为JDK8的环境
3.服务消费者
同样改装之前简单样例消费者项目,pom.xml与以上提供者一致,App启动类同理加上@EnableEurekaClient注解
application.yml
server:
  port: 8900
spring:
  application:
    name: consumer-order
user:
  url: http://localhost:7900/user/
eureka:
  client:
    service-url:
      defaultZone:  http://user:user@localhost:10000/eureka/
OrderController.java
package com.ithzk.spring.cloud.controller;

import com.ithzk.spring.cloud.entity.User;
import com.netflix.appinfo.InstanceInfo;
import com.netflix.discovery.EurekaClient;
import org.springframework.beans.factory.annotation.Autowired;
import org.springframework.beans.factory.annotation.Value;
import org.springframework.web.bind.annotation.GetMapping;
import org.springframework.web.bind.annotation.PathVariable;
import org.springframework.web.bind.annotation.RestController;
import org.springframework.web.client.RestTemplate;

/**
 * @author hzk
 * @date 2018/5/13
 */
@RestController
public class OrderController {

    //spring 提供用于访问rest接口的模板对象
    @Autowired
    private RestTemplate restTemplate;

    @Autowired
    private EurekaClient eurekaClient;

    @Value("${user.url}")
    private String url;

    @GetMapping("/order/{id}")
    public User getOrder(@PathVariable Integer id){
        //访问提供者 获取数据 通过rest访问获取的json数据转换为的User对象
        //PROVIDER-USER 为eureka中提供者注册服务名称
        InstanceInfo instanceInfo = eurekaClient.getNextServerFromEureka("PROVIDER-USER", false);
        //获取接口项目地址
        String homePageUrl = instanceInfo.getHomePageUrl();

        User user = restTemplate.getForObject(homePageUrl + "/user/" +id, User.class);
        return user;
    }
}
这样就简单搭建好了eureka-server、服务提供者和服务消费者,此时eureka注册中心有两个服务注册成功

通过调用http://localhost:8900/order/xx 可以达到同样的效果、到此基本的使用就大功告成