一、SpringBoot运行流程分析
SpringBoot工程里面pom.xml还是依赖于父配置文件的,这个文件中代管了版本号。另外在父配置文件中发现了下面的骚气代码:
	<resources>
      <resource>
        <filtering>true</filtering>
        <directory>${basedir}/src/main/resources</directory>
        <includes>
          <include>**/application*.yml</include>
          <include>**/application*.yaml</include>
          <include>**/application*.properties</include>
        </includes>
      </resource>
      <resource>
        <directory>${basedir}/src/main/resources</directory>
        <excludes>
          <exclude>**/application*.yml</exclude>
          <exclude>**/application*.yaml</exclude>
          <exclude>**/application*.properties</exclude>
        </excludes>
      </resource>
    </resources>
其实SpringBoot将所有的功能场景都抽取出来,做成一个个的starter 就是启动器,只需要在项目中引入这些starter,所有相关的依赖都会导入进来。
底层还是通过反射运行启动类,主要还是@SpringBootApplication这个注解。
	@SpringBootApplication
	public class DemoApplication {

	    public static void main(String[] args) {
	        SpringApplication.run(DemoApplication.class, args);
	    }

	}
二、配置文件明细(yaml/yml)
SpringBoot的配置根文件名字必须是application.*。
1、基本语法
key: value(yml对空格很敏感)
2、模块的优先级比较
优先级1:项目路径下的config文件夹配置文件
优先级2:项目路径下配置文件
优先级3:资源路径下的config文件夹配置文件
优先级4:资源路径下配置文件
3、yml中模块划分
yaml文件中也可以用三条横杠---分隔各个模块。
简单demo:
	server:
	  port: 8888

	---
	server:
	  port: 8080

	spring:
	  profiles: des

	---
	server:
	  port: 8088

	spring:
	  profiles:
	    active: des
最新版的SpringBoot一个yaml里面分为多个的时候,默认开启的是最后个模块的设置,当然可以在最后个模块中引用别的模块的设置。
其实每个模块就相当于一个properties文件,命名为application-x.properties后,也可以通过spring.profiles.active来相互引用。
4、yml配置文件写法
首先将需要配置的类加到容器中,之后再加上@ConfigurationProperties并指定prefix用来对应于配置文件中的对象名字。
编写yaml文件的时候,可以在pom.xml中配置以下依赖就可以有自动提示。实测我自己的垃圾电脑,第一次写没提示,需要在test类中跑一下才有提示。。。
		<dependency>
            <groupId>org.springframework.boot</groupId>
            <artifactId>spring-boot-configuration-processor</artifactId>
            <optional>true</optional>
        </dependency>
简单demo:
	@Component
	@ConfigurationProperties(prefix = "student")
	public class Student {
	    private Integer studentId;
	    private String studentName;
	    private String  studentNumber;
	//    @Autowired
	    private Dog studentDog;
	    ...
	}

	@Component
	@ConfigurationProperties(prefix = "dog")
	public class Dog {
	    @Value("1")
	    private Integer dogId;
	    private String dogName;
	    ...
	}
yaml文件(支持松散绑定,驼峰命名法–>一杠):
	server:
	  port: 8888

	student:
	  student-id: 2
	  student-name: cj
	  student-number: 44
	  student-dog:
	    dog-id: 2
	    dog-name: 二哈

	dog:
	  dog-name: 金毛
运行结果:

还一件事很迷,用SpringBoot自带的测试类的时候,明明本地的maven仓库有对应版本的文件,第一次用的时候竟然还要去中央仓库下载???ZZ啊。。。
JSR303校验,感觉也和SSM的不一样,暂时还没学到,现在这里标记一下!
三、原理图
1、个人理解的主启动类上注解的原理图

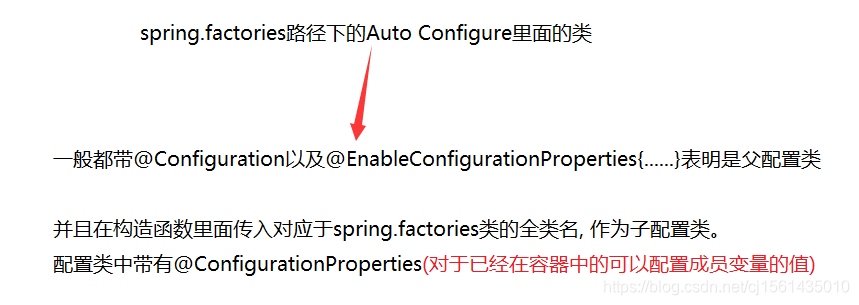
2、个人理解的spring.factories路径下的类注解原理图
3、反射调用方法开启服务的原理图(来自狂神大佬的博客)

四、源码攻击
1、选择类源码部分


	private static Map<String, List<String>> loadSpringFactories(@Nullable ClassLoader classLoader) {
        MultiValueMap<String, String> result = (MultiValueMap)cache.get(classLoader);
        if (result != null) {
            return result;
        } else {
            try {
            	//其实就是将spring.factories中的类用类加载器加载进去
                Enumeration<URL> urls = classLoader != null ? classLoader.getResources("META-INF/spring.factories") : ClassLoader.getSystemResources("META-INF/spring.factories");
                LinkedMultiValueMap result = new LinkedMultiValueMap();

                while(urls.hasMoreElements()) {
                    URL url = (URL)urls.nextElement();
                    UrlResource resource = new UrlResource(url);
                    Properties properties = PropertiesLoaderUtils.loadProperties(resource);
                    Iterator var6 = properties.entrySet().iterator();

                    while(var6.hasNext()) {
                        Entry<?, ?> entry = (Entry)var6.next();
                        String factoryTypeName = ((String)entry.getKey()).trim();
                        String[] var9 = StringUtils.commaDelimitedListToStringArray((String)entry.getValue());
                        int var10 = var9.length;

                        for(int var11 = 0; var11 < var10; ++var11) {
                            String factoryImplementationName = var9[var11];
                            result.add(factoryTypeName, factoryImplementationName.trim());
                        }
                    }
                }
				//private static final Map<ClassLoader, MultiValueMap<String, String>> cache = new ConcurrentReferenceHashMap();
                cache.put(classLoader, result);	//最后放到map中去
                return result;
            } catch (IOException var13) {
                throw new IllegalArgumentException("Unable to load factories from location [META-INF/spring.factories]", var13);
            }
        }
    }
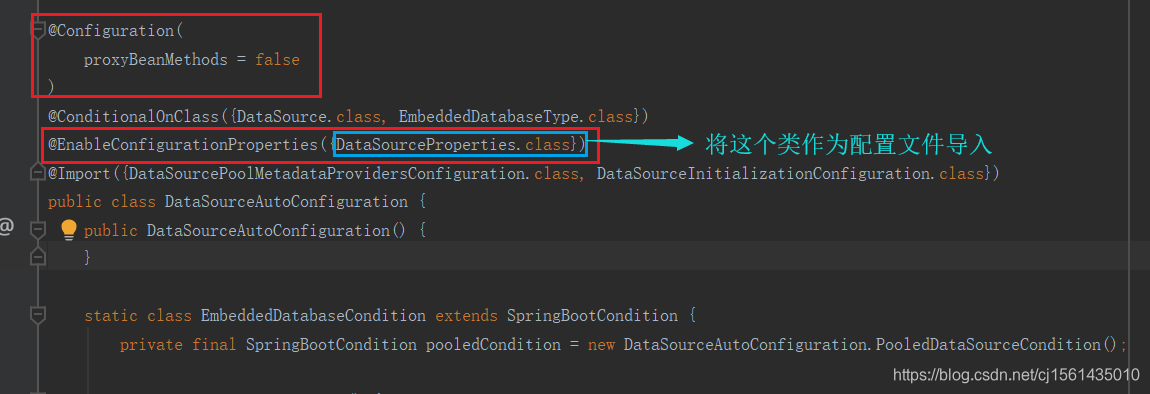
2、spring.factories路径下的对应类源码
以org.springframework.boot.autoconfigure.jdbc.DataSourceAutoConfiguration,\举例。
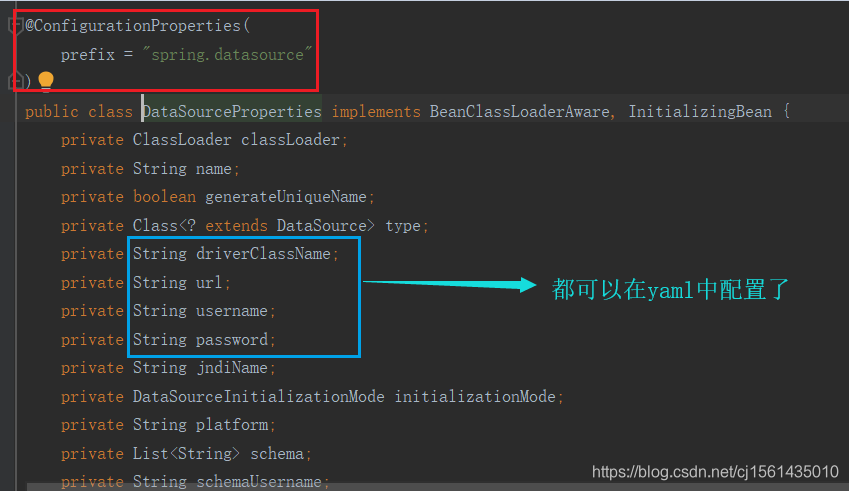
SpringBoot自动装配牛逼!省去了SSM那麻烦的一大堆配置!
