Elasticsearch 可以存储PB级的数据并实时分析数据,而MQTT被广泛使用于物联网中。那么我们该如果把MQTT的数据传入到Elasticsearch中呢?
我们可以通过如下的架构来把MQTT数据传入到Elasticsearch:

在这里,我们可以通过一个叫做MQTT的router来把数据传入到Elasticsearch。这些物联网的数据可以包括温度,速度,位置,速度,湿度,重力加速度,光感等。
下面,我们来介绍一下如何实现把MQTT的数据接入到Elasticsearch中来。为了说明问题方便,我们的测试环境是这样的:
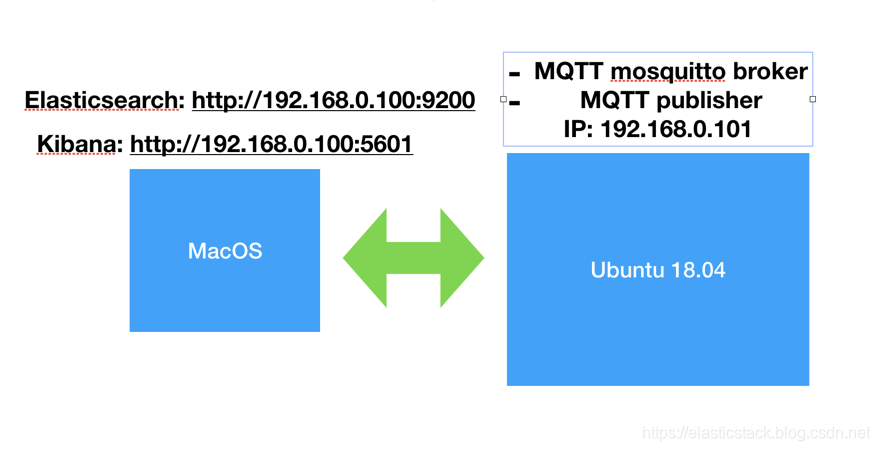
如上图所示,我们在MacOS上安装好自己的Elastic Stack。在Ubuntu 18.04的机器上安装好自己的MQTT broker及运行MQTT的publisher。
准备工作
安装Elasticsearch
如果大家还没安装好自己的Elastic Stack的话,那么请按照我之前的教程“如何在Linux,MacOS及Windows上进行安装Elasticsearch” 安装好自己的Elasticsearch。由于我们的Elastic Stack需要被另外一个Ubuntu VM来访问,我们需要对我们的Elasticsearch进行配置。首先使用一个编辑器打开在config目录下的elasticsearch.yml配置文件。我们需要修改network.host的IP地址。在你的Mac及Linux机器上,我们可以使用:
$ ifconfig来查看到我们的机器的IP地址。针对我的情况,我的机器的IP地址是:192.168.0.100。

我们也必须在elasticsearch.yml的最后加上discovery.type: single-node,表明我们是单个node。
等修改完我们的IP地址后,我们保存elasticsearch.yml文件。然后重新运行我们的elasticsearch。我们可以在一个浏览器中输入刚才输入的IP地址并加上端口号9200。这样可以查看一下我们的elasticsearch是否已经正常运行了。

安装Kibana
我们可以按照“如何在Linux,MacOS及Windows上安装Elastic栈中的Kibana”中介绍的那样来安装我们的Kibana。由于我们的Elasticsearch的IP地址已经改变,所以我们必须修改我们的Kibana的配置文件。我们使用自己喜欢的编辑器打开在config目录下的kibana.yml文件,并找到server.host。把它的值修改为自己的电脑的IP地址。针对我的情况是:

同时找到elasticsearch.hosts,并把自己的IP地址输入进去:

保存我们的kibana.yml文件,并运行我们的Kibana。同时在浏览器的地址中输入自己的IP地址及5601端口:

如果配置成功的话,我们就可以看到上面的画面。
安装Ubuntu虚拟机
这个不在我的这个教程之内。在网上我们可以找到许多的教程教我们如何安装Ubuntu虚拟机。
安装MQTT mosquito
我们在Ubuntu机器里,执行如下的指令:
sudo apt-get update
sudo apt-get install -y python-paho-mqtt
一旦上面的命令执行成功后,我们可以通过如下的命令来检查mosquito服务是否已经成功运行:
sudo systemctl status mosquitto
更多关于mosquito的安装请参阅链接。
我们也可以同时执行如下的指令来安装MQTT的客户端:
sudo apt-get install mosquitto-clients安装Python 2及Elasticsearch Python
我们可以按照如下的指令来安装python 2:
sudo apt install python-minimal然后我们打入如下的指令来安装Elasticsearch Python:
sudo apt install python-elasticsearch到目前位置我们的安装基本上已经完成了。
MQTT router
在我们的实现中,我们使用Python语言来实现对MQTT信息的转发。其基本原理是订阅我们所感兴趣的topic,然后把我们截获的数据再转发到Elasticsearch中。我们可以通过如下的指令来下载我的测试程序:
git clone https://github.com/liu-xiao-guo/mqtt-elasticSearch具体实现如下:
mqttToElasticSearch.py
mqttServer="localhost"
mqttPort="1883"

channelSubs="test"
#use below as alternative to subscribe to all channels
#channelSubs="#"

import paho.mqtt.client as mqtt
from datetime import datetime
from elasticsearch import Elasticsearch


# The callback for when the client receives a CONNACK response from the server.
def on_connect(client, userdata, flags, rc):
    print("Connected with result code "+str(rc))
    # Subscribing in on_connect() means that if we lose the connection and
    # reconnect then subscriptions will be renewed.
    client.subscribe(channelSubs)

# The callback for when a PUBLISH message is received from the server.
def on_message(client, userdata, msg):
    print(msg.topic+" "+str(msg.payload))

# this is the syntax to follow for the elasticSearch update taken from documentation
#    es.index(index="mqtt-index", doc_type="_doc", id=42, body={"any": +str(msg.payload, "timestamp": datetime.now()})
#    {u'_id': u'42', u'_index': u'my-index', u'_type': u'test-type', u'_version': 1, u'ok': True}

#our implementation uses this to separate numeric(float) from string data

    try:
        float(msg.payload)
        es.index(index="mqtt-index", doc_type="_doc", body={"topic" : msg.topic, "dataFloat" : float(msg.payload), "timestamp": datetime.utcnow()})

    except:
        pass
        #es.index(index="my-index", doc_type="string", body={"topic" : msg.topic, "dataString" : msg.payload, "timestamp": datetime.utcnow()})

# by default we connect to elasticSearch on localhost:9200

es = Elasticsearch(
    ['192.168.0.100'],
    http_auth=('user', 'secret'),
    scheme="https",
    port=9200,
)


client = mqtt.Client()
client.on_connect = on_connect
client.on_message = on_message
client.connect(mqttServer,mqttPort, 60)

# Blocking call that processes network traffic, dispatches callbacks and
# handles reconnecting.
# Other loop*() functions are available that give a threaded interface and a
# manual interface.
client.loop_forever()
在这里,我使用了一个叫做test的topic来做测试。在实际的使用中,需要根据自己的需求来调整。同时在Elasticsearch的初始化过程中,我们需要填入自己的IP地址:
es = Elasticsearch(
    ['192.168.0.100'],
    http_auth=('user', 'secret'),
    scheme="https",
    port=9200,
)
我们向Elasticsearch中写入一个叫做mqtt-index的索引。
我们可以通过如下的方式来运行我们的router:
python2 mqttToElasticSearch.py 
我们可以在另外一个terminal中打入如下的指令:
mosquitto_pub -m "1" -t "test"
请注意这里的mosquitto_pub是来自上面的mosquitto-clients安装。那么这个时候再我们的mqttToElasticSearch.py 运行的客户端中,我们可以看到:

显然我们的router已经收到者信息。我们可以在Kinaba中查看mqtt-index:
GET mqtt-index/_search显示结果:
    "hits" : [
      {
        "_index" : "mqtt-index",
        "_type" : "_doc",
        "_id" : "Ce0pkm8B9t-DLEX5oV8G",
        "_score" : 1.0,
        "_source" : {
          "topic" : "test",
          "timestamp" : "2020-01-11T01:13:07.278997",
          "dataFloat" : 1.0
        }
      },
      {
        "_index" : "mqtt-index",
        "_type" : "_doc",
        "_id" : "CO0pkm8B9t-DLEX5oF8_",
        "_score" : 1.0,
        "_source" : {
          "topic" : "test",
          "timestamp" : "2020-01-11T01:13:07.279708",
          "dataFloat" : 1.0
        }
      }
    ]
  }
在上面的数据显示我们的Elasticsearch已经成功地收到数据了。
我们也可以使用在git项目中的publisher.py来发送信息:
publisher.py
#!/usr/bin/env python2

import paho.mqtt.client as mqtt
import sys


print ("argv[0]: %s" % (sys.argv[1]))

client = mqtt.Client()
client.connect("localhost",1883,60)
client.publish("test", sys.argv[1]);
我们可以按照如下的命令来发送信息:
python2 publisher.py 5至此,我们已经成功地把我们的MQTT数据发送到了Elasticsearch。
如果有兴趣的开发者,也可以参照项目https://github.com/nathan-K-/mqttbeat。由于一些原因,该项目不能很好地和最新版本的Elasticsearch工作。需要作者更进一步完善。
