本例使用126邮箱,需开通POP3/SMTP服务。
- 登录126邮箱,在设置-->POP3/SMTP/IMAP 中设置如下选项,记住服务器地址。

下面为已调通的Python3代码
 1 # coding:utf-8
 2 # smtplib模块负责连接服务器和发送邮件
 3 # MIMEText:定义邮件的文字数据
 4 # MIMEImage:定义邮件的图片数据
 5 # MIMEMultipart:负责将文字图片音频组装在一起添加附件
 6 import smtplib  # 加载smtplib模块
 7 from email.mime.text import MIMEText
 8 from email.utils import formataddr
 9 from email.mime.application import MIMEApplication
10 from email.mime.image import MIMEImage
11 from email.mime.multipart import MIMEMultipart
12
13 sender = 'xxx@126.com'  # 发件人邮箱账号
14 receive = 'xxx@qq.com'  # 收件人邮箱账号
15 passwd = 'xxx'
16 mailserver = 'smtp.126.com'
17 port = '25'
18 sub = 'Python3 test'
19
20 try:
21     msg = MIMEMultipart('related')
22     msg['From'] = formataddr(["sender", sender])  # 发件人邮箱昵称、发件人邮箱账号
23     msg['To'] = formataddr(["receiver", receive])  # 收件人邮箱昵称、收件人邮箱账号
24     msg['Subject'] = sub
25     #文本信息
26     #txt = MIMEText('this is a test mail', 'plain', 'utf-8')
27     #msg.attach(txt)
28
29     #附件信息
30     attach = MIMEApplication(open("D:\xx\\tool\pycharm\\1.csv").read())
31     attach.add_header('Content-Disposition', 'attachment', filename='1.csv')
32     msg.attach(attach)
33
34     #正文显示图片
35     body = """
36     <b>this is a test mail:</b>
37     <br><img src="cid:image"><br>
38     """
39     text = MIMEText(body, 'html', 'utf-8')
40     f = open('D:\xx\pip.png', 'rb')
41     pic = MIMEImage(f.read())
42     f.close()
43     pic.add_header('Content-ID', '<image>')
44     msg.attach(text)
45     msg.attach(pic)
46
47
48     server = smtplib.SMTP(mailserver, port)  # 发件人邮箱中的SMTP服务器,端口是25
49     server.login(sender, passwd)  # 发件人邮箱账号、邮箱密码
50     server.sendmail(sender, receive, msg.as_string())  # 发件人邮箱账号、收件人邮箱账号、发送邮件
51     server.quit()
52     print('success')
53 except Exception as e:
54         print(e)
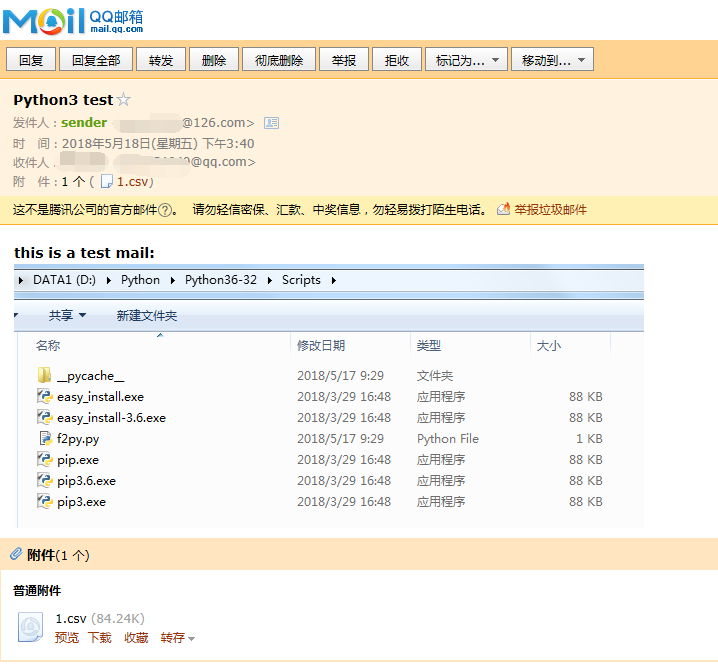
发送成功如下图所示:

在测试过程中有遇到如下报错,调用126邮箱服务器来发送邮件,需要开启POP3/SMTP服务,开通后会有一个126邮箱客户端授权码,代码中的“passwd”要用此授权码代码邮箱的登录密码。
(535, b'Error: authentication failed')